Asides

  • Software configuration tool for MHUB 2K and MHUB 4K (2014-2016)

    Windows configuration tool for MHUB 2K and MHUB 4K systems. Search for MHUB, configure EDID and network settings.

    Download the MHUB 2K and MHUB 4K configuration tool.

    The software configuration tool has been written for an older version of Windows. If you run the exe file on your laptop and you receive a C++ error message then please read this support article.

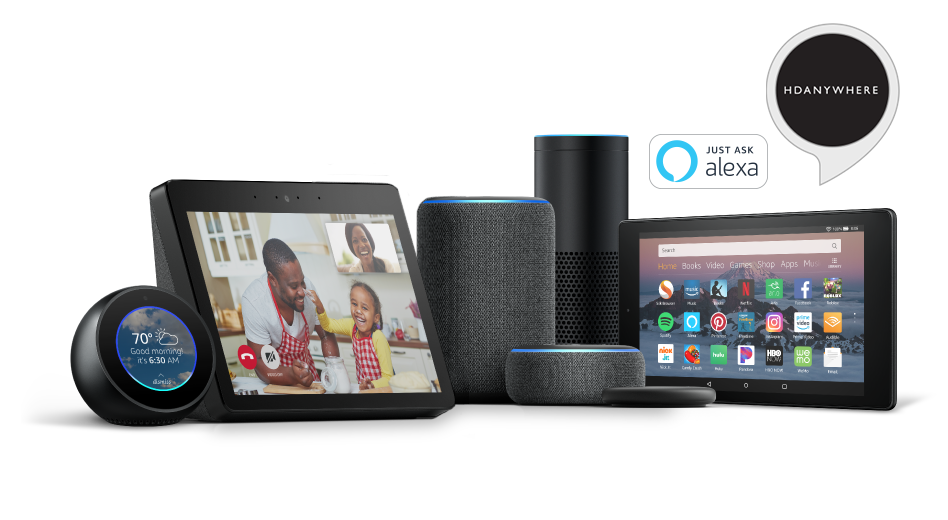
  • Voice control with Amazon Alexa* using the “MHUB AV” Skill

    HDANYWHERE (HDA) Amazon Alexa App Skill

    *Before you activate the Alexa Voice Service with your MHUB, make sure Amazon support your territory and version. We cannot guarantee voice services or offer support to those territories not officially supported by Amazon. Check here: https://www.amazon.co.uk/gp/help/customer/display.html?nodeId=202207000

    What you need to get your MHUB to respond to voice commands:

    1. You have completed the first-boot procedure within MHUB-OS
    2. You have MHUB-OS version 8.10 or higher installed on your MHUB
    3. You have an active HDA Cloud account
    4. You have downloaded uControl packs for all displays and source devices you want to control
    5. You have completed input mapping in MHUB-OS
    6. You have an active Amazon account
    7. You have an Amazon Alexa enabled device, such as Amazon Dot/Echo/Show

    Setting up AV Skill

    Configure voice commands to do exactly what you want

    Let’s take the command “Alexa, Turn on football” as an example.

    It might appear like a very simple command but there are a number of things that need to happen in order to watch football! First the TV might need to turn on, but in which room? The volume might need to be set to a desired limit. The correct source input might need to be selected on MHUB and finally that source will need to navigate to the channel hosting the football.

    You can configure all those actions in what we call a “Sequence”.

    Taking the example above:
    Alexa (this wakes up your Amazon Dot/Echo/Show)
    Turn on… (this invokes the smarthome skill)
    football (this is your custom name for the Sequence, it can be anything you want)

    Inside MHUB-OS we can configure exactly what “football” does.

    • You can select if you want MHUB to turn your TV on and adjust the volume
    • You can tell MHUB to switch to the source device with has the football on it
    • You can instruct MHUB to change the channel on that source device

    Read more about Sequences and Scheduling.

    Troubleshooting

    • When searching for devices, nothing is found
      1. Check you cloud account details were entered correctly
      2. Ensure only 1 system is linked with the cloud account being used
      3. Ensure you have backed up the system to cloud after configuring the Alexa Skill on MHUB-OS
    • When you try to control a zone Alexa says the command isnt supported
      1. Ensure there are no other devices linked to the Alexa that have the same name as the zone.

    Here’s a table of all the commands you can tell your MHUB to do…

    Now you’re ready to go. Take a look at a full list of commands that you can say to your Echo.

  • Setting up Apple Hey Siri

    Siri Shortcuts & HDANYWHERE.

    With any Apple device along with an MHUB or Zone Prossesor you can use Apple “Hey Siri” and our API to send commands to uControl/uOS to control virtually any display, source inputs plus lighting control.

    Below you will find a step by step how-to guide.


  • What is “uControl inside” on MHUB or Zone Processors

    horizontal_uC_inside_colour_lightBG@3x

    If you see a HDANYWHERE or third party device marked with “uControl inside” then it contains our control system inside it. You can find out what it can do by visiting uControl’s website here.

    Comparing AV and Full versions of uControl inside

    Some devices are marked “AV” where others are “Full”. This is determined by the operating system found on the device. The “full” implementation of uControl can be found in devices which have uControl OS (uOS) inside. “AV” means that the system is running MHUB-OS (MOS) and control capability is restricted to AV only or the devices that are directly connected to the MHUB system.

    Full

    • Control over sources, AVRs, displays and projectors (IR)
    • Control over sources, AVRs, displays and projectors (IP/CEC)
    • IP control over lighting, blinds, shades, PDUs, relays and more See all here
    • uControl app, Alexa, Watch support
    • uControl Remote
    • Super Sequences, Functions and Scheduling

    AV

    • Control over sources, AVRs, displays and projectors (IR)
    • uControl app, Alexa, Watch support
    • uControl Remote*
    • Sequences and Scheduling

    Upgrading an older MHUB to support Full uControl

    It may be possible to update your MHUB’s control capabilities by adding a uControl Zone Processor to manage your system instead. Not all models are supported so we recommend contacting us to confirm the level of support first.

    *Requires a Zone Processor to be added to the system to upgrade to Full uControl capabilities.

  • Philips Hue Sync box and MHUB

    Philips Hue Sync boxes can add a layer of depth to your home cinema experience, however, it can cause problems to a system as adding this switch at the display end can interfere with EDID and HDCP signals causing picture/audio problems.

    While this issue does not always happen with a Philips Hue Sync box in an A/V distribution system, when it does there is a setting that can be disabled to work around it which is CEC.

    There is an article on disabling CEC for your HDANYWHERE system which covers sending the command via a URL/web browser search bar, Hercules and Netcat. If you disable CEC and are still having issues with your Philips Hue Sync box please contact HDANYWHERE Support.

  • Modular and IR Control

    Modular units have the ability to receive Infra-red(IR) commands in two different ways; Code-based IR and Contextual based IR. Code-based IR uses unique codes for each room/output, whilst Contextual IR uses a single set of codes, with the unit determining where the IR command originated.

    If you wish to revert the unit to Code based IR control please edit the settings.ini file on the SD card (Please use only PC based systems to edit the SD card contents) and remove the following information.

    cir1 = 0x00ff9867
    cir2 = 0x00ffd827
    cir3 = 0x00ff8877
    cir4 = 0x00ffa857

    cir1 = 0x00ff807f
    cir2 = 0x00ff00ff
    cir3 = 0x00ff30cf
    cir4 = 0x00ff906f


  • Error Message: ‘The application has failed to start because its side-by-side configuration is incorrect’

    Description

    When I try to install the software, I receive this warning:

    “The application has failed to start because its side-by-side configuration is incorrect. Please see the application event log for more detail.”

    This issue is typically caused by a conflict between the program and one or more of the files in the C++ runtime libraries. These libraries are part of the Windows operating system and are used, and potentially updated, by installing or updating several Microsoft or other third party products.

    If you are experiencing this error when launching or installing the program, and if the program repair option does not resolve the issue, the most effective method to correct this error is to uninstall and reinstall any Microsoft Visual C++ installations currently available on your computer before proceeding with the installation.

    To uninstall all current Microsoft Visual C++ installations

    Open the Control Panel and locate the list of programs.

    Windows 8/10
    From within the Start screen, type “Control Panel” and click on the Control Panel search result when it appears.
    Select Programs and Features.

    Windows 7/Vista
    Click Start> Control Panel
    If viewing categories, click Programs> Uninstall a Program
    If viewing icons, click Programs and Features

    Windows XP
    Select Start> Control Panel> Add or Remove Programs

    Scroll down to locate the Microsoft Visual C++ entries.

    Select each one, starting from the top entry, and choose Uninstall.

    Do this for each entry, until there are no more Microsoft Visual C++ entries listed.

    To reinstall new Microsoft Visual C++ packages follow the instructions on this page –

    Microsoft Vistual C++

    Once every package has been downloaded and installed, restart Windows.

    Finally, launch the program. If the error message persists after following all of these instructions, then please contact HDanywhere technical support on 01684 576348

  • HDANYWHERE product information on power usage and BTU outputs

    The table below details the PSU DC rating, the system power draw in watts and BTU(British thermal unit) heat output of each device.

    Product Code Release PSU Rating (DC) Power Draw (watts) BTU

    XTND

    XTND2K30 2017 5V 1A 2.5 9
    XTND4K40ARC 2018 24V 1A 20 68
    XTND4K100TPC 2018 24V 1A 12 41

    MHUB

    MHUBAUDIO64 2018 24V 13.4A 520 1774
    MHUBMAX44 2018 24V 2.71A 19.2 66
    MHUB431U 2018 24V 2.71A 36 123
    MHUB862U 2018 24V 2.71A 28 198
    MHUBPRO4440 2018 24V 2.71A 40 136
    MHUBPRO8870 2018 24V 6.3A 98 334
    MHUB4K44PRO 2016 24V 2.71A 42.72 146
    MHUB4K88PRO 2016 24V 6.3A 100 341
    MHUBPRO24440 2019 24V 5A 68 232
    MHUBPRO288100 2019 24V 6.3A 130 444

    SPLITTERS AND SCALERS

    SPLITTERMAX12 2019 5V 1A 2 7
    SPLITTERMAX14 2019 5V 1A 2 7
    SIGNALMANAGER 2018 5V 1A 1.65 6
  • Resetting your system

    For uControl 2016 only

    DO NOT RESET YOUR SYSTEM IF YOU DO NOT KNOW WHAT YOUR HDA DEVICE DOES:
    Your HDA hardware is an integrated system and very similar to a central heating boiler.
    It maybe controlling your AV sources, displays, speakers, lights etc. If you reset your system and you do not know how to restore it yourself then it could render your AV unusable.

    Is your system managed by a HDA Pro Installer?

    If your system has been built and serviced by a HDA Pro Installer then please contact them first before resetting your device. This is especially important if they are servicing your system. If you proceed with a system reset then your HDA Pro can reserve the right to charge a call out fee to restore your system to a working state.

    Resetting your system

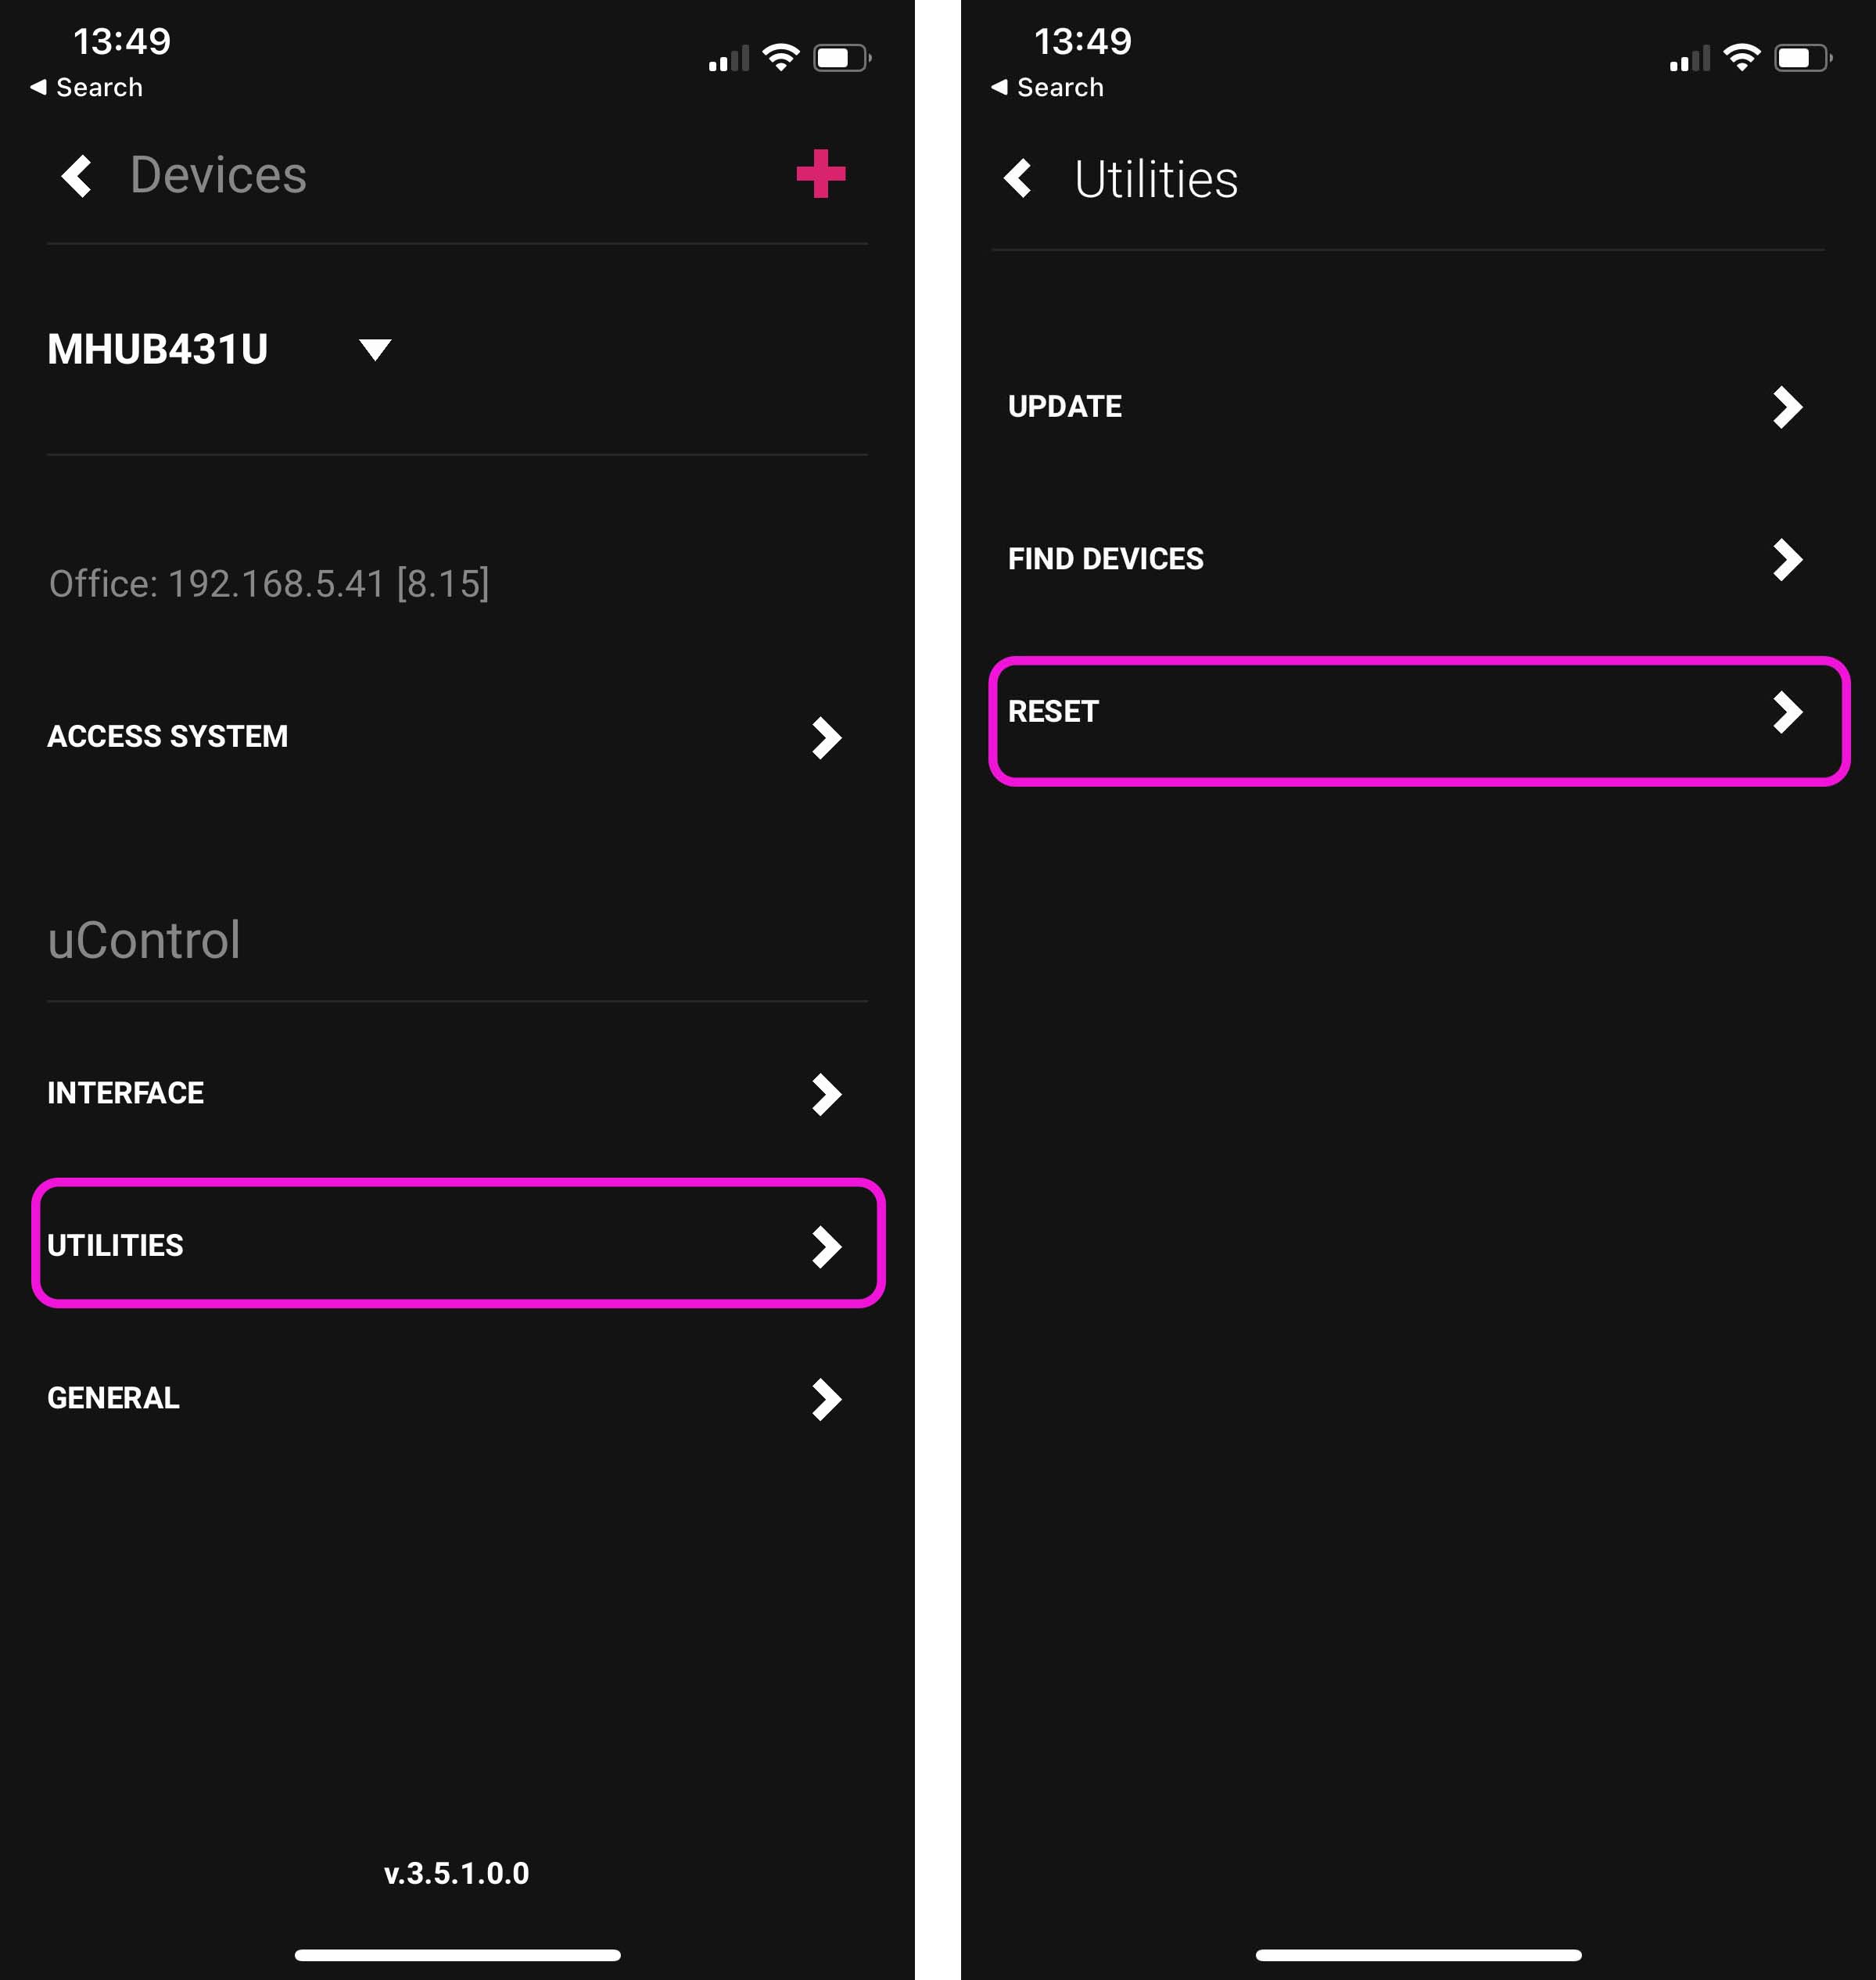
    If you are already connected to a HDA system:
    uControl menu (top left menu icon) > Settings Cog (bottom left) > Utilities > Reset

    1-2-con

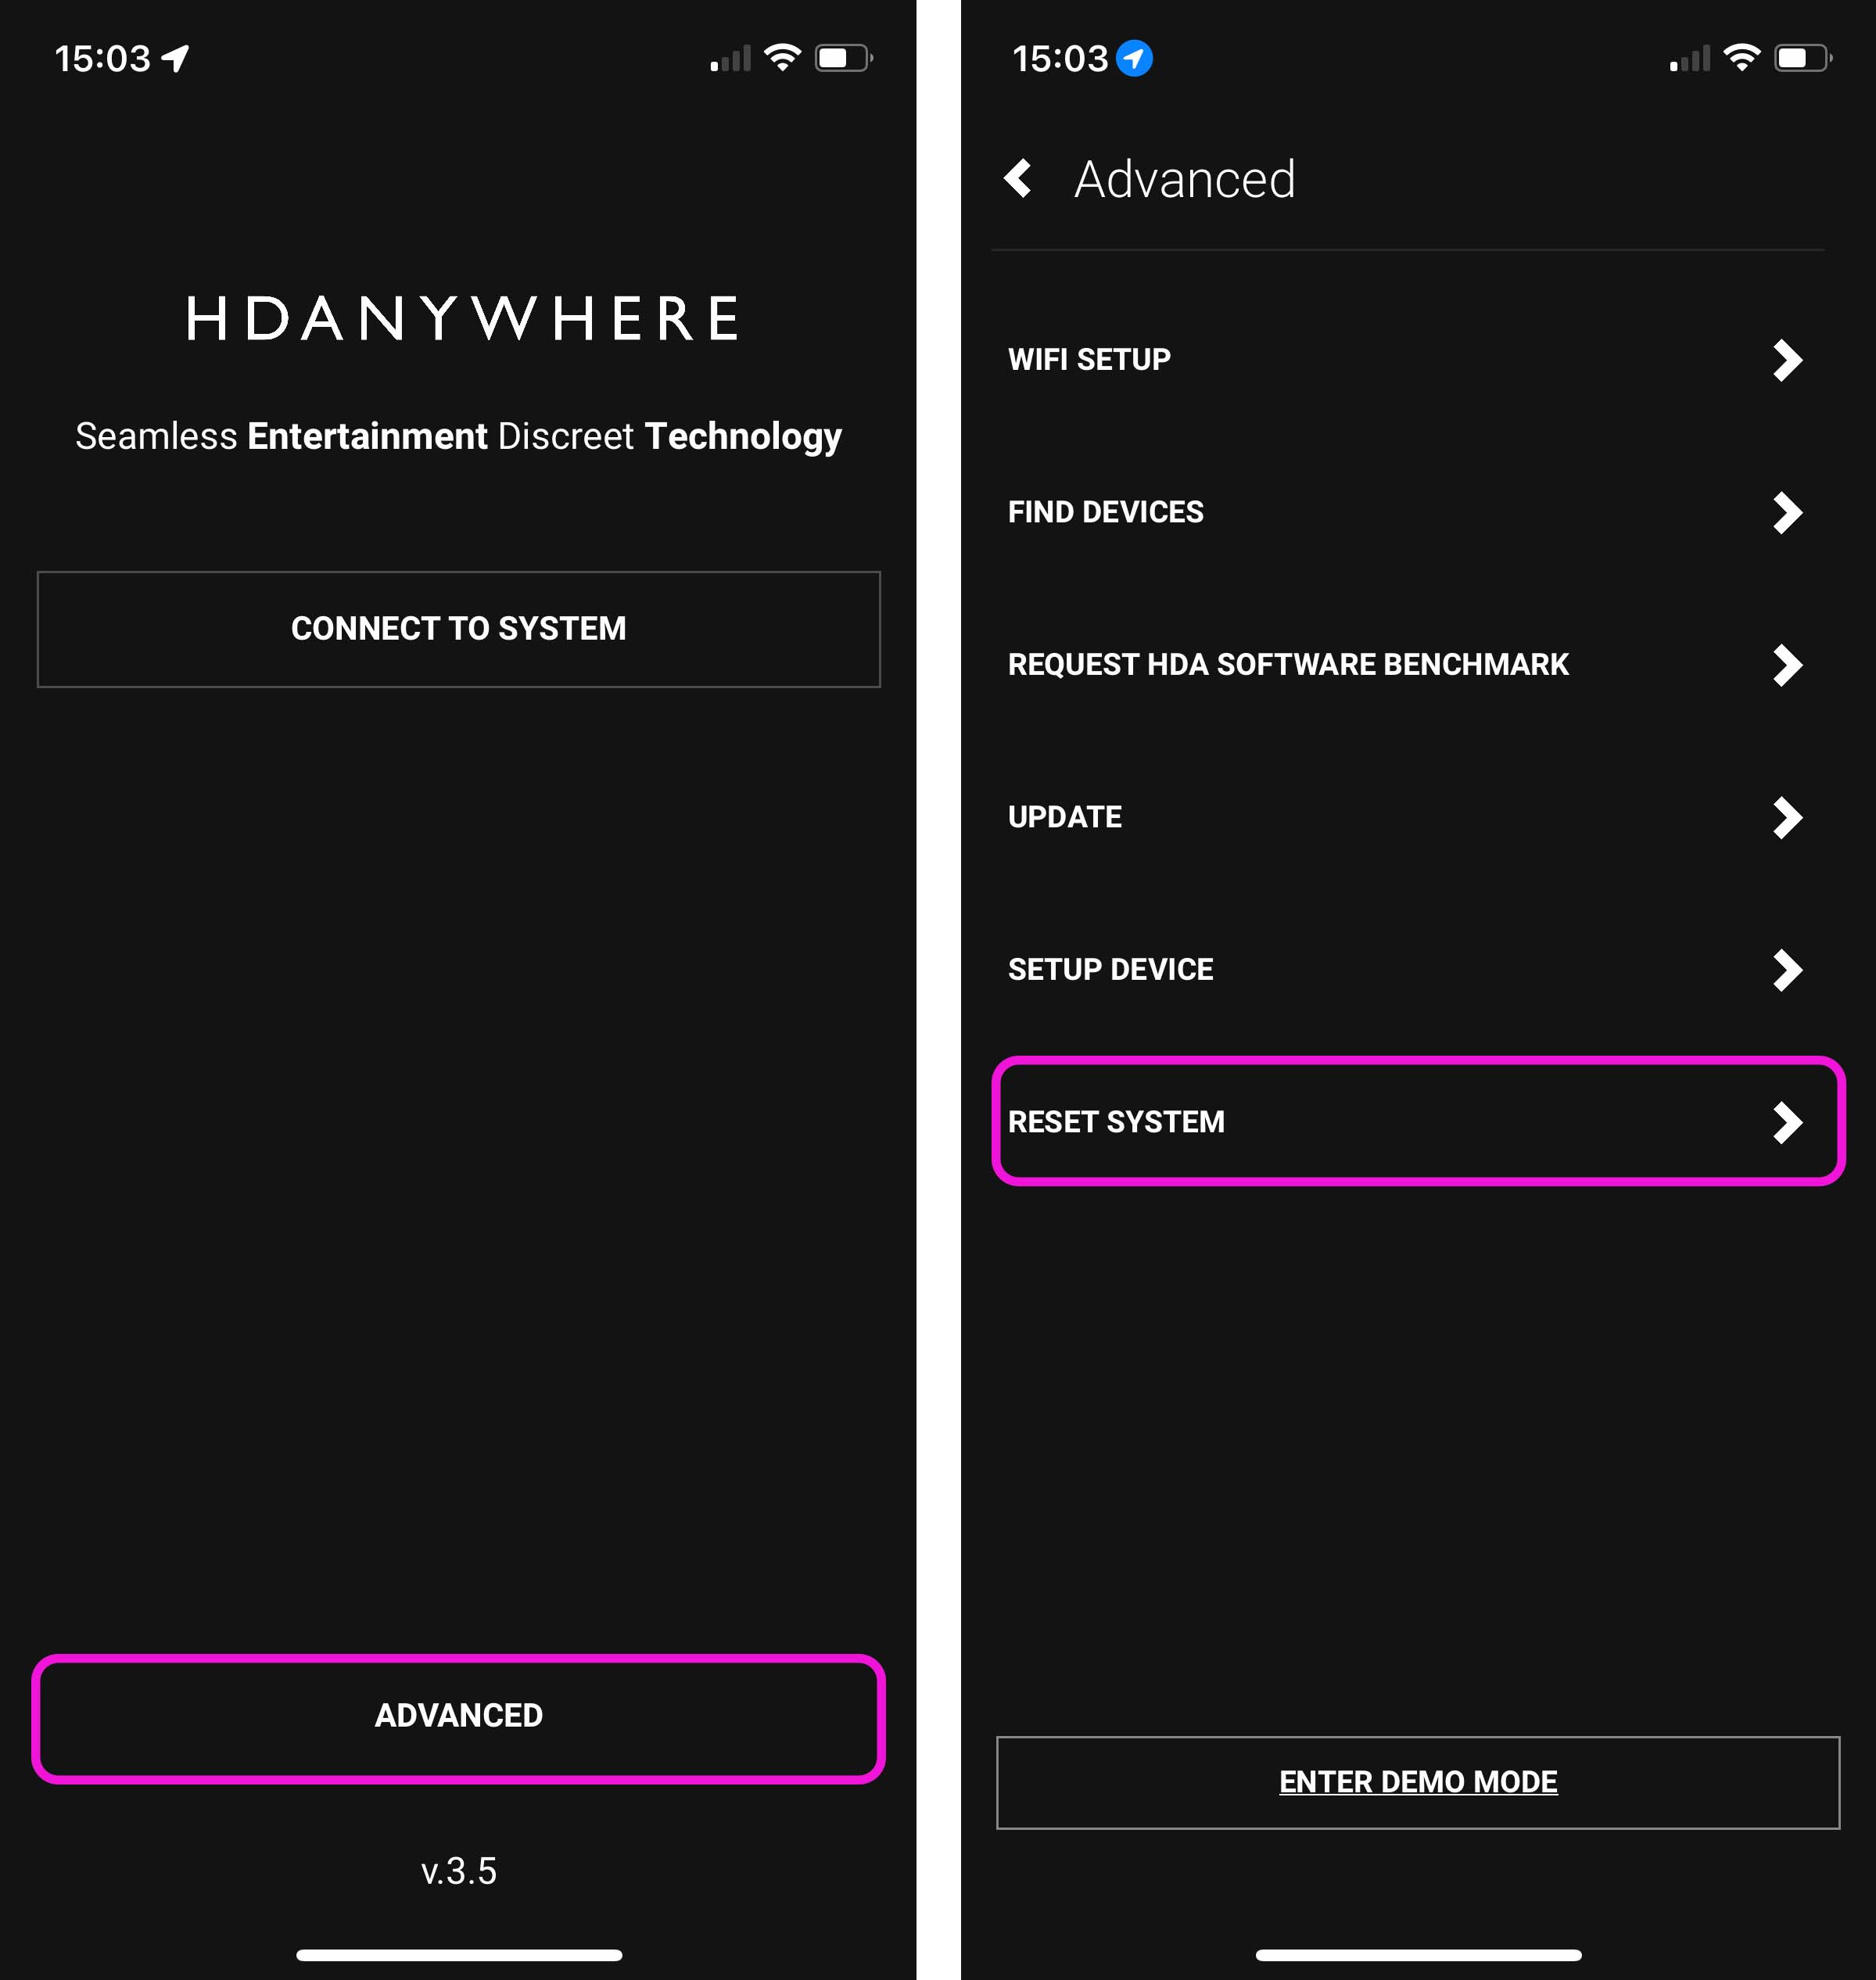
    If you are not connected to any system:
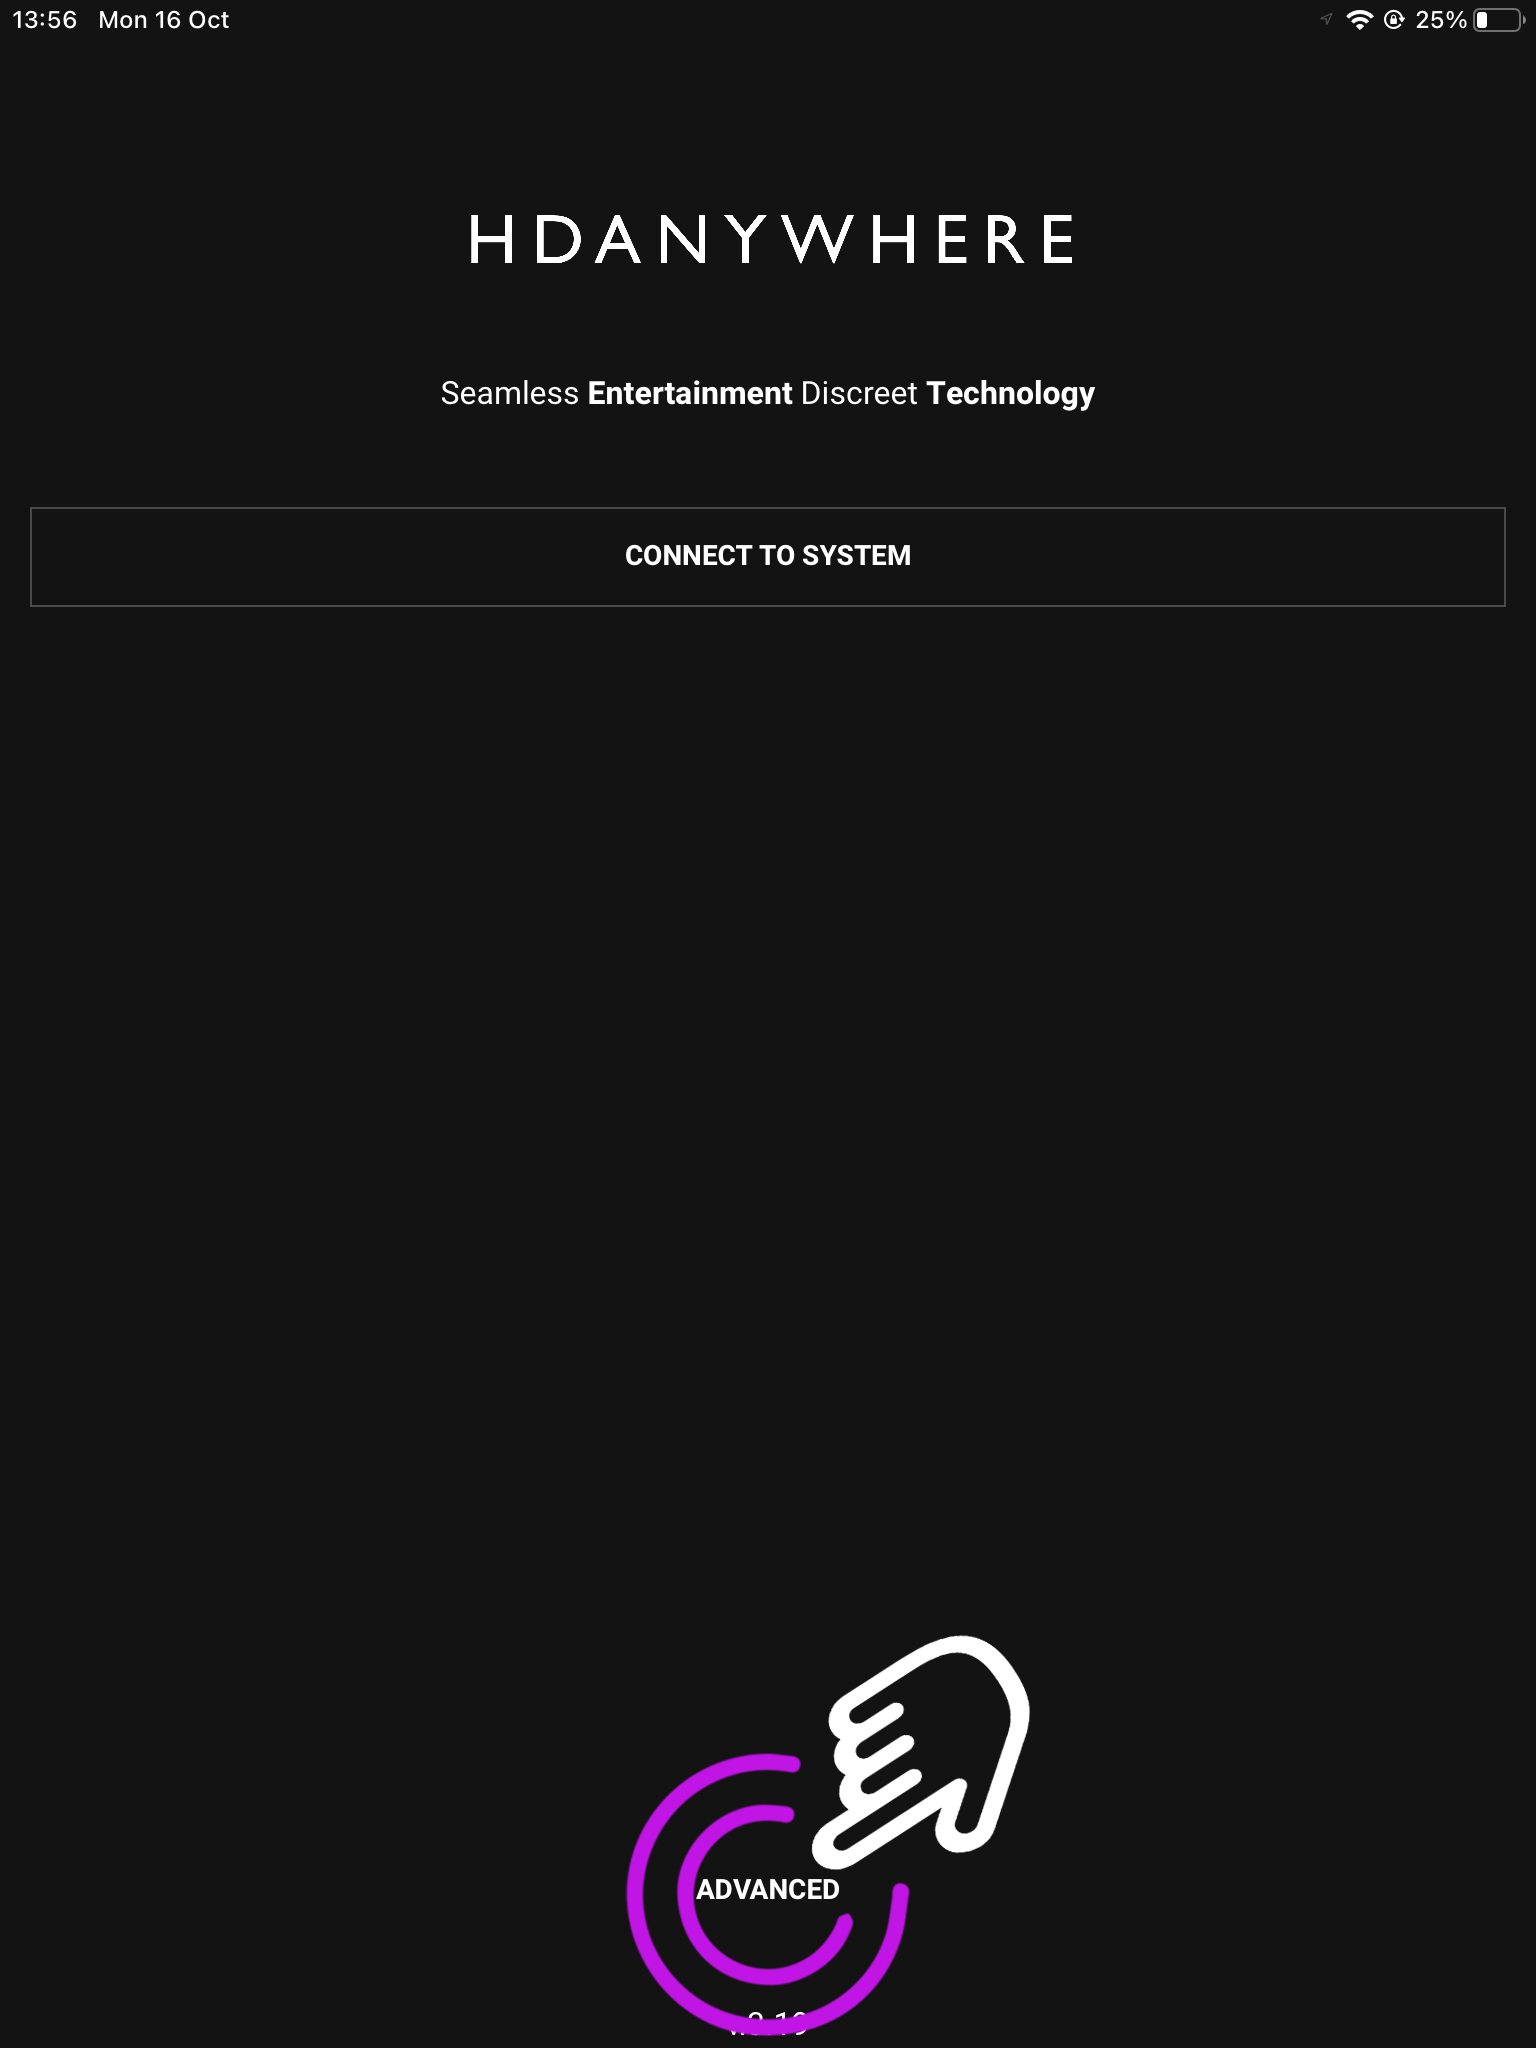
    uControl Splash Screen > Advanced > Utilities > Reset

    1-2-ncon

    Tapping on reset will not work. You will need to tap the reset button 10 times in order to unlock the reset process. Follow instructions inside the app to continue with the system reset.

  • Finding the IP address of your device

    Your HDA device broadcasts its IP address using a protocol called mDNS over your Local Area Network (LAN). The easiest way to find your IP address is to use our app, uControl.


    In this support article:


    Finding your device on a (new/reset) system


    1. Open uControl app

    Launch uControl and you will see the Home Page.

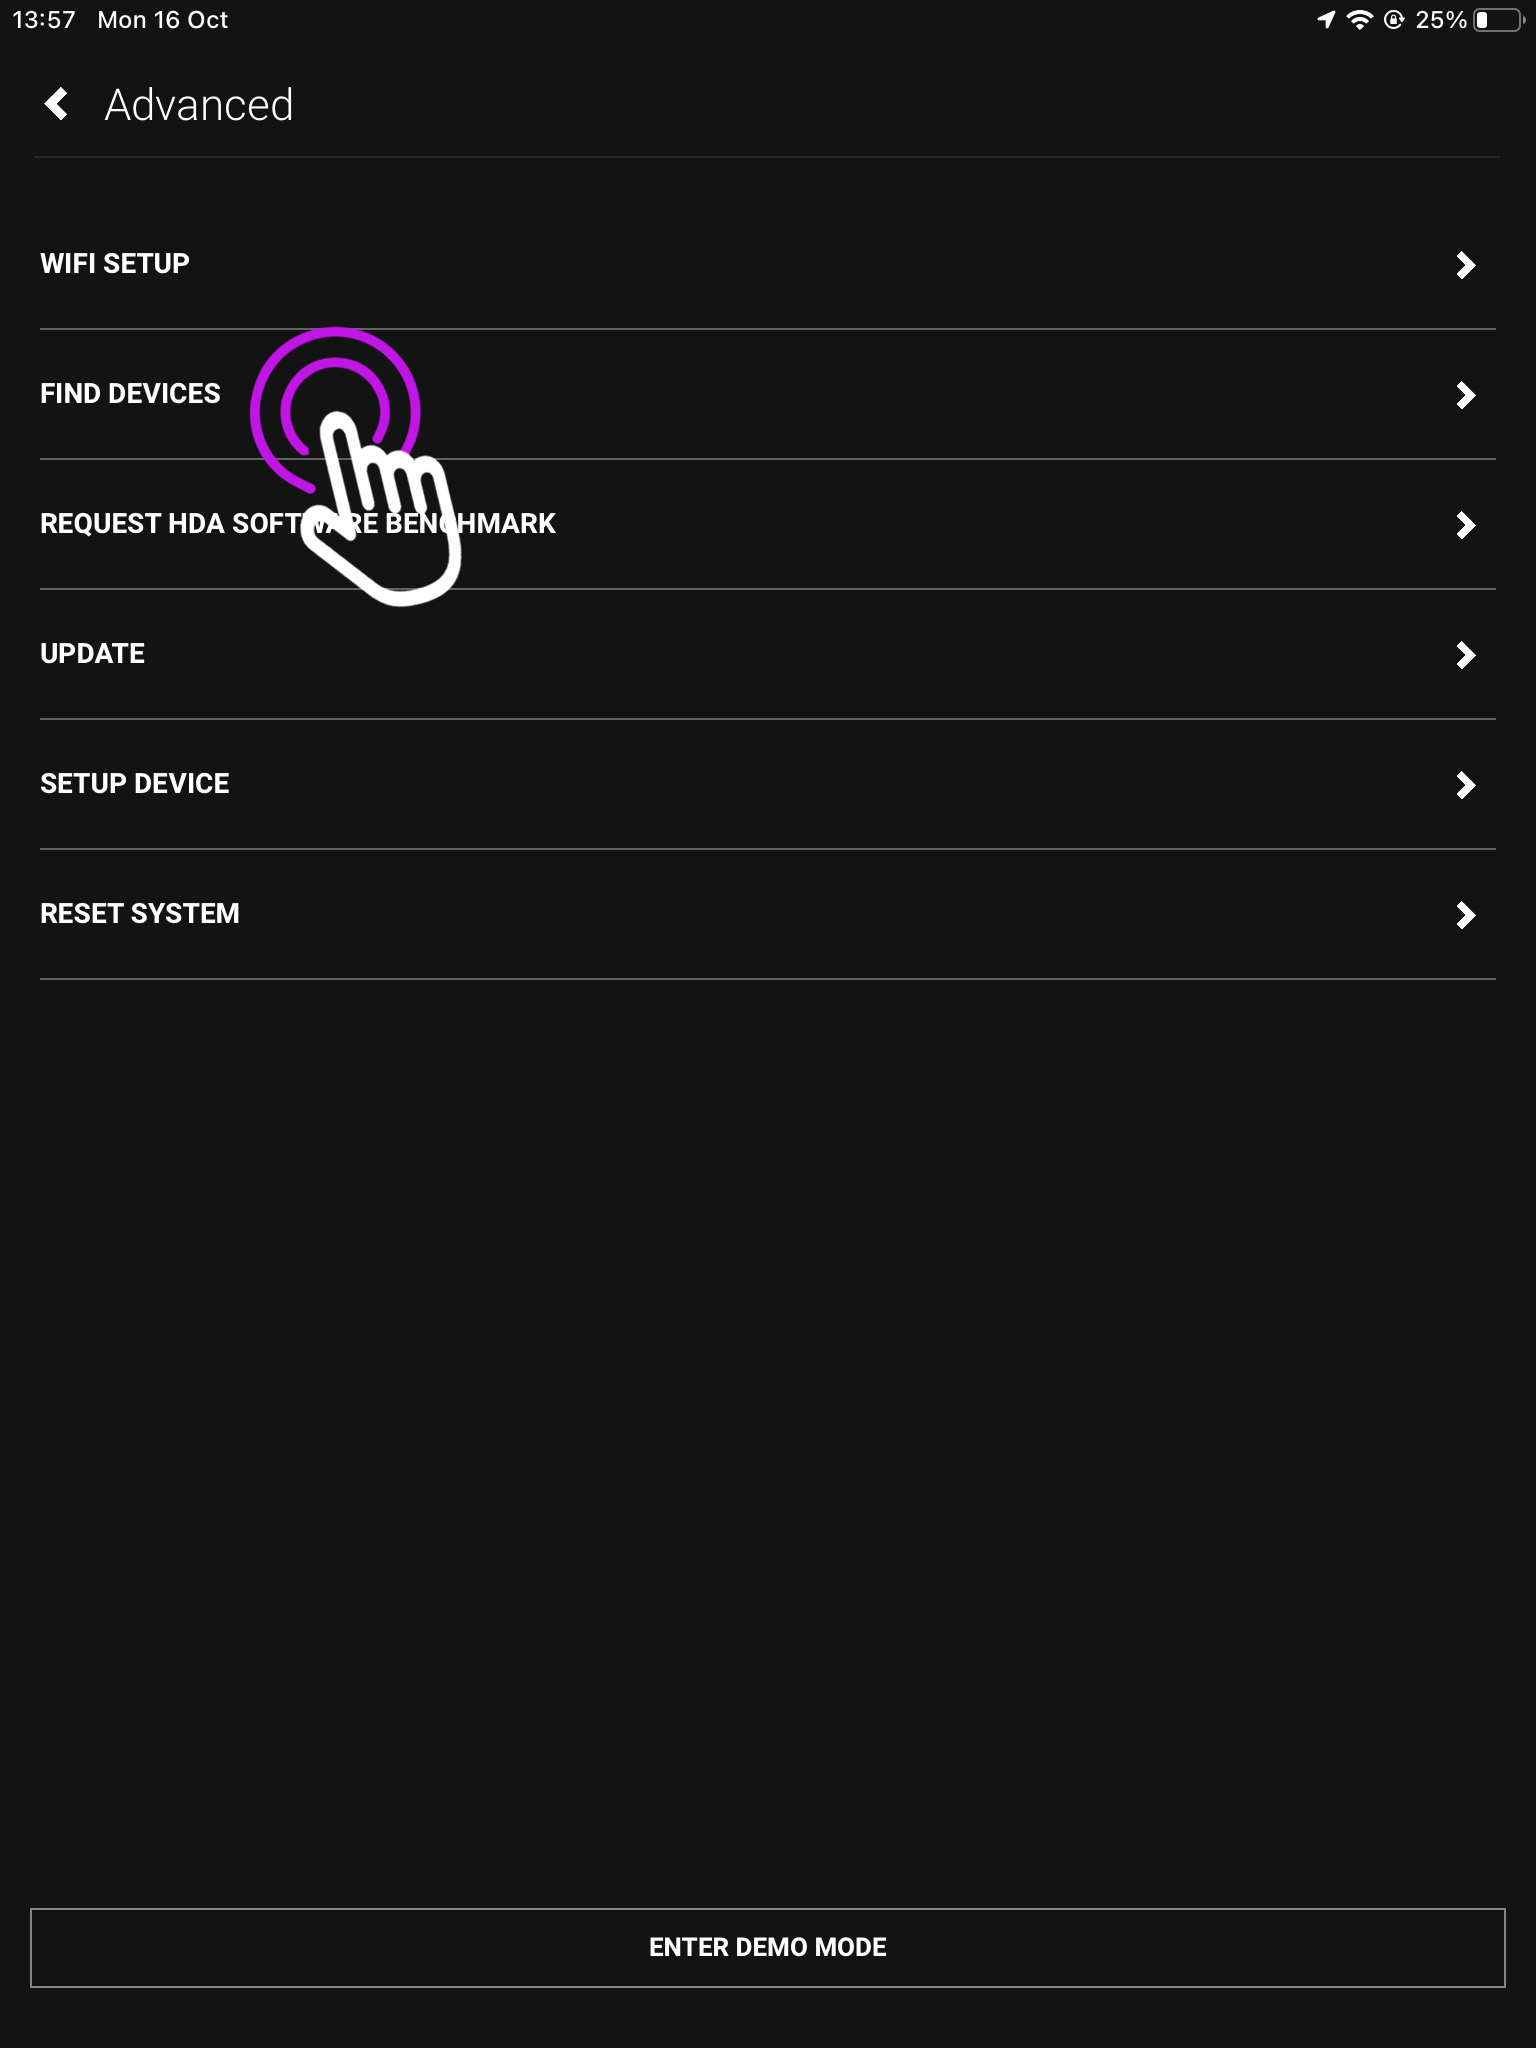
    You now need to press advanced.

    2. Press “Find Devices”

    This is your Advanced Page where you can find the HDA systems connected to your network.

    From here you can find your devices, connect over WiFi, reset your system and more.

    3. “Available System(s)”

    Your connected devices will show here along with their IP address.

    If you have more than one device you can use the identify button to make the power LED blink.

    Finding your device if you’re already connected to a system

    1. Open up uControl

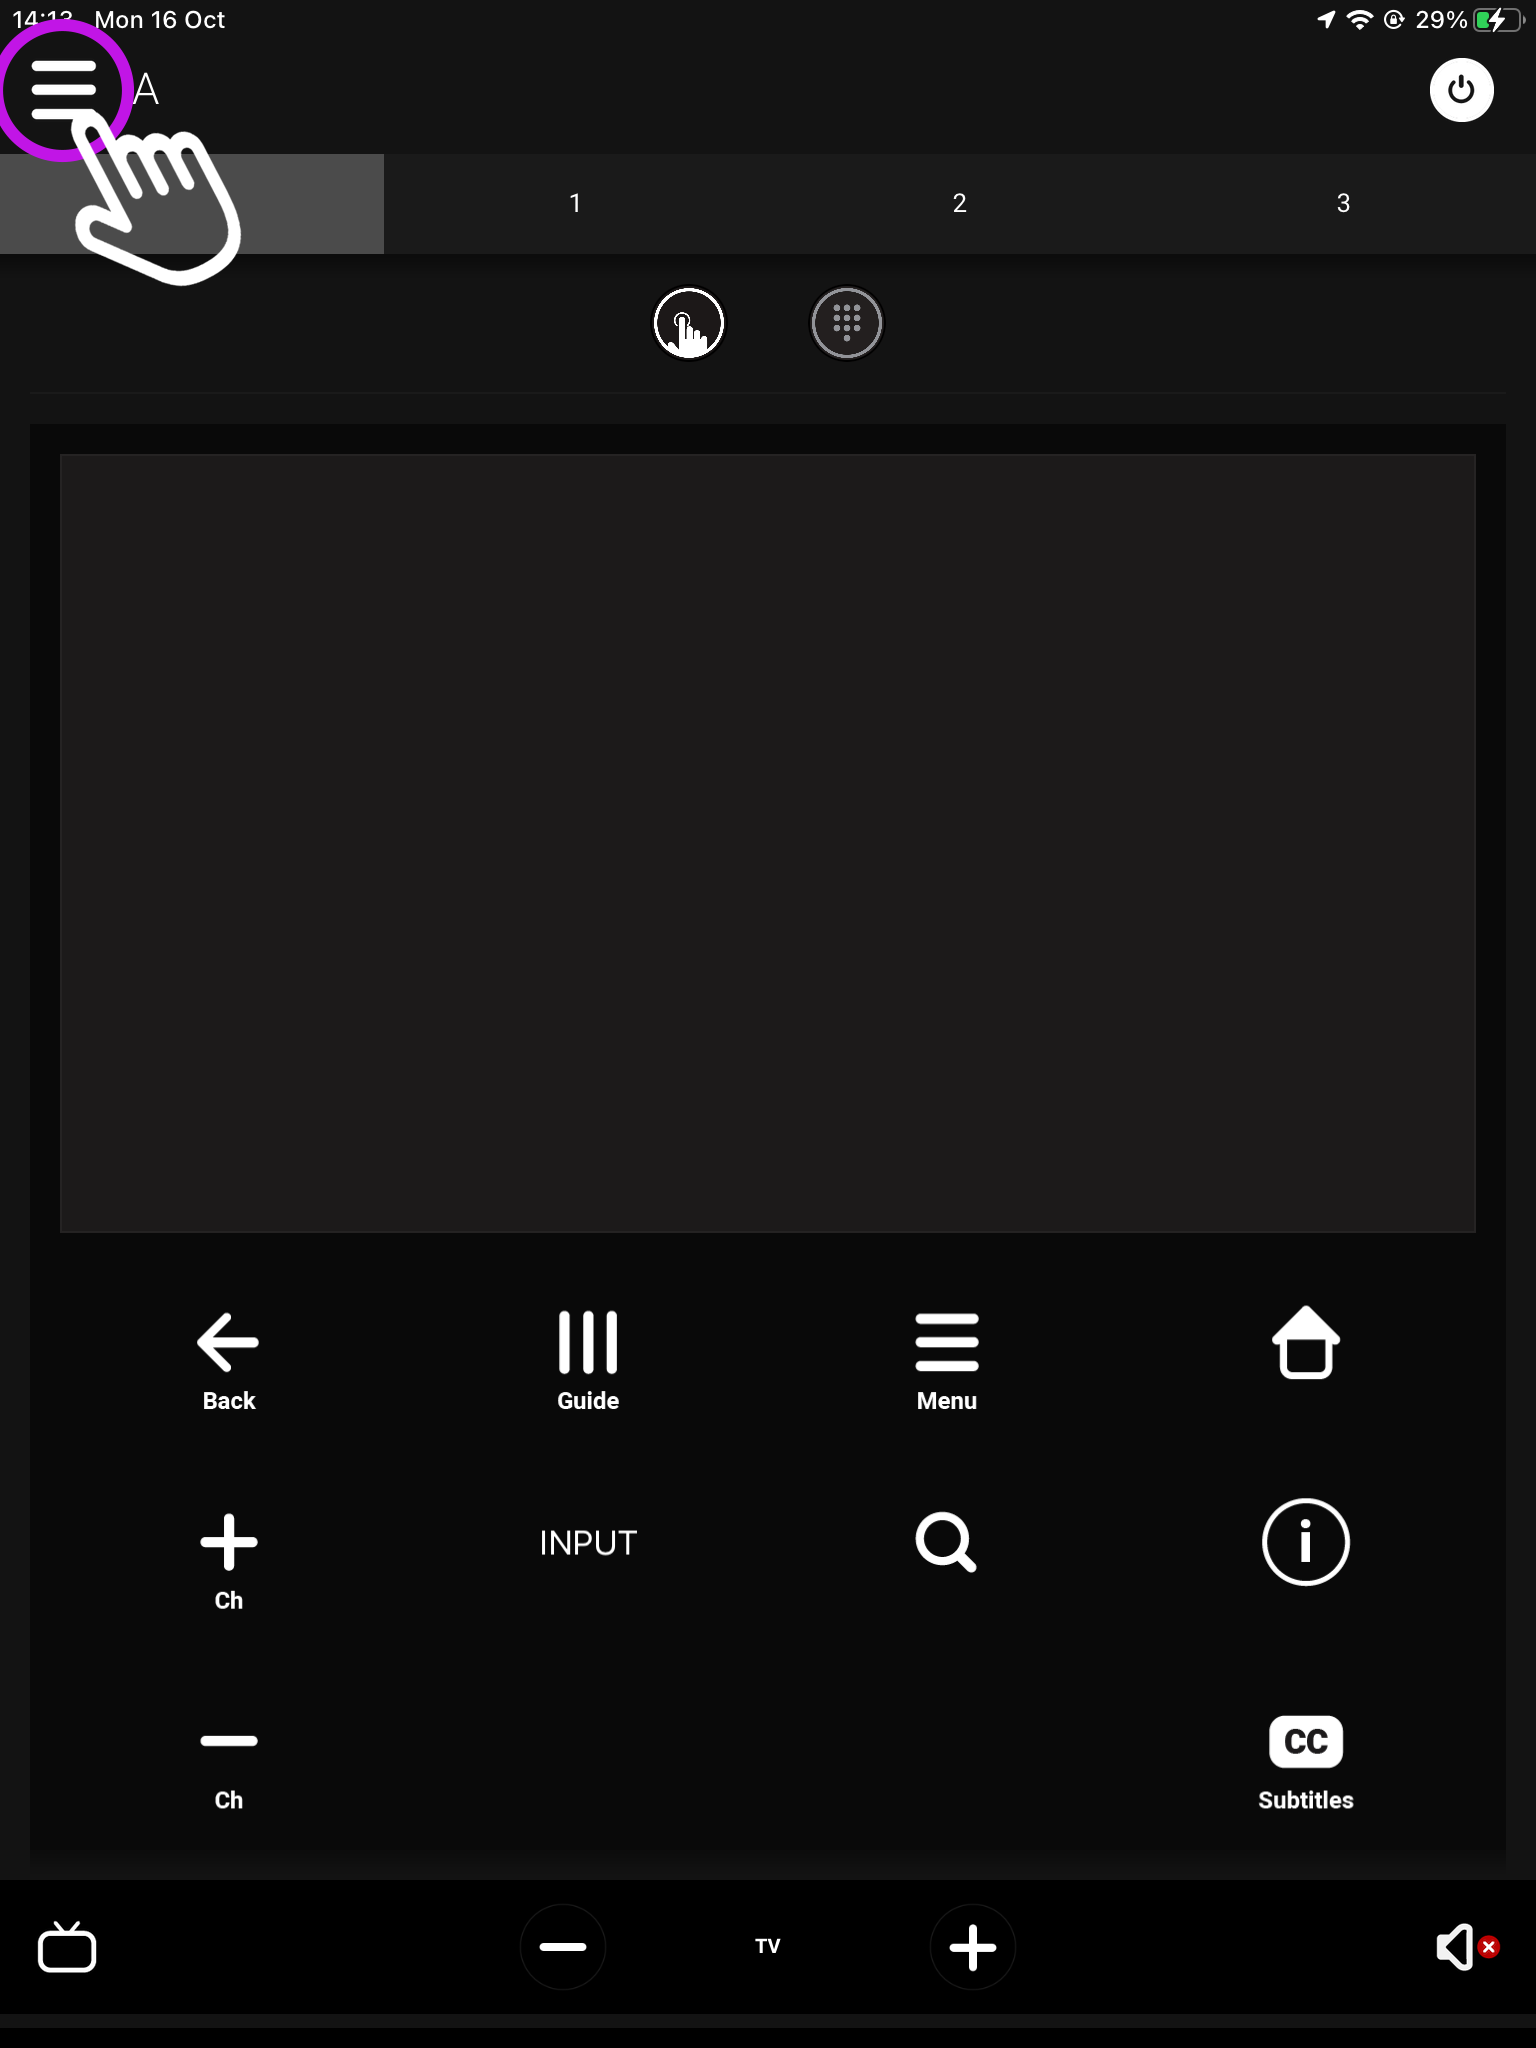
    If you’re already connected to a system then you will need to access uControl’s settings. From the main screen you will see something similar to this (see below). From here, look for a menu icon (three horizontal lines) in the top left corner, press that to reveal the Zone selector and Zone control menu.

    What you see on the main screen may differ, however, the three lined menu bar will still be there.

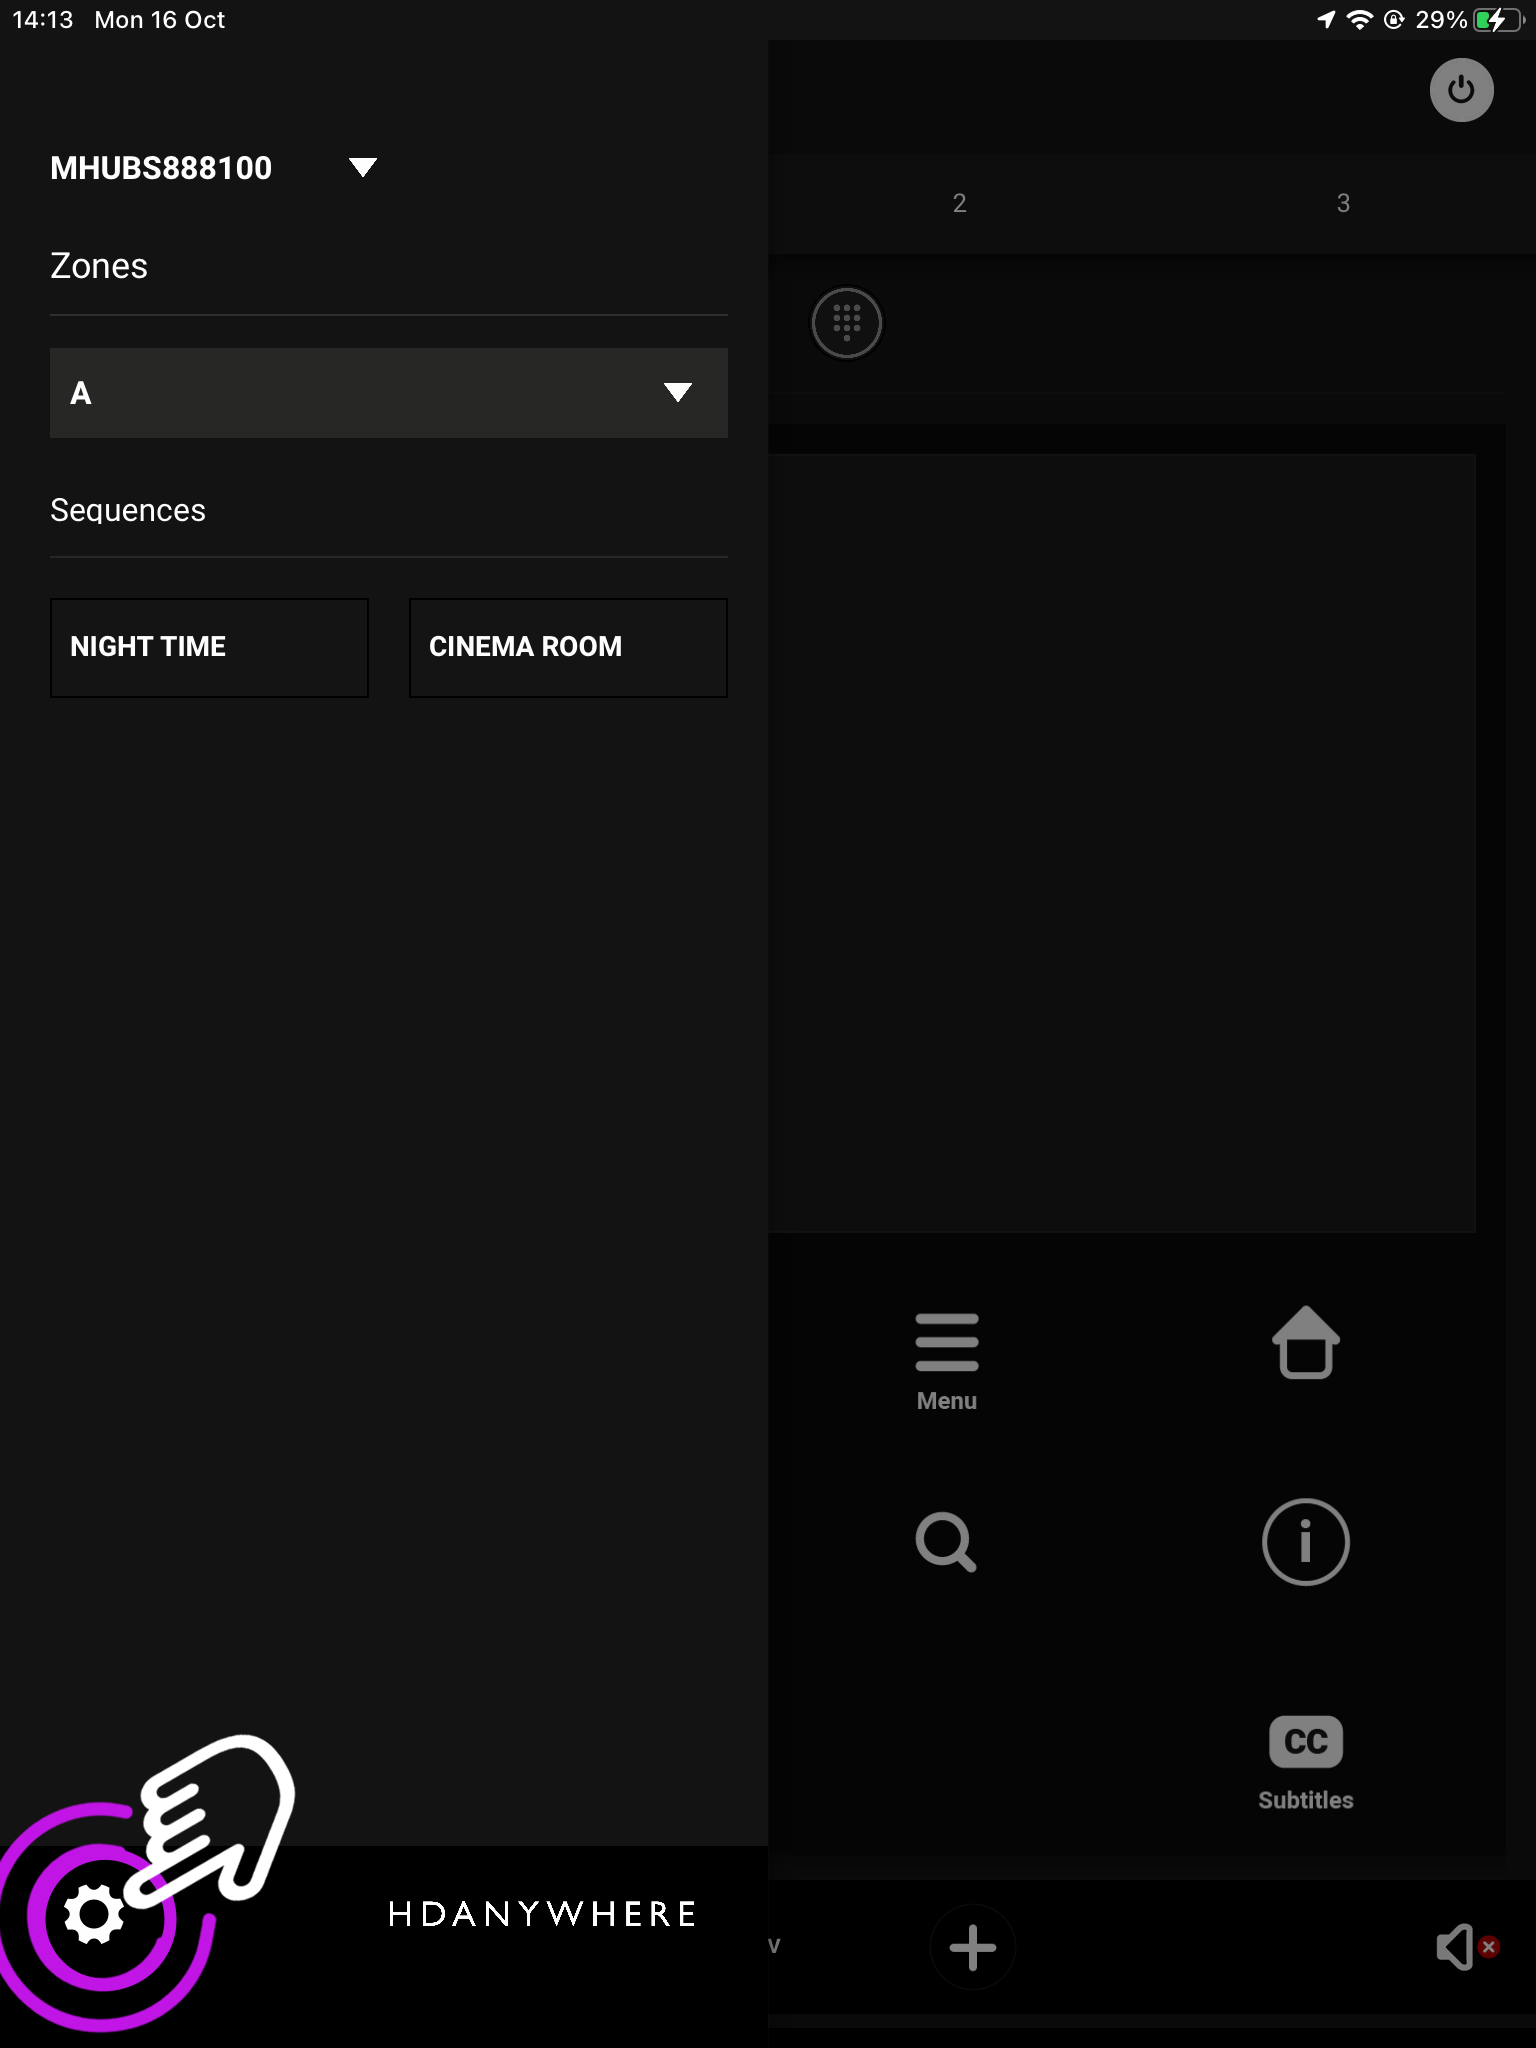
    2. Navigate to your settings

    Look for the settings icon located in the bottom left corner.

    The icon may vary depending on your mobile devices size, however, it will still be in the bottom left corner.

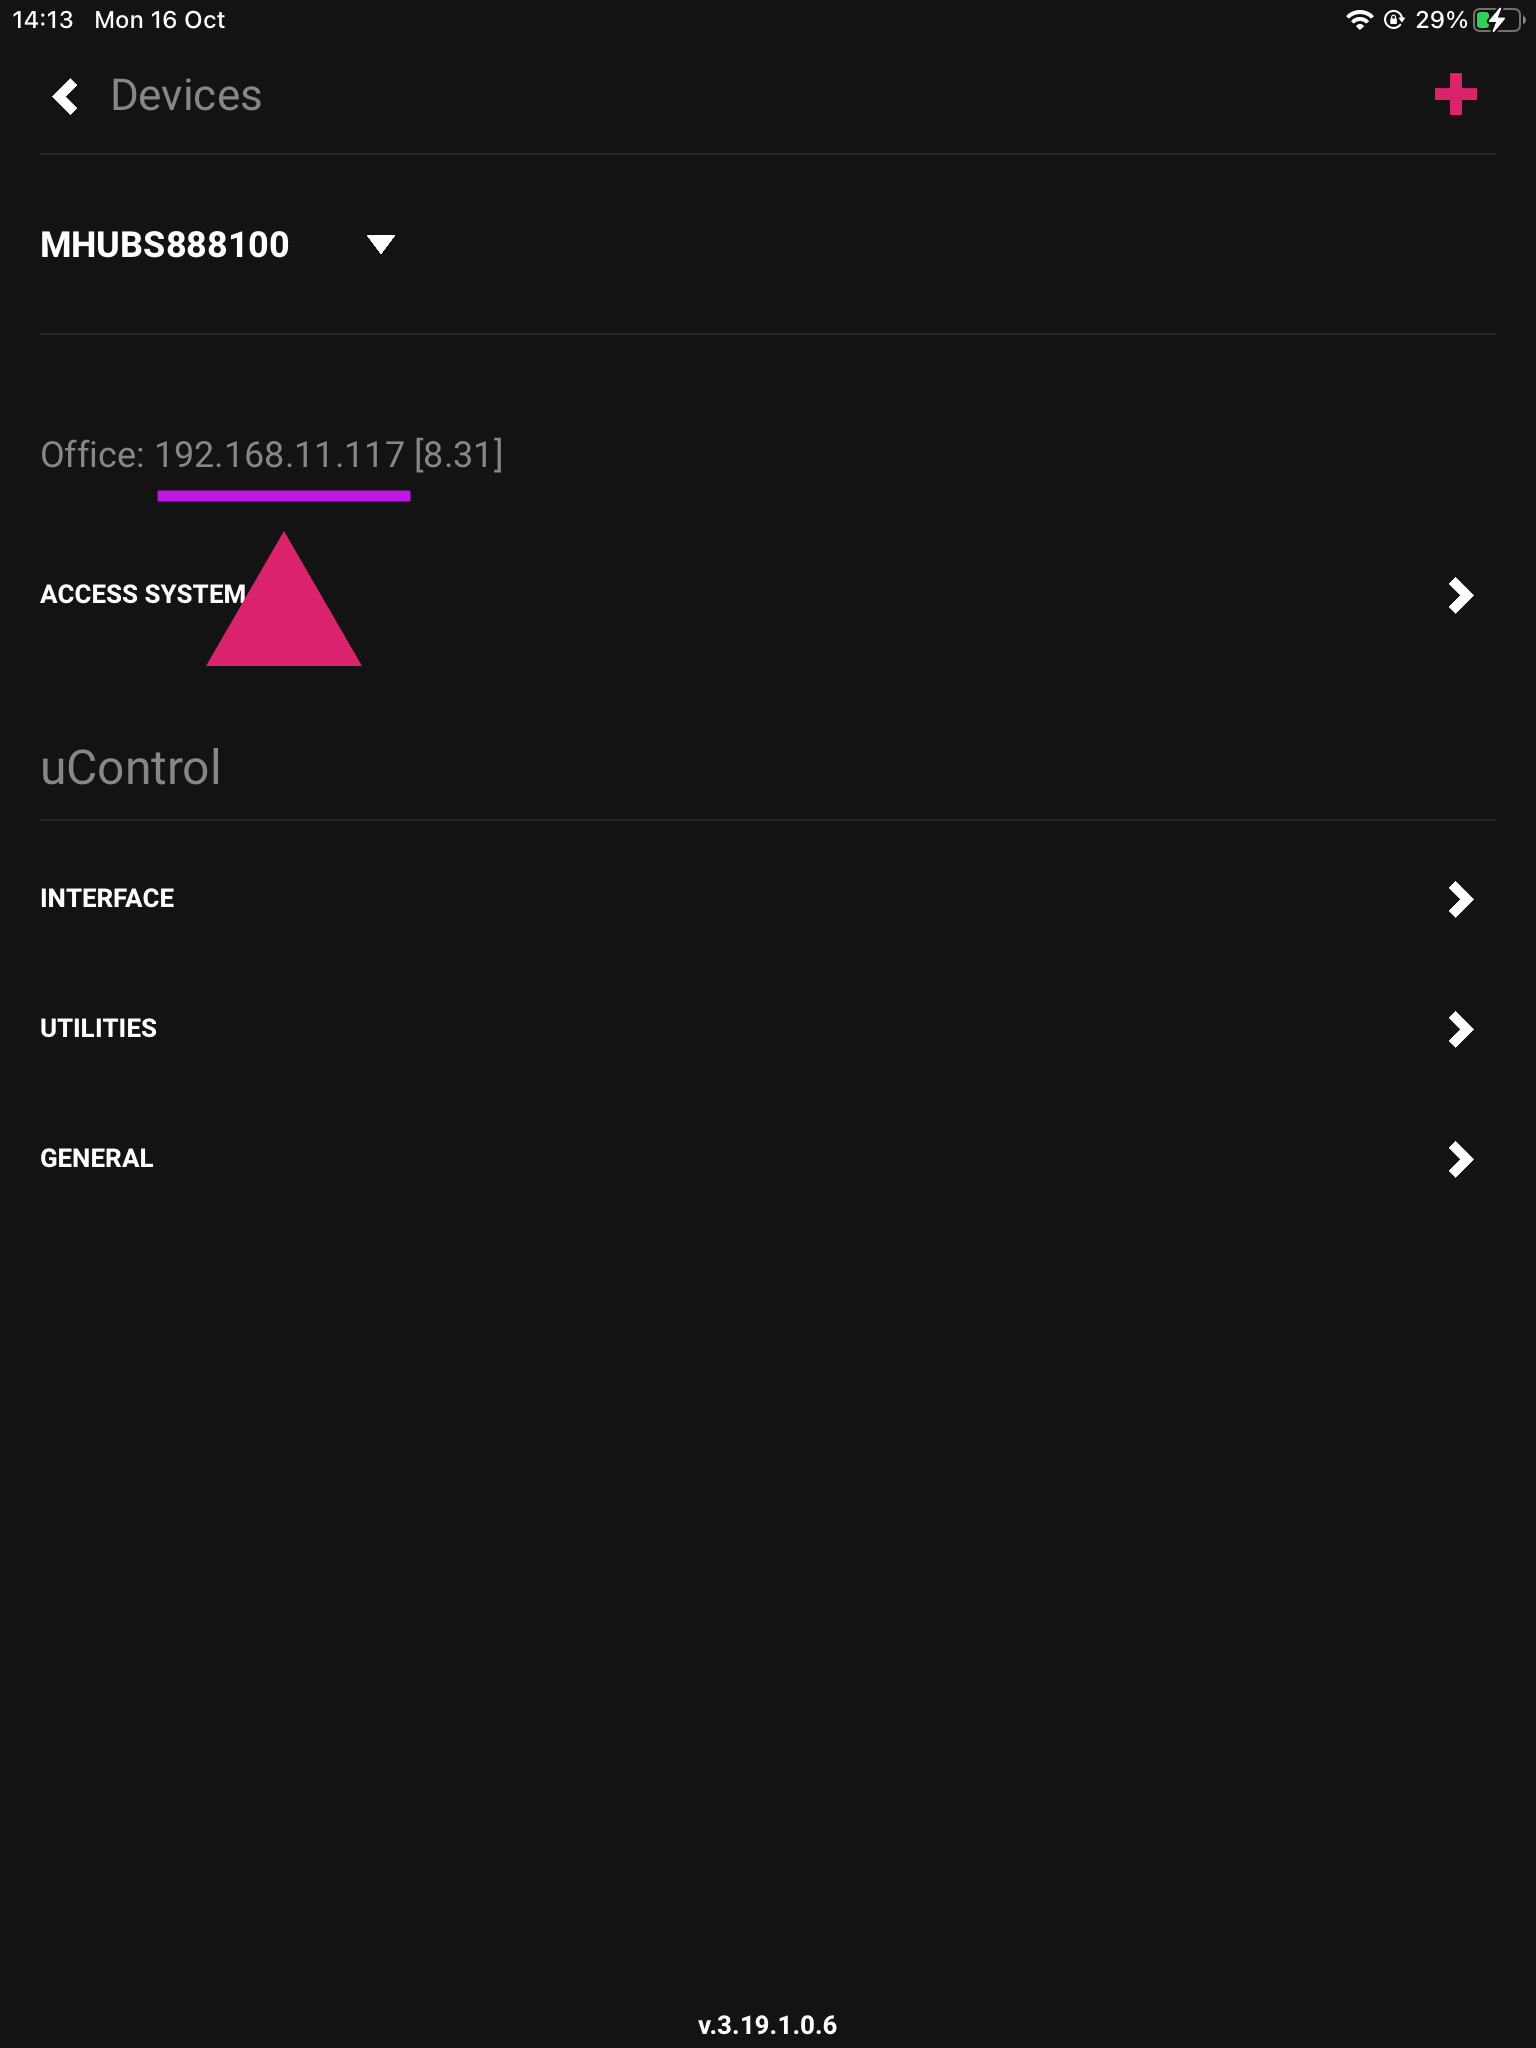
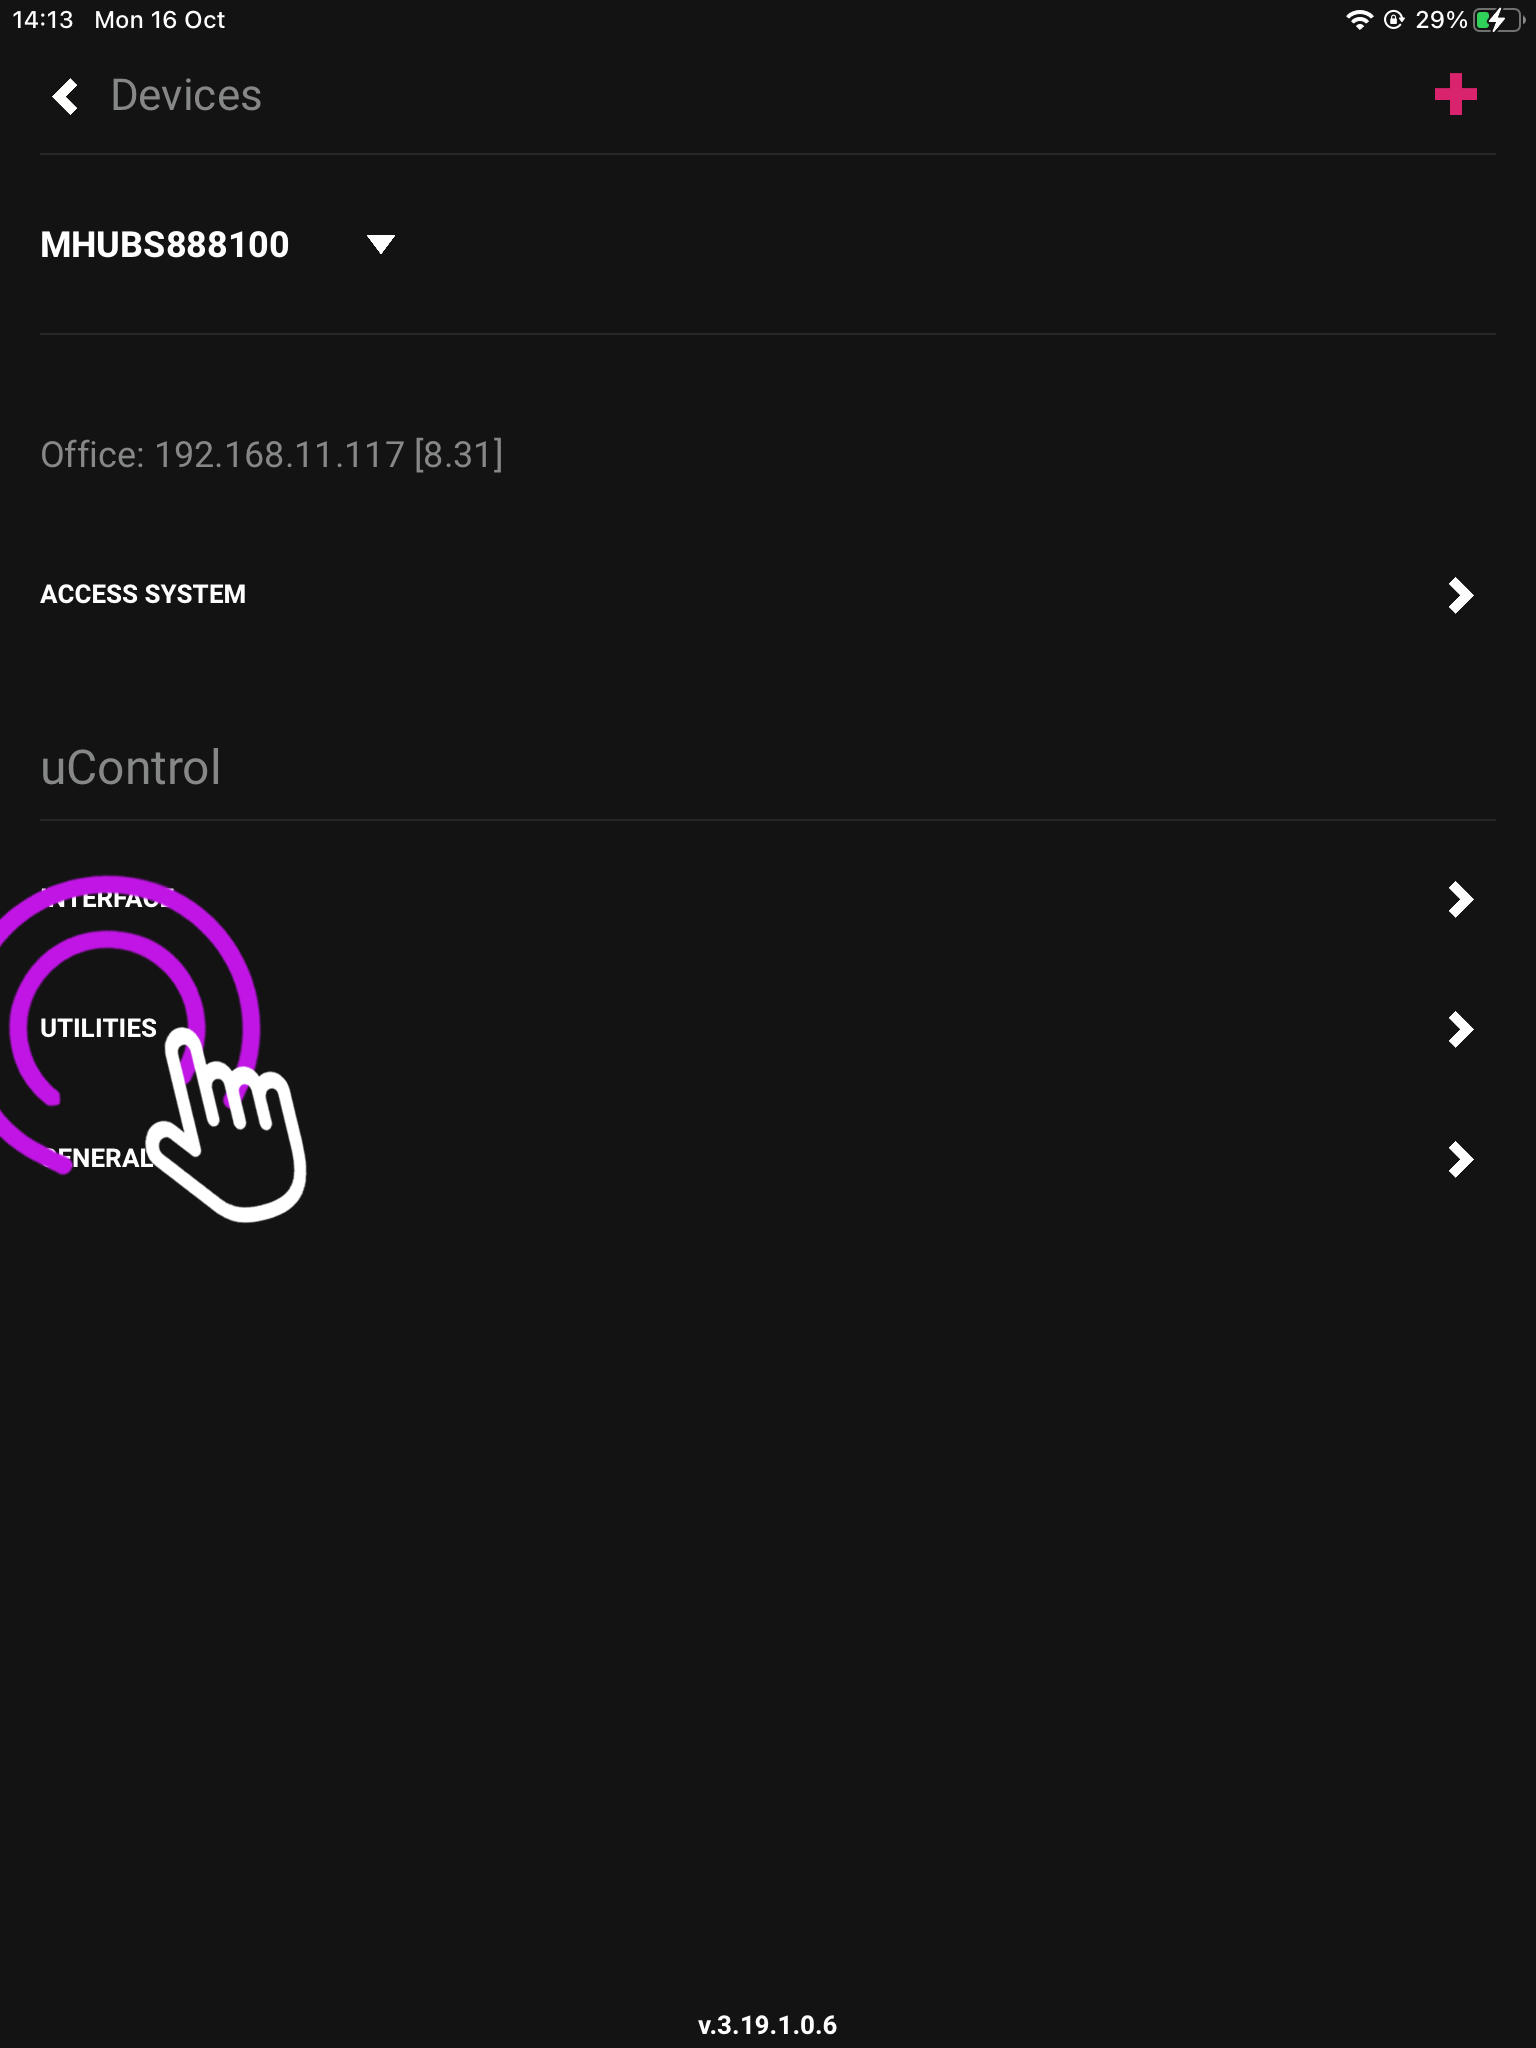
    3. Utilities

    This is your device page which displays your model and IP address, if you want a list of all connected devices go to utilities.

    From here you can also add another device to your setup using the plus sign in the top right.

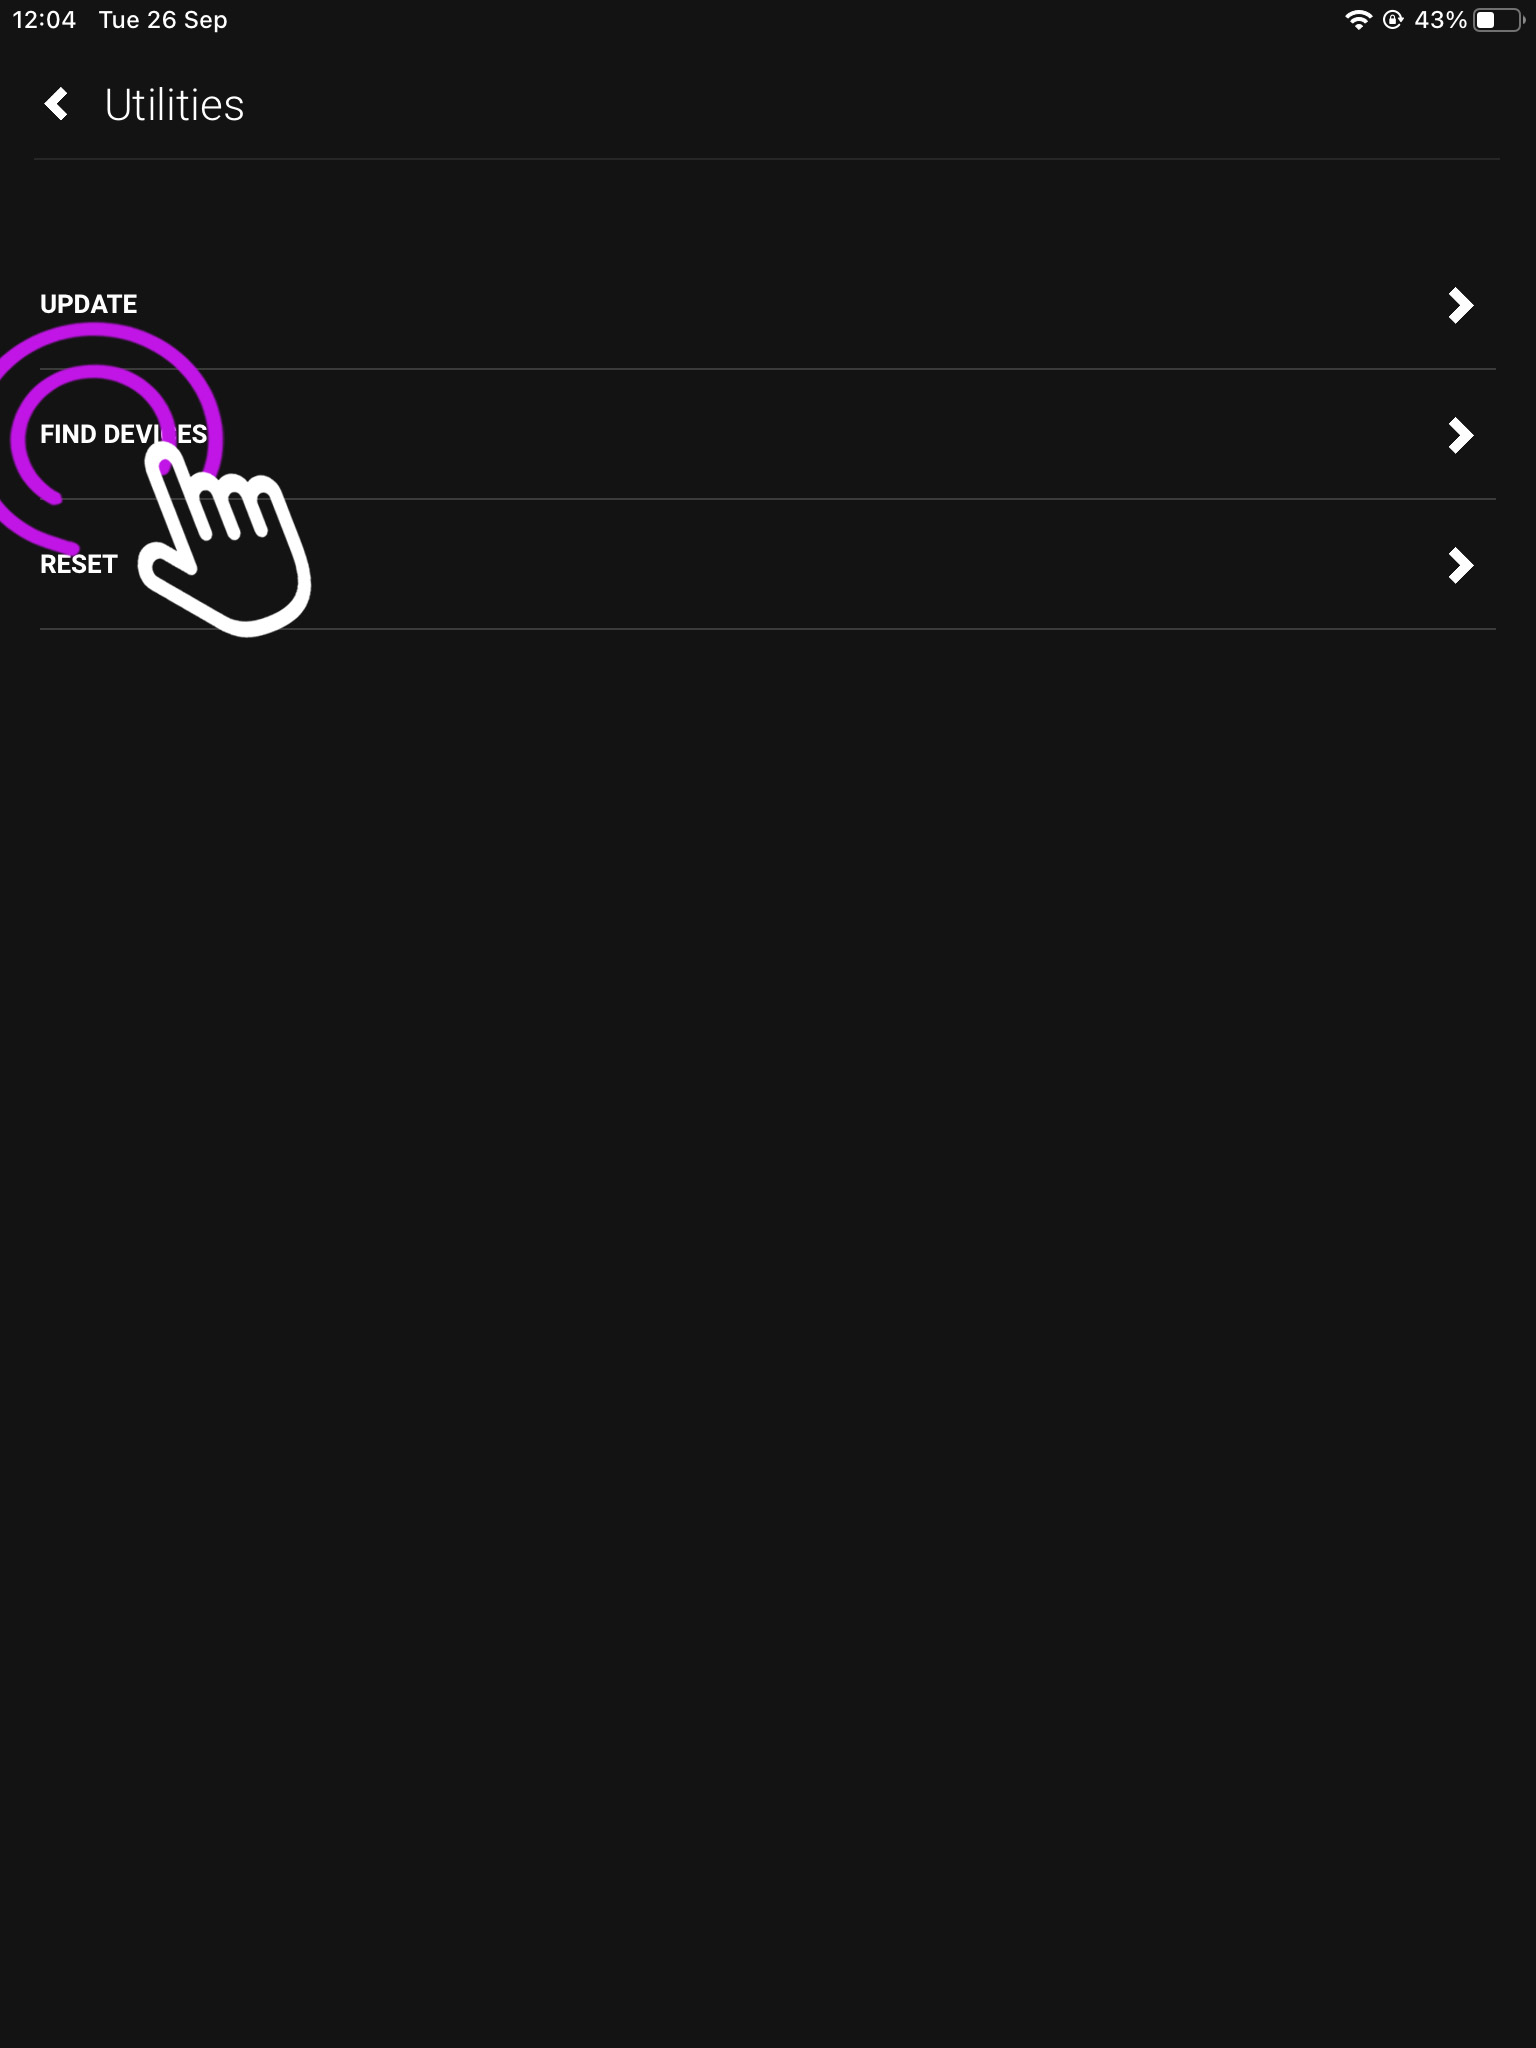
    4. Find Devices

    This page is where you can update, reset or find your available connected systems.

    To reset your system as you can see below, you will need to press it 10 times.

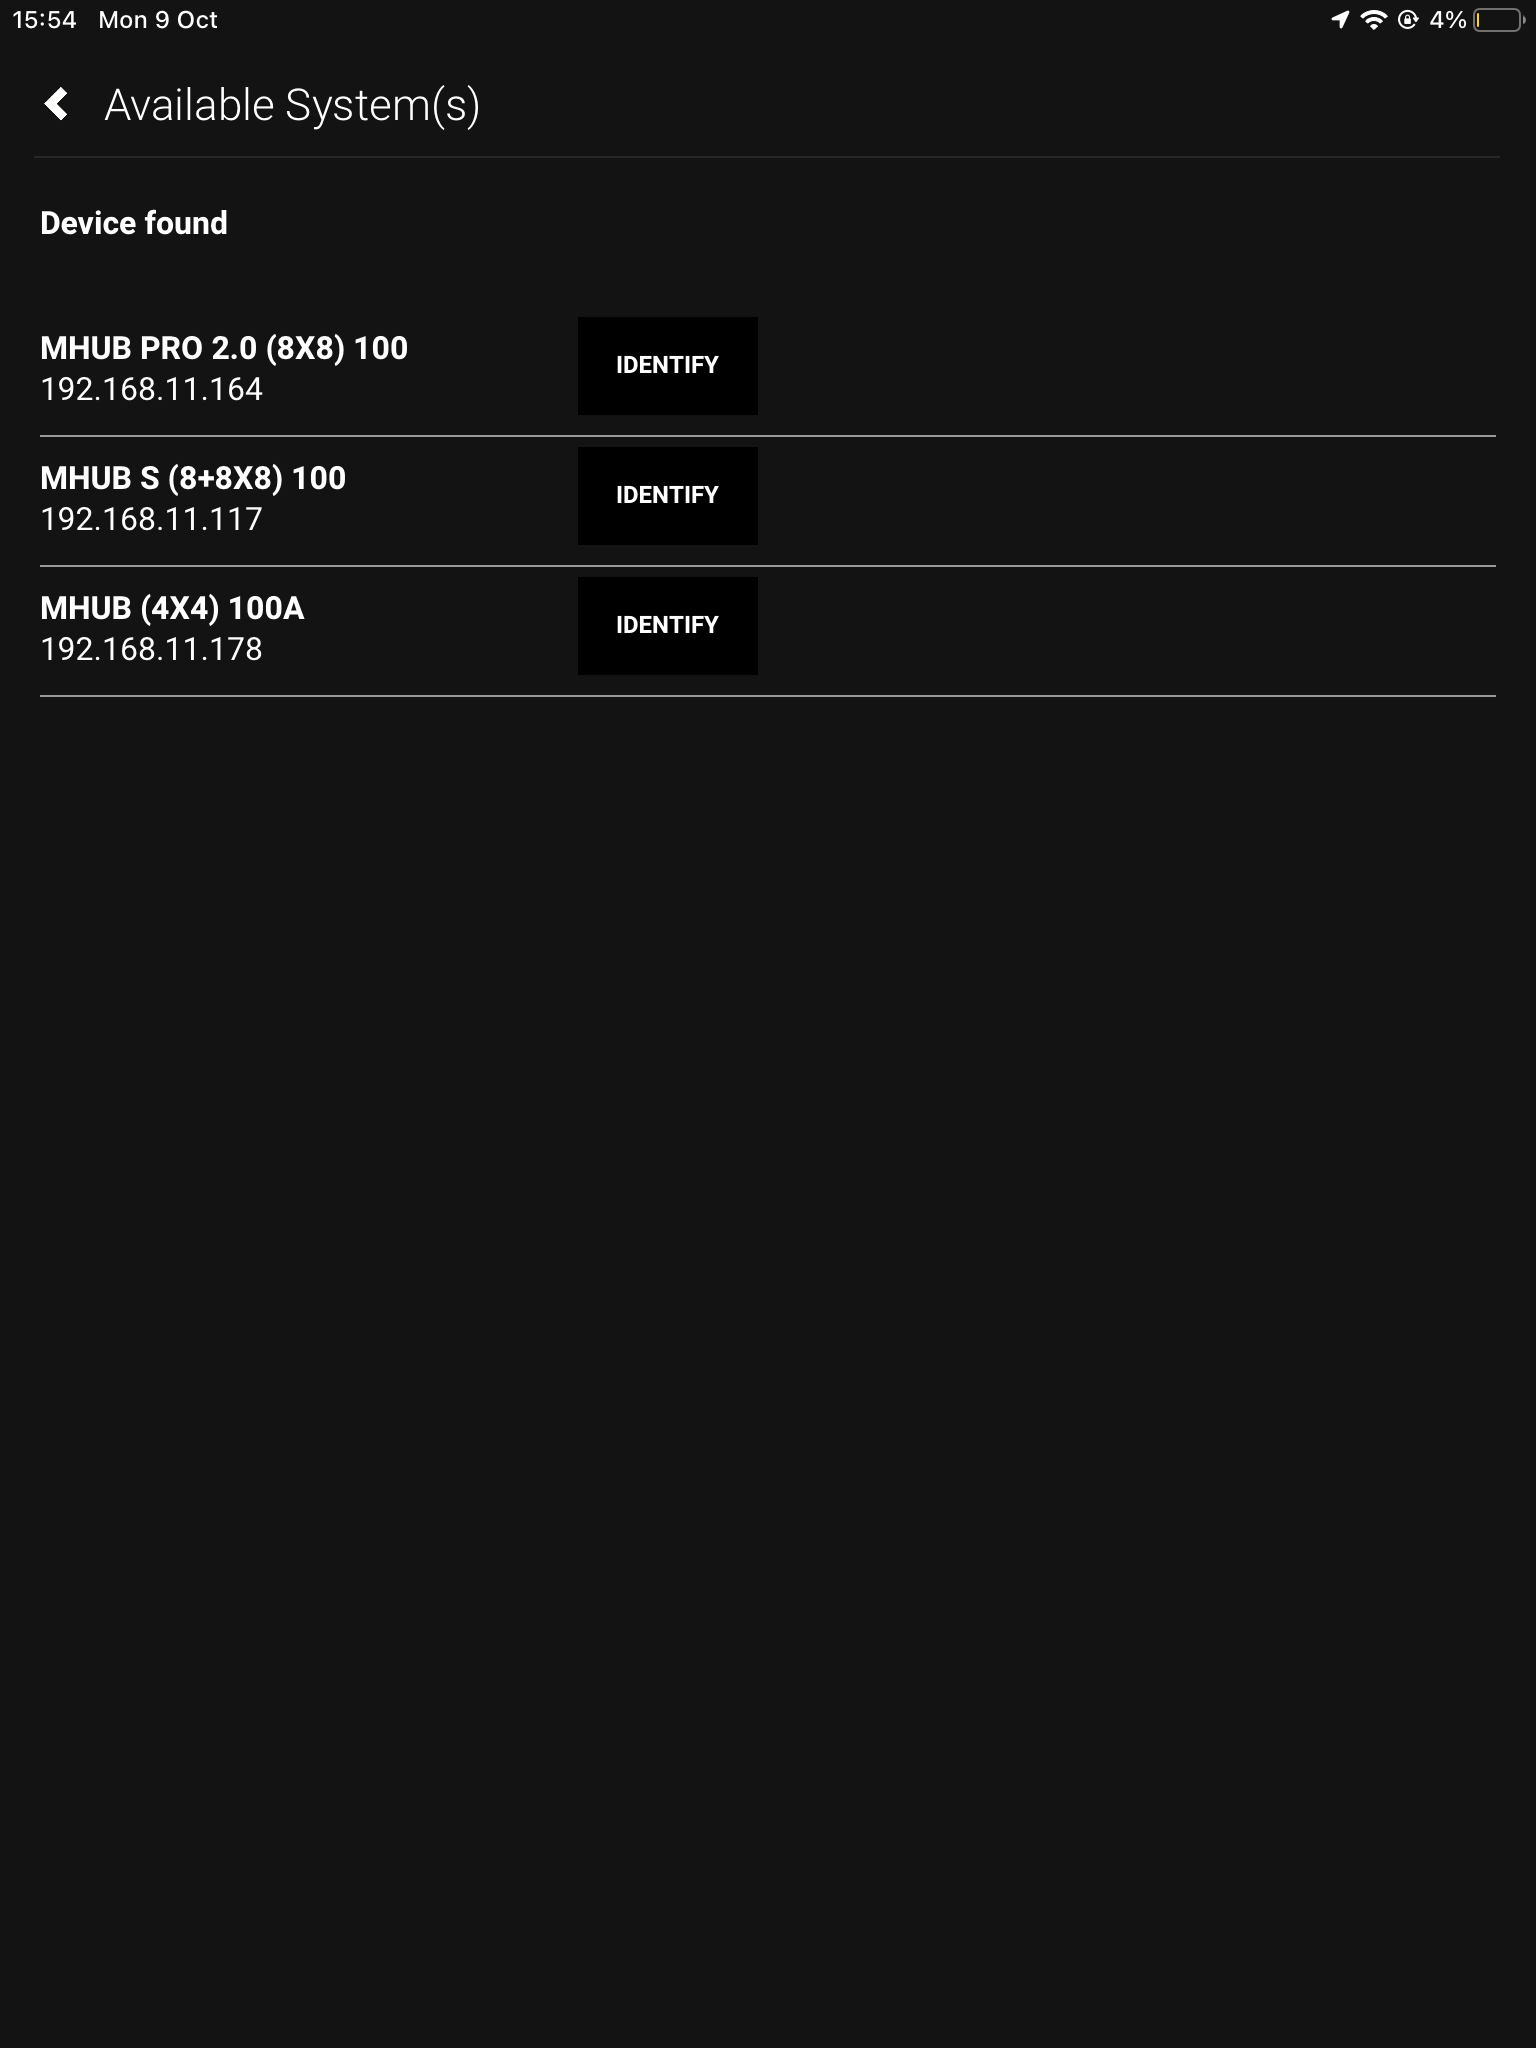
    5. Available Systems

    Here you will see all your connected devices, and their IP addresses.

    If you have multiple devices connected, you can distinguish between them by pressing the identify button which will make the power LED flash.