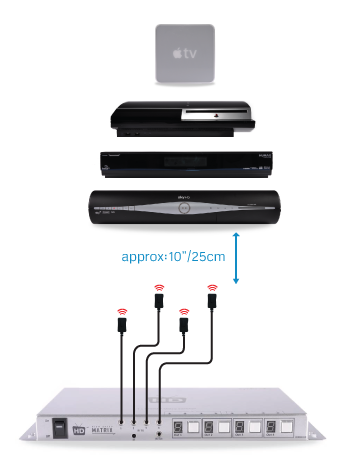
Basic IR Setup (dos and don’ts)
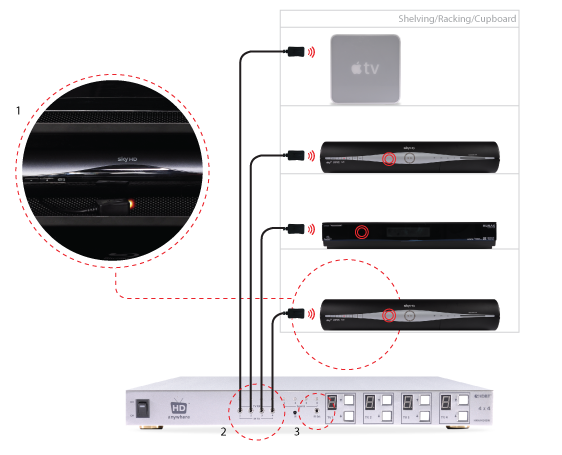

Finding the IR window on your source device can be difficult if it isn’t mentioned in your user manual or is marked clearly on the front of your device. A very common device is Sky+HD and Virgin’s Tivo boxes. Below, we’ve marked where the IR windows are on these devices for easy installation.
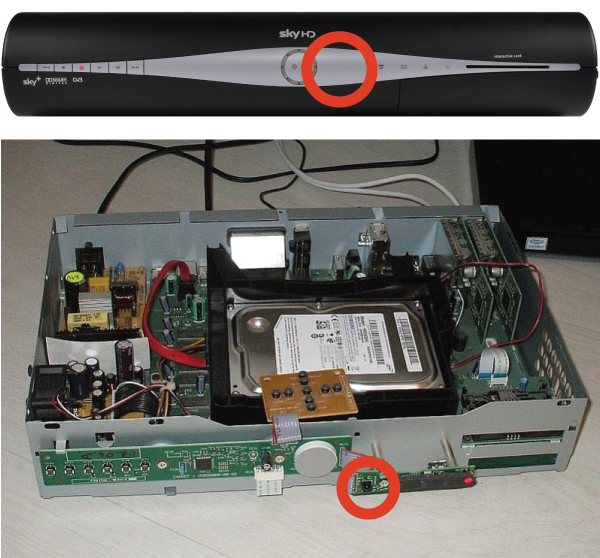
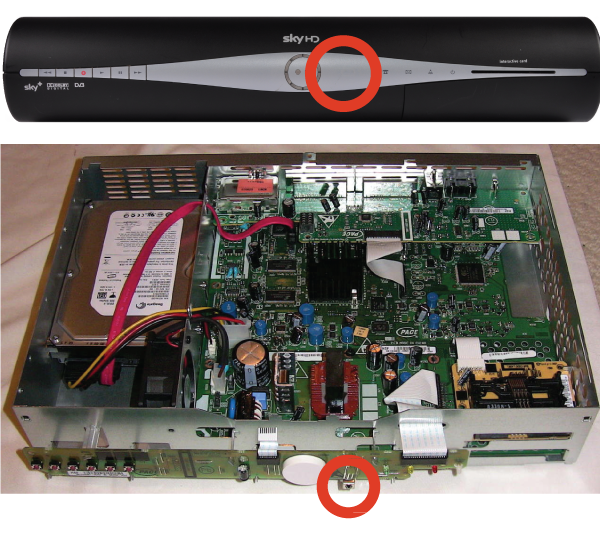
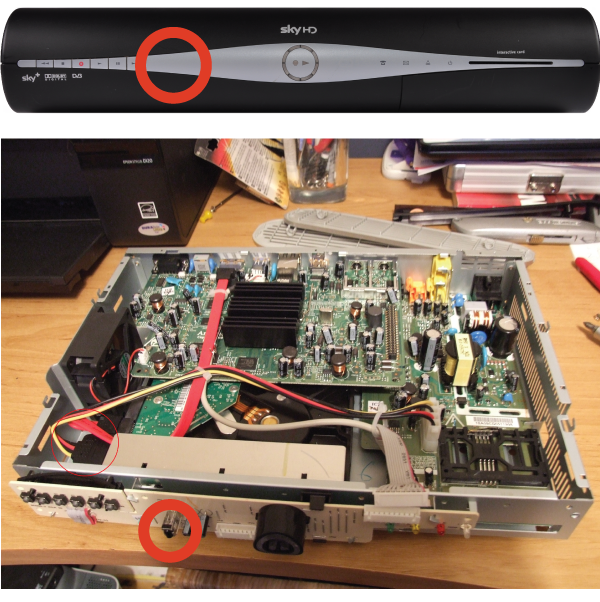
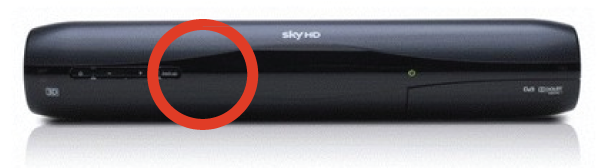
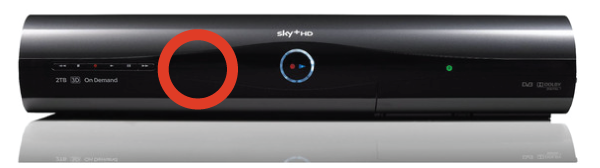
Can’t find the source device that you we’re looking for? Please email us with a request and we will make it available online the next working day.
Still having problems with your IR setup?
Please check our HDanywhere IR wiring setup diagrams or have a look at our IR troubleshooting video
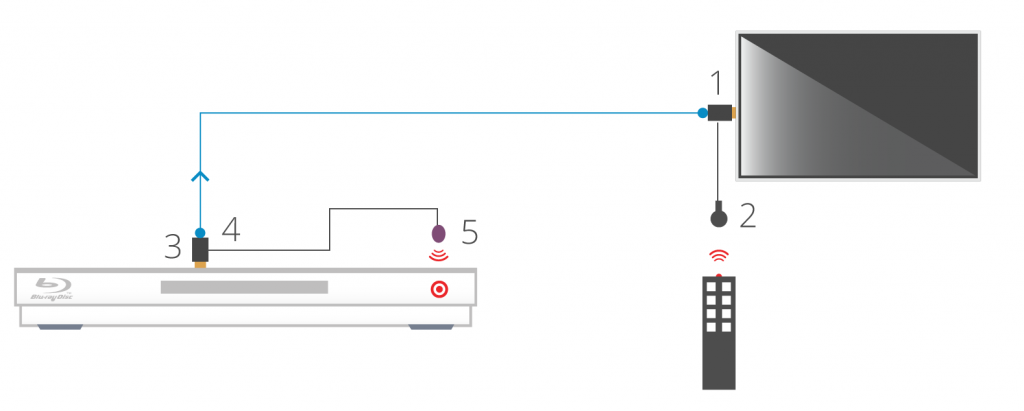
1. Install the HDMI IR dongle between the HDMI input on the TV and your HDMI cable. Ensure that the switch is set to “IR”. Plug the IR Receiver (see ‘Pack Contents – 2.’) into the stereo jack input on the dongle (labelled RX).
2. Position the IR Receiver ( see ‘Pack Contents – 2.’) with clear line-of-sight to the remote.
3. Install the HDMI IR dongle betwen the HDMI input on the source and the HDMI cable, similarly to point 1. Again, ensuring that the switch is set to “IR”.
4. Plug the IR Transmitter (see ‘Pack Contents – 1.’) into the stereo jack input on the dongle (labelled RX on the dongle).
5. Position the IR transmitter ( see ‘Pack Contents – 1.’) with clear line-of-sight to the remote receiver on the source.e.
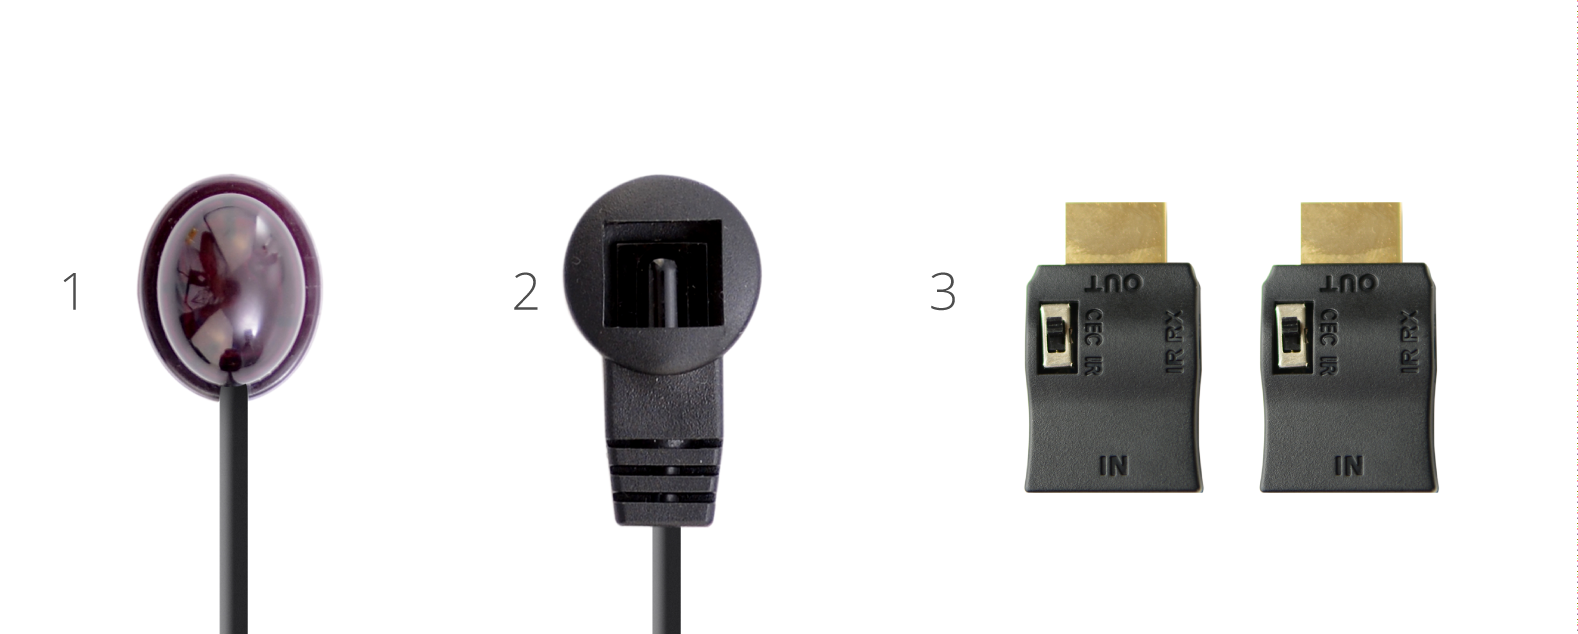
1. IR Transmitter
2. IR Receiver
3. IR Dongle (both labled RX)
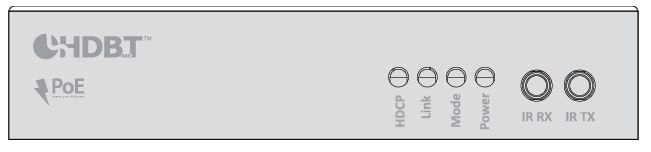
HDCP indictor light – shows whether a handshake between that display and source has been authenticated
Link indicator light – confirms the TV receiver is connected to the hub
Mode indicator light – if flashing all is correct
Power indicator light – Lit when the TV receiver is on
Should you be experiencing difficulty with our RESW50, please read through the support notes below to troubleshoot your installation. If your issue persists and you need any further information or support, you can contact customer services here. A downloadable and printable version of these notes is available here.
When you push a button on one of your remote controls at home, a short burst of infrared light is emitted from it (normally from the top at the front of the remote). This short burst of light contains information about the button you have pushed. When this light reaches your source device (sky box, Apple TV etc) it is interpreted and the function of the button you have pushed (stop, play, pause etc) will be performed.
Products based on HDBaseT are based on one of two groups of electronic chips. The HDBaseT-Pro and HDBaseT-Lite groups. Each has different distances over which it can extend HDMI and this also depends on the type of cable used.
HDanywhere video distribution systems require a single network cable to be run from each HDTV location, back to a central point. Some single wire systems use HDBaseT technology to transmit over 1 x Cat5e/6/7 cable up to a 100 / 328 ft metre distance.
This article is designed to give you a good overview of the standard of wiring needed for a HDBaseT system. For a detailed, official set of guidelines issued by HDBaseT click here.
Using multichannel 5.1 / 7.1 amps AVR with matrix systems
Essential Knowledge
To understand how multichannel (5.1 / 7.1 etc) audio/sound is routed via a HDMI or HDBaseT matrix system, it is important to firstly acknowledge that all HDMI source devices (Blu-ray players, set-top-boxes, media servers, PCs etc) can only output a single audio format type at any one time. This is a limitation of HDMI itself.
For example, the HDMI port on a Blu-Ray player cannot simultaneously output HDMI with 2.0ch stereo as well as HDMI with 7.1 DTS Master audio. It is always one or the other.
With only displays connected to the matrix
When a matrix has only displays connected, with no AMPS/AVR in your set up, routing audio is relatively easy. This is because displays generally only have two speakers, and so a single HDMI format of HDMI+2.0ch can be routed to all displays. This gives you video and audio at every display.
Adding an AVR/AMP the matrix
When adding an AMP/AVR to the connected device mix, you are adding a component that can accept a multichannel audio format, such as 5.1 or 7.1.
You now have a situation whereby some connected devices (displays) can only accept HDMI with 2.0ch stereo and some (the AVR/Amp) can accept HDMI with multichannel audio.
What to expect in a mixed display / AVR setup
Video matrixes operate on a “lowest common denominator” rule. This means that the matrix will exchange information with your displays and AVRs to decide on the format of audio to get from the source device; choosing the format that will ensure audio is output in all of your locations.
One of two things can happen: If the AVR is turned on first and the matrix set to send a source capable of multi-channel audio to the AVR, the source will deliver multi-channel audio to the AVR. If a stereo TV is then turned on and the matrix then set to send the same source going to the AVR to the TV, the TV will be unable to play back the multi-channel audio. The result would be no sound from the TV.
In the reverse, if a TV is turned on first and the matrix is set to send one of the connected sources, the source will deliver stereo audio to the TV via the matrix. If the AVR is then switched on and the matrix set to deliver the same source going to the TV, the AVR will only receive stereo audio.
It is important to re-iterate, this is not a product limitation of HDanywhere matrixes. This is a limitation of HDMI technology itself and its specification.
A solution is therefore required whereby the source device always sends multichannel audio to the AMP/AVR and 2.0ch stereo audio to the displays.
Solution options
There are many ways to solve this problem. Some complicated, some easier. Things will depend on the location of your equipment and the number of AVRs. We are always happy to help you build a specific solution that meets your setup. Here we can only cover some of the more common setup examples and a single solution to those.
I have a single AVR located beside / local to my source devices and the matrix e.g. in a cupboard / AV rack.
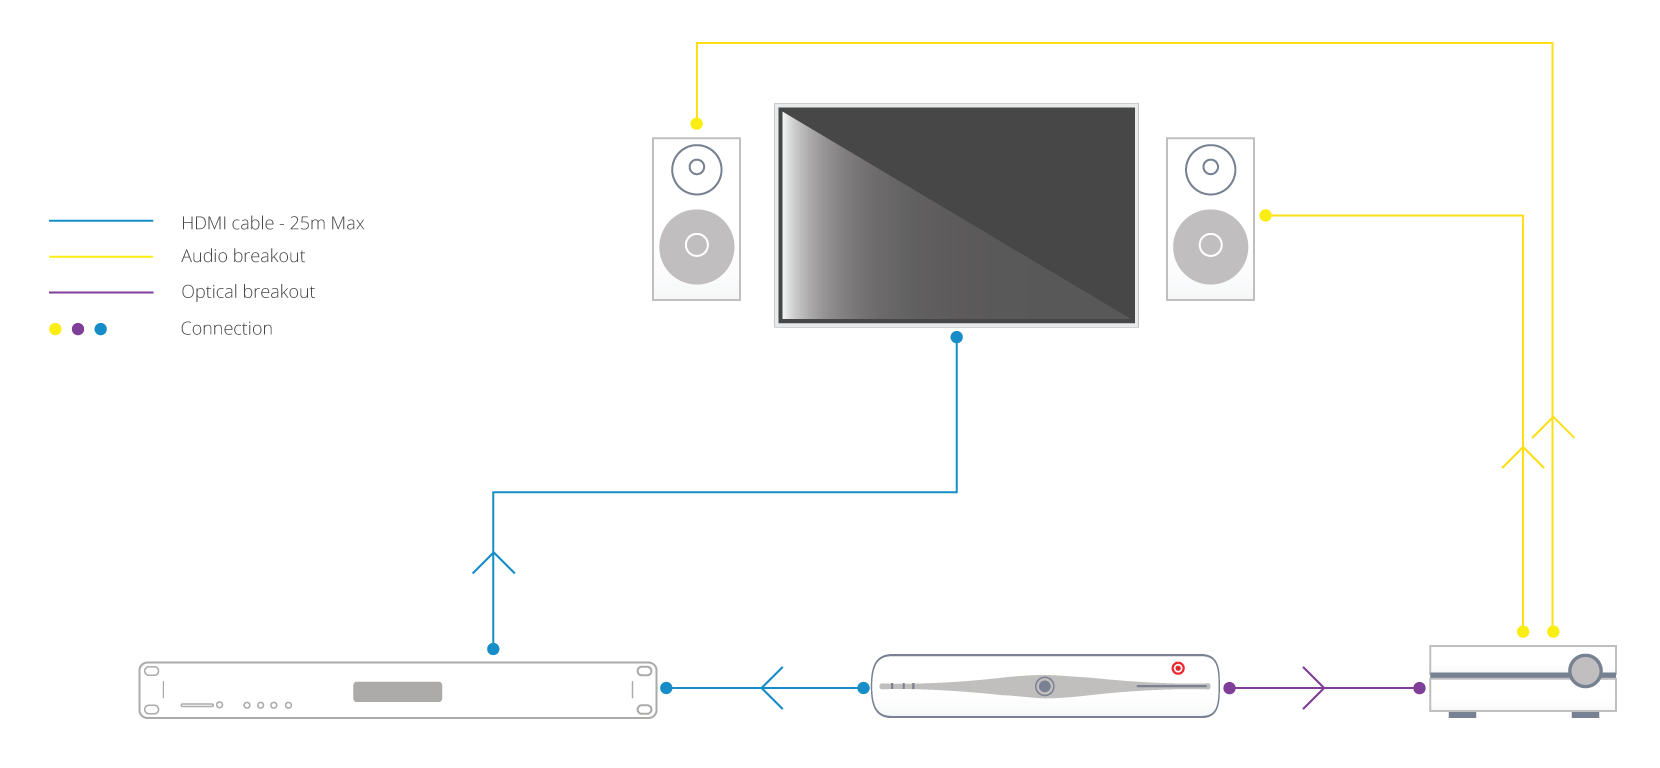
In this type of setup, where the AVR for the multi-channel room is located with the sources and matrix itself, one solution is to deliver the audio to your AVR via alternative connectors to the HDMI where possible. For example, Sky HD boxes and Blu-Ray players usually have a digital audio output that can be connected to the AVR** via optical cabling. This can deliver multi-channel audio to the AVR over the optical cable, whilst the HDMI output from the source device can deliver 2.0 ch stereo audio to your matrix and therefore your other TV (stereo) locations in your setup. If this setup is located away from the room with multi-channel speakers fitted, say an under-stairs cupboard, there are solutions to keep IR control of your AVR that we can help with.
AVRs located in the room with the displays
In this type of setup, where AVR(s) are located in the rooms local to the displays, make sure the HDMI device is set to output 5.1 / 7.1 channel audio. This audio format will be sent over the Cat cable to each display location. In order to get audio out of your HDTVs (in say three rooms) and the AVR (connected to HDTV in a fourth room), some additional hardware is needed. HDanywhere sell a signal manager. Place 1 x signal manager at each TV that needs 2.0 channel audio aka. each TV that does not have an AVR. Use a HDMI cable to connect the HDMI output port of the matrix’s display receiver to the HDMI input port of the Signal manager. Then use another HDMI cable to connect the HDMI output port of the Signal Manager to the HDMI port on the HDTV. So, the Signal Manager sits in between the display receiver and the HDTV.
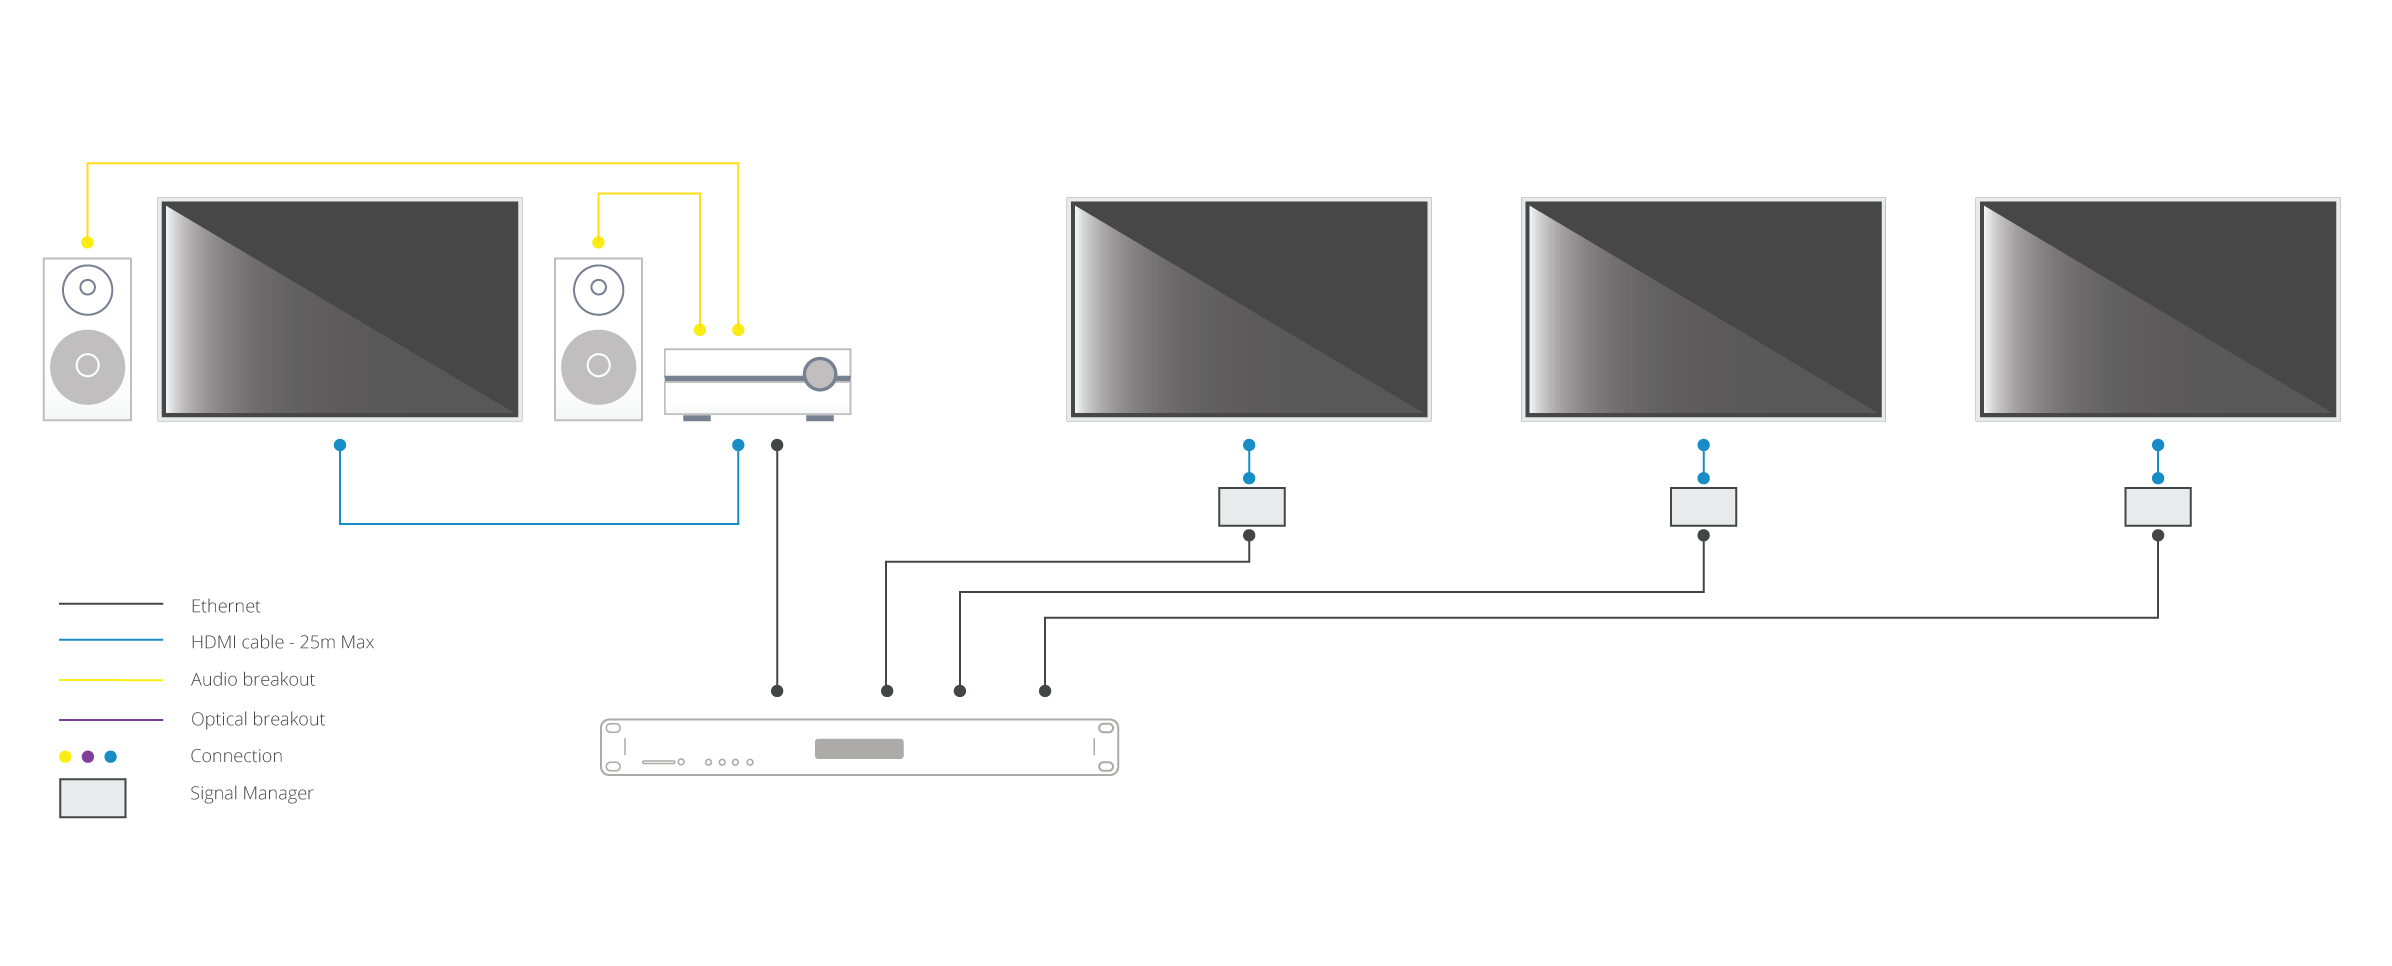
The Signal Manager has a box labelled “Audio”. The little switch on this audio section needs toggled to number 2: LPCM 2.0 before you connect up and turn on all your HDMI source devices and displays. Do not switch toggle the switch from no. 1 to no. 2 whilst displays and HDMI sourced devices are on. If you do so, you will need to power down the re-power all source devices and displays.
Once the signal manager is set up and in place it will take 5.1 and output it as 2.0, ready to be accepted and then output by the HDTV. This should hopefully resolve your issue and deliver 5.1 to your AVR and 2.0 to your HDTV.
Notes:
*Multichannel audio via HDMI includes the following formats: LPCM, Dolby Digital, DTS, DVD-Audio, Super Audio CD, Dolby Digital Plus, Dolby TrueHD,DTS-HD High Resolution Audio, DTS-HD Master Audio, MPCM, DSD, DST
**When using alternative audio connectors other than HDMI, support for DTS-HD Master Audio and Dolby True HD is lost.