Asides

  • Creating a Function in uOS

    If your HDA device has uControl, you are able to use Functions which allow you to manage the on/off, up/down, mute/unmute and open/close state of your devices and include them into your sequences.


    In this support article:


    Creating a Function in uControl

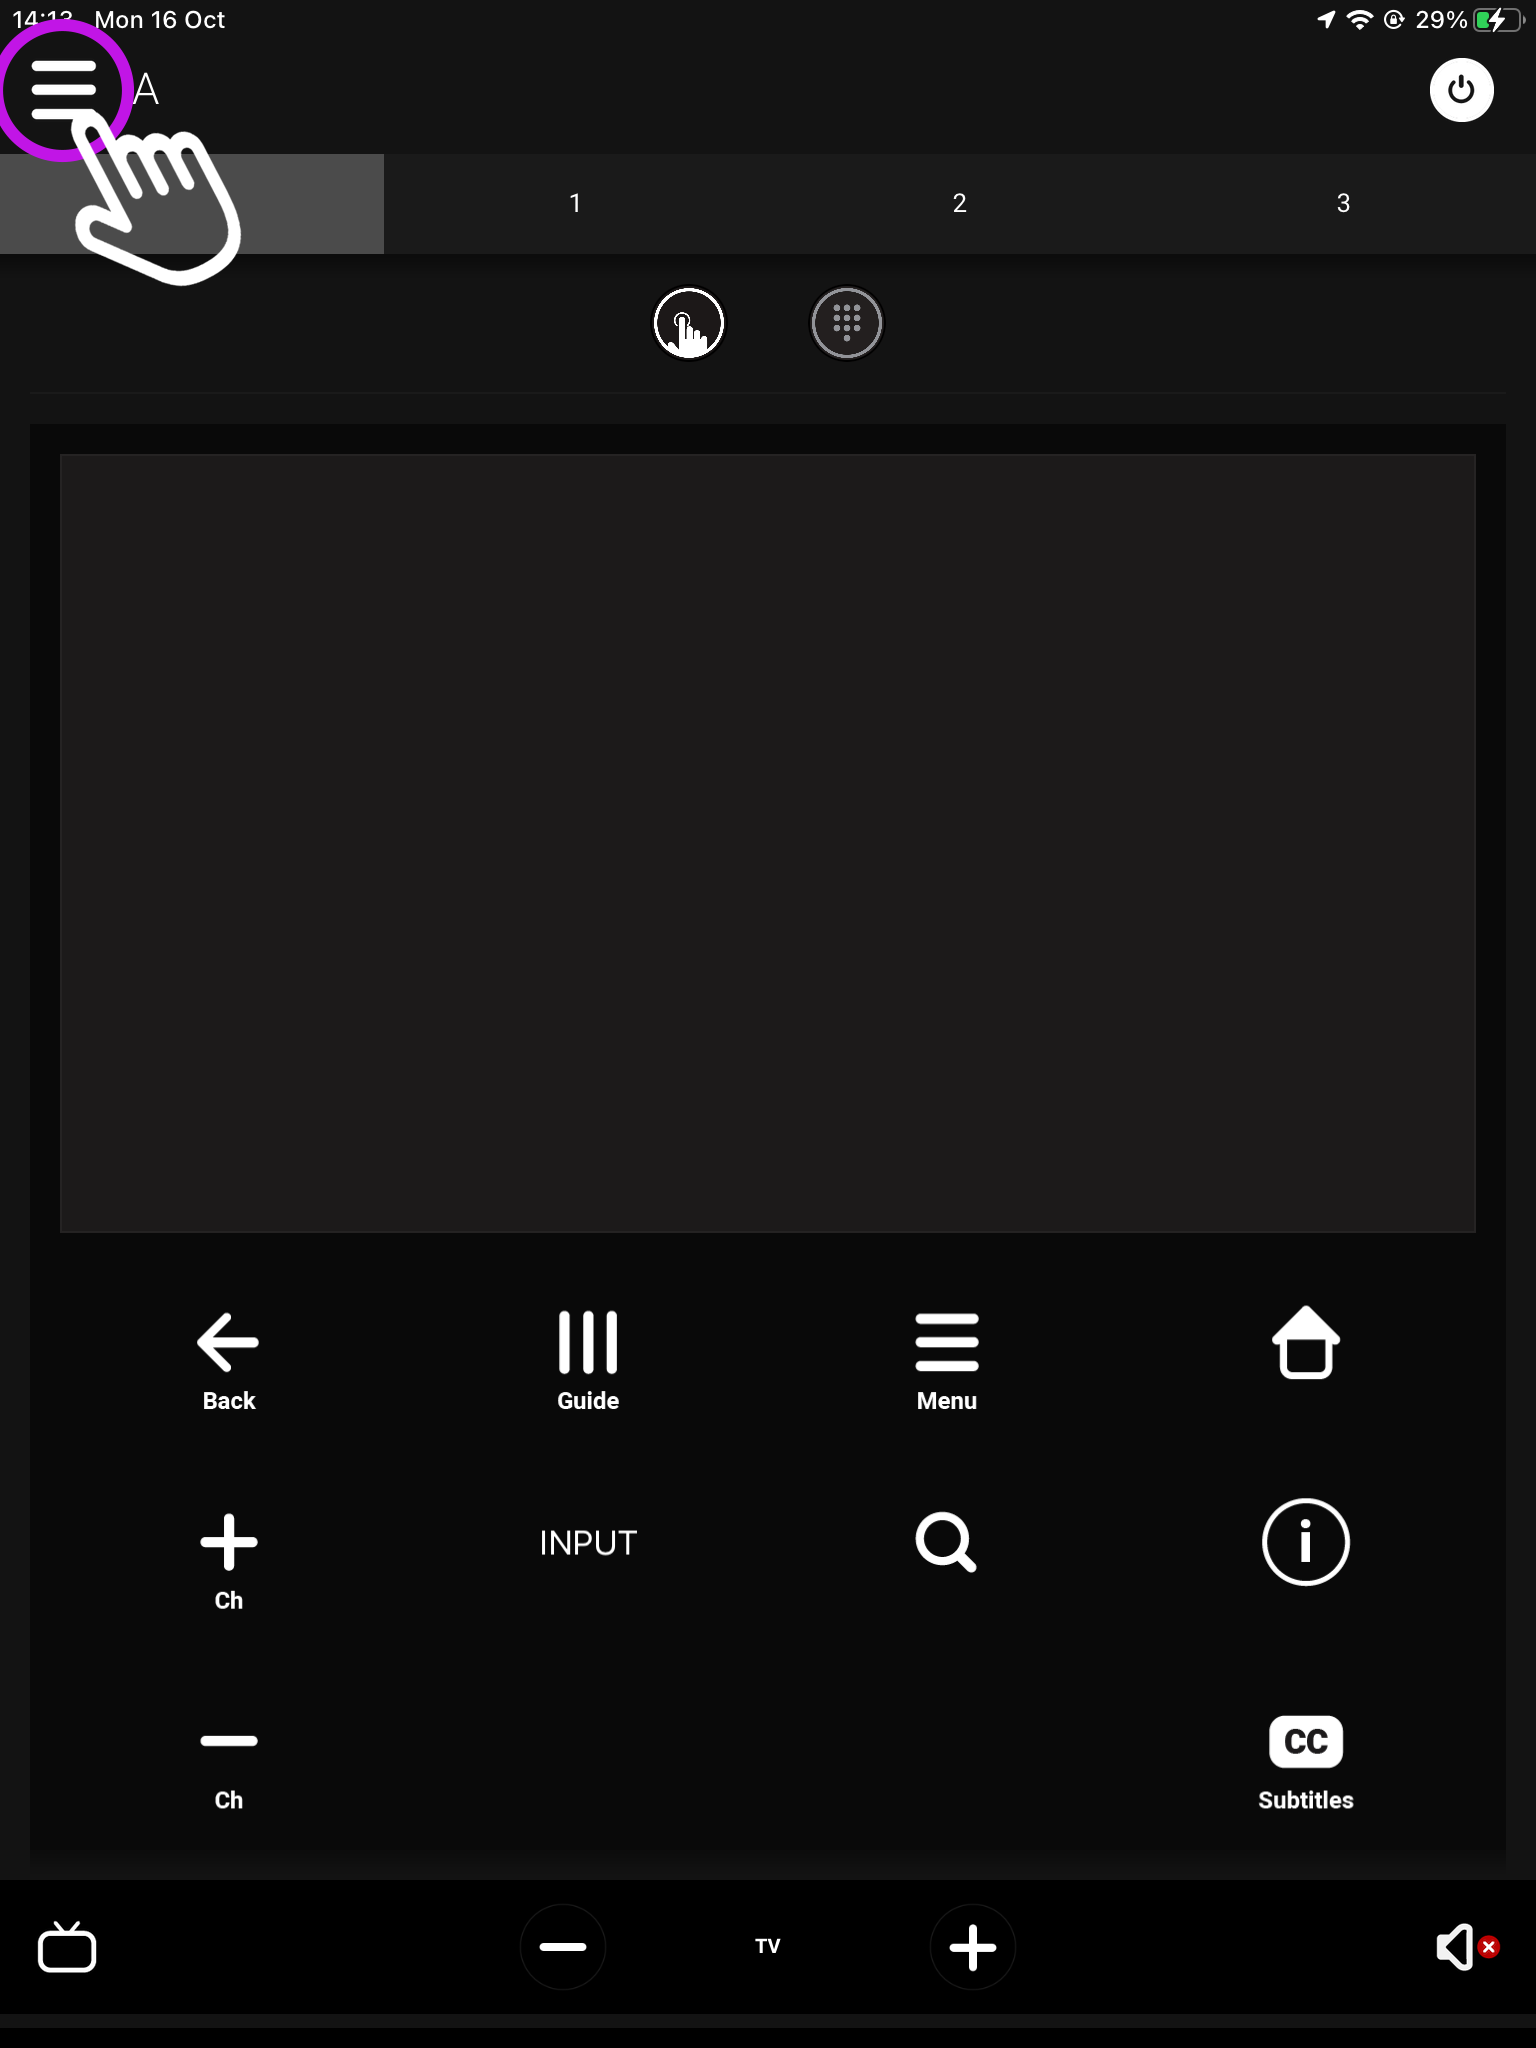
    1. Open uControl

    From the main screen navigate to the menu in the top left.

    What you see on the main screen may differ, however, the three lined menu bar will still be there.

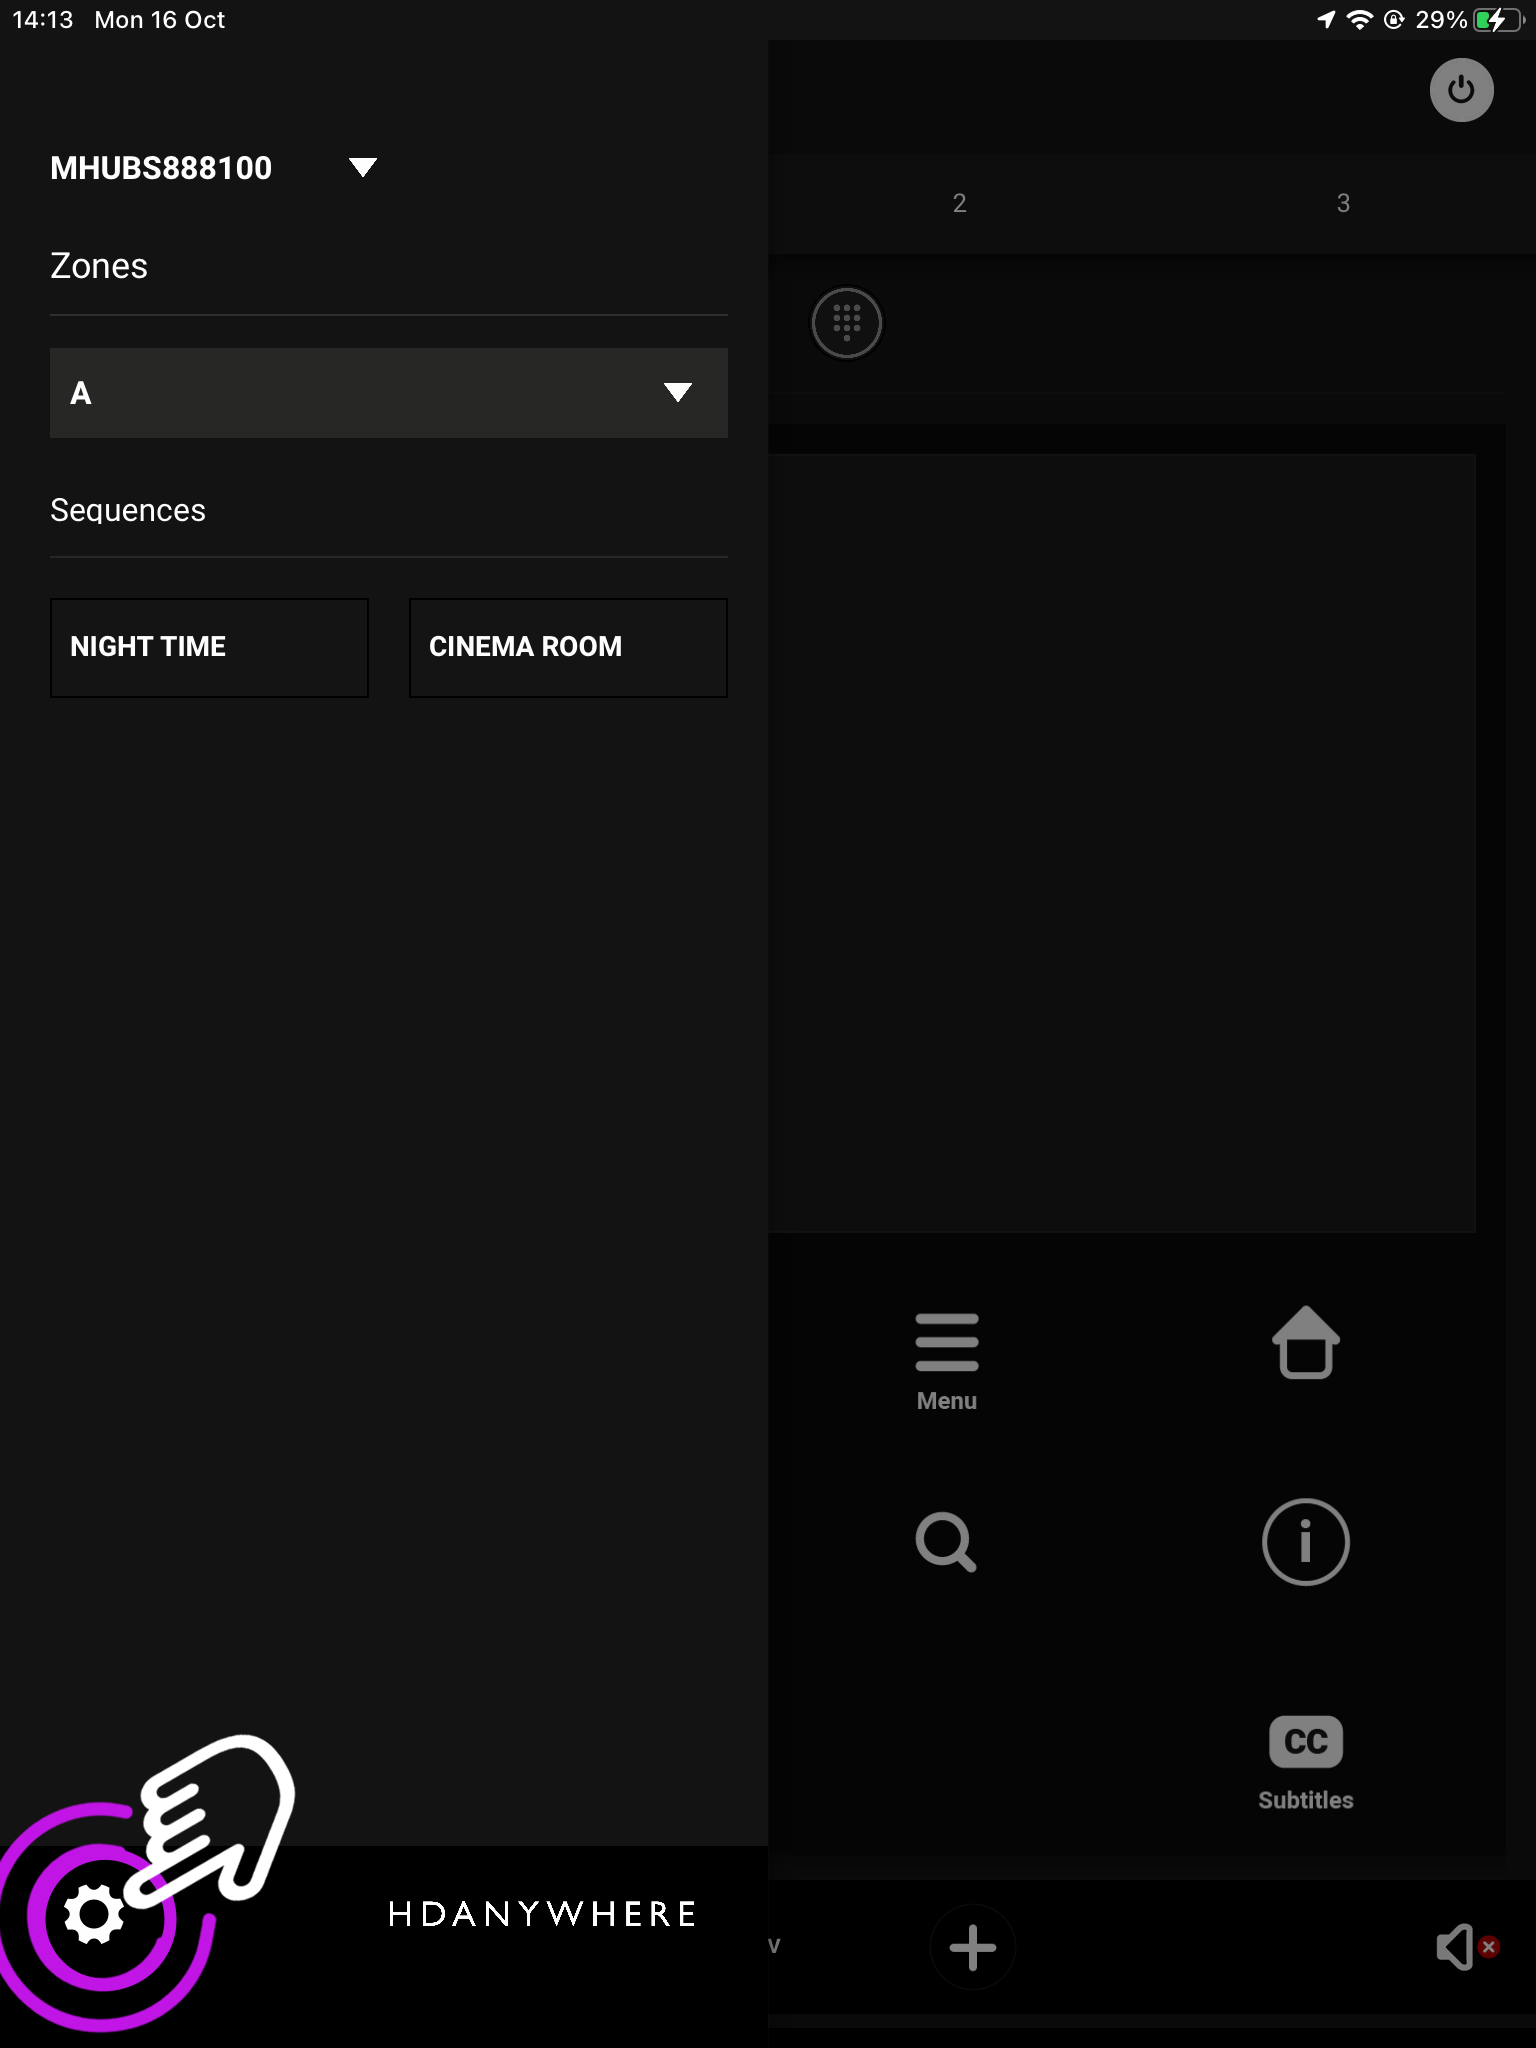
    2. Navigate to your settings

    Look for the settings icon located in the bottom left corner.

    The icon may vary depending on your mobile devices size, although it will still be in the bottom left corner.

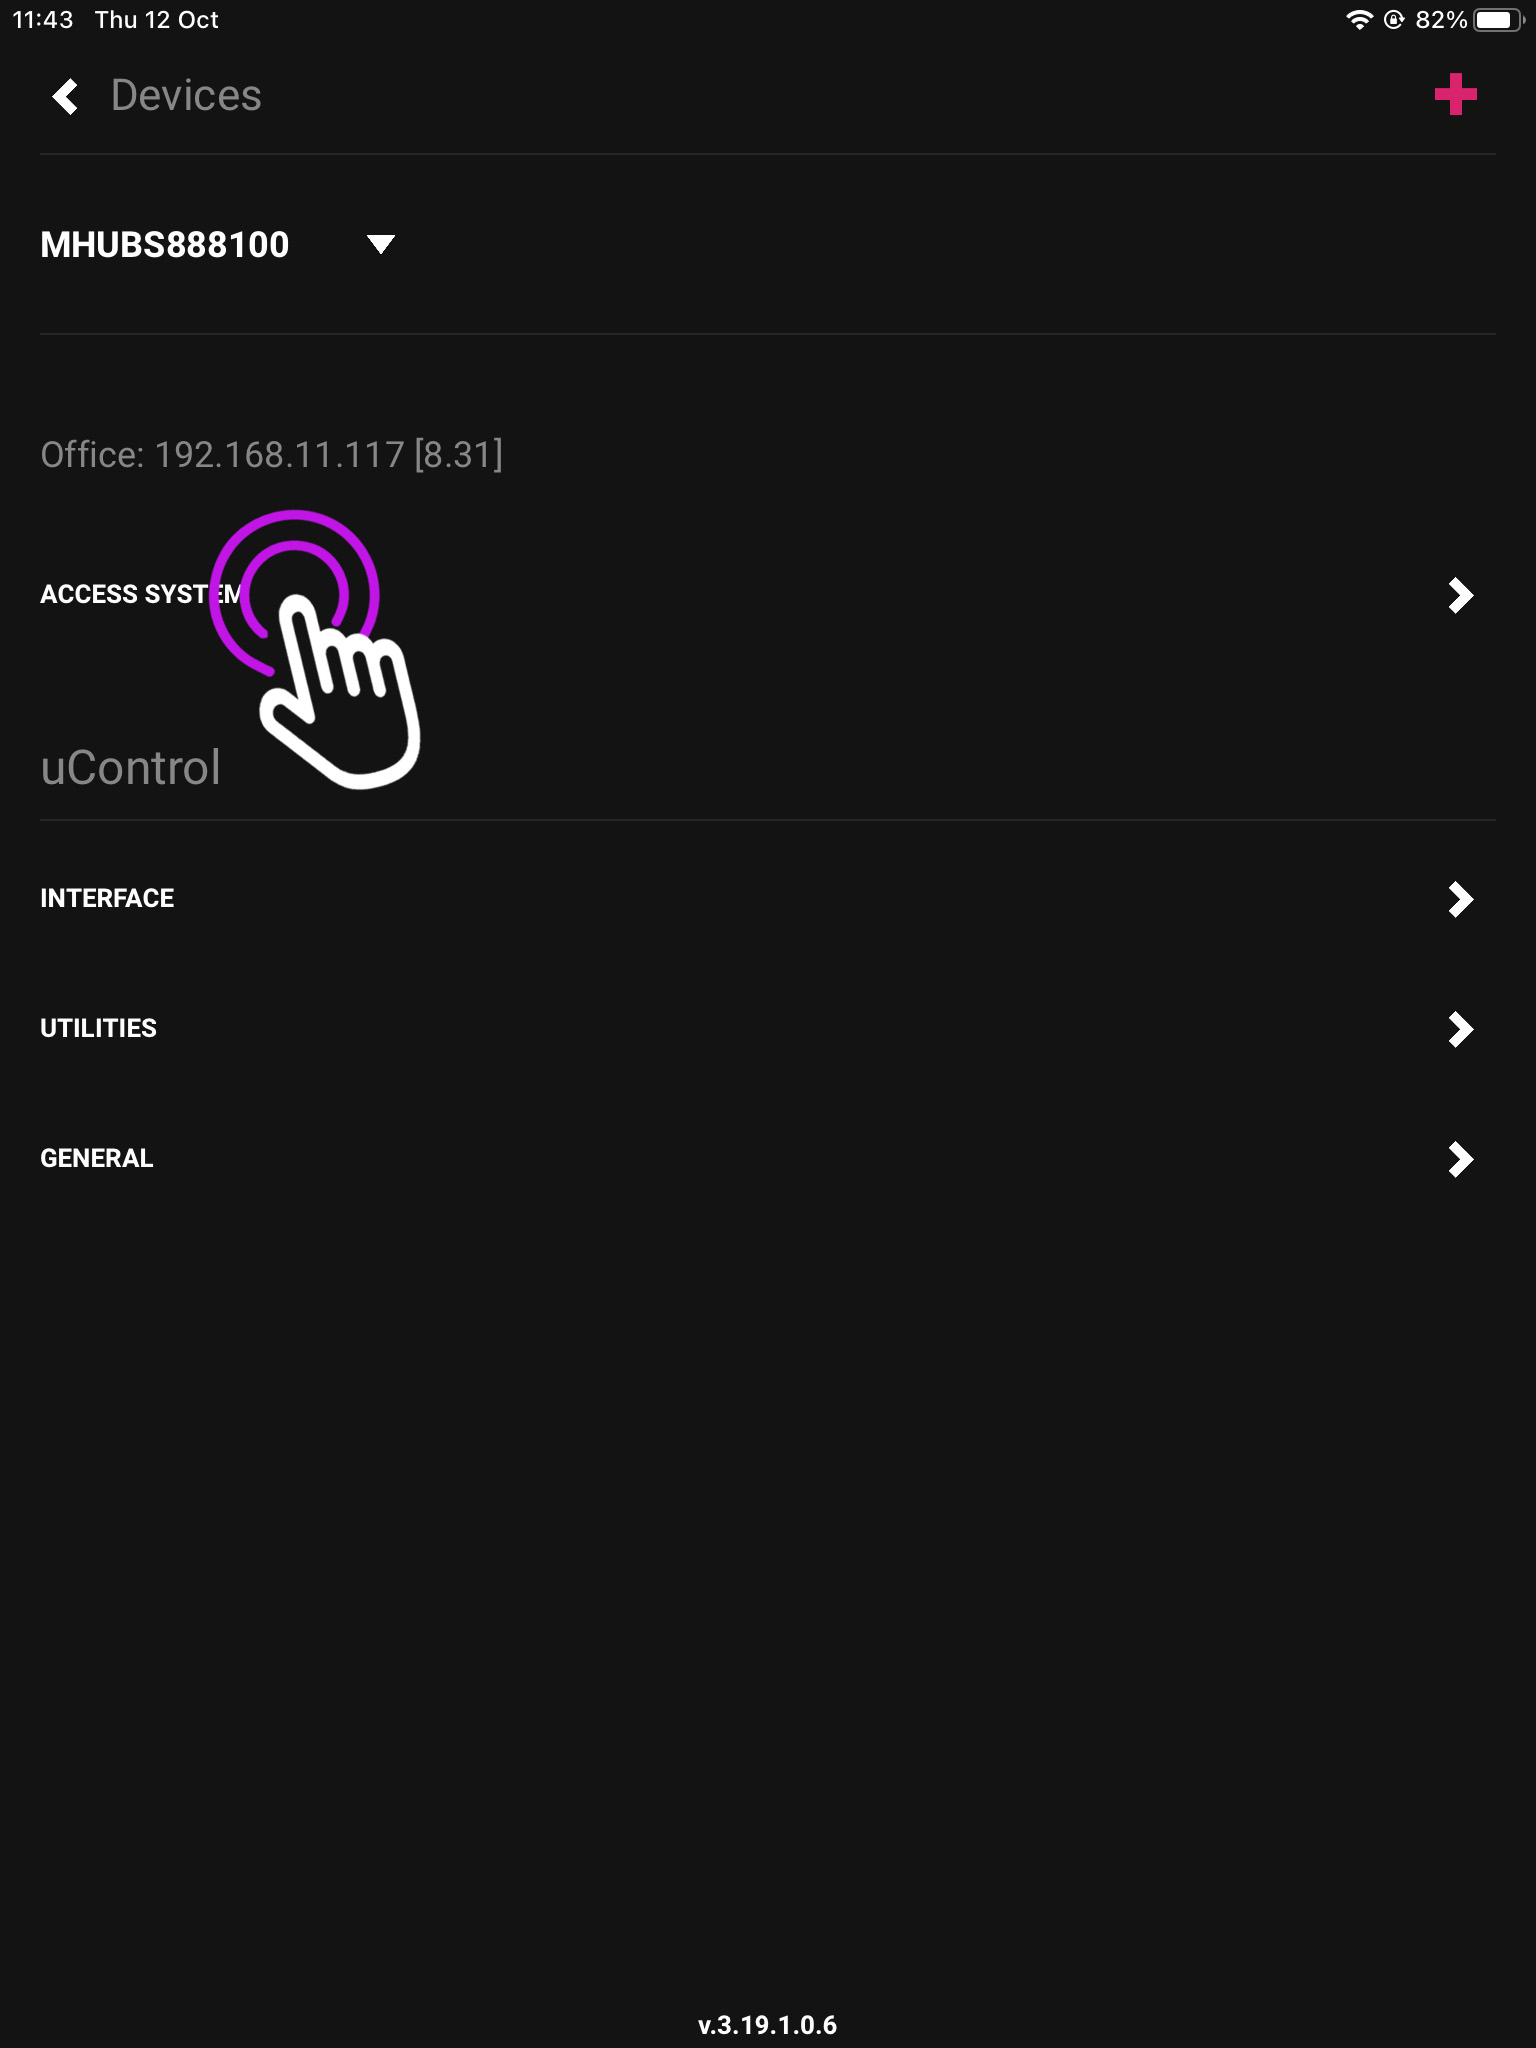
    3. Access system

    From here press “Access System”.

    This is your device page which displays your units model and IP address.

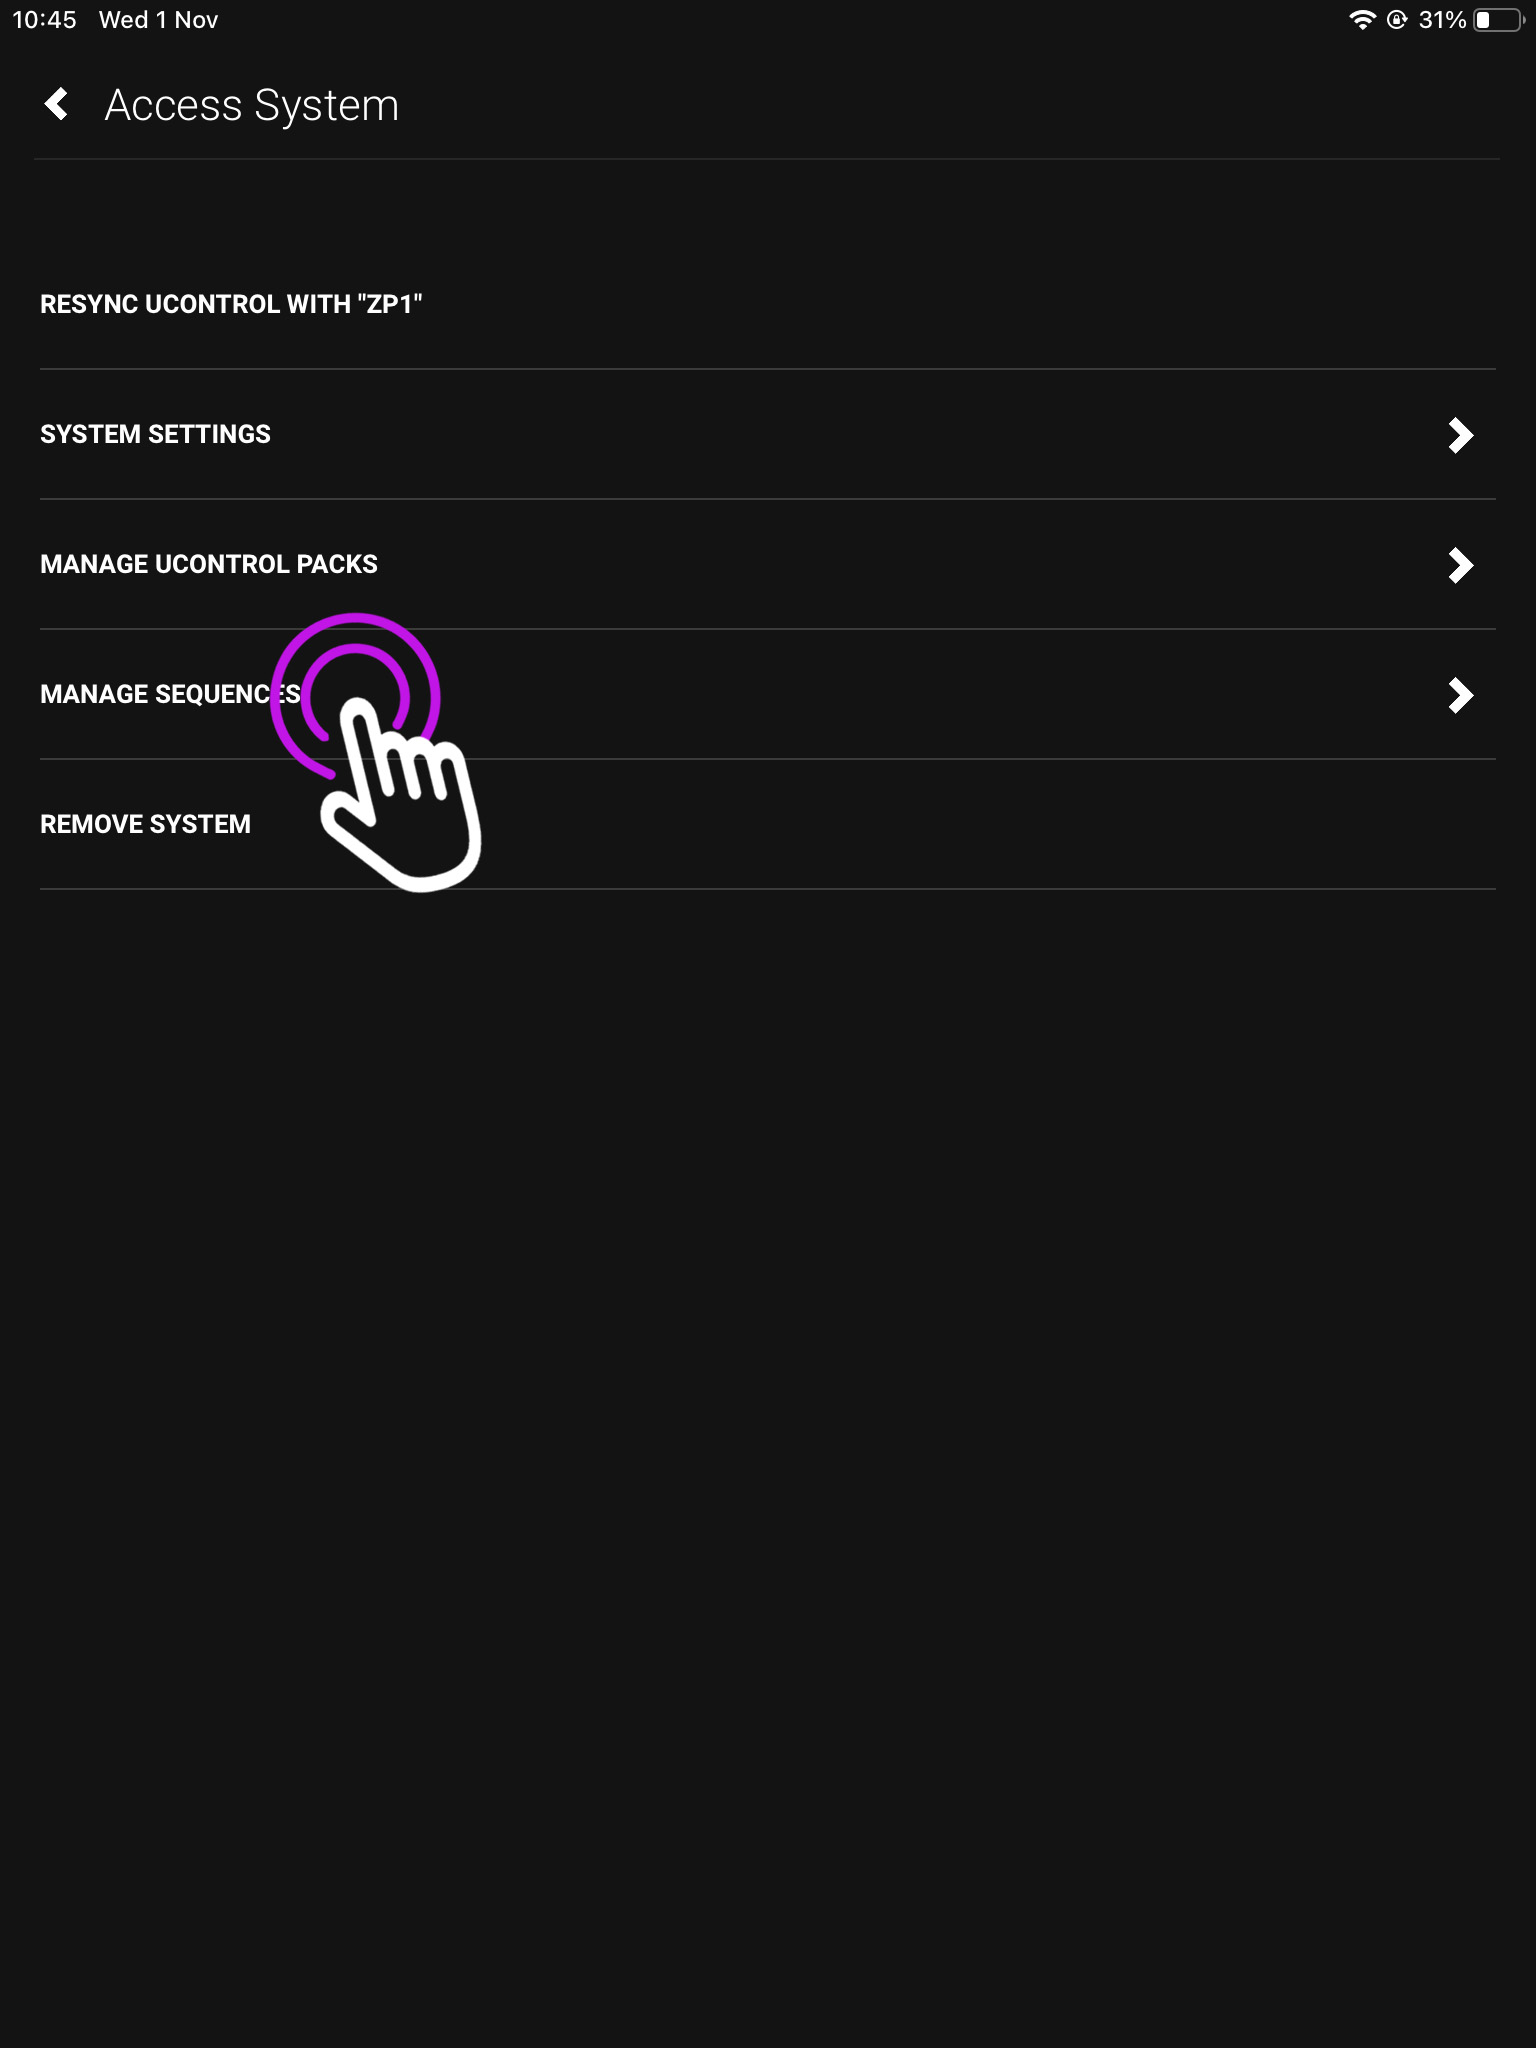
    4. Sequences

    In this menu press “Manage Sequences”.

    This will take you to the page where you manage both Sequences and Functions.

    5. webUI

    The webUI can also be easily accessed by typing you devices IP address into a website URL.

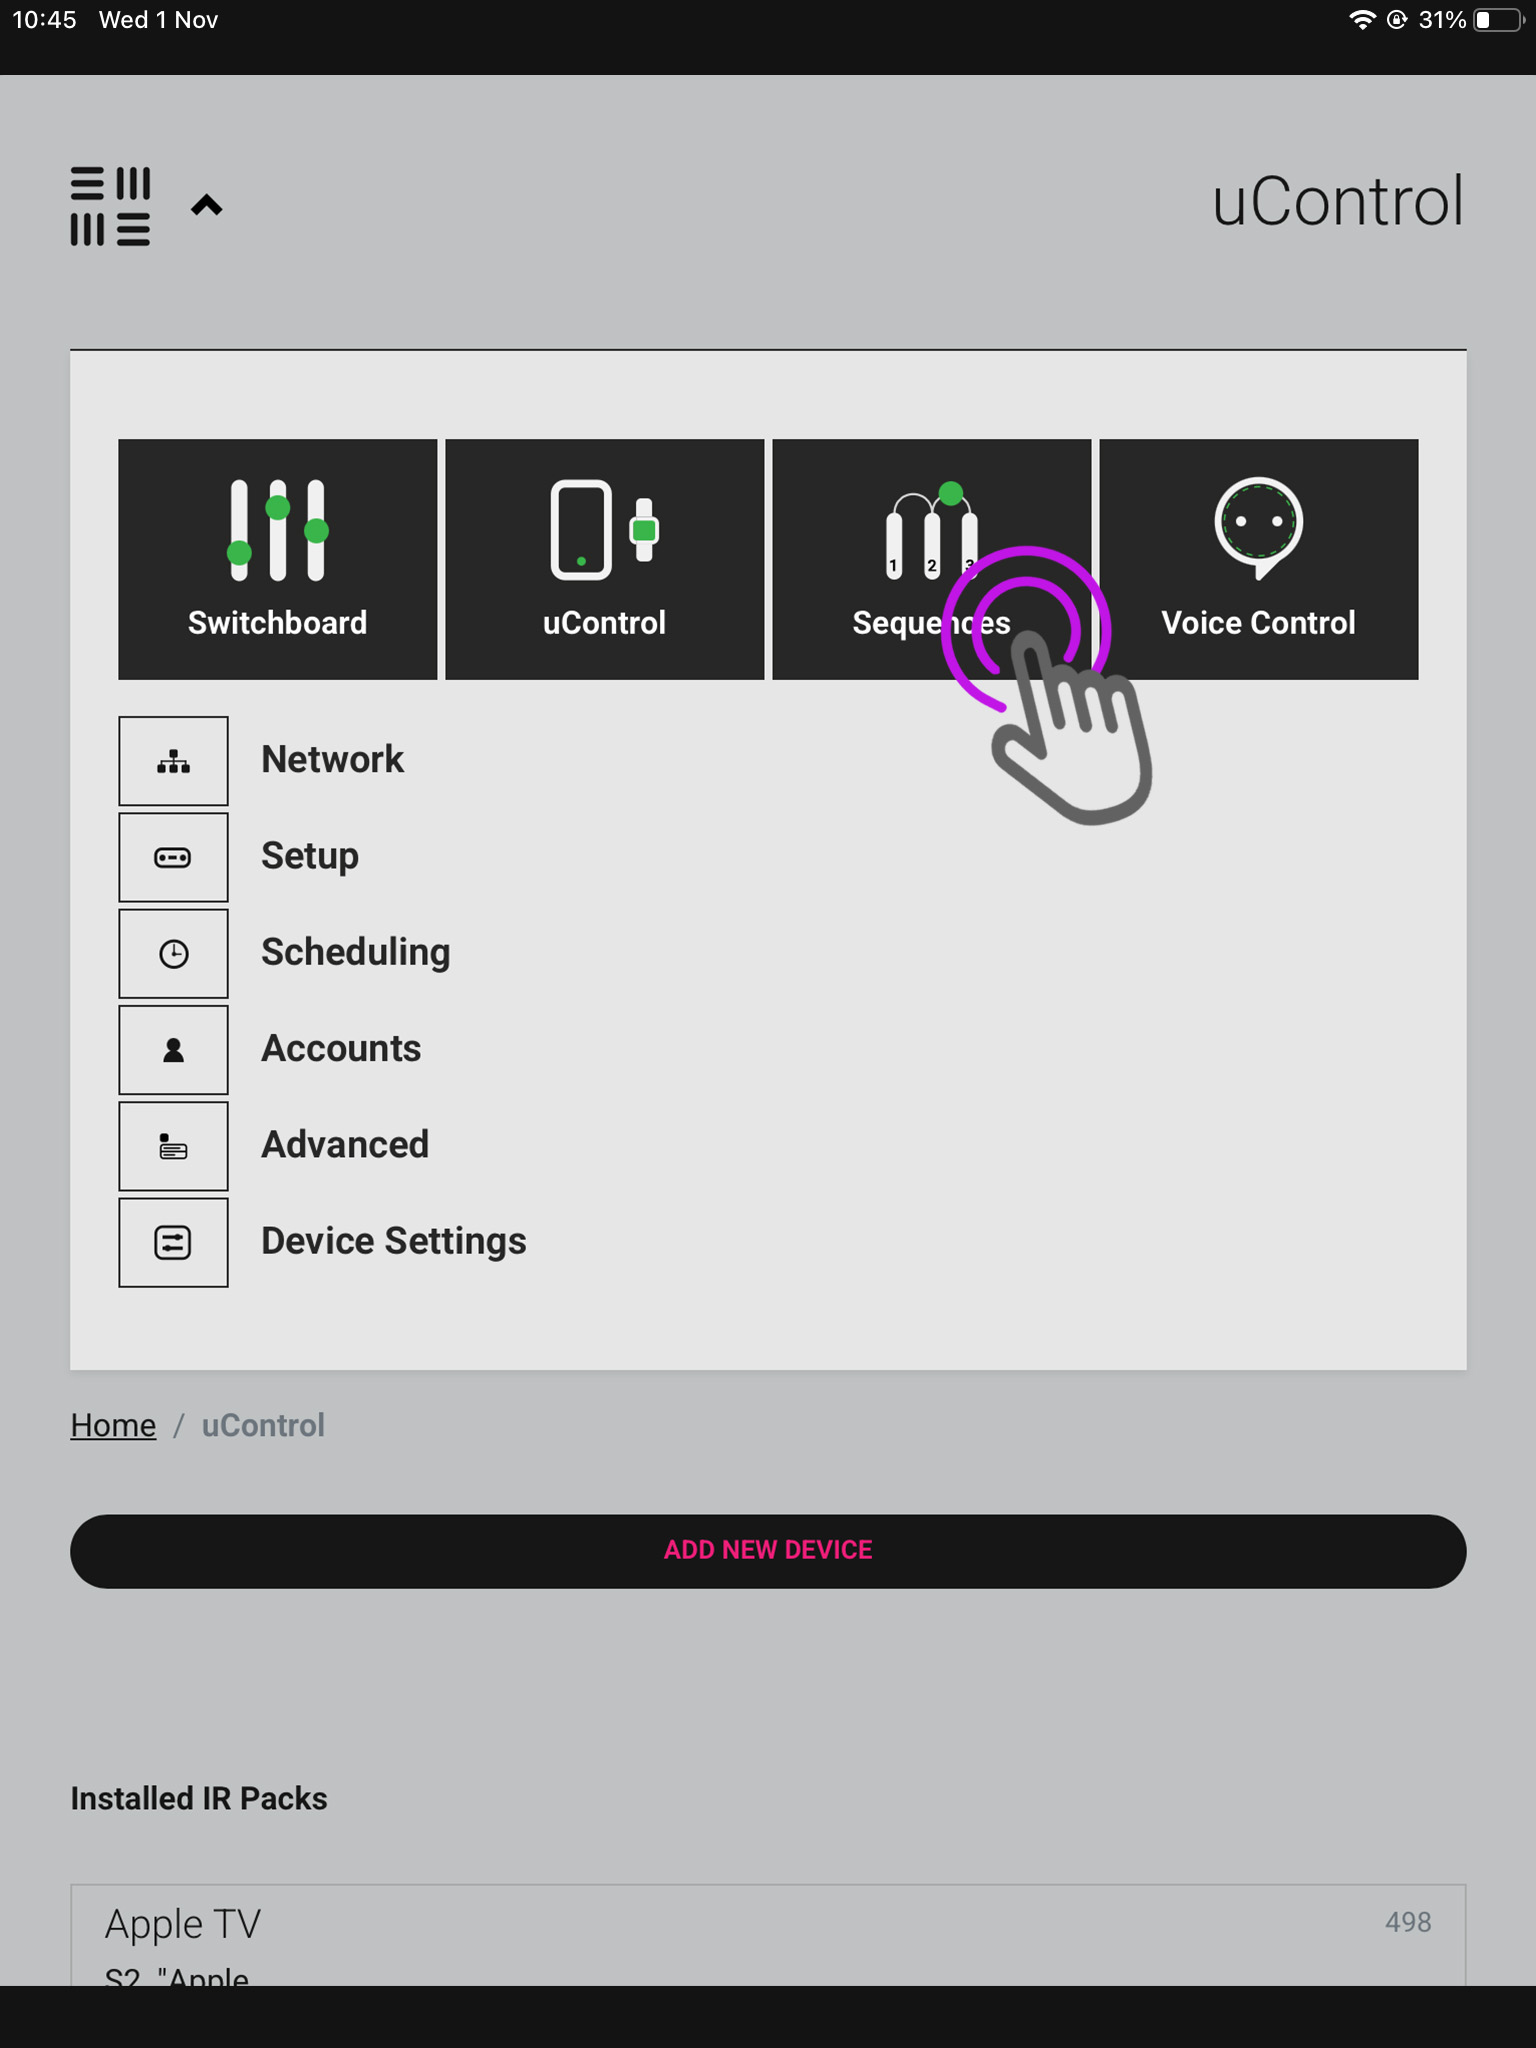
    You will be taken to the uOS home page, open the menu in the top left and select “Sequences”.

    6. Add new

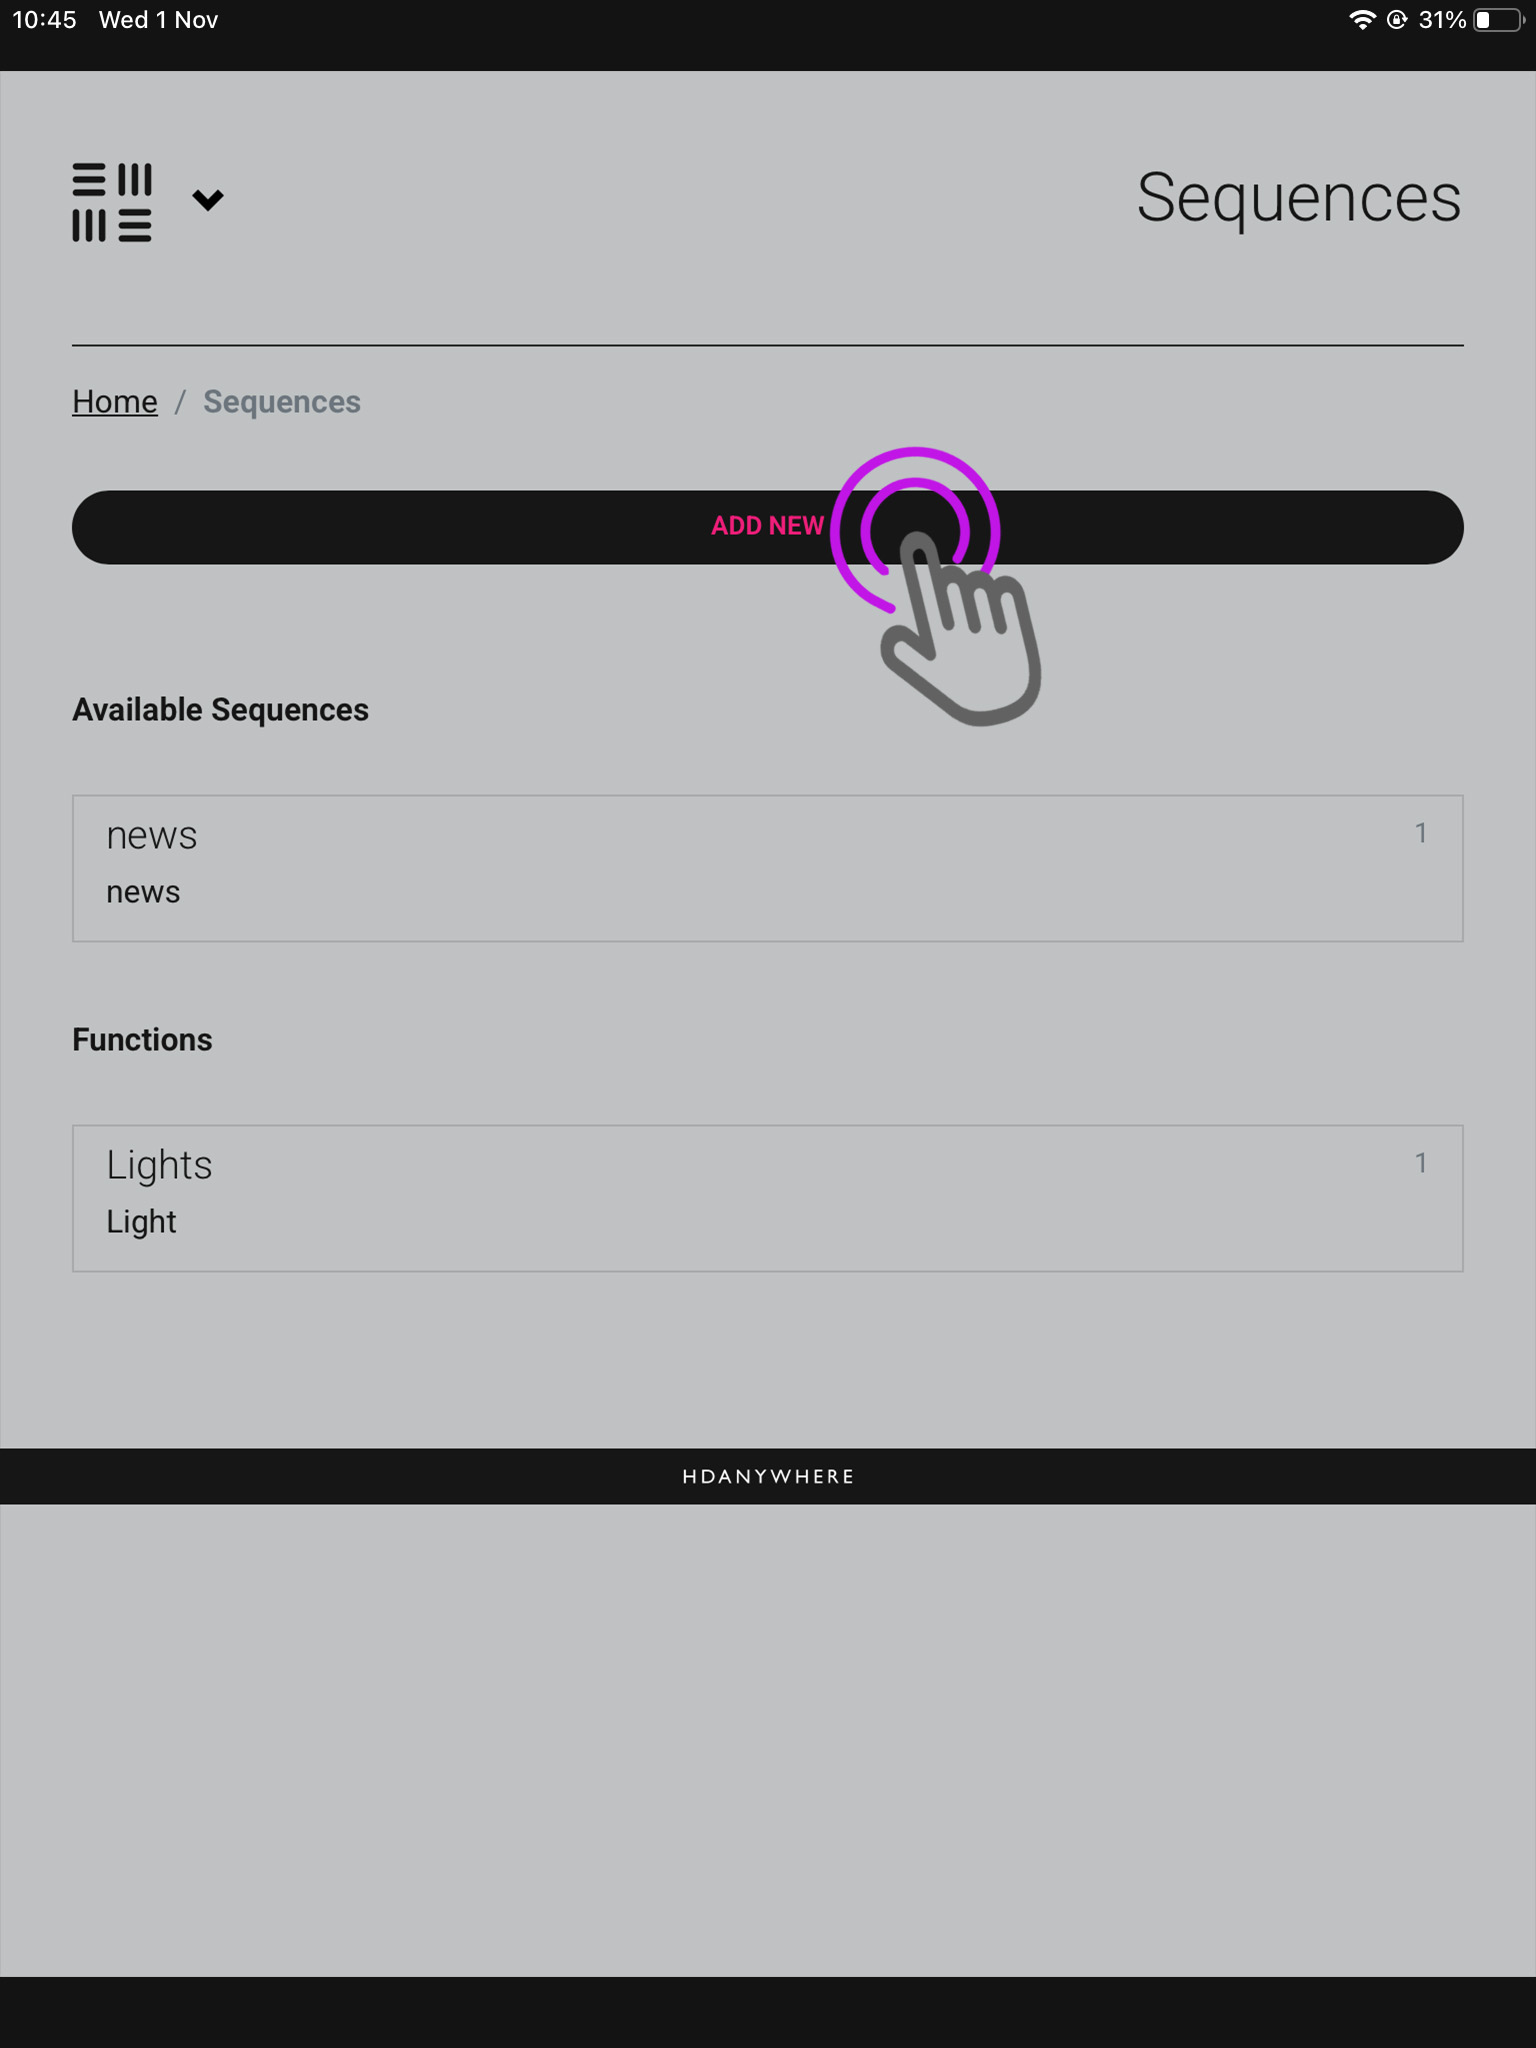
    We are now in the sequences page where you can see your available sequences, and current functions. Press “Add New”.

    A pop-up will appear asking if you’re creating a Function or Sequence, choose Function.

    7. Functions

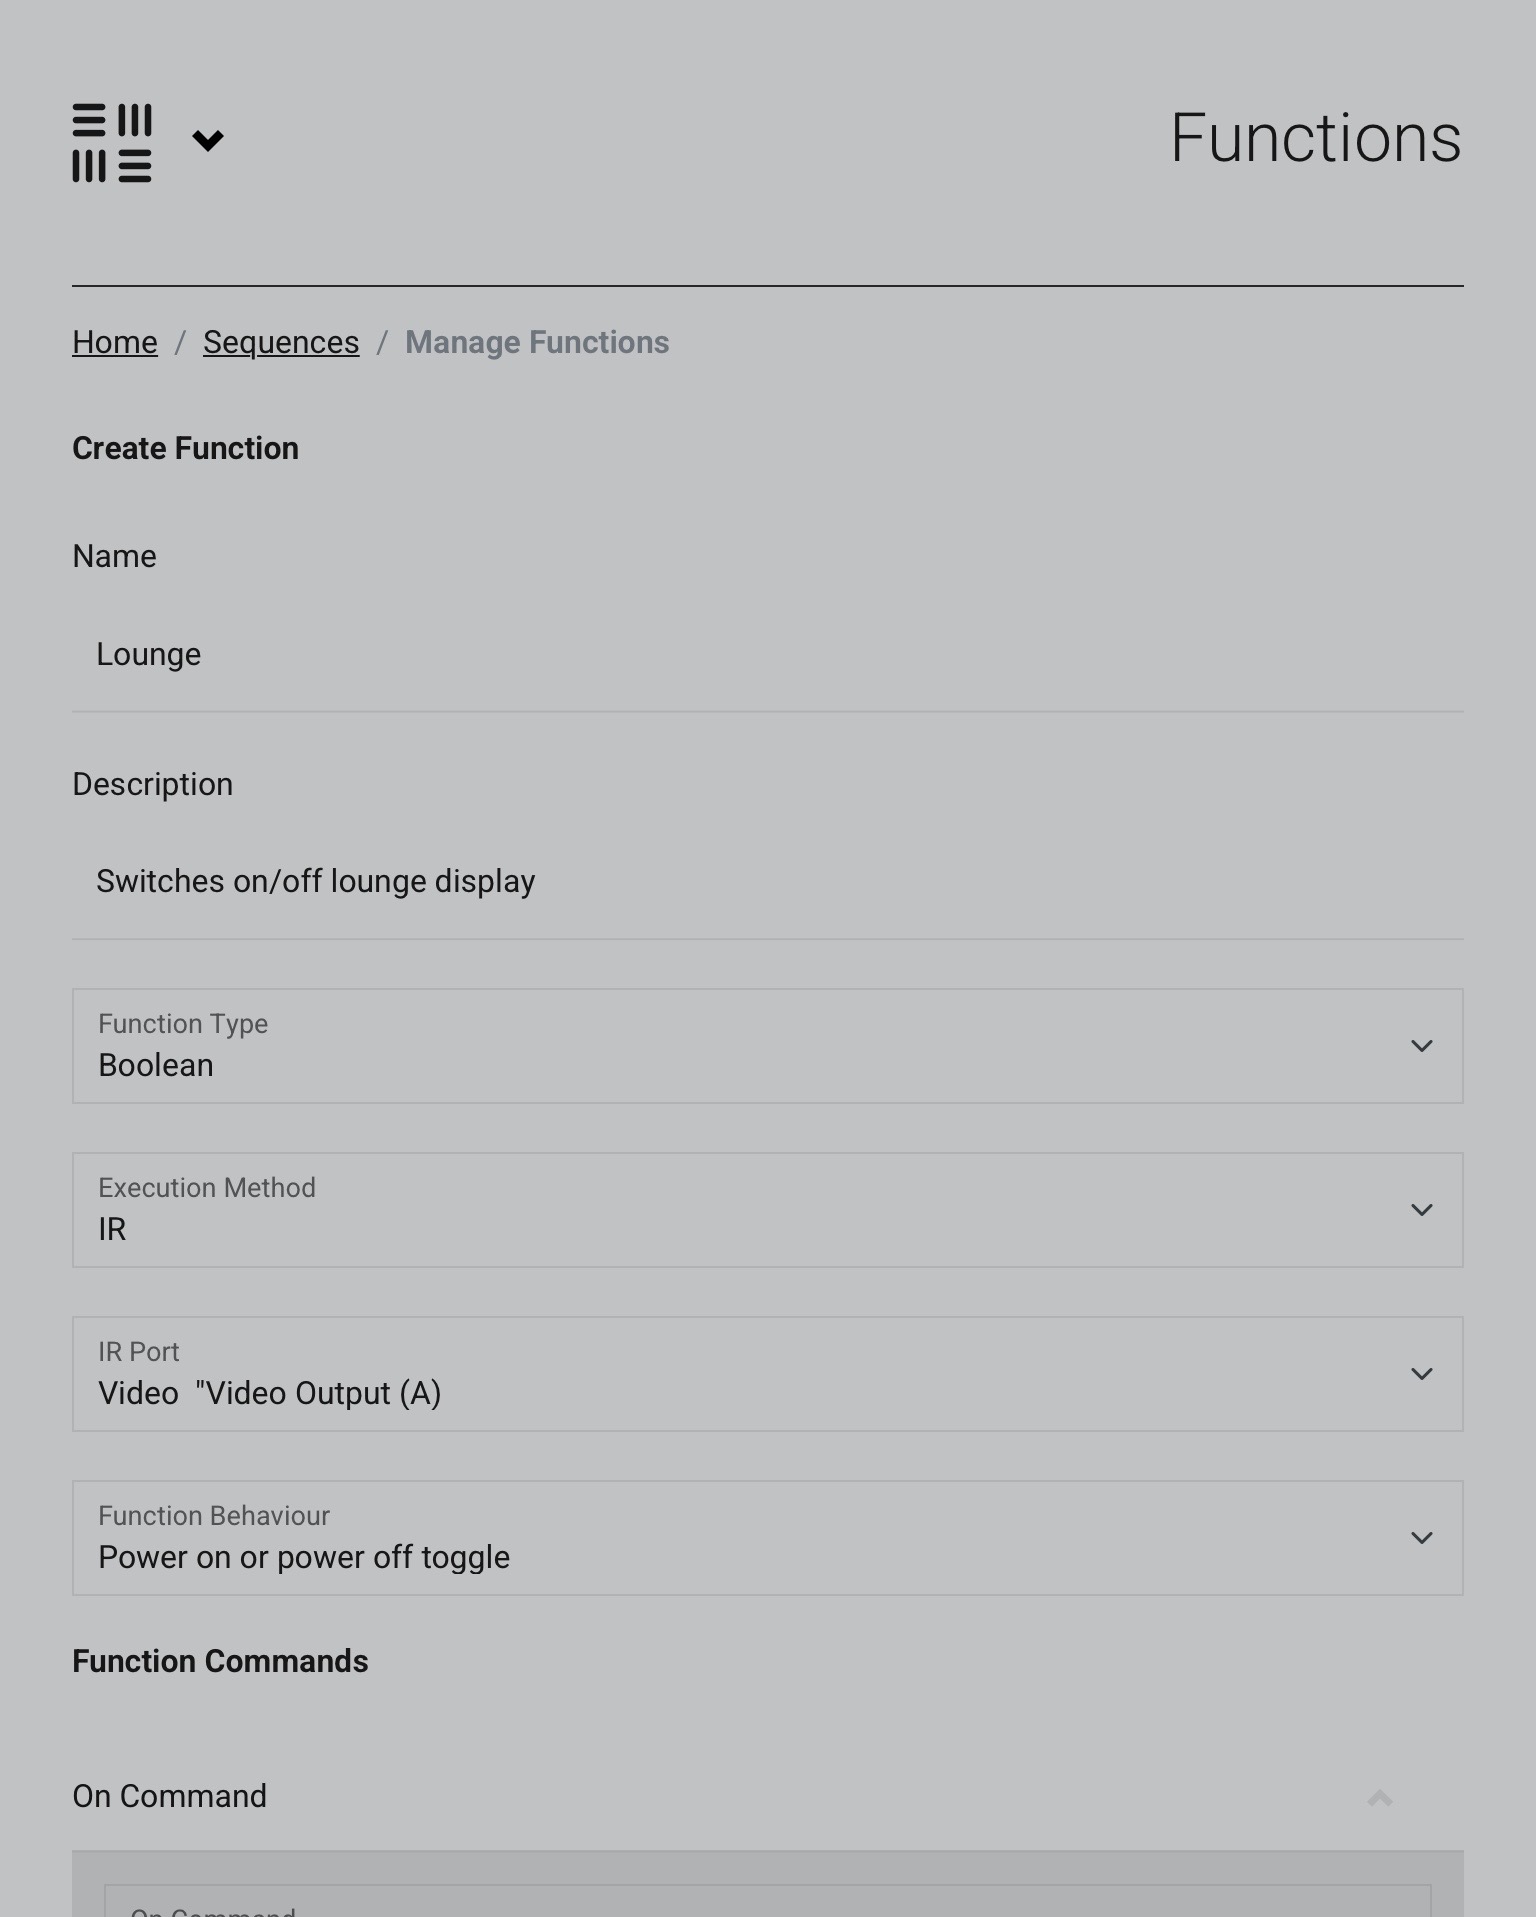
    Now we need to create your Function.

    In this page label what your Function does, choose Boolean and whatever method you have been controlling this device by (in this case IR), and then the port at which the device is plugged into along with the command you wish to execute.

    8. Zone selection

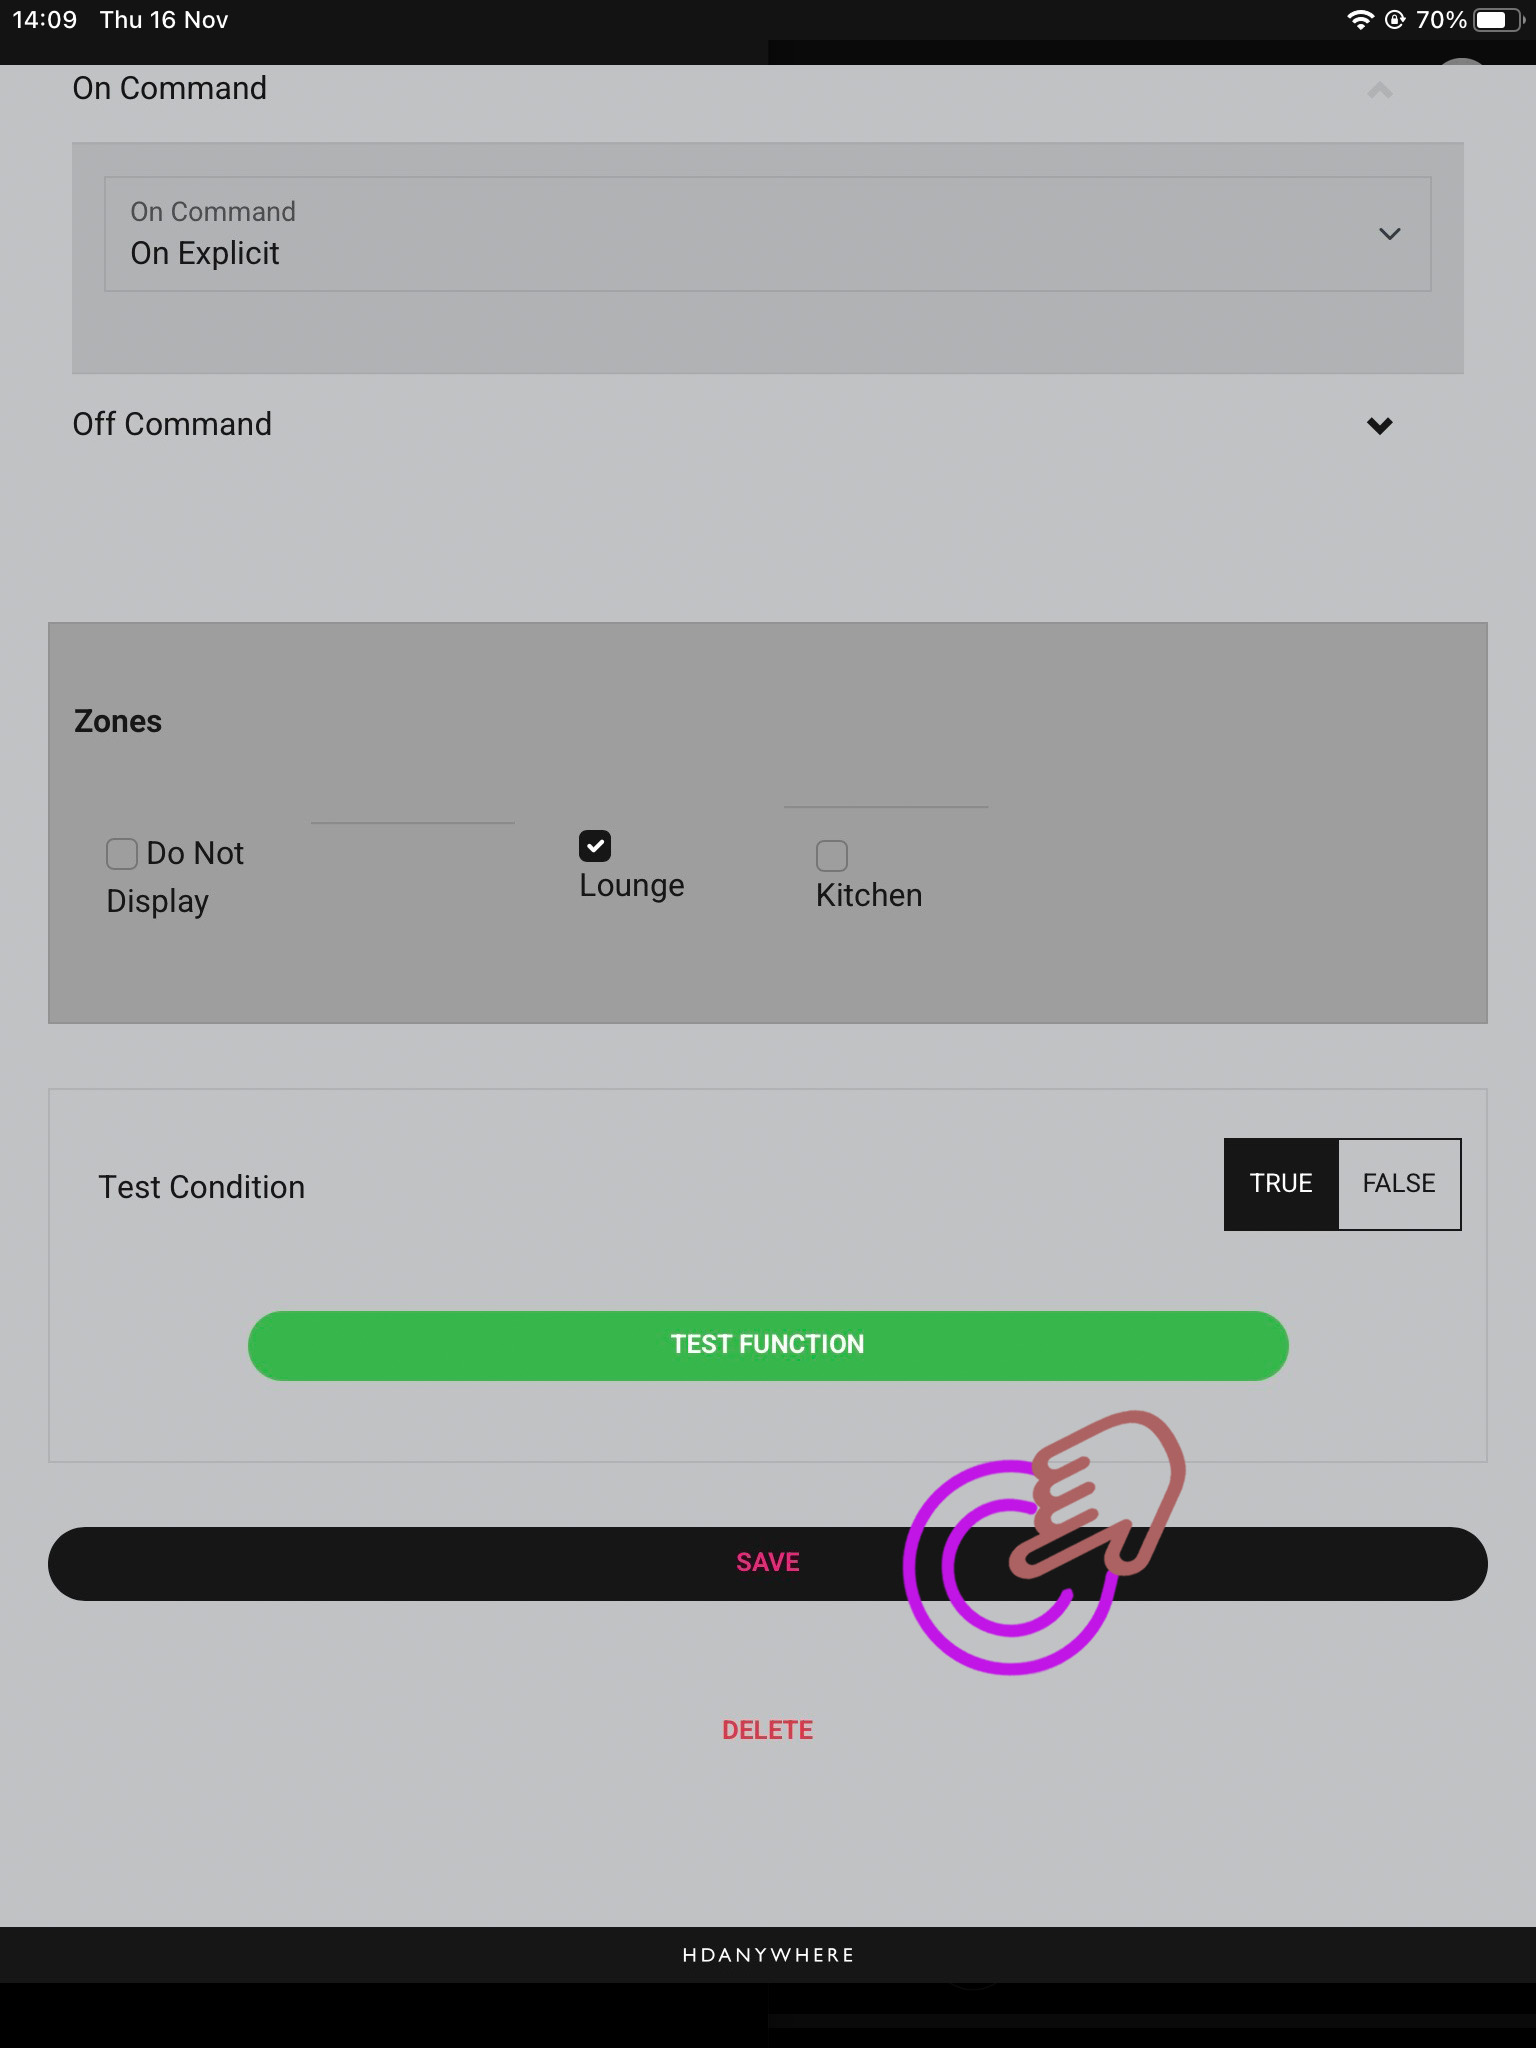
    Certain zones won’t require your Functions to be present in them as the devices you’re controlling are in another room, so select which Functions are required where appropriate.

    As the method is Boolean, there will always be an on and an off command which can be toggled by pressing the Function in the app.

    9. Activating your Function

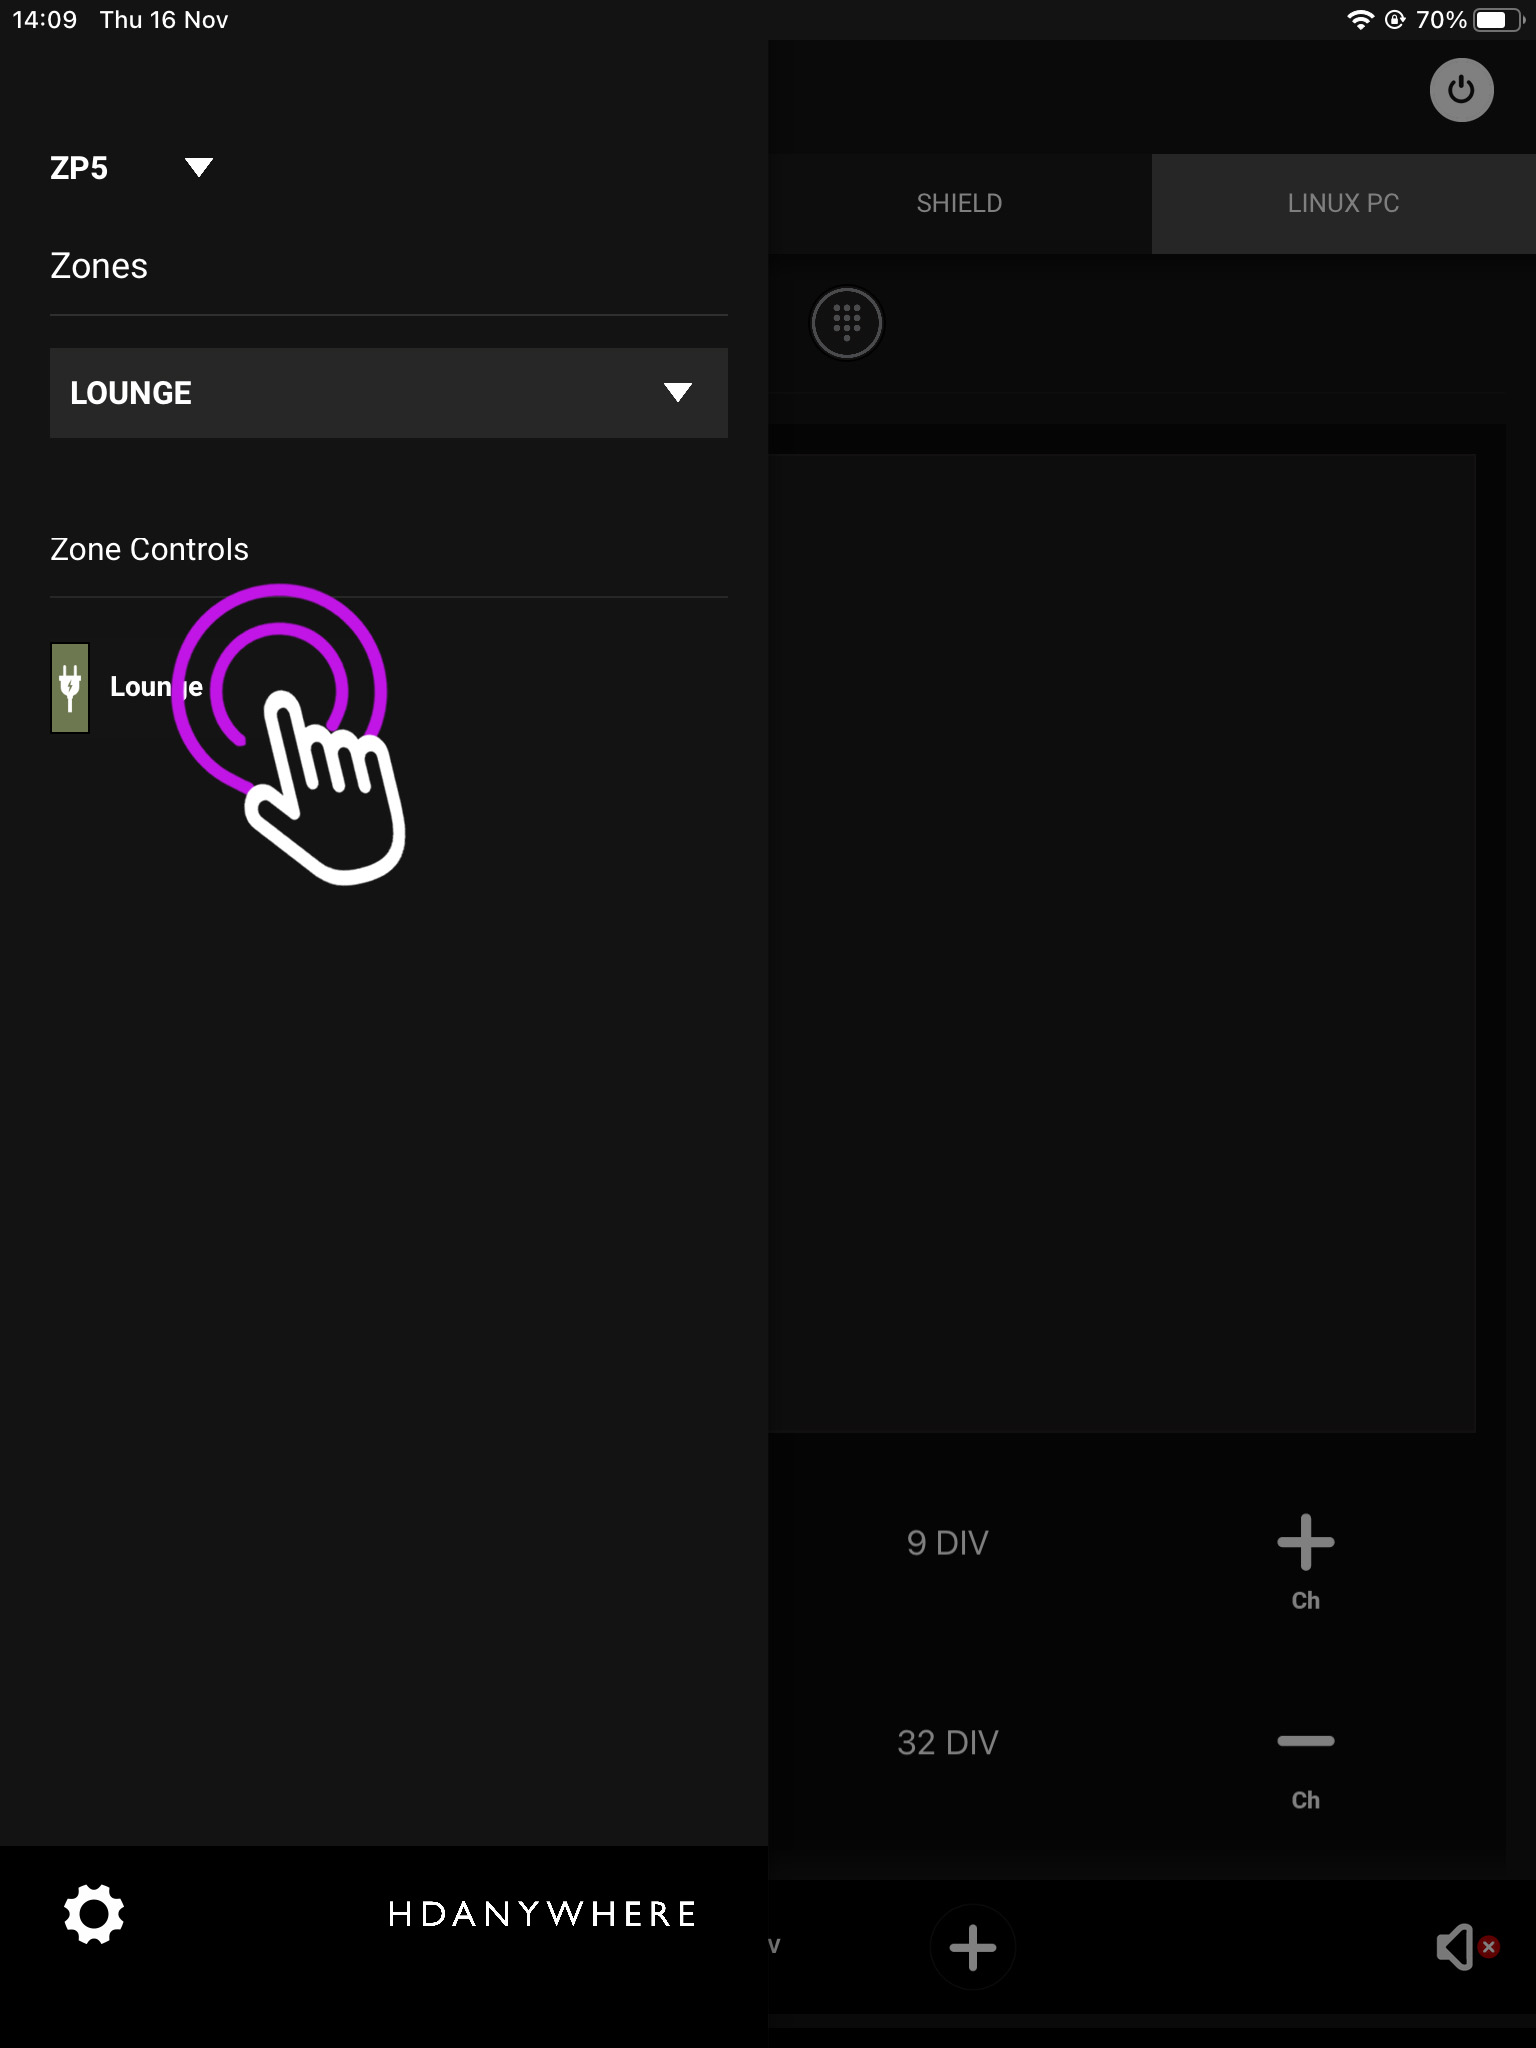
    Open the menu in the top left and you will see your available Sequences.

    You may have only selected a certain zone for your Sequence to be available in, to chnage between zones press the downward arrow and you can switch between them.

  • First generation HDMI 1.4 spec UHD 4K, next-generation HDMI 2.0 spec UHD 4K and what integrators need to know.

    An analysis of 4K Interim vs 4K Proper by Chris Pinder, Founder and MD of HDanywhere, June 2015.

    blog2

    4K is a complicated subject matter. 4K isn’t one format, it’s an umbrella term for many combinations of resolutions, frame rates and colours. Talking about 4K in too generalised a way is dangerous. When I discuss 4K with anyone, in as non-patronising a way as possible to simplify and aid understanding, I refer to ‘i’ and ‘p’, (like 1080i and 1080p) but my ‘i’ and ‘p’ doesn’t mean interlaced and progressive, I mean first generation 4K and next-generation 4K, or in other words  ‘interim’ and ‘proper’. P could also quite easily stand for ‘premium’.

    This is my take on the two-speed world of 4K UHD devices at the moment. It may be labelled and marketed as 4K, it may even support HDCP 2.2 – but is it 4Ki or 4Kp?

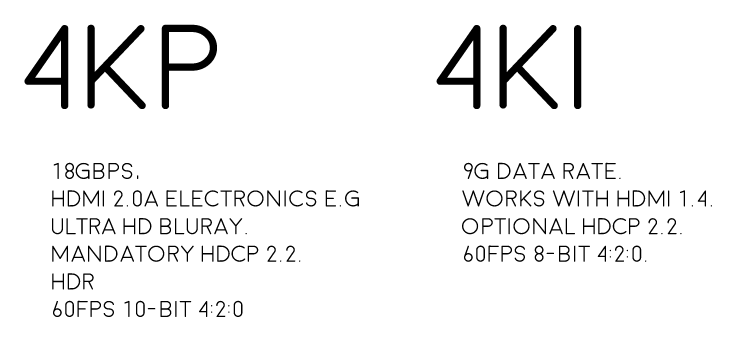
    Proper 4K (4Kp) is next-generation HDMI 2.0 spec 4K, it’s what Ultra HD Blu-ray is and what premium 4K content will be. Ultra HD video refreshes at a smooth 60 frames per second in amazing 10-bit 4:2:0 colour (or if your display doesn’t support 10-bit) 8-bit 4:4:4 colour – basically hugely superior colours than what we have seen before over HDMI. 4Kp can also support HDR content and runs at very high 18Gbps data rates and, as a result, will require all new high-bandwidth HDMI 2.0a* spec electronics.  4Kp will also have HDCP 2.2 copy protection encrypting the content, which I’ll touch on later.

    What is most important from integrator perspective is that single-cable HDBaseT DOES NOT carry 4Kp. It will only carry 4Ki because HDBaseT is max 10.2Gbps and 4Kp requires 18Gbps.

    Most devices out there today labelled as ‘4K’ do not support 4Kp, they only support 4Ki. And by most, I mean over 95%. But this is improving, more and more displays are coming out now that support HDMI 2.0 and have a 10-bit panel. Ultra HD Blu-ray is likely going to be the first 4Kp source device we see. So what is 4Ki?

    Interim 4K (4Ki) runs at a 9G data rate (half that of 4Kp) and doesn’t necessarily require new HDMI 2.0 electronics. It will work on older HDMI 1.4 spec devices. It may or may not have HDCP 2.2 encryption. And colour-wise if it’s running at 60fps it can only be the lesser 8-bit 4:2:0 quarter colours. For 4:4:4 a lower 30fps refresh rate is used instead and smooth panning shots are sacrificed. 10-bit colour content just flatly isn’t supported full stop.
    blog1

    What is so important about colours?

    4Kp/60 and 4Ki/60 if watched in black and white are EXACTLY the same. The same number of pixels wide and high, refreshing at 60 times per second, with the same pixel data for light and dark contrast. So no difference in sharpness, motion or contrast.

    Where they differ is with a compromise on colour. The resolution of the colour layer that gets laid over the top of the black and white frame when combined to make the final image. With 8-bit 4:4:4 each pixel can choose a colour, whereas with 4:2:0 every 4 pixels have to share a single colour choice. Even though a cluster 4 pixels are sharing the same colour, the overlay of the black and white image creates different shades. The resulting 4:2:0 video content, although a lesser quality, is not as substantially different from 4:4:4 as you might think. In fact, when viewing the two from a couple of metres away, the human eye really struggles to differentiate them.

    OK, now that you’re thinking is in tune with there being two primary types of 4K material and you understand the difference between the two.

    You also NEED to be aware of a couple of associated meteors about to hit the AV side of the CI industry that relate to the facilitation of working 4K HDMI systems. (Remember HDMI is a system, NOT a cable) One is called ‘HDMI 2.0’ and the other is ‘HDCP 2.2’. The two meteors should really hit simultaneously, but not necessarily.

    Meteor 1: HDMI 2.0 is the new twice-as-big digital pipeline to accommodate the higher data rates of proper 4K jumping from 9G to 18G bandwidth. Its not a new cable design, its new electronics at either end of the existing (short) HDMI cable we use. So that is new source devices (Ultra HD Blu-ray players for example) and new displays (10-bit SUHD Samsung panels for example). However for longish cable distances, say 3m and over, current passive cables may struggle with the higher data rates. We’ll begin to see some new breeds of HDMI cable types appear to solve this. Some will use integrated active/powered boosting chips and others are likely to be a copper/fibre hybrid cable. Existing long length HDMI cables, that may be buried in walls for example will be able to be utilised through the use of restorative dongles that can be placed at the start and end of the cable run. I expect to see this HDMI cable rescue/fixer market grow over the coming years sharply.

    Meteor 2: HDCP 2.2 is the new 128 bit encryption designed to secure 4K content from being pirated. It is the same level of security encryption as credit card issuers use for internet transactions. Unless every device in the signal path is HDCP 2.2-capable, theoretically the content will not be shown. Source, matrix, AVR, balun, display, projector must all support HDCP 2.2. One weak link means black screen. The thing about HDCP 2.2 support is that it’s essential to ensure the best chance of displaying 4K content from your favourite content providers (i.e Hollywood and sports). The HDCP 2.2 event horizon will largely be determined by the release of Ultra-HD 4K Blu-ray and 4K content being delivered via our set-top-boxes.

    Conclusion

    In summary, until more next-gen 4Kp source devices, like Ultra HD Blu-ray, set-top-boxes, and media players are released we live in a kind of interim 4K limbo land, a phoney, interim 4K world with no proper, premium 4K content to enjoy. In addition to this, more displays with HDMI 2.0, HDCP 2.2 and 10-bit panels need to be released so that users can take full advantage of the advancements in picture quality offered by 4Kp. Month-on-month this situation improves.

    From an integrator perspective, quite rightly there is a lot of emphasis currently on HDCP 2.2 support within matrixes. But even when HDCP 2.2 compliant, single-cable HDBaseT is a bottleneck in many video distribution systems, which will result in premium 4K content video quality being downgraded when distributed. There is a quality compromise currently in order to deliver a distributed solution over a single network cable.

    SIDELINE RED HERRING: What about 4K streaming like Netflix?

    Well it’s not 4Kp and it’s not 4Ki… It’s dynamically compressed, streamed 4K content using AVC H.264 and HEVC H.265 codecs with varying quality from home to home according primarily to the speed and quality of their network. For the purposes of this article, I am talking about uncompressed 4K content.

     

  • MHUB-OS first boot process

    Make sure MHUB is connected up correctly before starting the first boot process on MHUB-OS

    HDANYWHERE(HDA) recommends that every MHUB install goes through its first boot process to ensure that the MHUB is setup correctly. Please follow the quick start guide (inside MHUB packaging) to make sure your MHUB is connected correctly to your source devices, displays and has an active network connection before proceeding.

    I don’t want to use MHUB-OS or go through the first boot process, will MHUB work like a normal matrix?

    Yes. You do not need to access MHUB-OS if you don’t want to. MHUB will work distributing video as normal and will be controllable using the included remote controls. Please note that you will not be able to access advanced features such as voice control, the uControl app or build Sequences.

    Accessing MHUB-OS (MOS)

    There are two ways to access MOS:

    1. Download our app, uControl, from the iOS or Google Play Store and let it find MHUB (and run you through the first boot) for you
    2. Go to your MHUB and press and hold the “MENU” button for 5 seconds to reveal its IP address. Make a note of it then put that address in to any web browser on the same network. You will be forwarded to the first boot process.

    First boot process

    FIRST-BOOT1

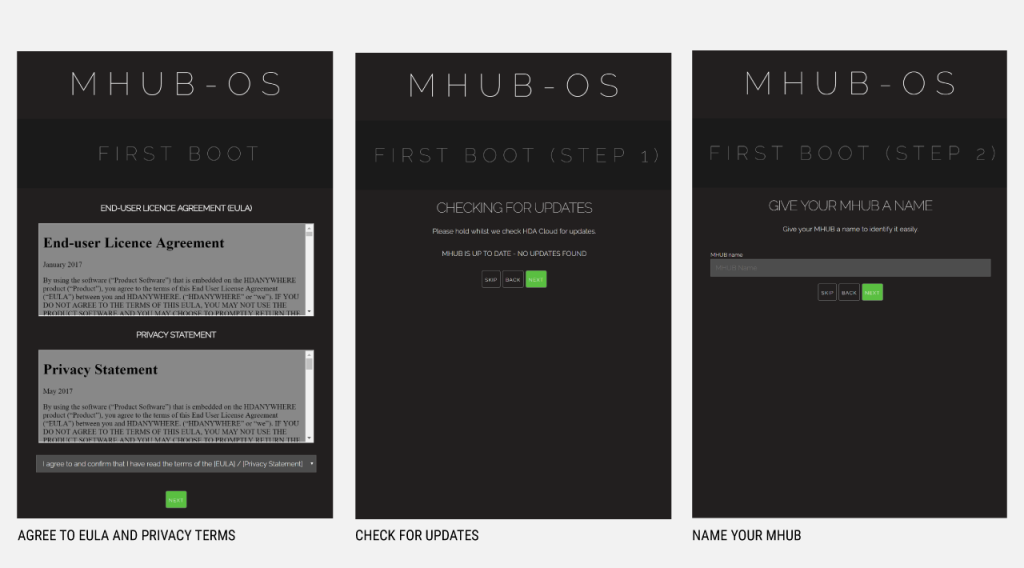
    • BEFORE STARTING:Read and agree to the End User Licence Agreement (EULA) and Privacy Statement
    • First Boot Step 1 – Check for MOS updatesThis is where your MHUB requests available updates from HDA cloud so your unit will update to the latest version. This is done before proceeding.
    • First Boot Step 2 – Name your MHUB
      Here you can give your MHUB a personal name, this can also be used to differentiate multiple installations by HDA Pro’s
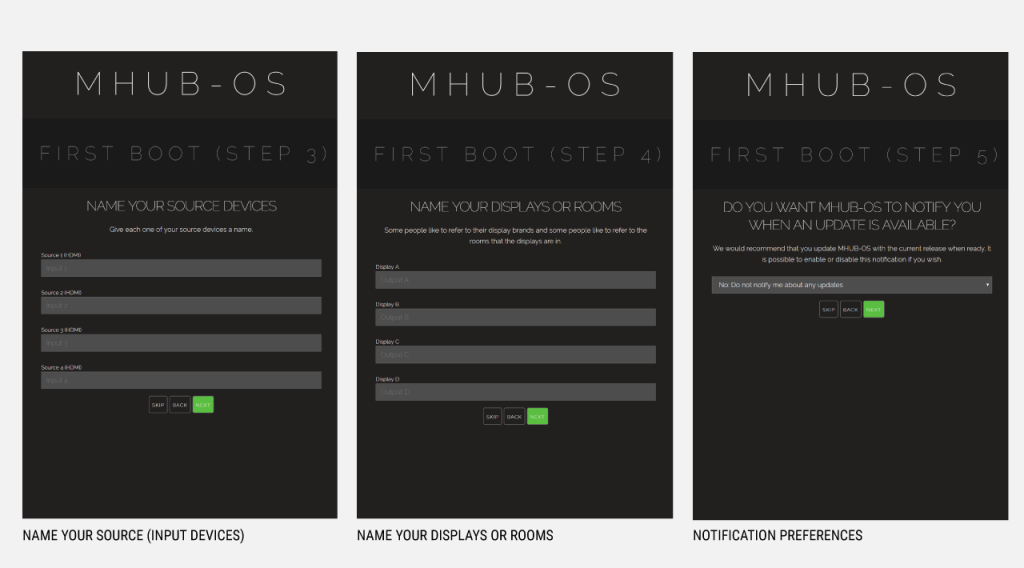
    • First Boot Step 3 – Name your sources/inputs
      On this page you can label your input devices, such as Sky, Apple or Tivo. These labels are used in the uControl app and with voice control. Please go here for best practices when adding names. [Best Practices]

    FIRST-BOOT2

    • First Boot Step 4 – Name your Displays/Rooms/outputs
      This page is similar to the previous step. You can choose to label them as display manufacturers or room names. Again please follow best practice guidelines available here – [Best Practices]
    • First Boot Step 5 – Turn update notifications On/Off
      MOS updates are released periodically, here you can choose to be notified when an update is available

    FIRST-BOOT3

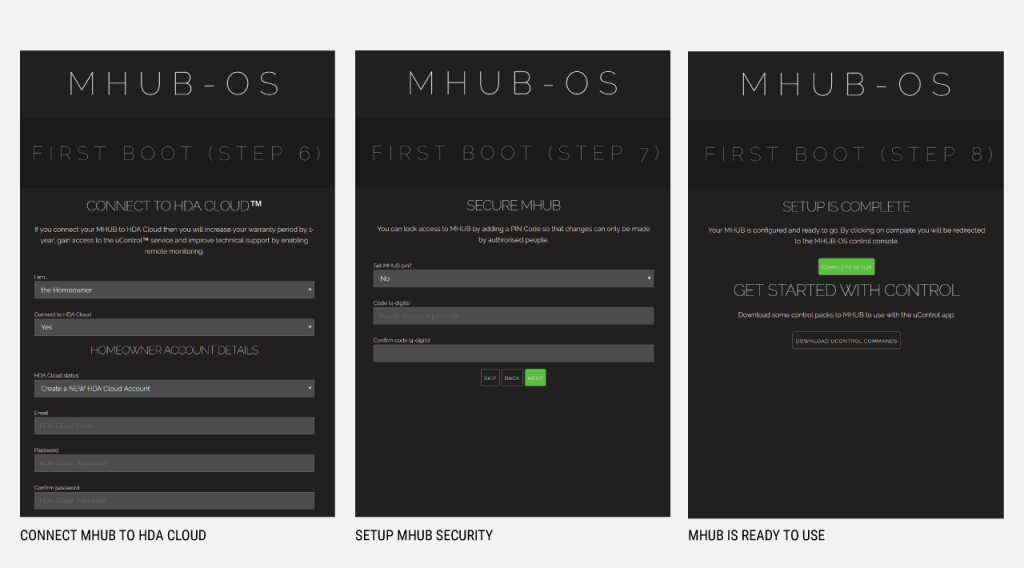
    • First Boot Step 6 – Create or link your MHUB to a HDA cloud account, read and agree to our Terms and Conditions
      MHUB4K(3rd gen) and MHUB4KPRO units can be linked to a cloud based account. When registering as a homeowner this enables a couple of things. Firstly when you register, your warranty period is extended by 1 year, in addition to that cloud access is required when using the uControl IRengine feature allowing you to control source and display devices. Cloud access is also required for voice integration. For a HDA PRO the cloud account allows you to manage your MHUB installations remotely, getting system information as well as a host of other features.
    • First Boot Step 7 – Secure MHUB with a PIN number
      If you wish you can lock local access to MOS stopping any unwanted configuration changes from being made.
    • First Boot Step 8 – Complete First Boot Setup
      Once you have completed the first boot process you can either ‘COMPLETE SETUP’ and go to the MOS DASHBOARD pag, . or goto the uControl page to start adding device/source control. For more information on uControl go here uControl
  • Extracting ARC from your TV to a nearby AVR or (Sonos) Amp

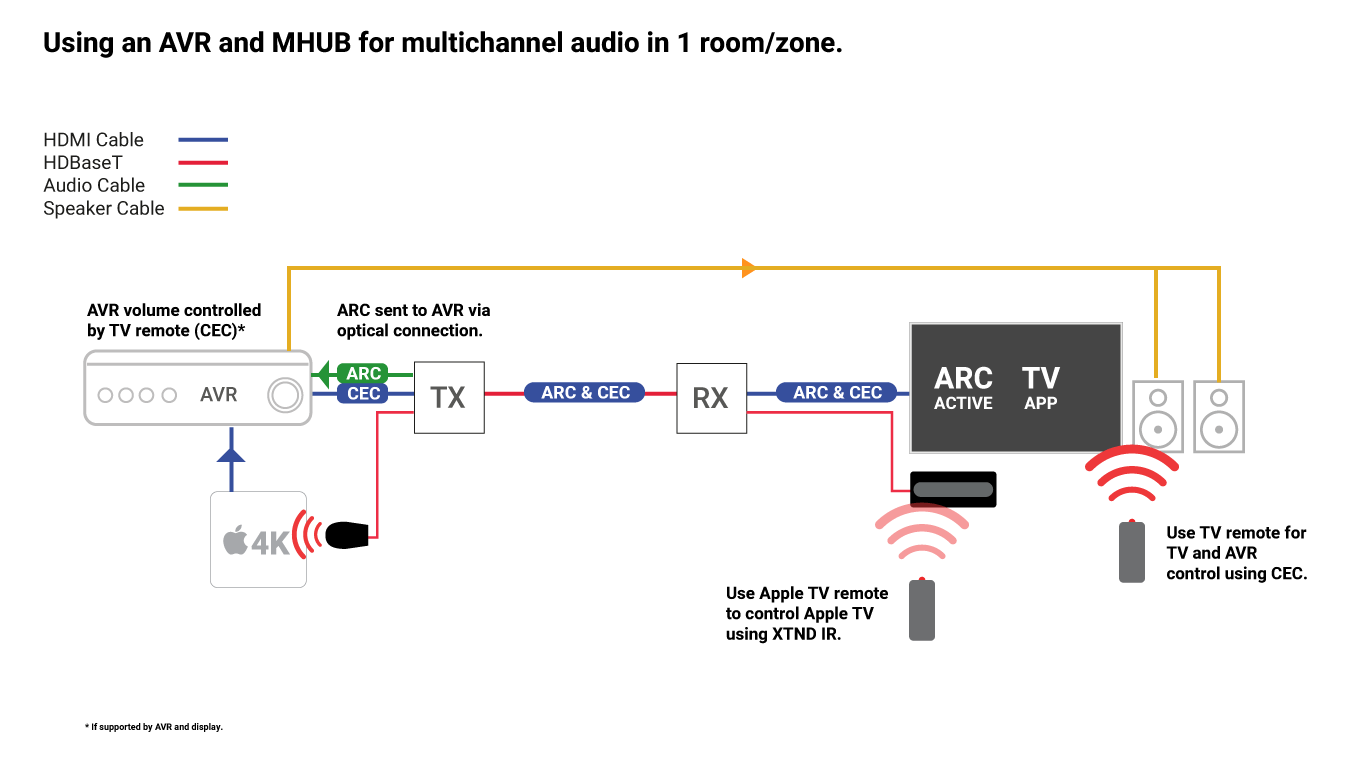
    Many displays sold from 2015 come with apps to watch TV directly from the Internet (Netflix, Disney+, YouTube etc). If you want to extract that audio to nearby speakers you have two options: 1) extract the audio using a technology within the HDMI cable called Audio Return Channel (ARC) back to an amplifier that also has ARC or 2) extract the audio from the TV using its stereo or optical connection and run additional cabling back to the amplifier.

    If the TV is wall mounted, is at a distance, or you are unable to run any additional cable to the amplification equipment then your only choice is to rely on ARC – if supported by your display – to achieve this result.

    Both MHUB and XTND support ARC (check model spec) BUT there are some important points you should understand before purchasing your system. This article describes ARC extraction and control via CEC for XTND models.

    xtnd-audio

    Do they support eARC?

    No. eARC is not supported currently. ARC support includes 2 channel audio (stereo) and multichannel audio upto 5.1 (if supported by your display).

    Our extenders do not mimic a long HDMI cable…

    Your MHUB or XTND device does not act like a long HDMI cable and should not be thought of as one. Our devices can handle HDMI features like HDCP, EDID, CEC and ARC but it doesn’t ‘pass it through’ like a standard copper HDMI cable does point-to-point.

    With ARC on our XTND models for example, it doesn’t pass through to the HDMI cable on the source side. Instead our extenders extract the audio to an optical or analogue output which can then be fed in to an AVR or Amp.

    This is done because the XTND is not an ARC extender. It is primarily a HDMI video extender that supports the ARC featureset.

    …meaning you can’t use ARC + CEC together.

    So for scenarios where you want to use Sonos Amp you might have a problem because you can not use the TVs remote control to control the Sonos Amp but you have an alternative options because you can use IR passback to control the Sonos Amp instead.

  • Controlling GUDE power switching from uOS

    This guide explains how to pull data from the Gude API so you can control it directly from uOS, uControl App and uControl Remote.


    Before you begin, you will need:

    • A HTTP test program such as Postman, available here
    • The Gude IP address on the same network as the HDA system
    • A fully-commissioned HDA or uControl system with the latest version of uOS (MHUB-OS does not support IP integrations) on the same network as the Gude
    • A tablet or laptop using any of the most popular browsers (or an iPhone with the uControl app, at the very least) on the same network as the HDA system.

    Step 1:Get data from the Gude system

    There are a few ways you can get the IP address of your Gude device:

    • Using a network scanner application like Fing on your mobile phone to scan your network.
    • Log into your wireless router and look up Gude in the DHCP table.


    Step 2: Build Function


    Example Commands

    Gude Command Examples

  • Installing uControl Packs

    If your HDA device has uControl, you can download IR or IP packs to control thousands of third party devices from the interface of the uControl mobile app. In this guide you will see how to browse our extensive library to download and control the packs for your devices.


    In this support article:


    Installing uControl Packs from uControl

    1. Open uControl

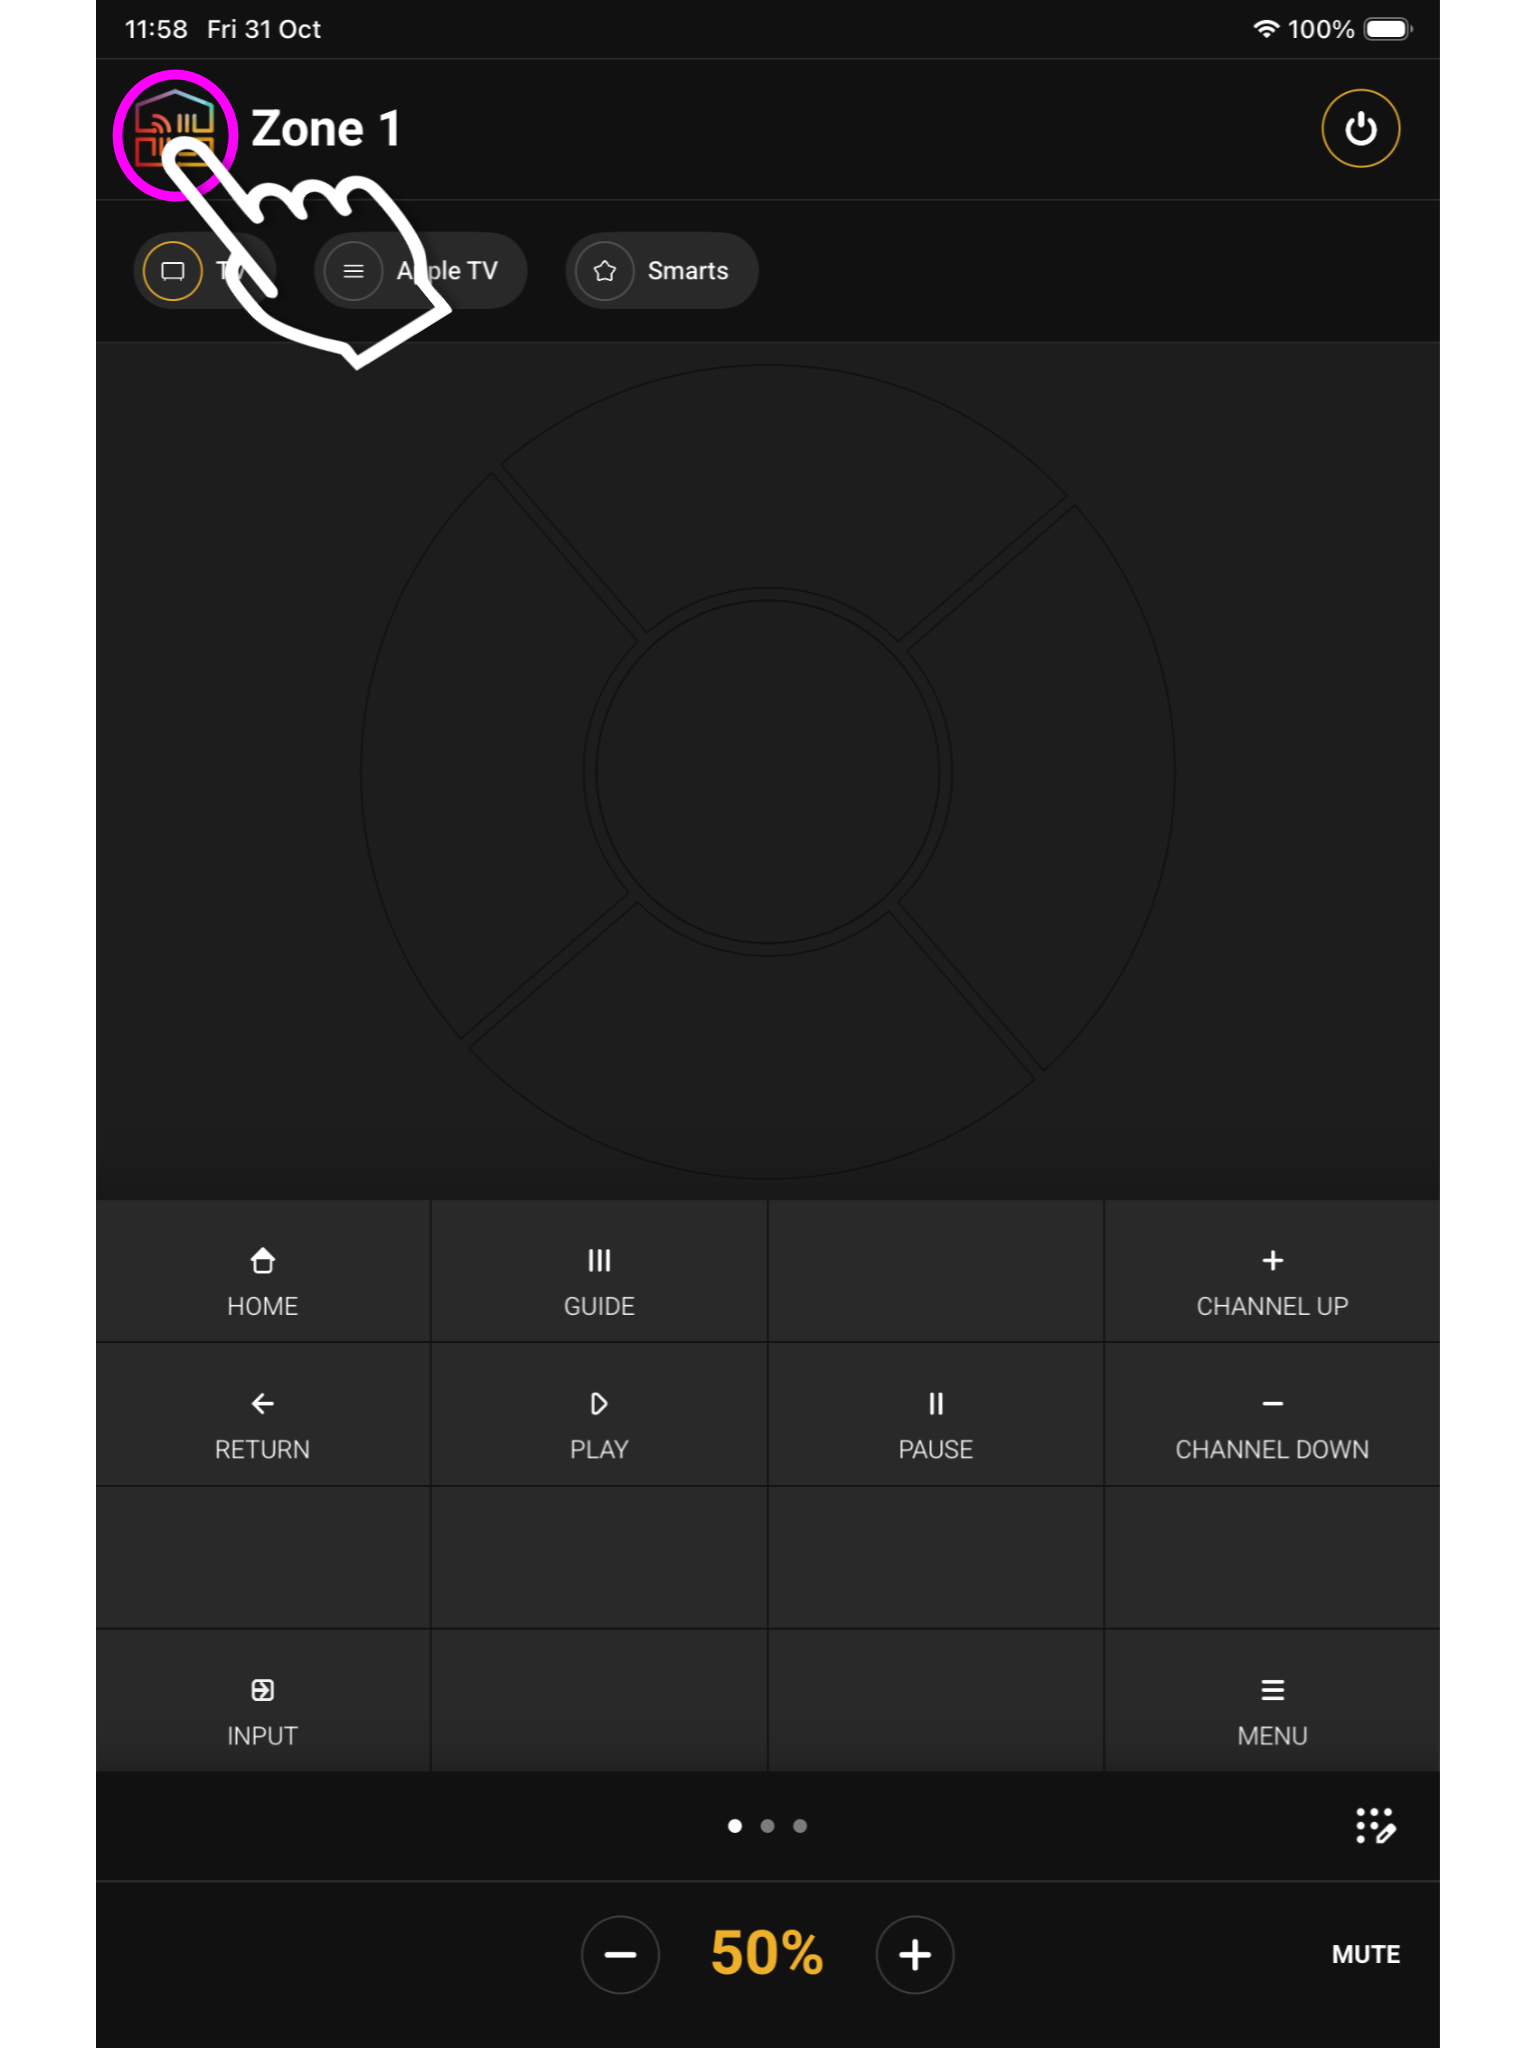
    From the main screen navigate to the menu in the top left.

    image 1
    What you see on the main screen may differ, however, the house icon will still be there.

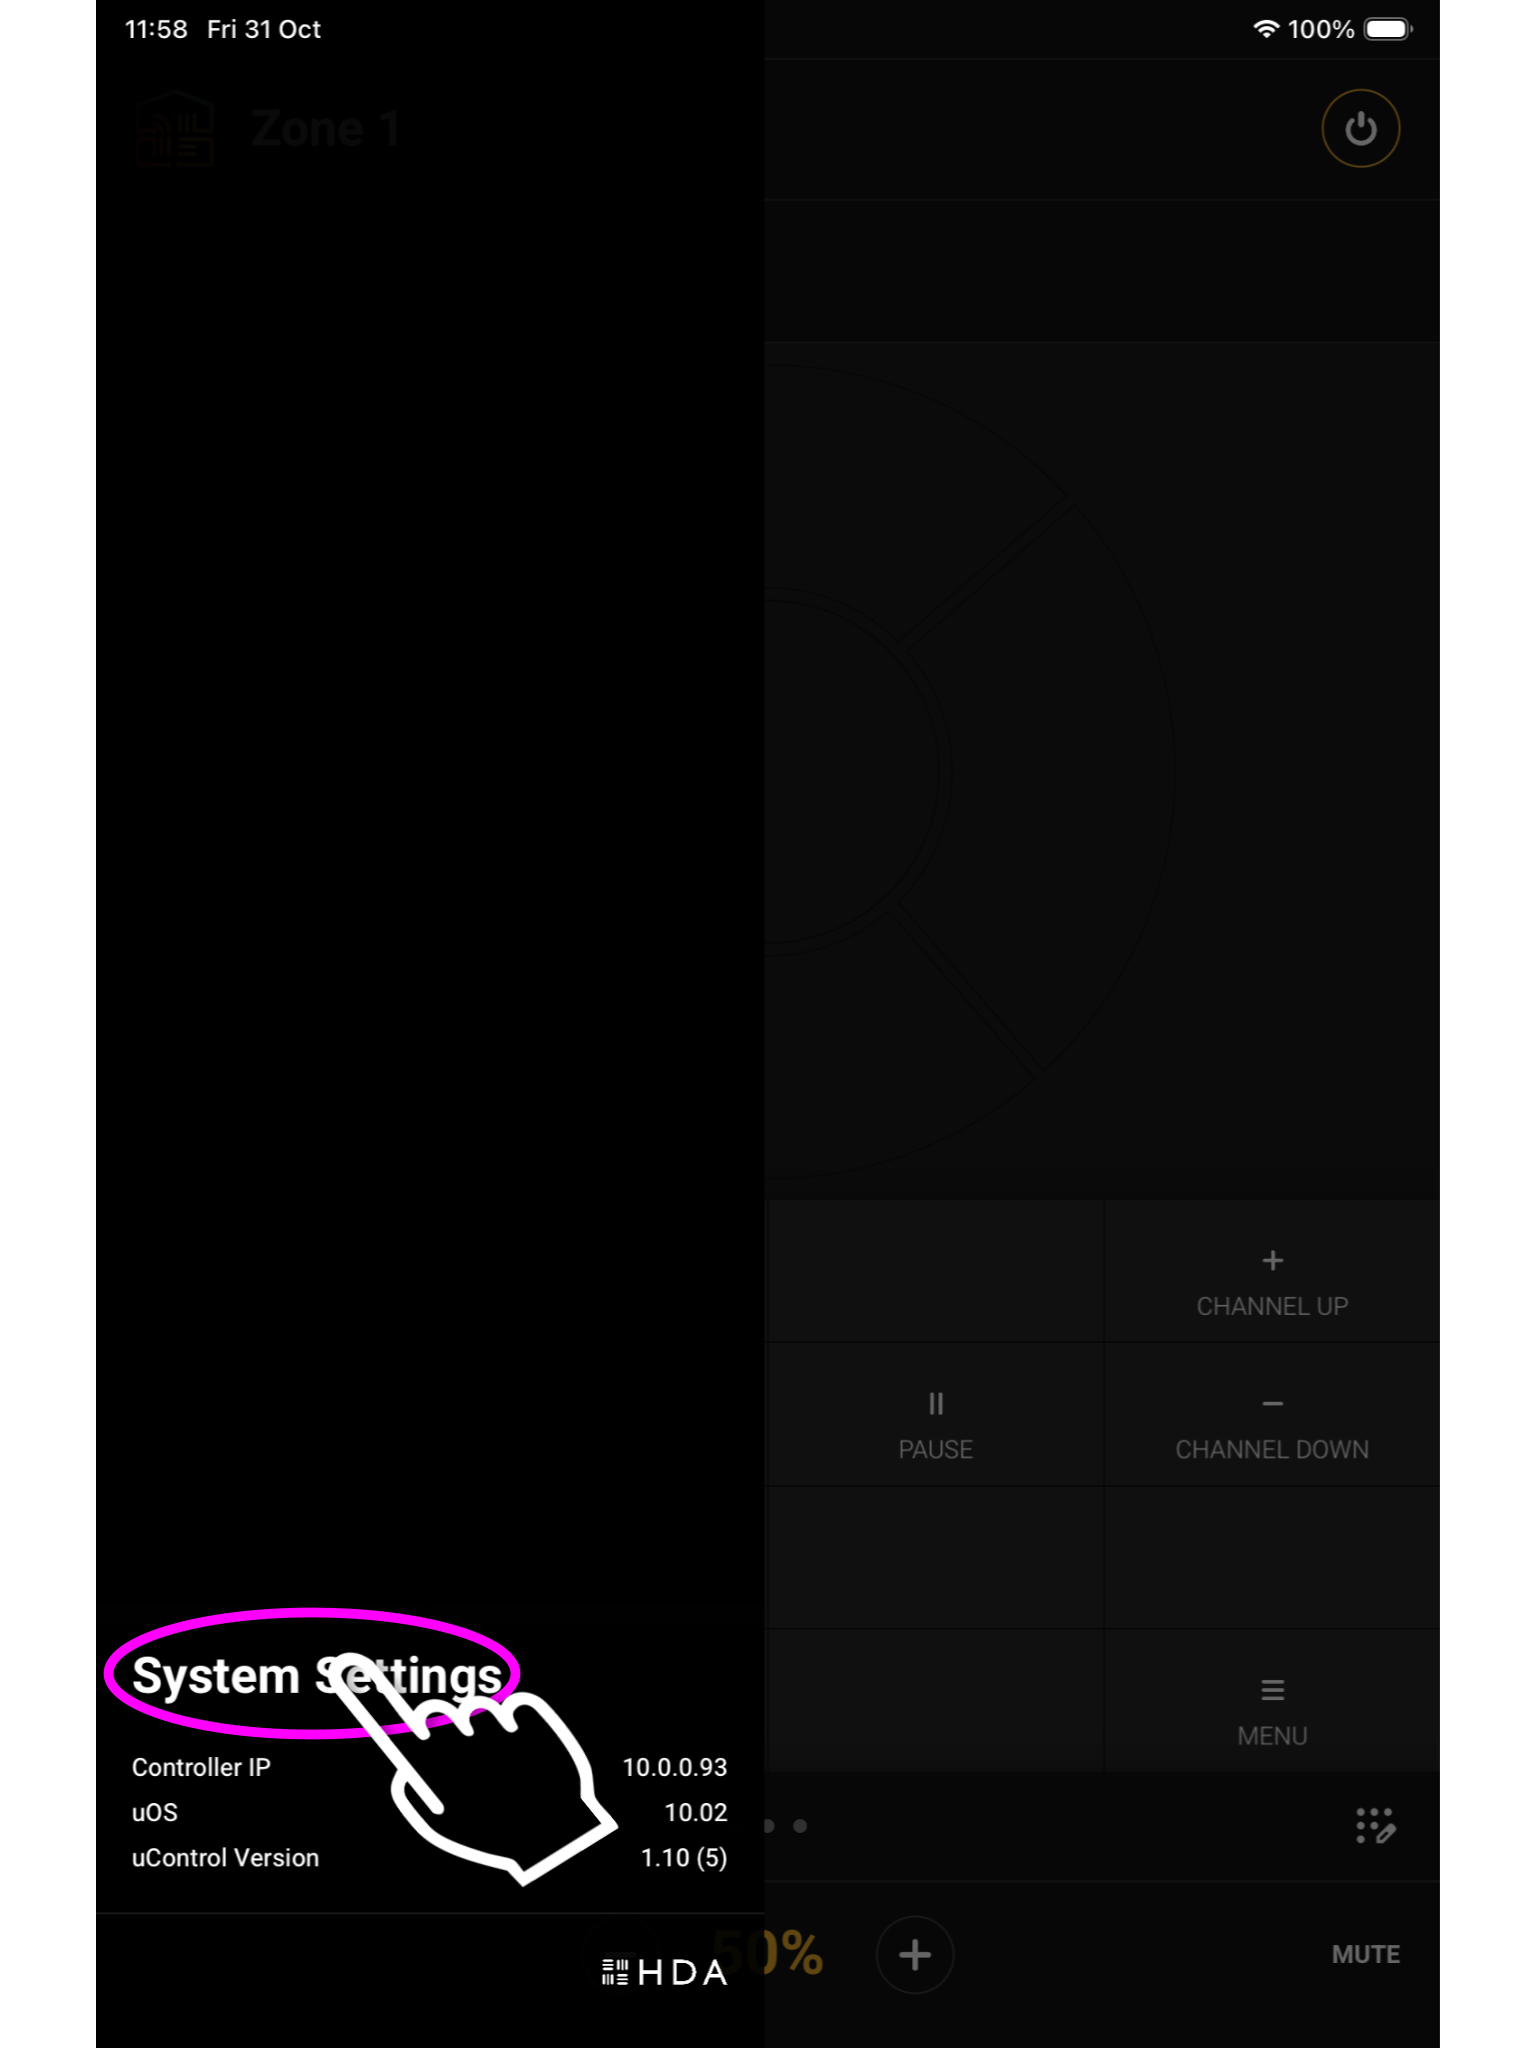
    2. Navigate to your settings

    Look for ‘System Settings’ located in the bottom left corner.

    image 2
    It will be in the bottom left corner.

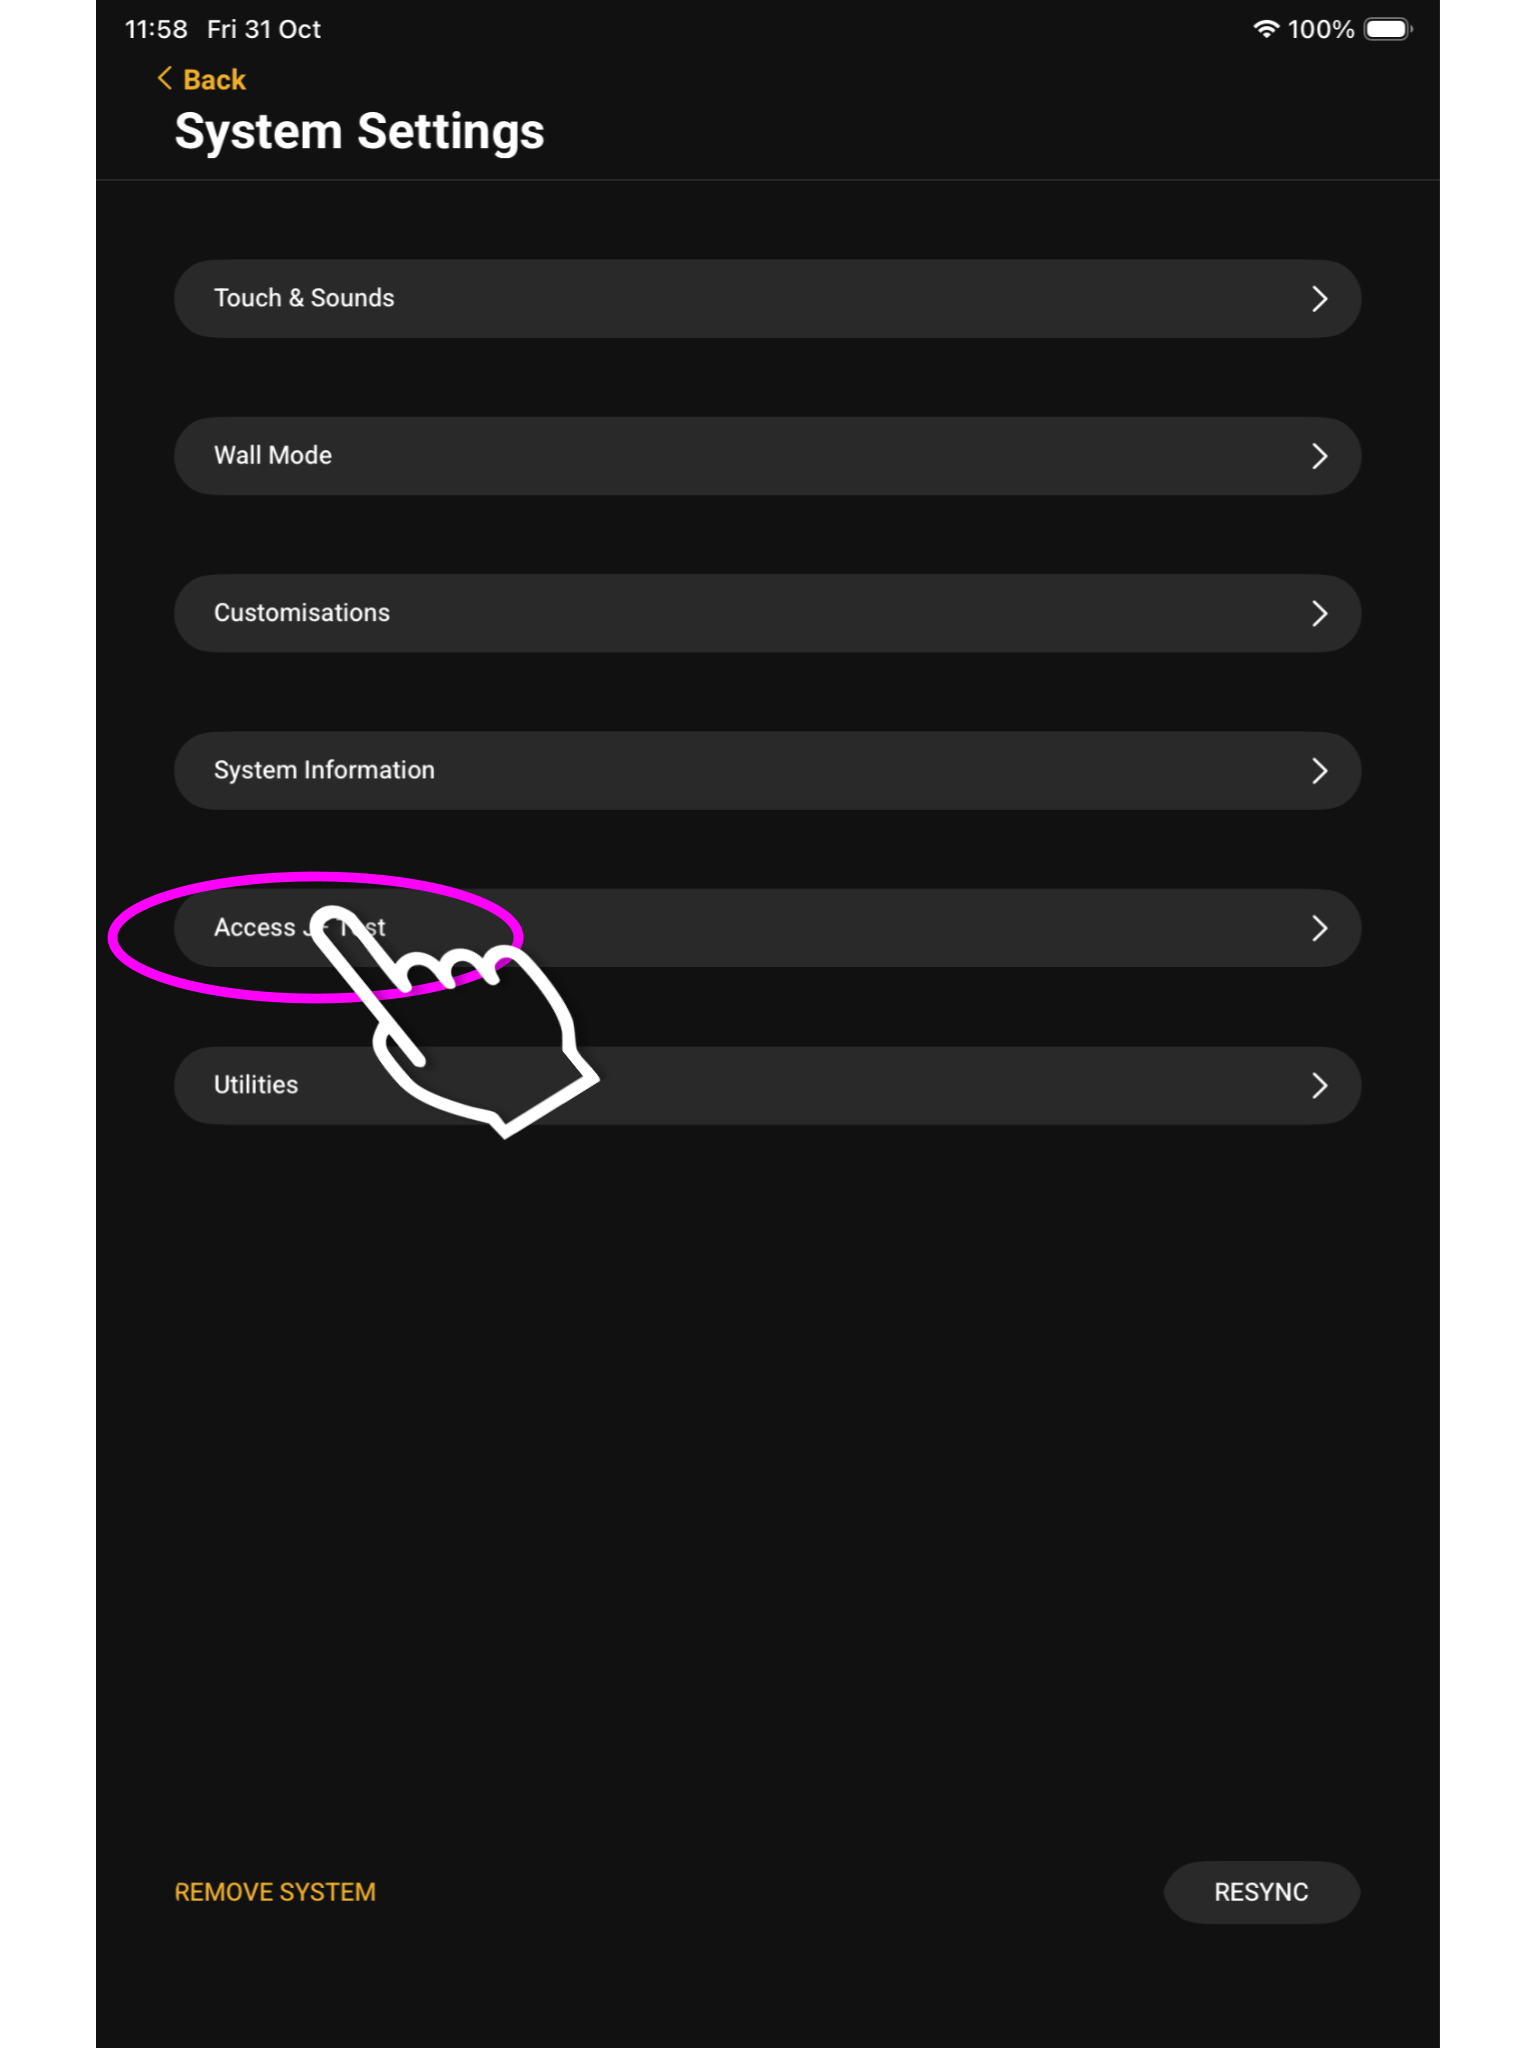
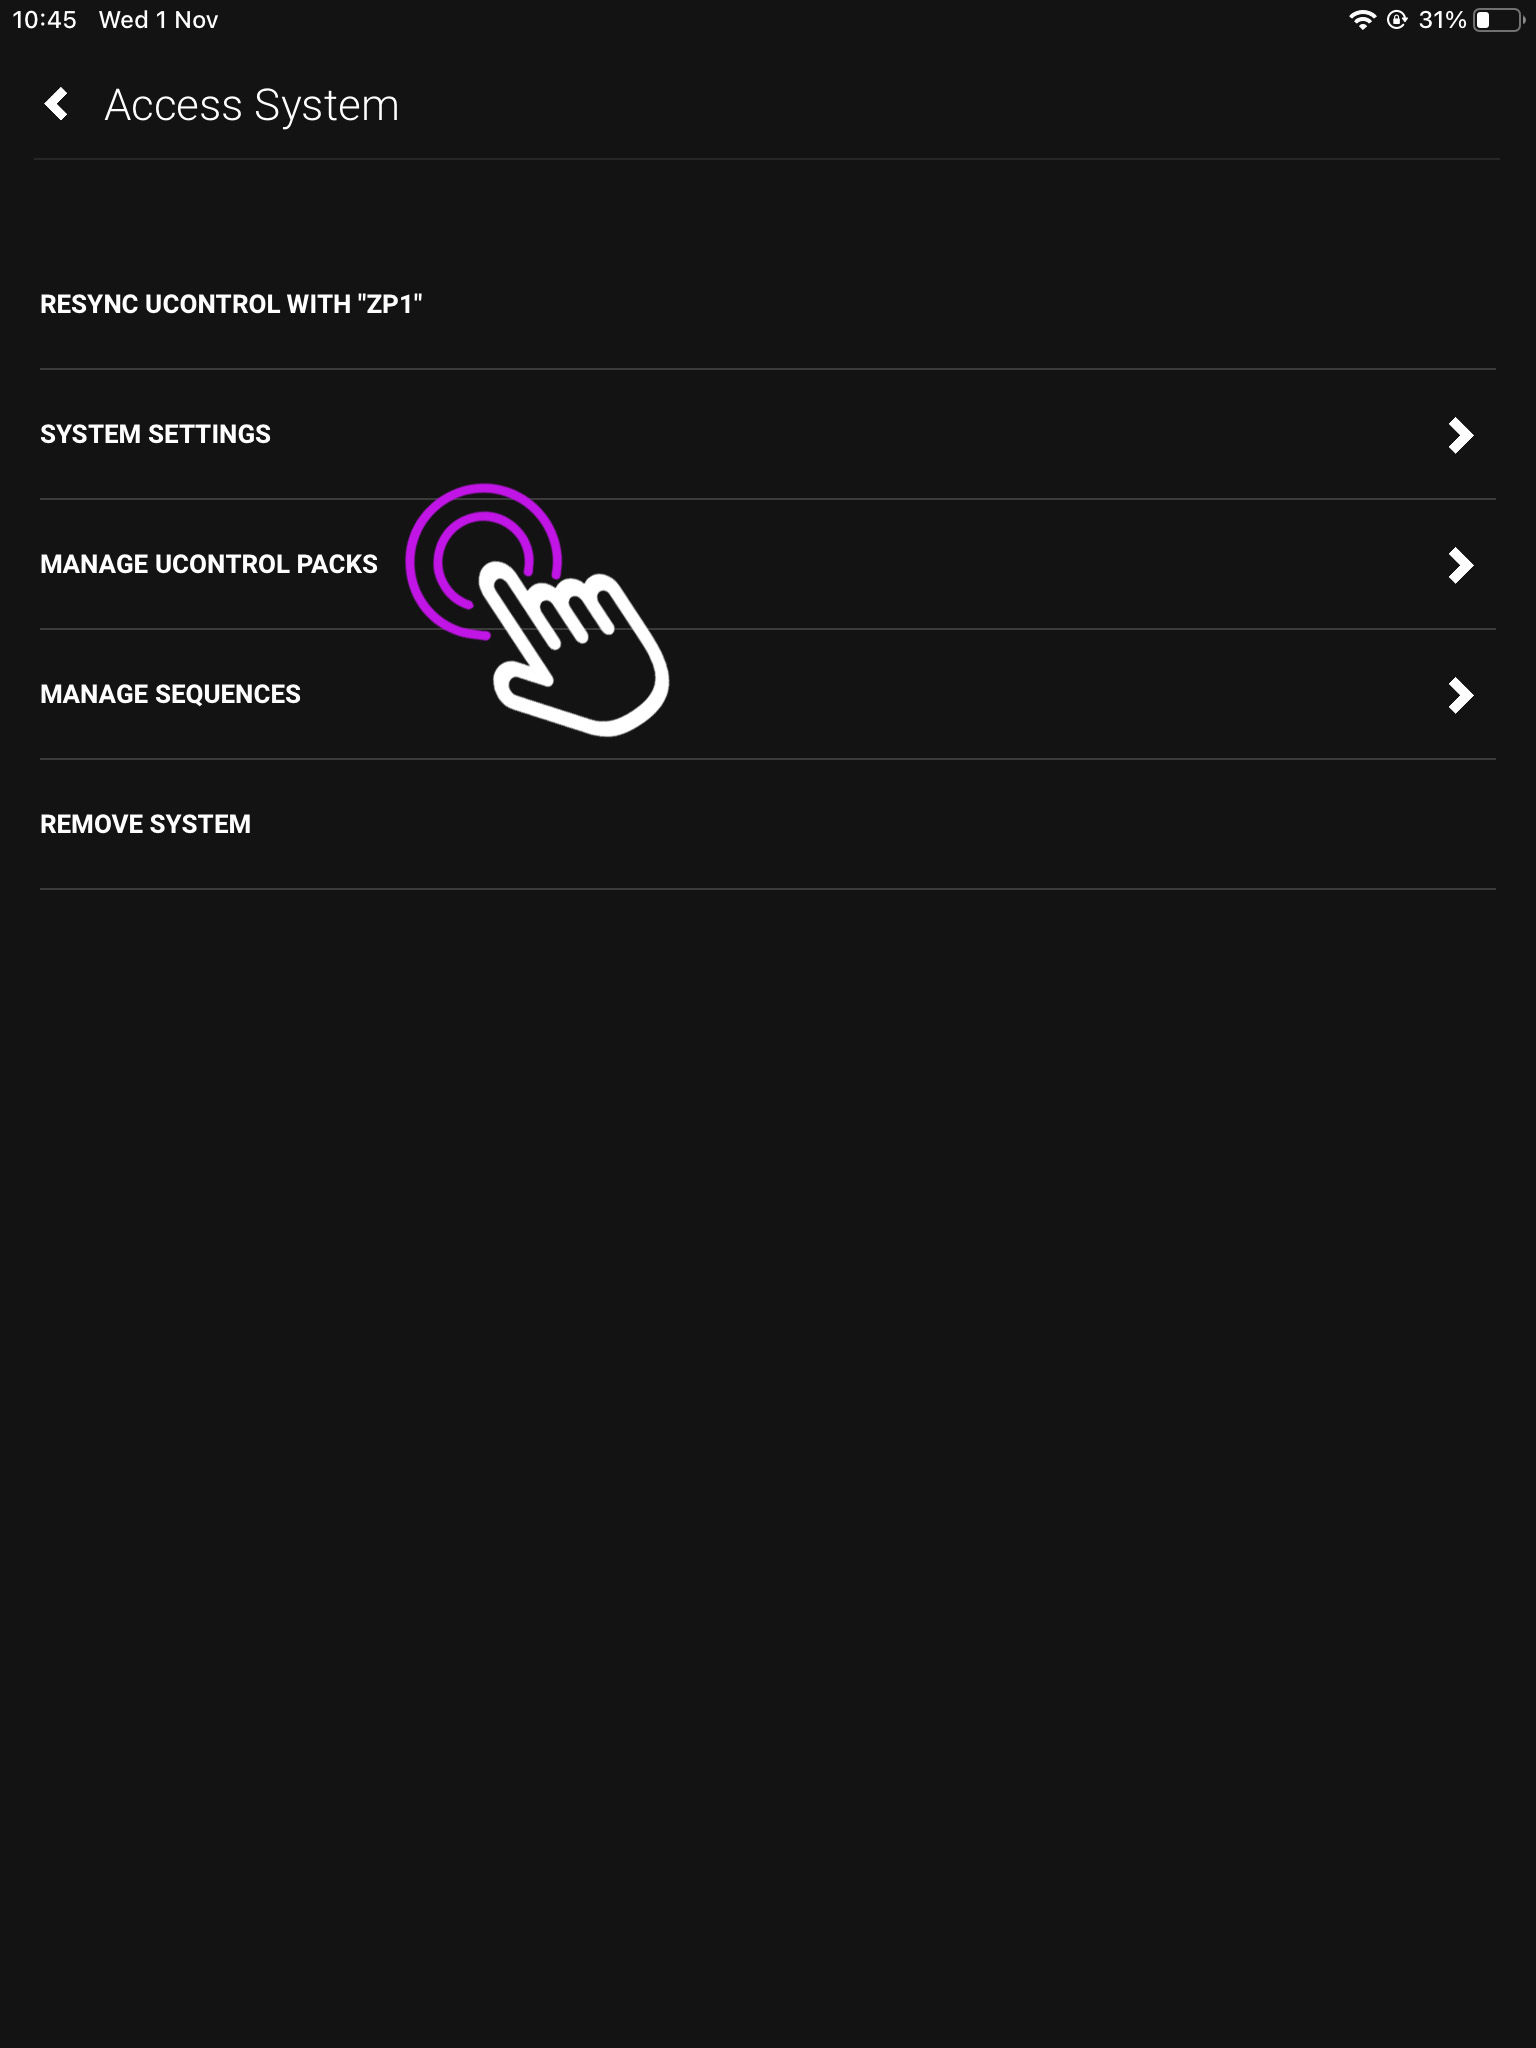
    3. Access System

    From here press Access System.

    image 3
    Click Access [system name], the name you configured in uOS will be shown here

    4. uControl Packs

    In this menu press “Manage uControl Packs”.

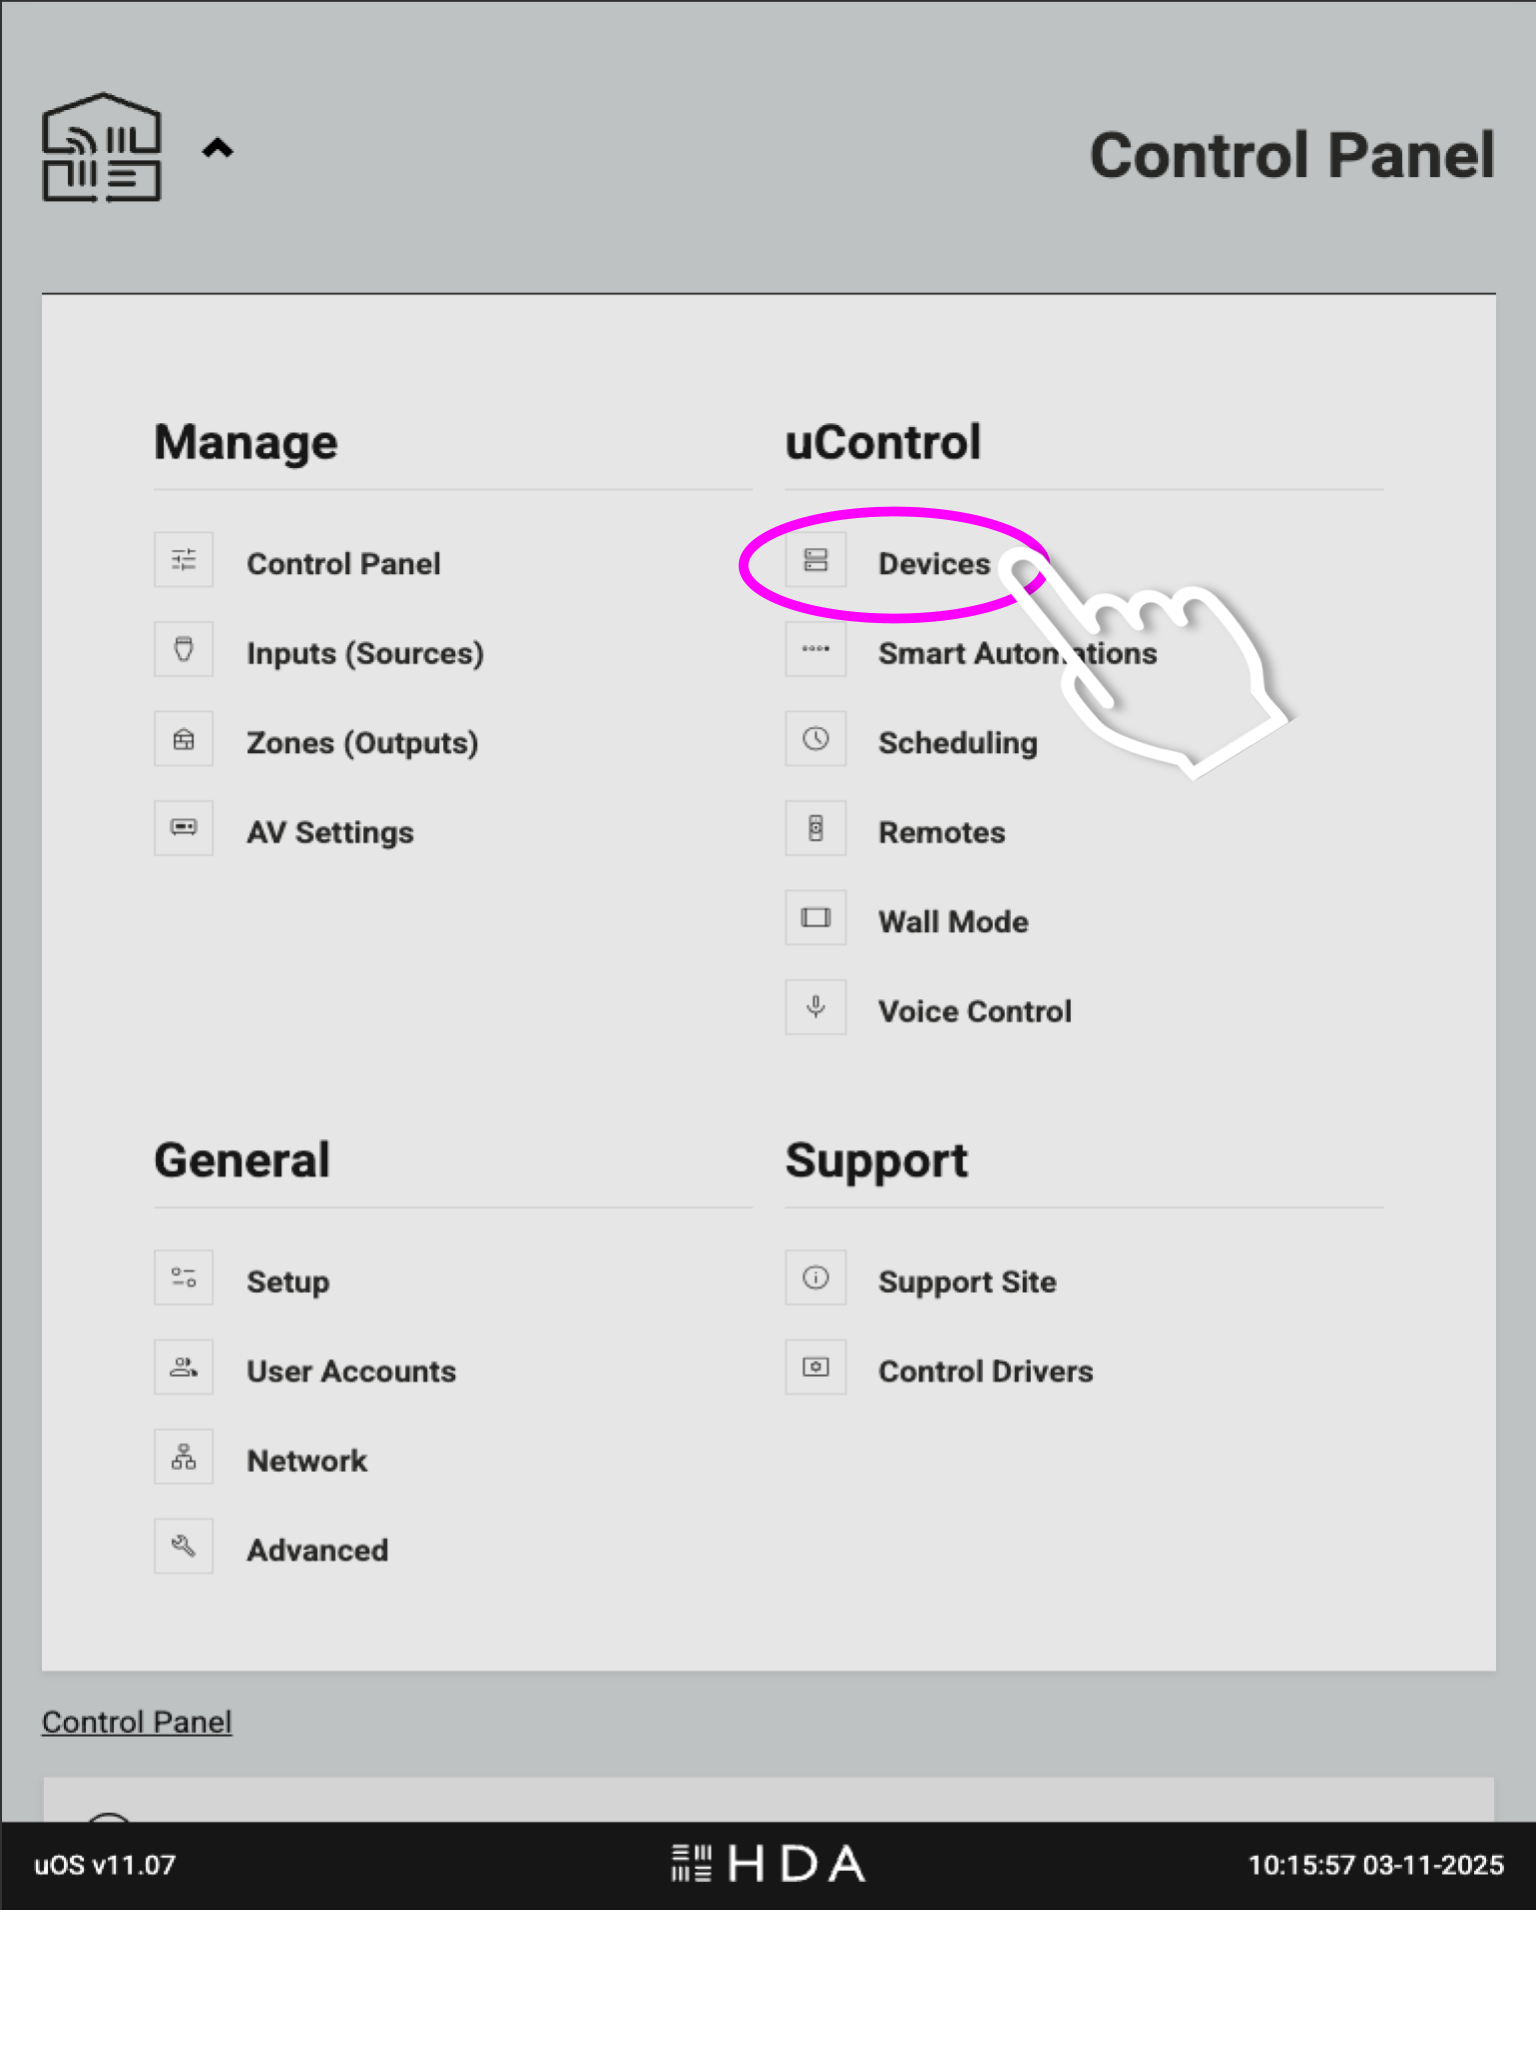
    Open the menu and select ‘Devices’. This will take you to the page where you can download IR and IP packs, and also create IP connections for integrating 3rd party controllers.

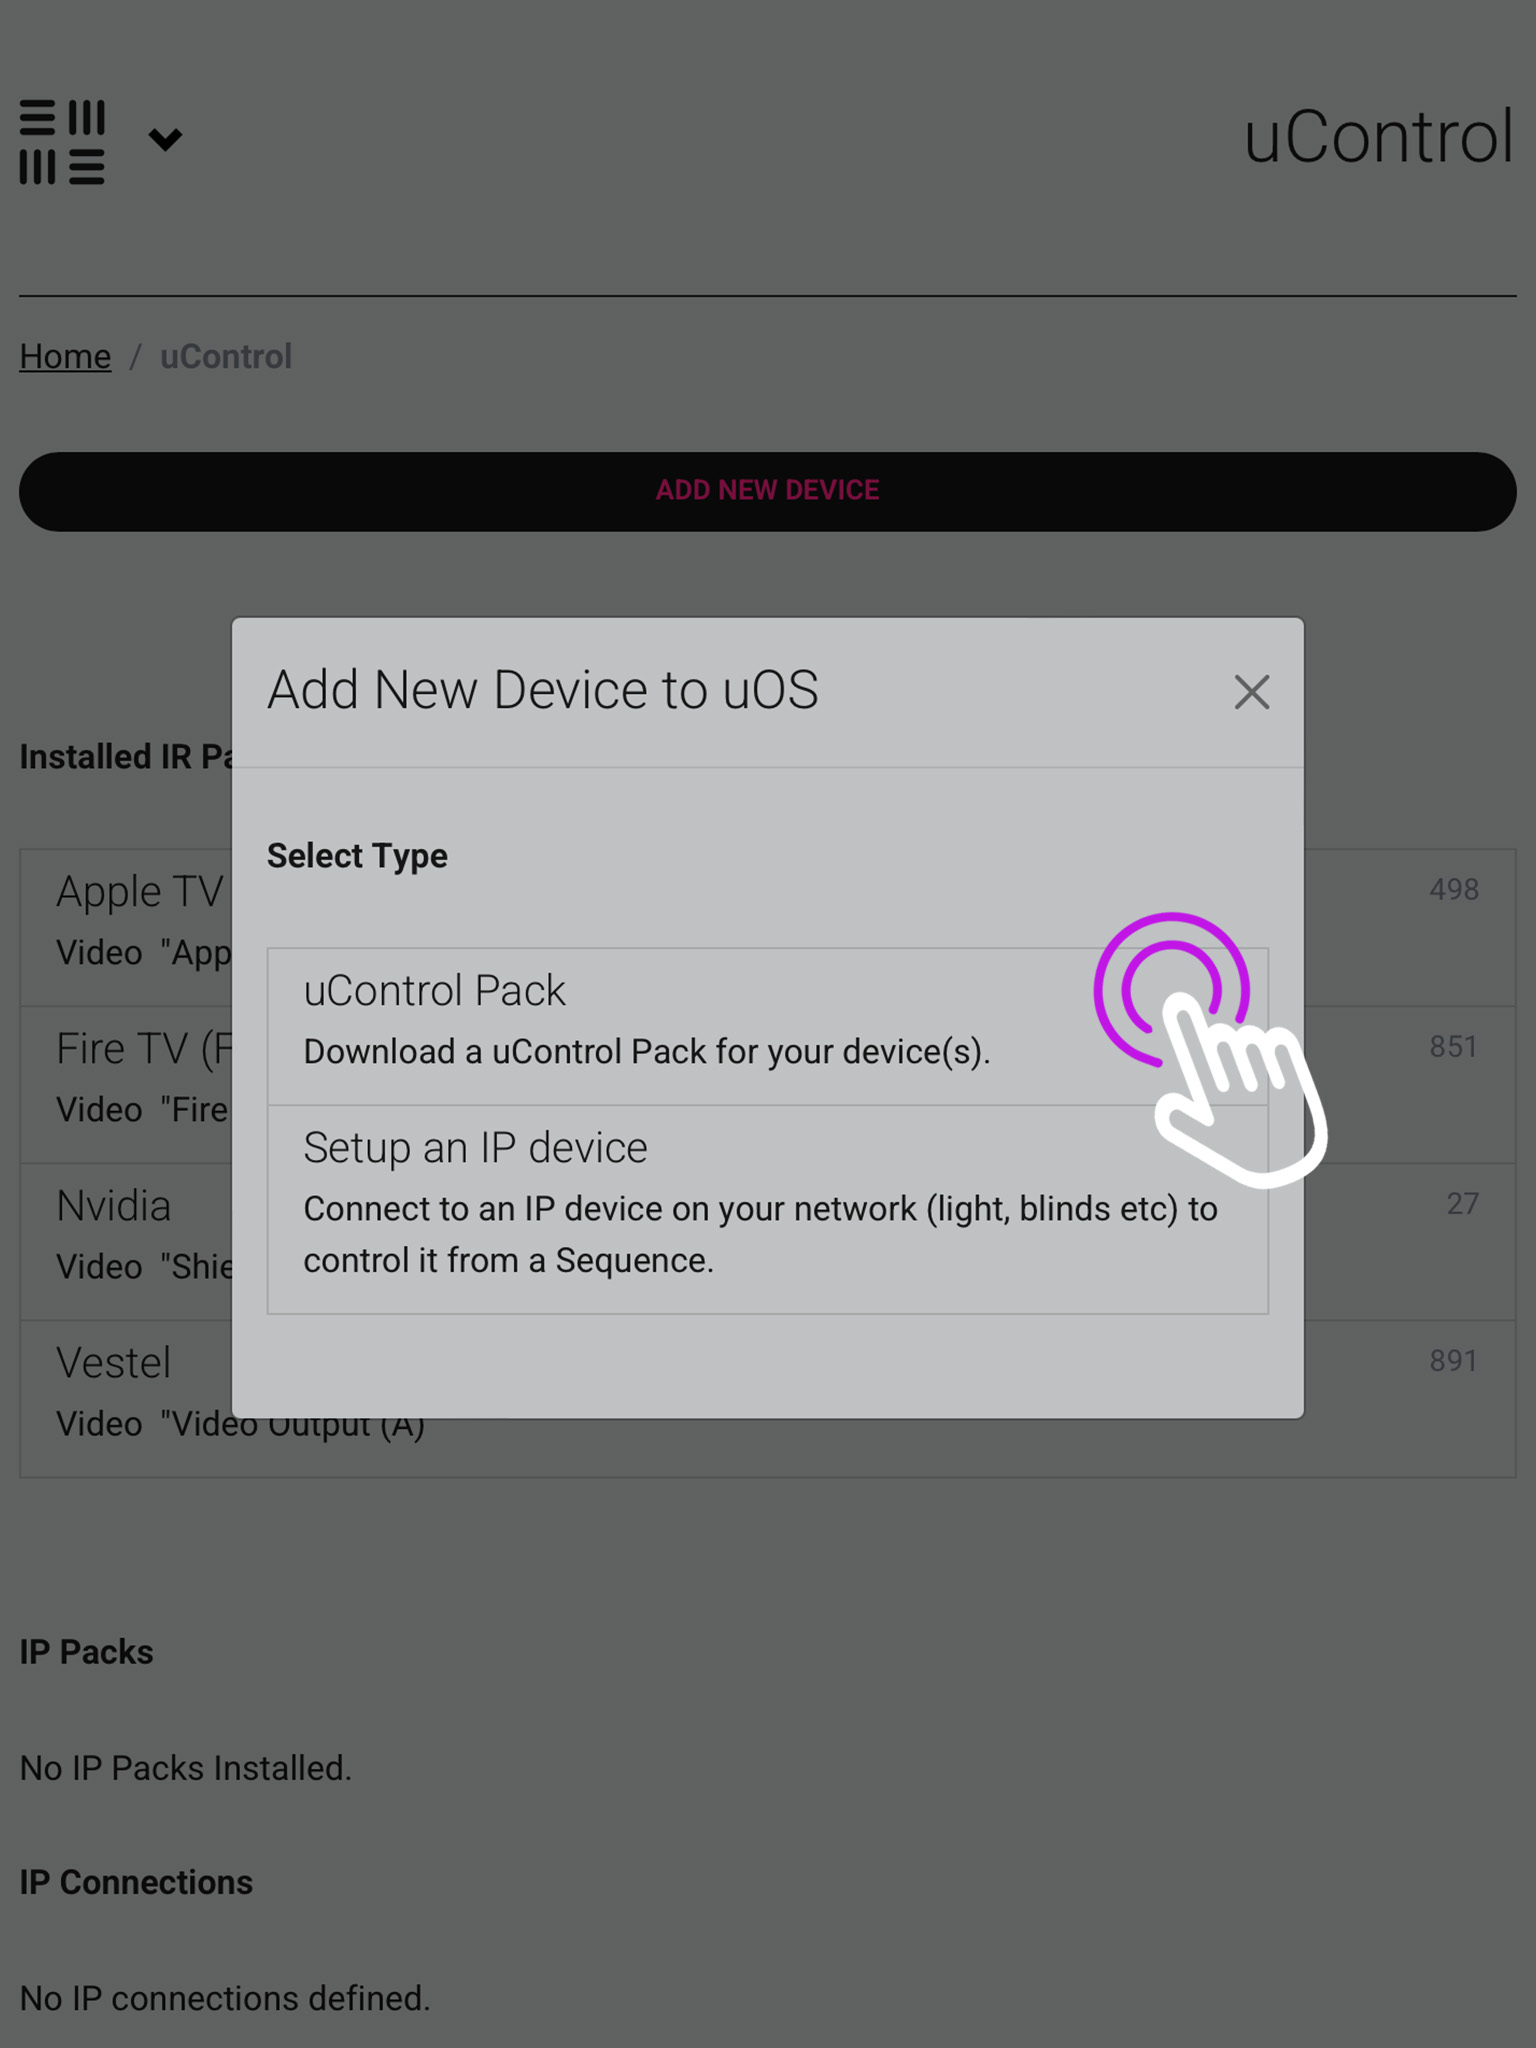
    5. Add New

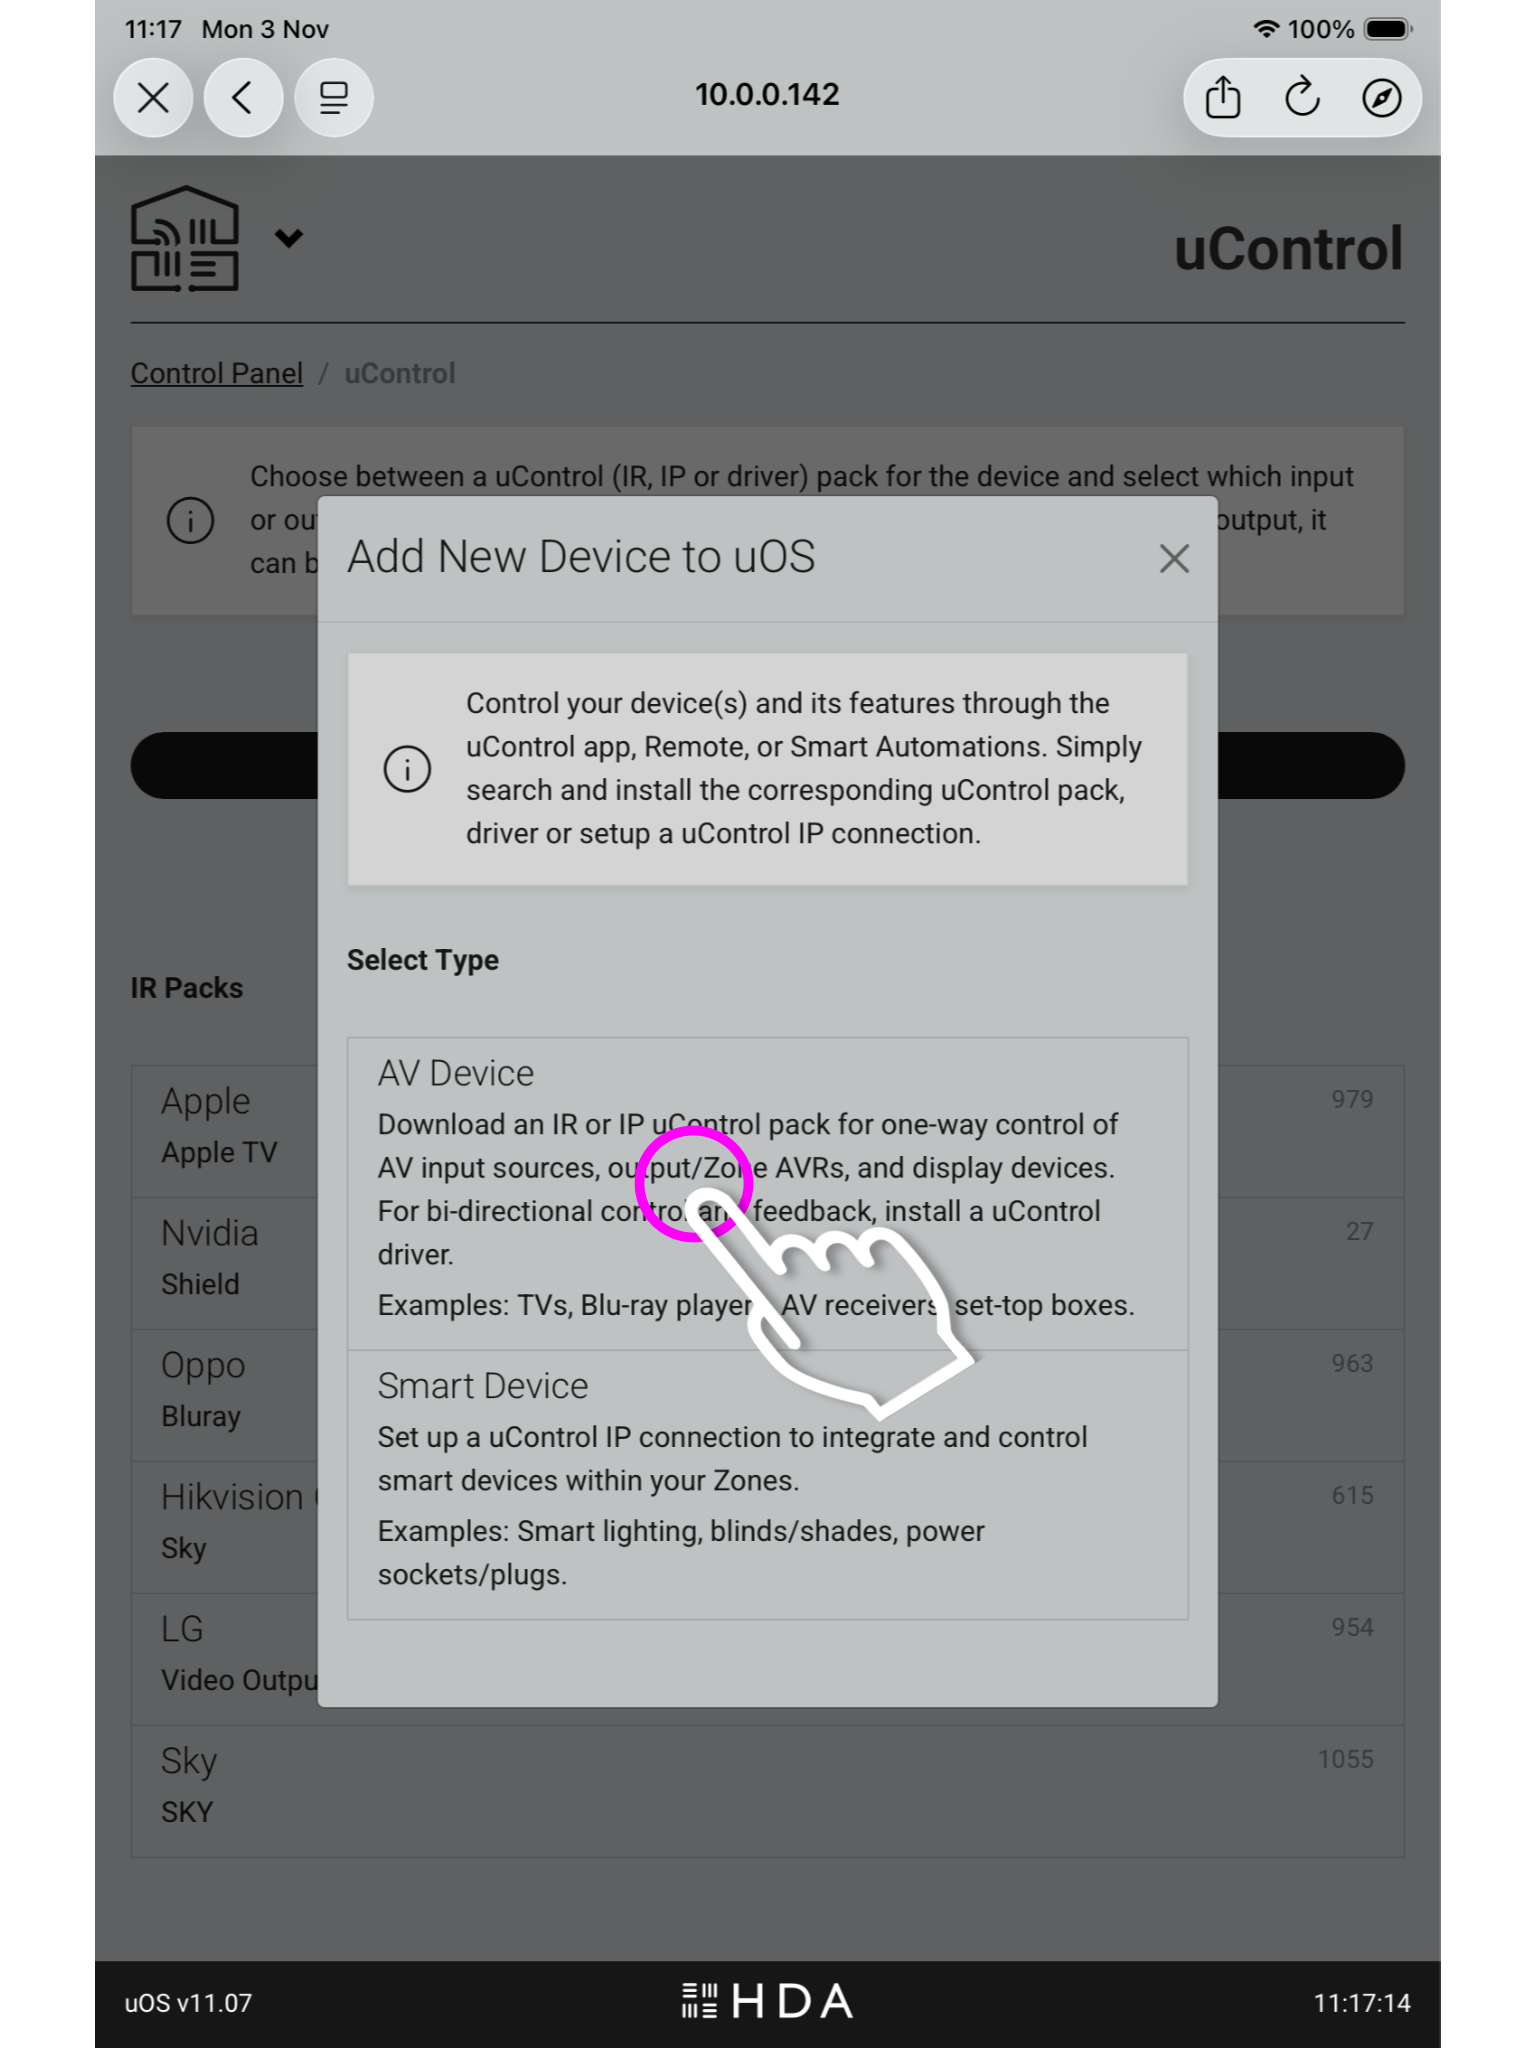
    Now we are in uOS press Add New and a pop up window will appear, press AV Device.

    The below option (Smart Device), is for integrating third party controllers to be controlled by uOS.

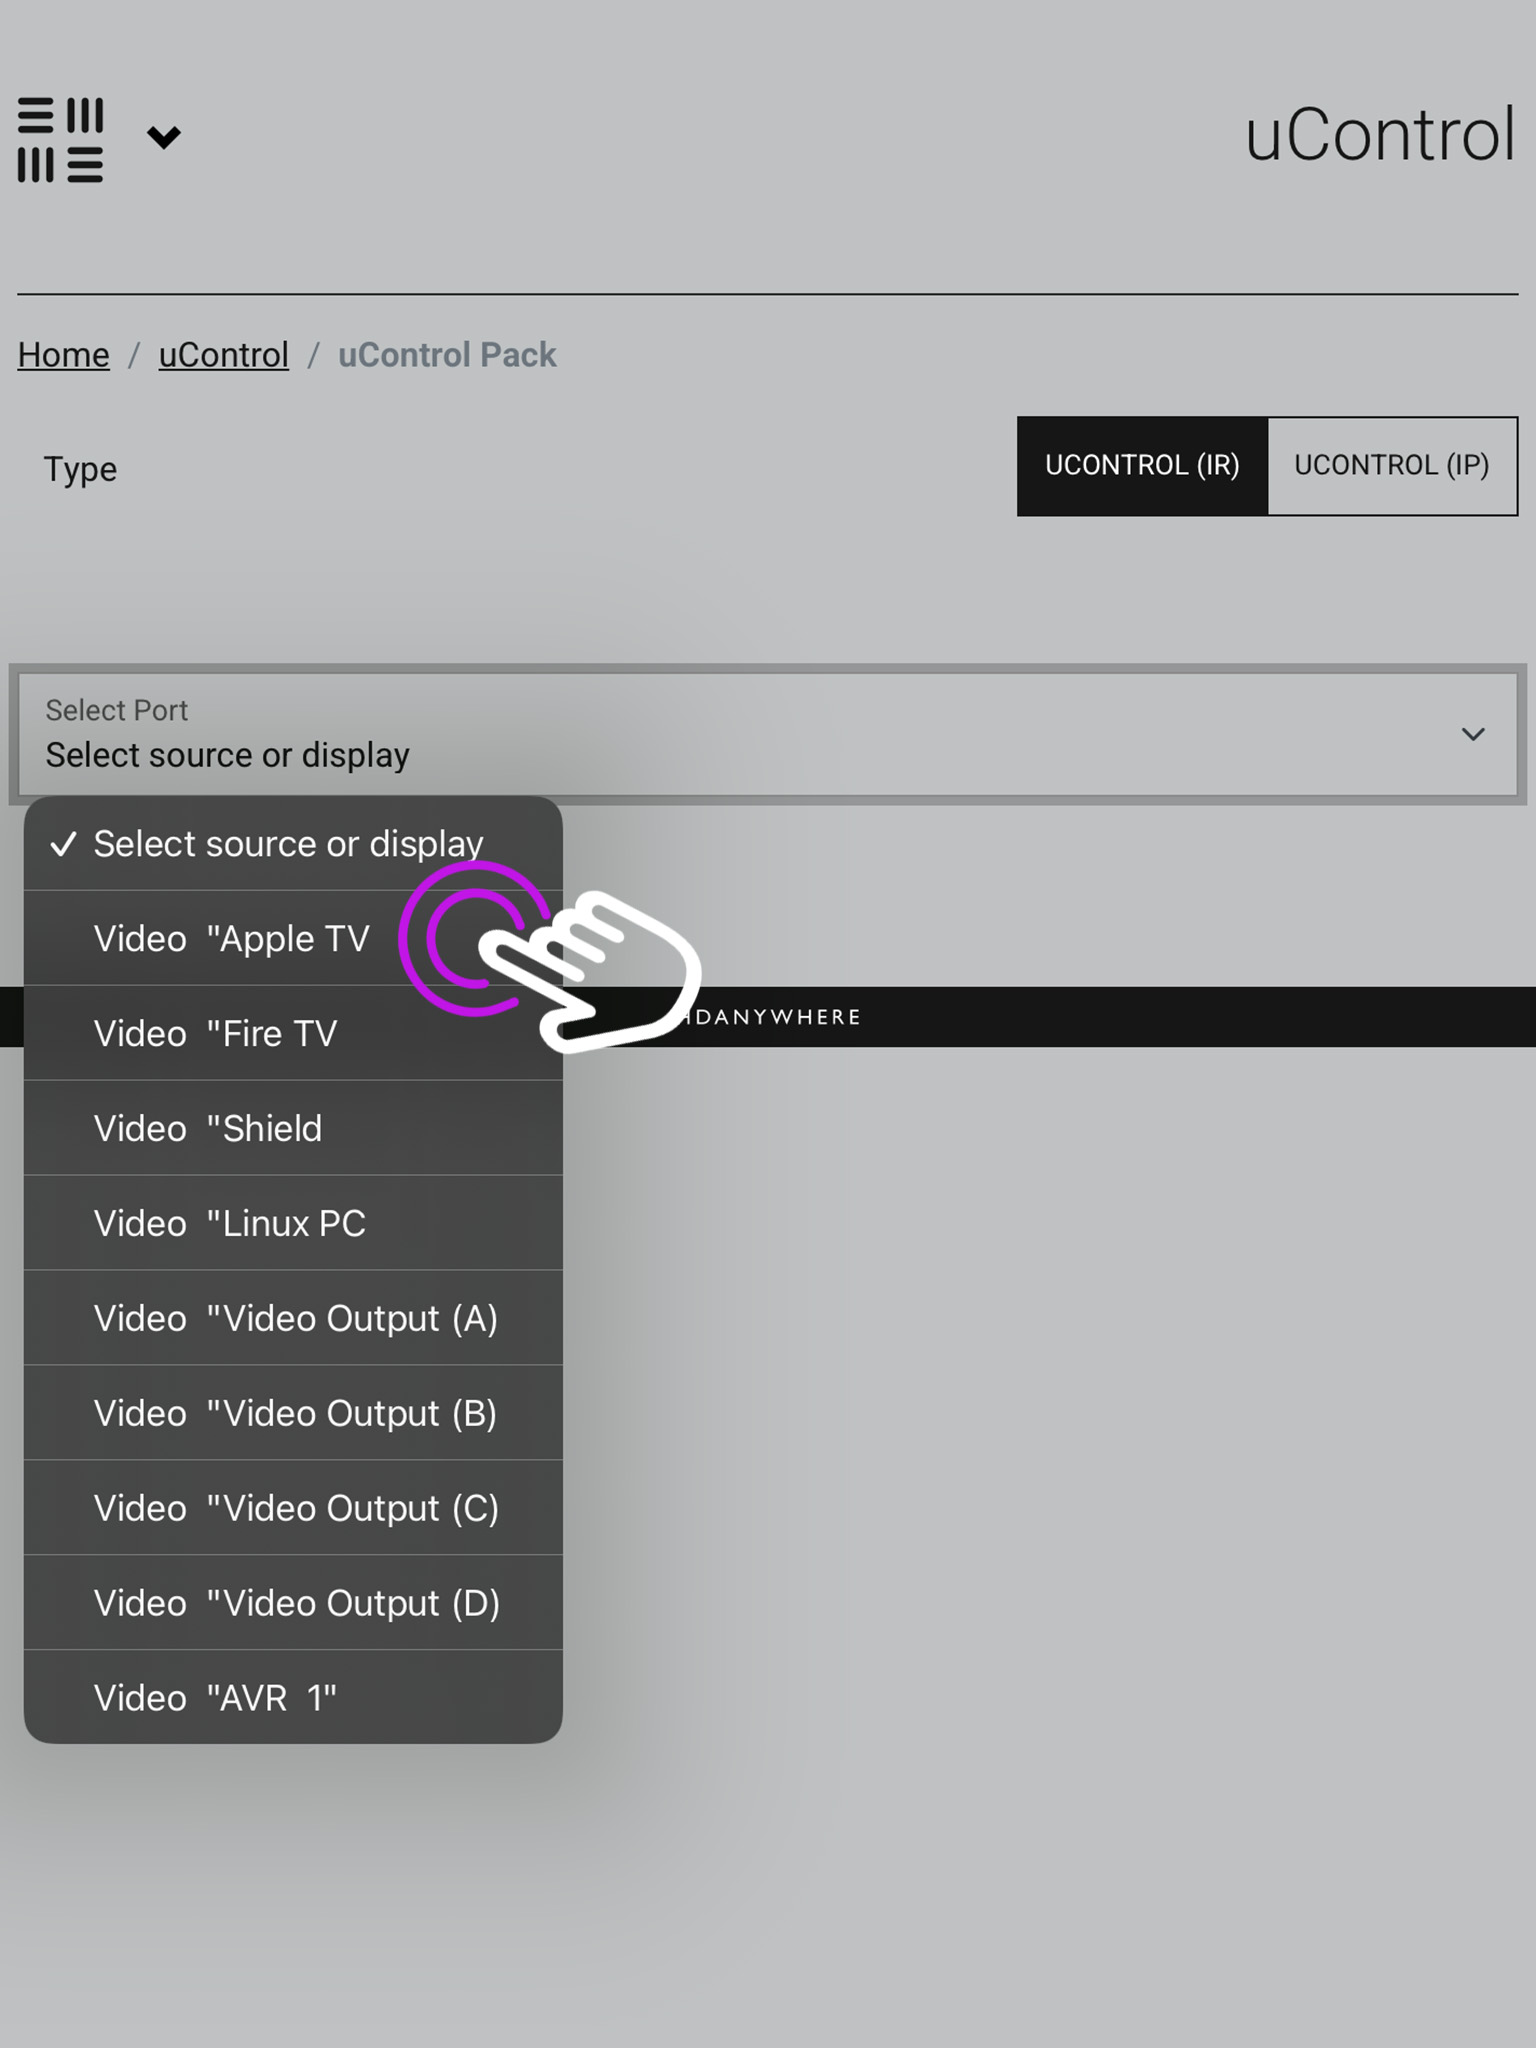
    6. Port Select

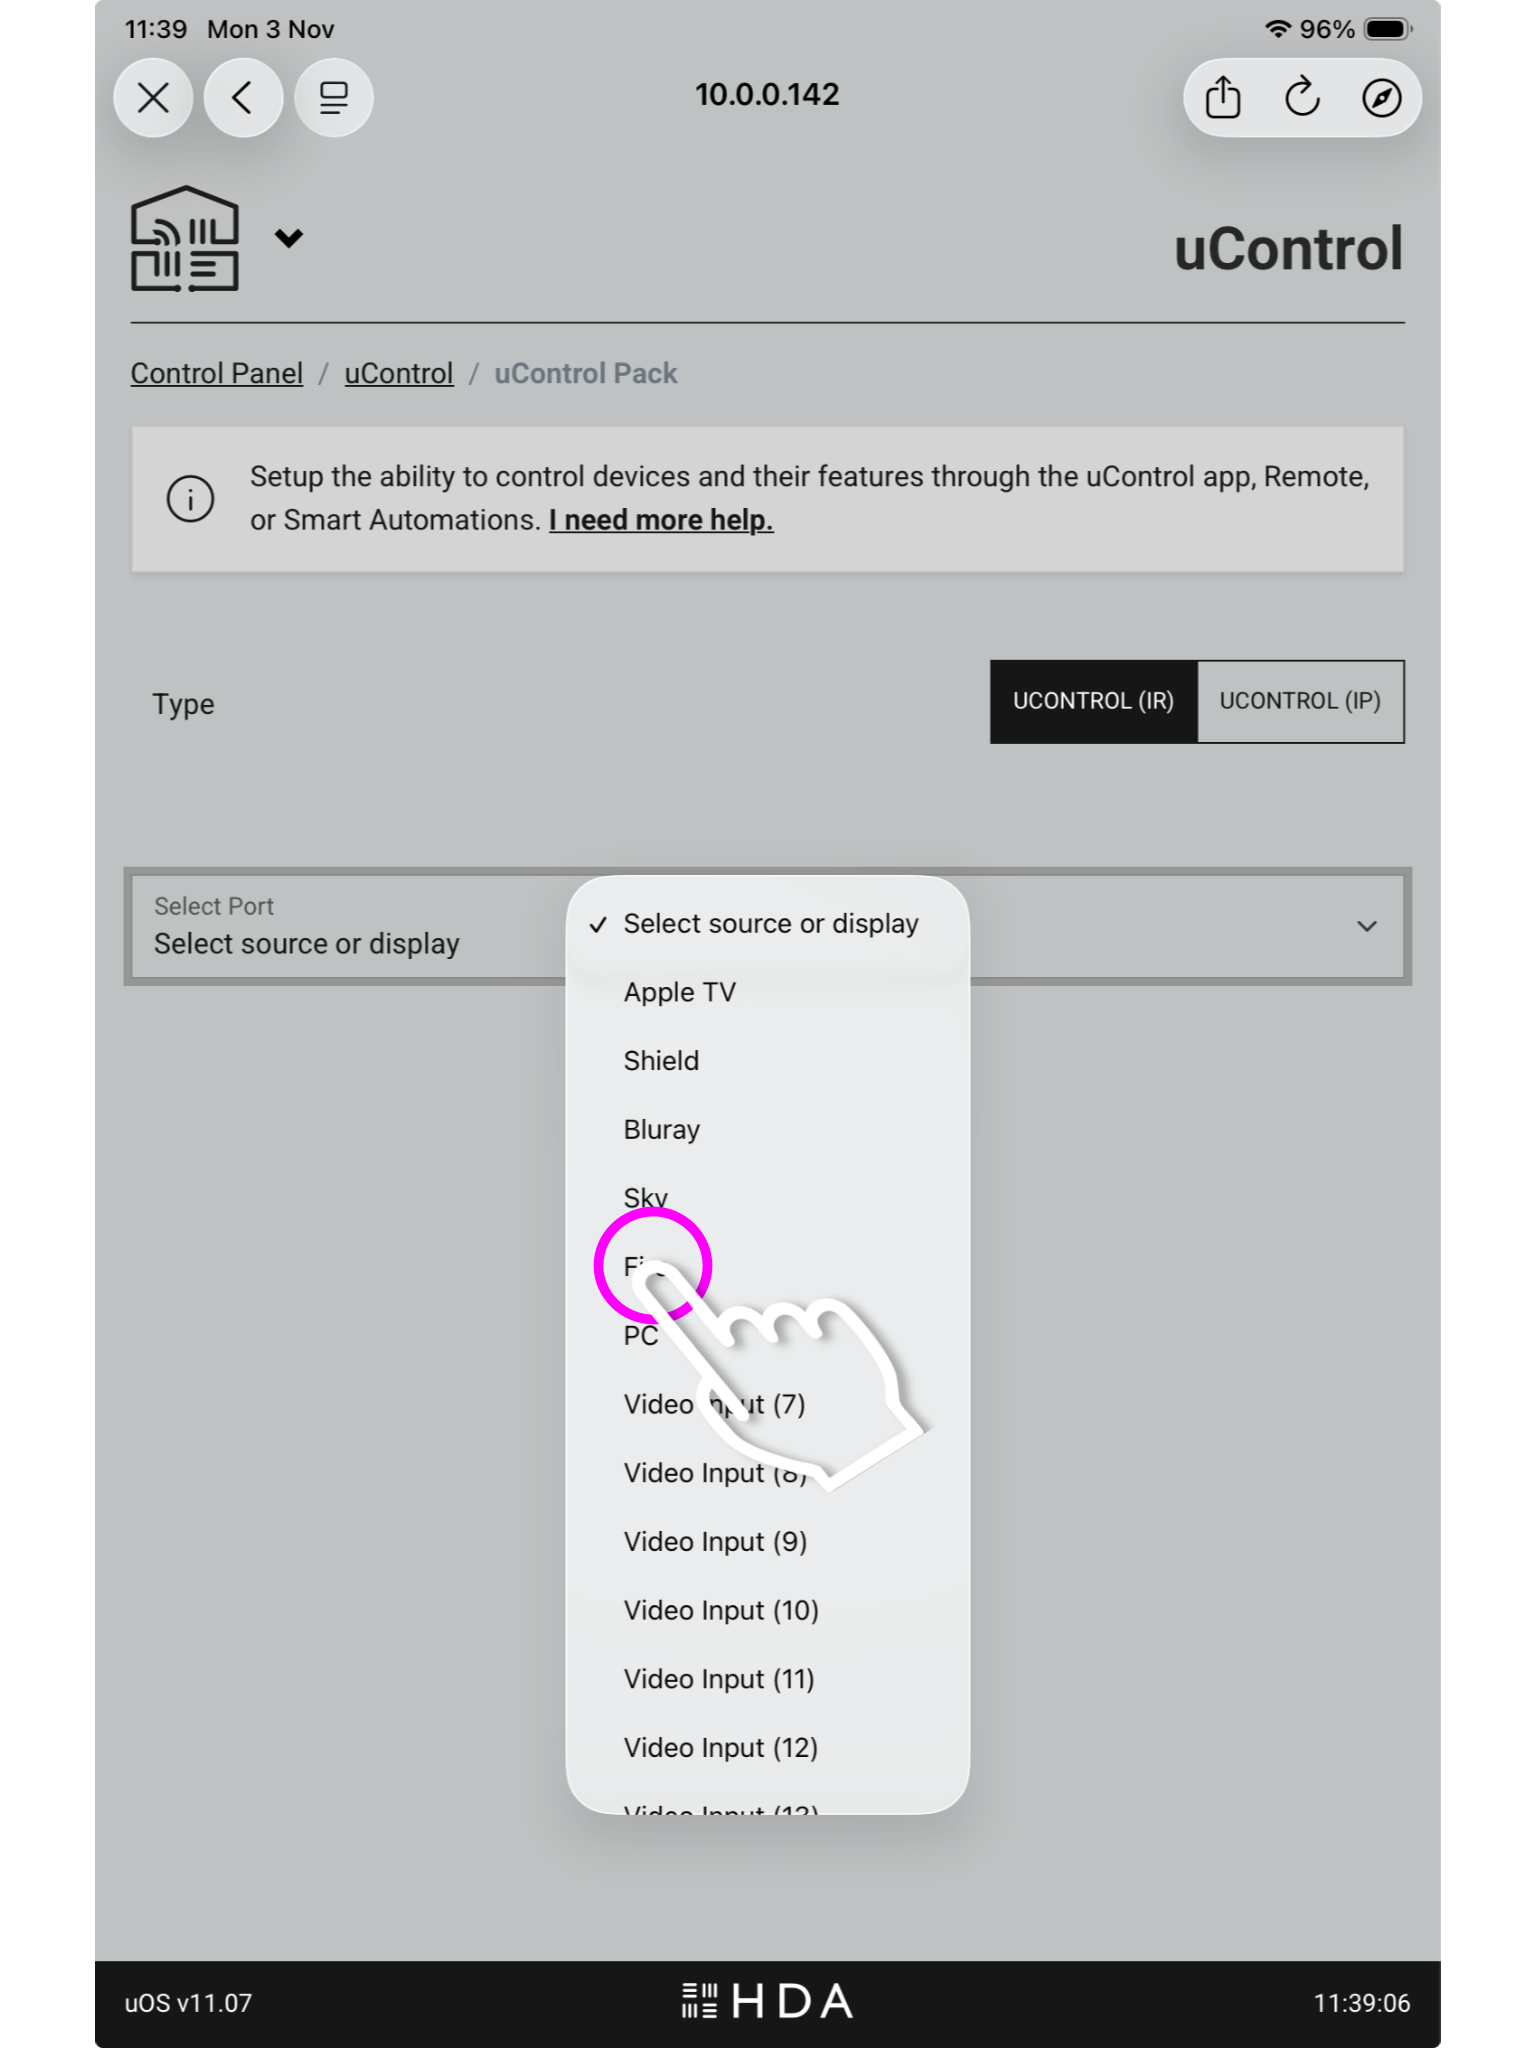
    You must now select if you’re installing a pack for a source device,a display/output or assigning it to a zone.

    image 6-6
    You may have labelled your ports after the sources plugged into the HDA device in the setup like above, or they may remain named numerically.

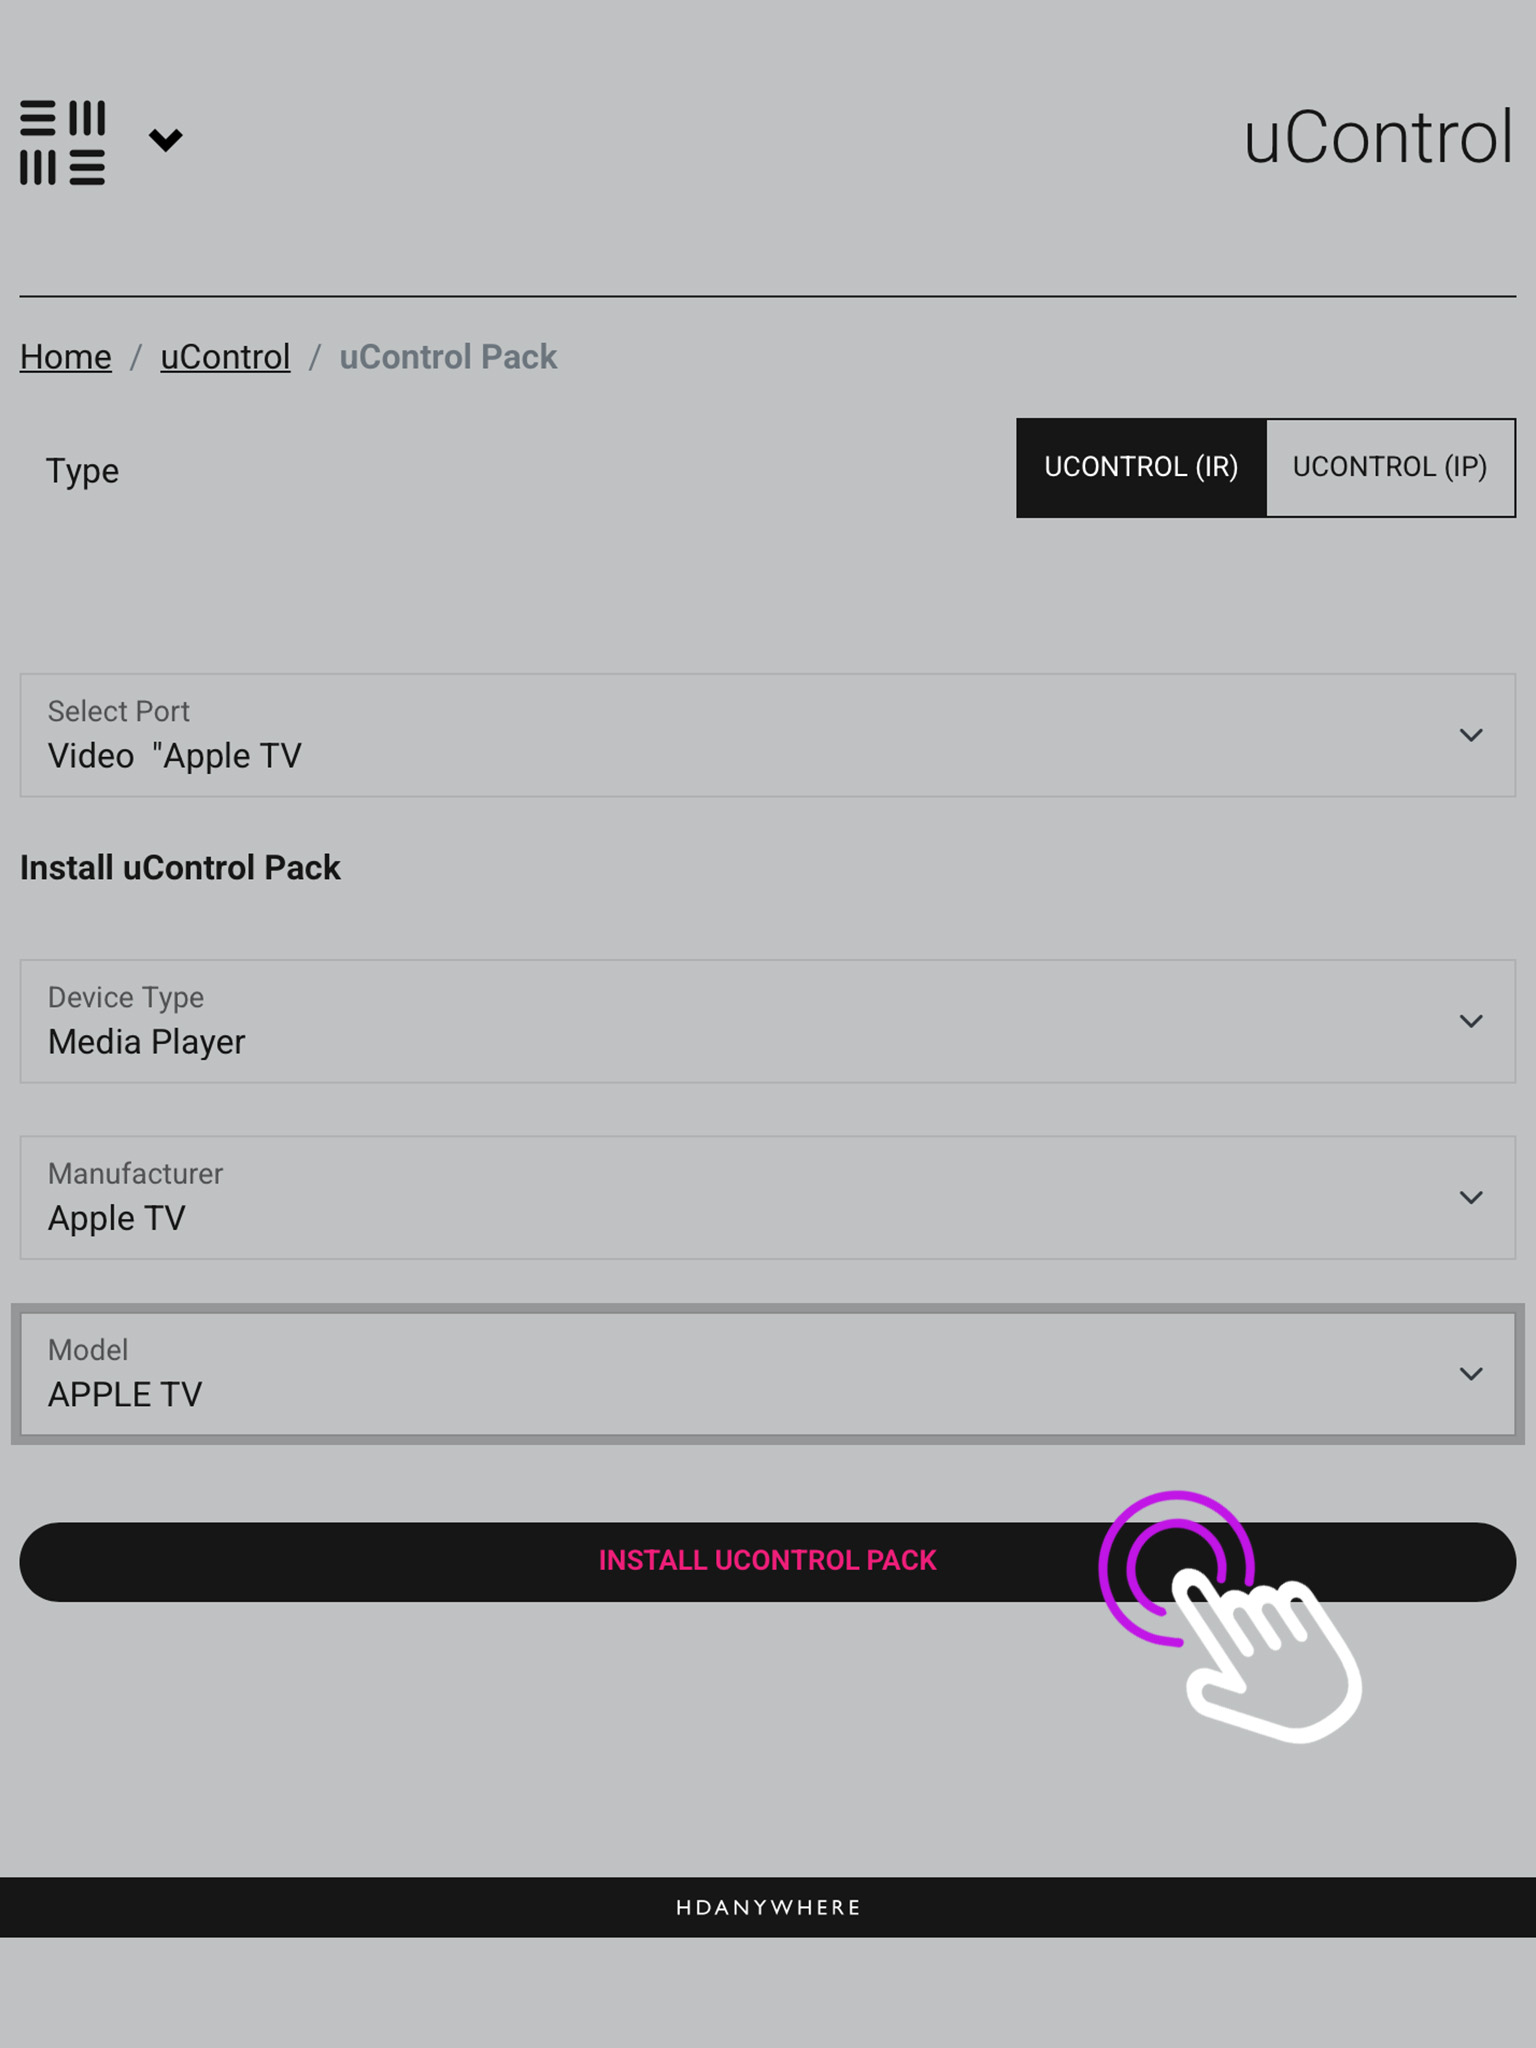
    7. Pack Information

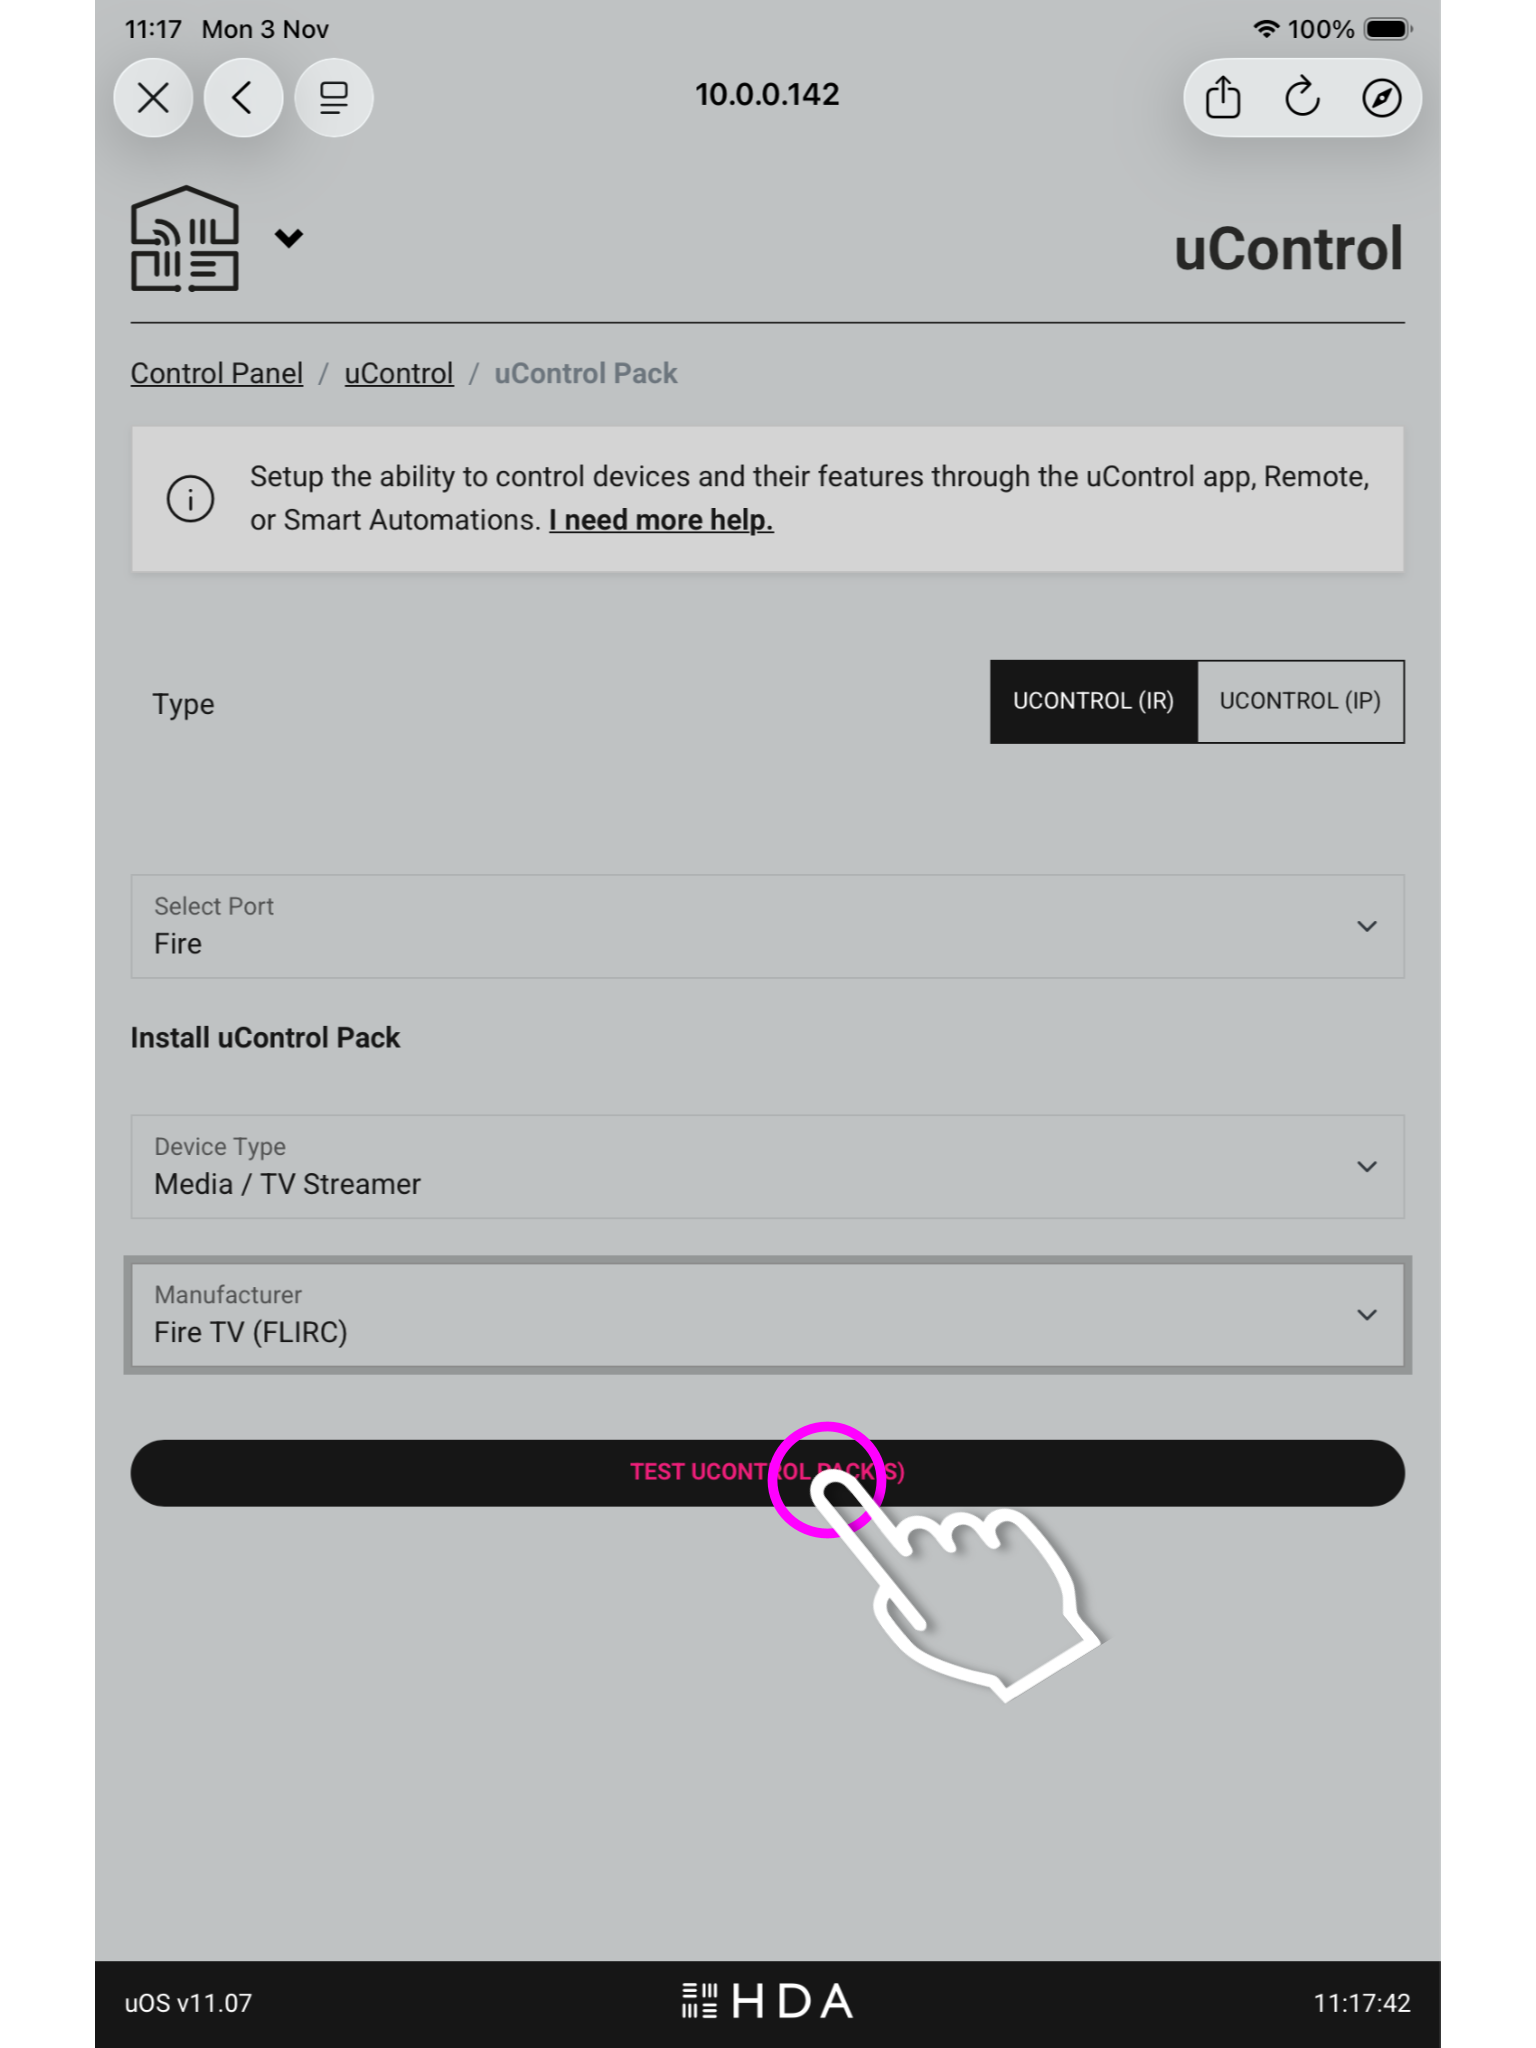
    Once you have chosen the port you need to select the device type and its manufacturer then press install.

    In the top right you will see the option to switch between IR and IP packs.

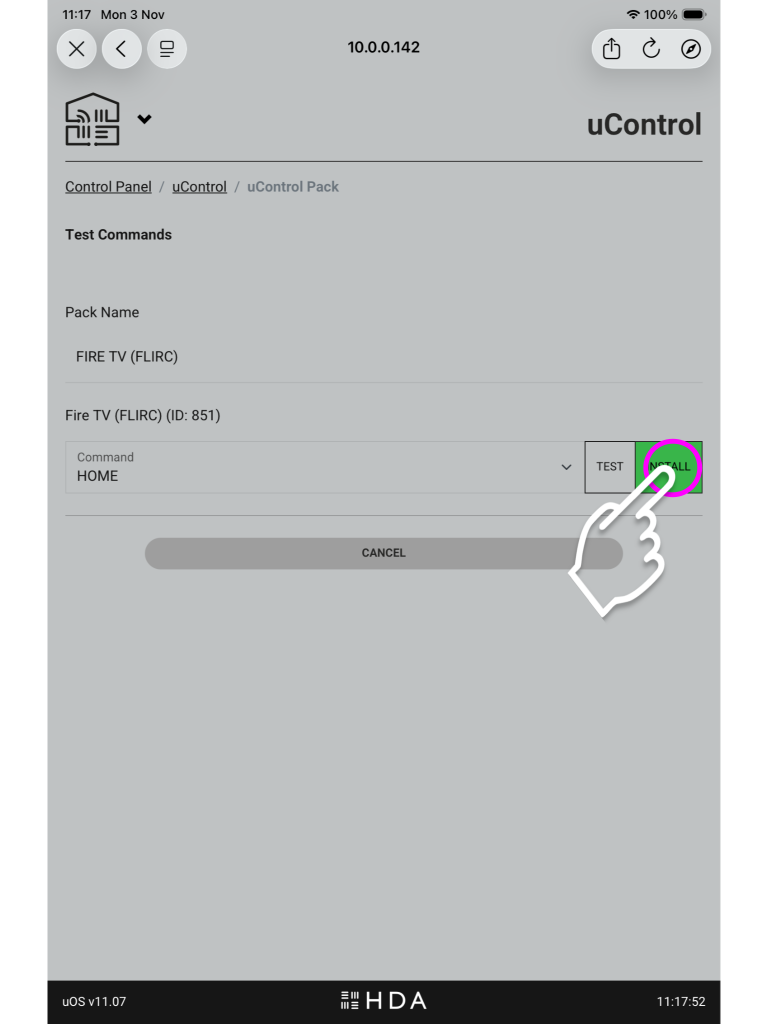
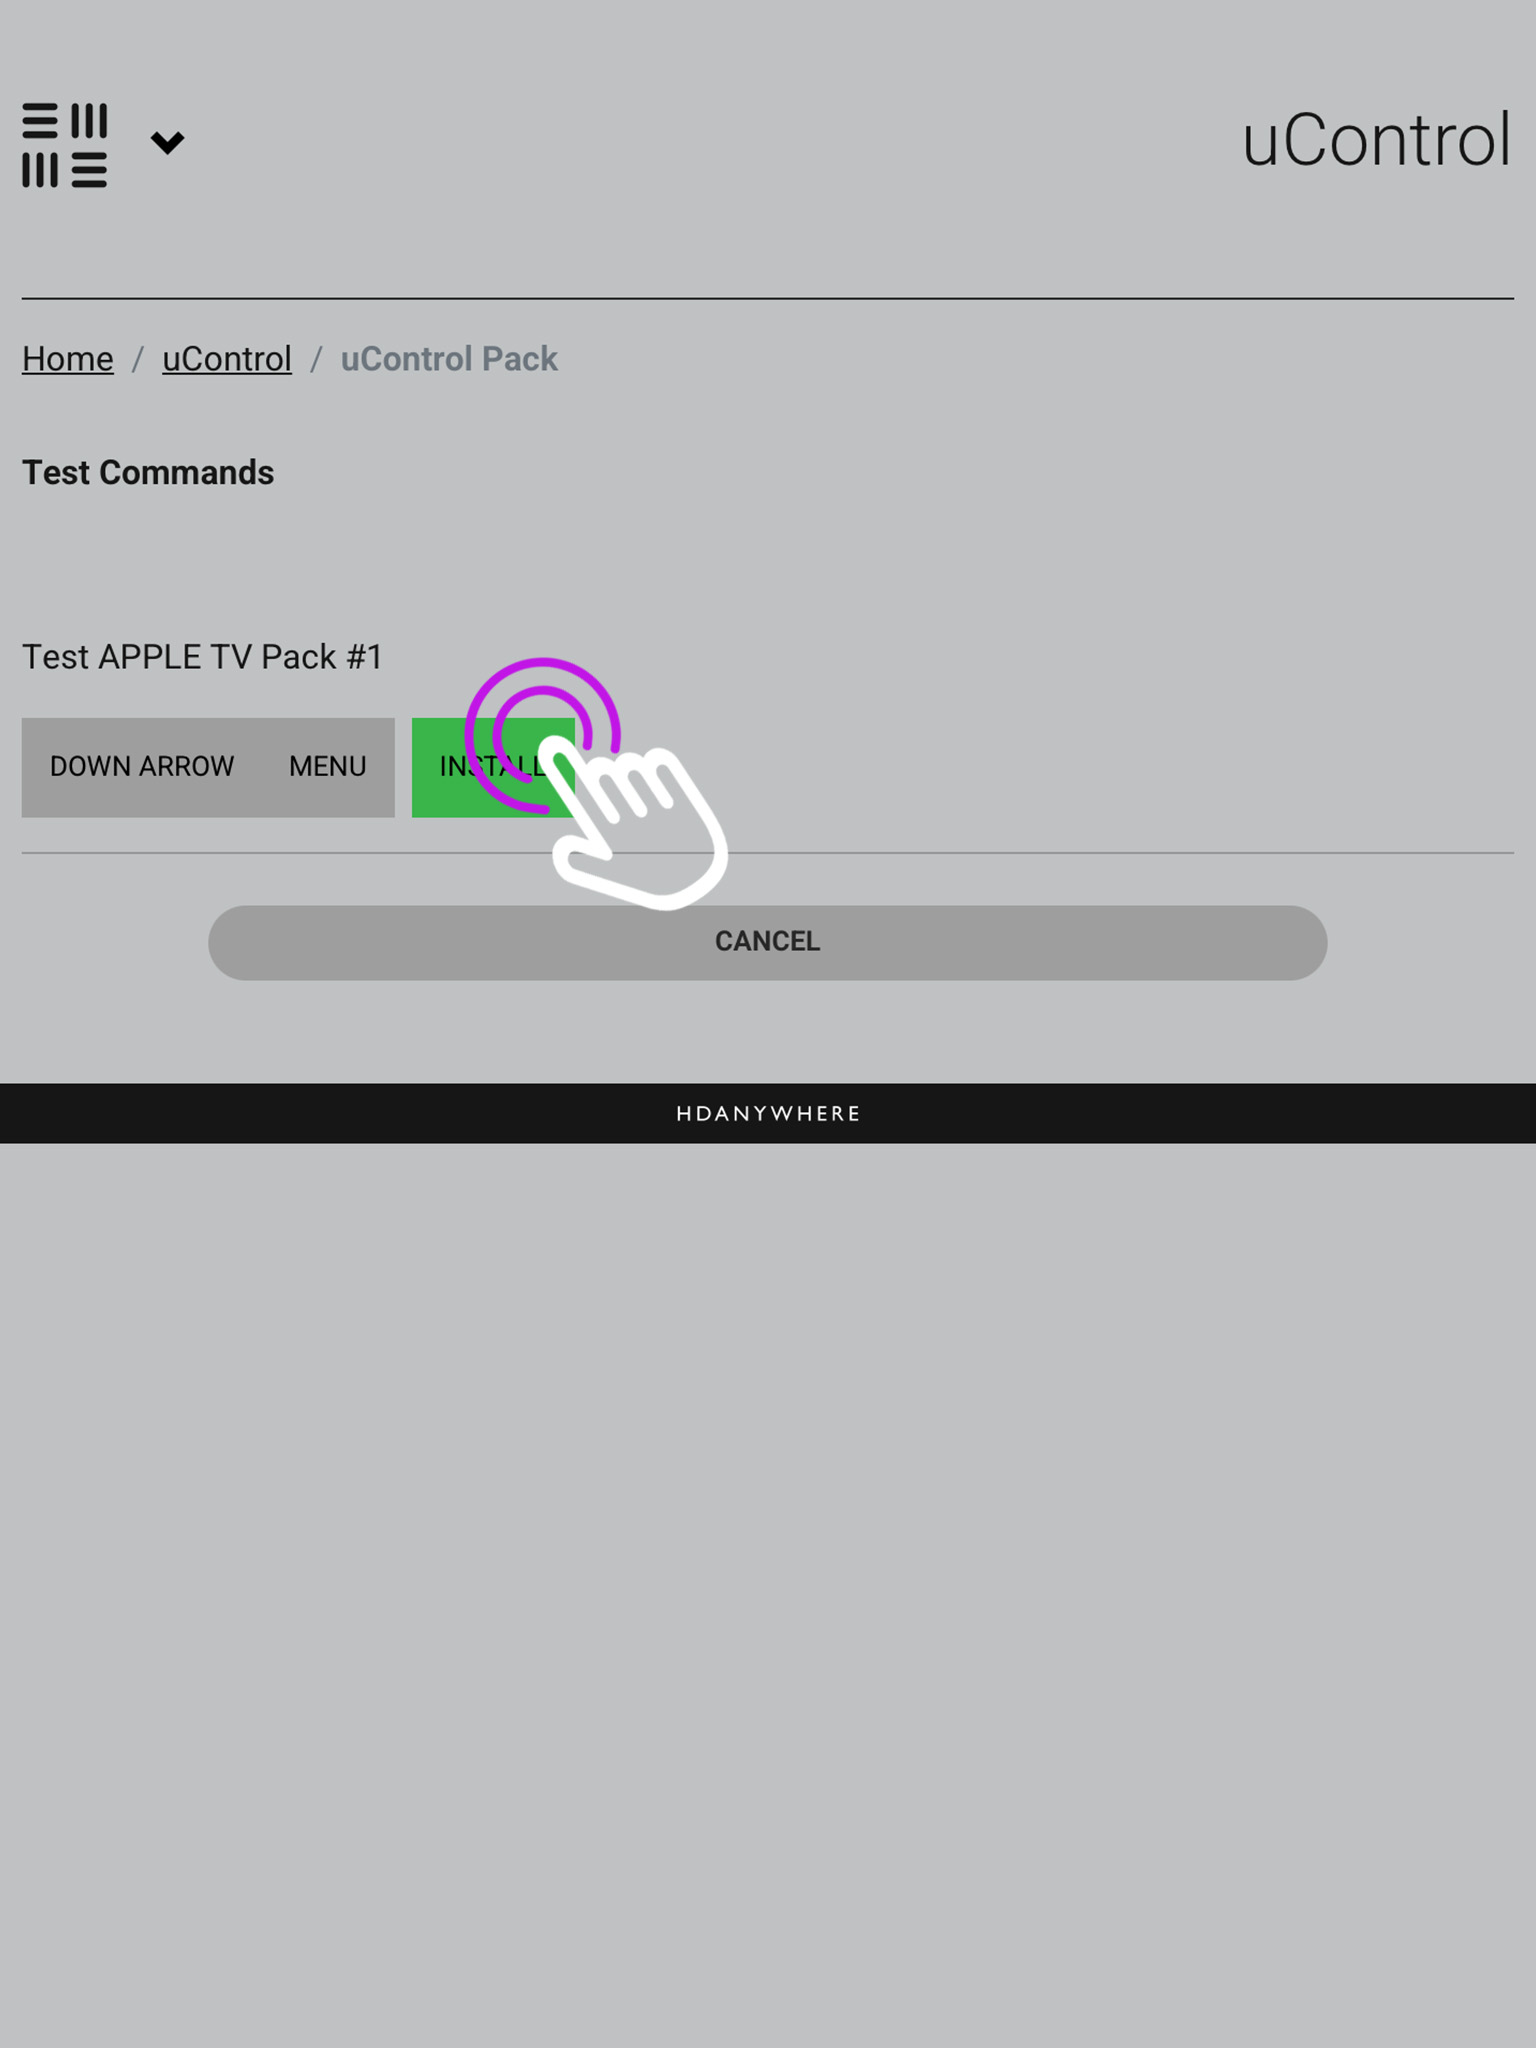
    8. Testing the pack

    The last step is to test the commands to make sure you have the correct pack installed, if you get a response press install.

    image 7
    If you do not see a response, ensure you have the IR trasnmitter plugged into the correct “Source IR Out” port and have the bud itself covering the IR window of the source device.

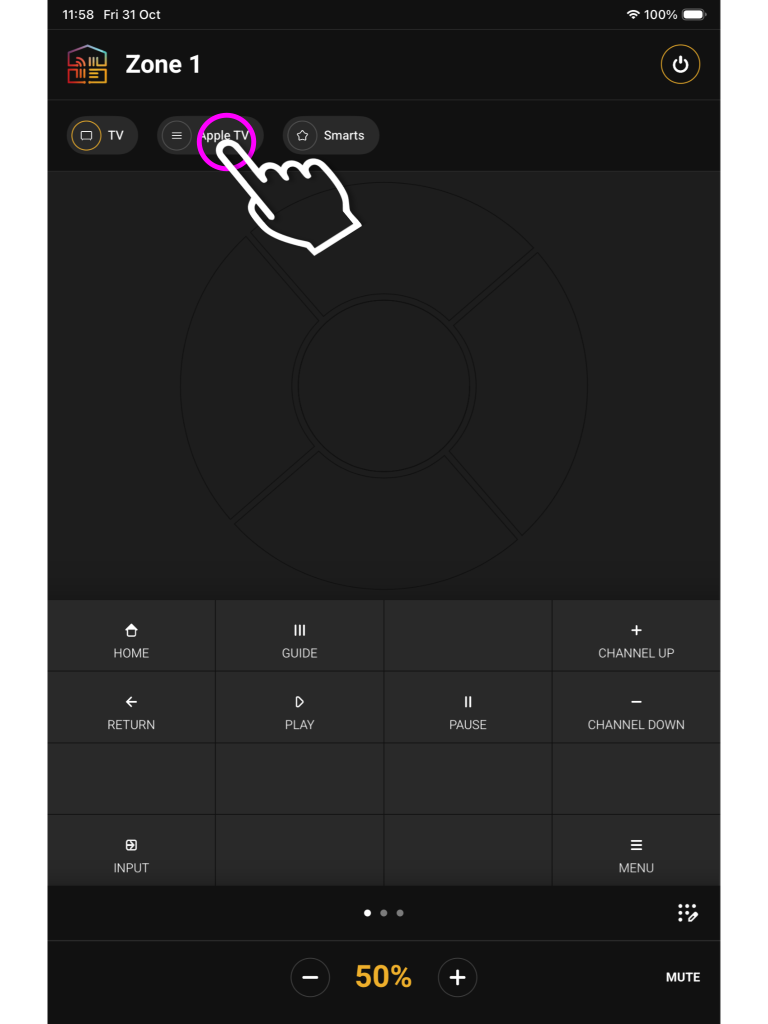
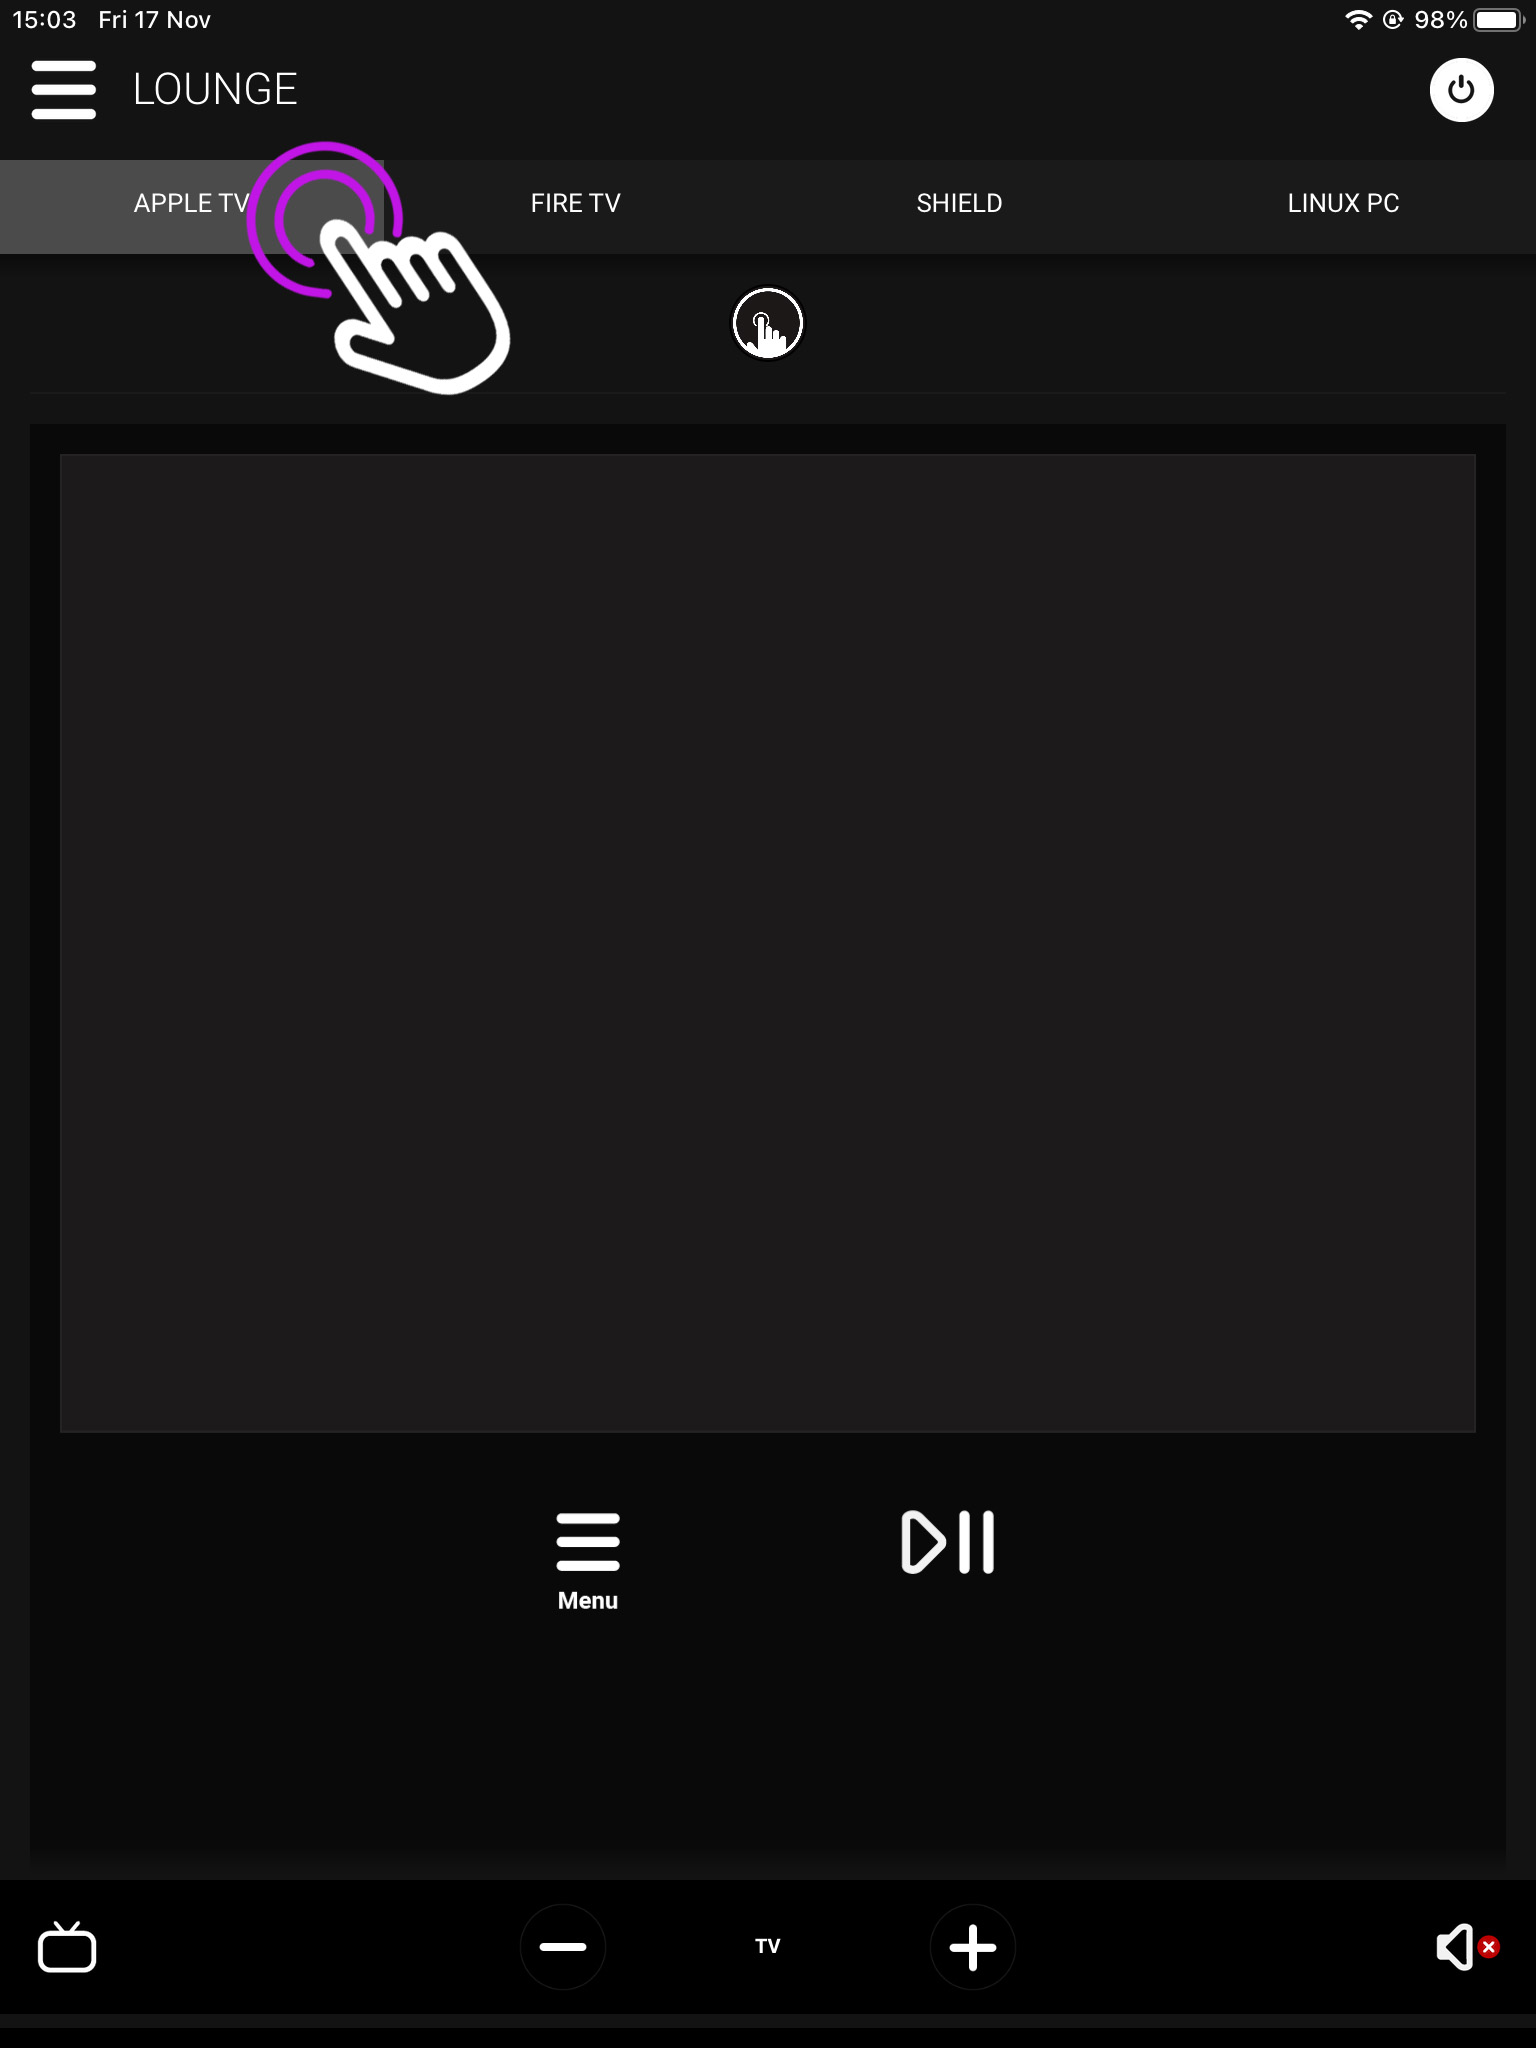
    9. Using the pack in uControl Homepage

    You will see your available sources at the top of the uControl Homepage, and you can use these icons to switch between inputs.

    image 9
    The pack UI will have the buttons which would appear on the remote, along with a gesture box for navigation and volume controls located at the bottom.


    Installing uControl Packs from uControl

    1. Open uControl

    From the main screen navigate to the menu in the top left.

    What you see on the main screen may differ, however, the three lined menu bar will still be there.

    2. Navigate to your settings

    Look for the settings icon located in the bottom left corner.

    The icon may vary depending on your mobile devices size, although it will still be in the bottom left corner.

    3. Access System

    From here press Access System.

    This is your device page which displays your units model and IP address.

    4. uControl Packs

    In this menu press “Manage uControl Packs”.

    This will take you to the page where you can download IR and IP packs, and also create IP connections for integrating 3rd party controllers.

    5. Add New

    Now we are in uOS press Add New and a pop up window will appear, press uControl Pack.

    The below option (Setup an IP device), is for integrating third party controllers to be controlled by uOS.

    6. Port Select

    You must now select if you’re installing a pack for a source device or a display/output.

    You may have labelled your ports after the sources plugged into the HDA device in the setup like above, or they may remain named numerically.

    7. Pack Information

    Once you have chosen the port you need to select the device type, its manufacturer and model then press install.

    In the top right you will see the option to switch between IR and IP packs.

    8. Testing the pack

    The last step is to test the commands to make sure you have the correct pack installed, if you get a response press install.

    If you do not see a response, ensure you have the IR trasnmitter plugged into the correct “Source IR Out” port and have the bud itself covering the IR window of the source device.

    9. Using the pack in uControl Homepage

    You will see your available sources at the top of the uControl Homepage, and you can use these icons to switch between inputs.

    The pack UI will have the buttons which would appear on the remote, along with a gesture box for navigation and volume controls located at the bottom.

  • Replacing the uControl Remote’s battery (Step-by-step instructions)

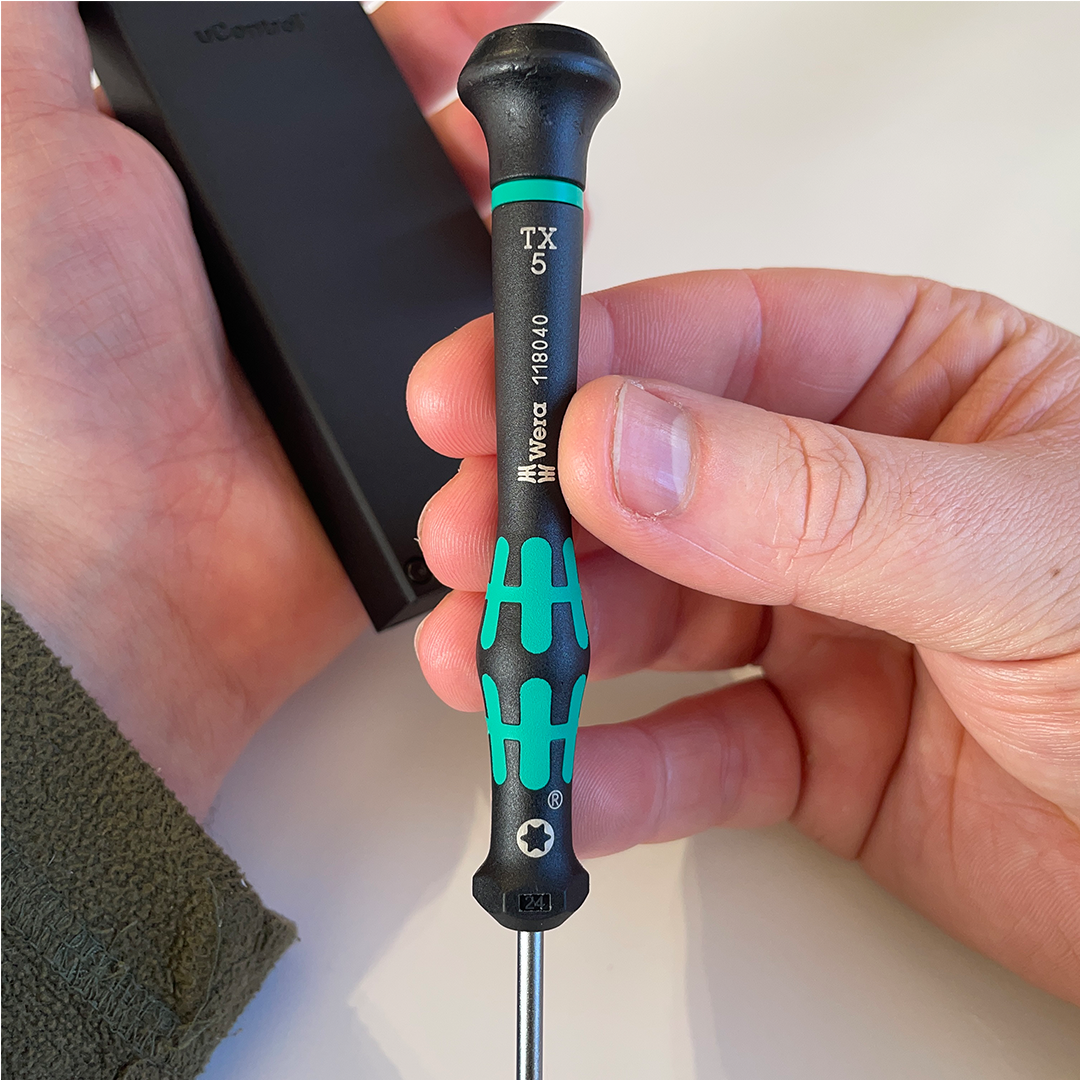
    Required tools

    Make sure you have a T5 Torx Screwdriver to remove the screws on the uControl Remote.


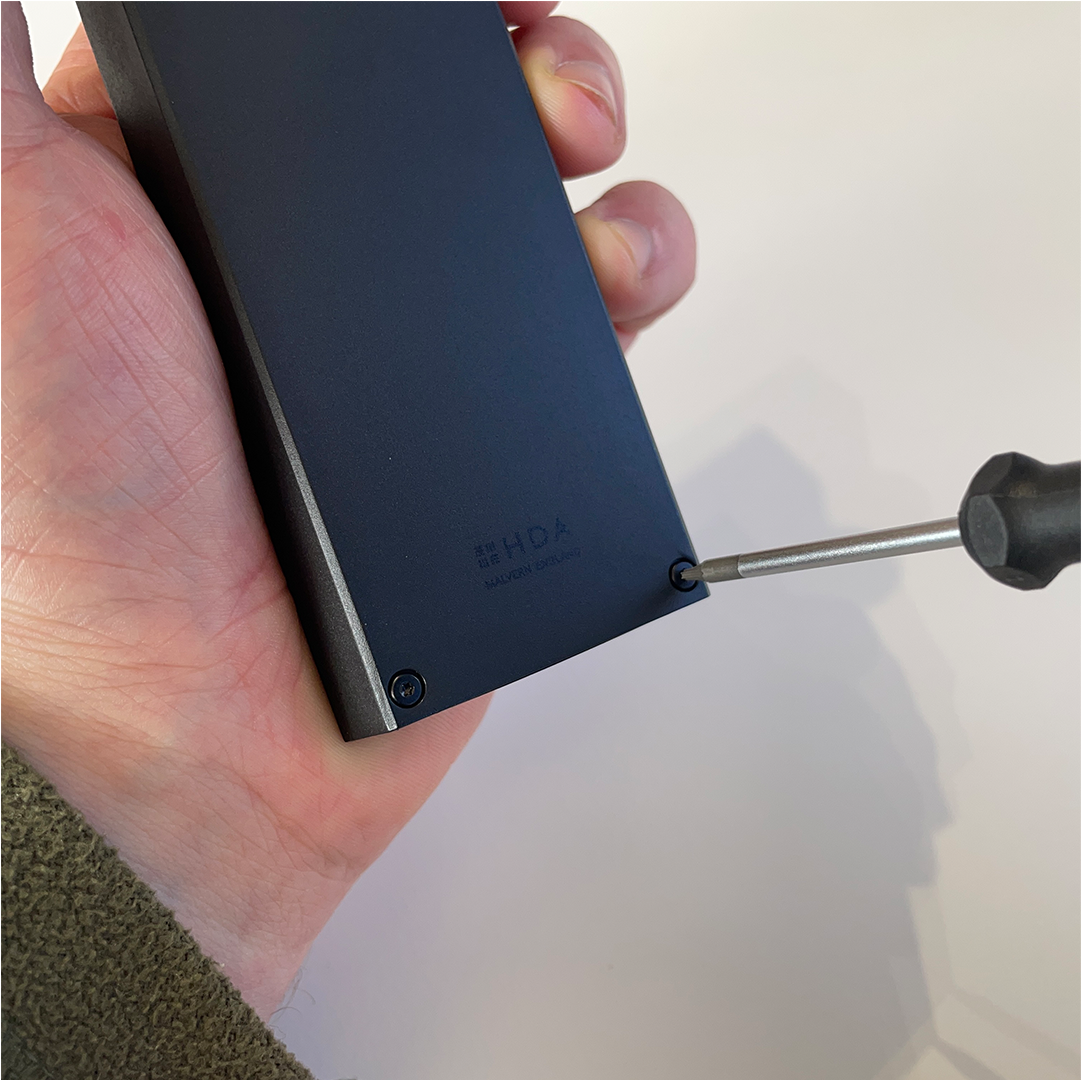
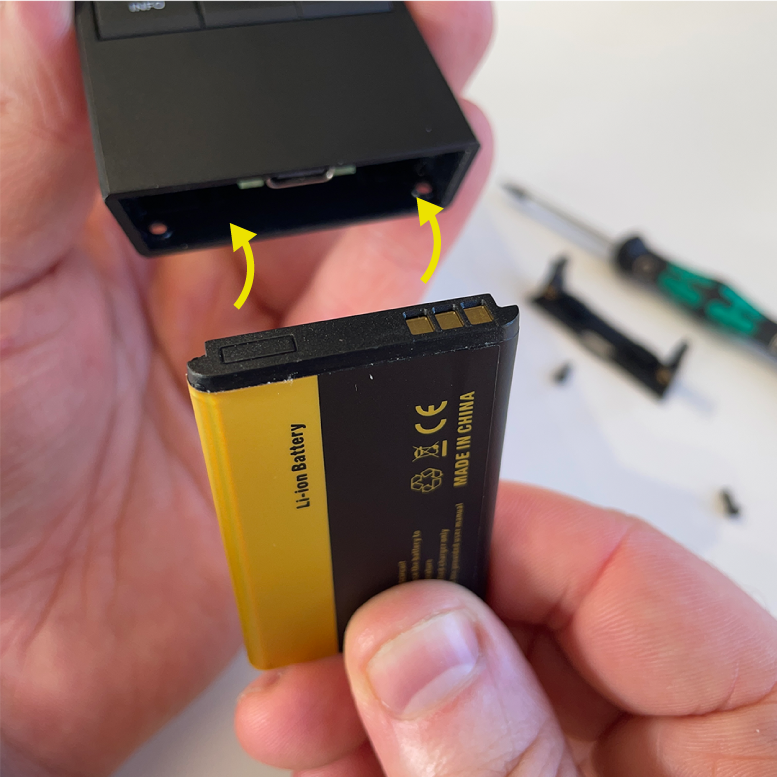
    Flip your uControl Remote over and look to the bottom of the device, you will notice two screws, remove them with your T5 screwdriver.


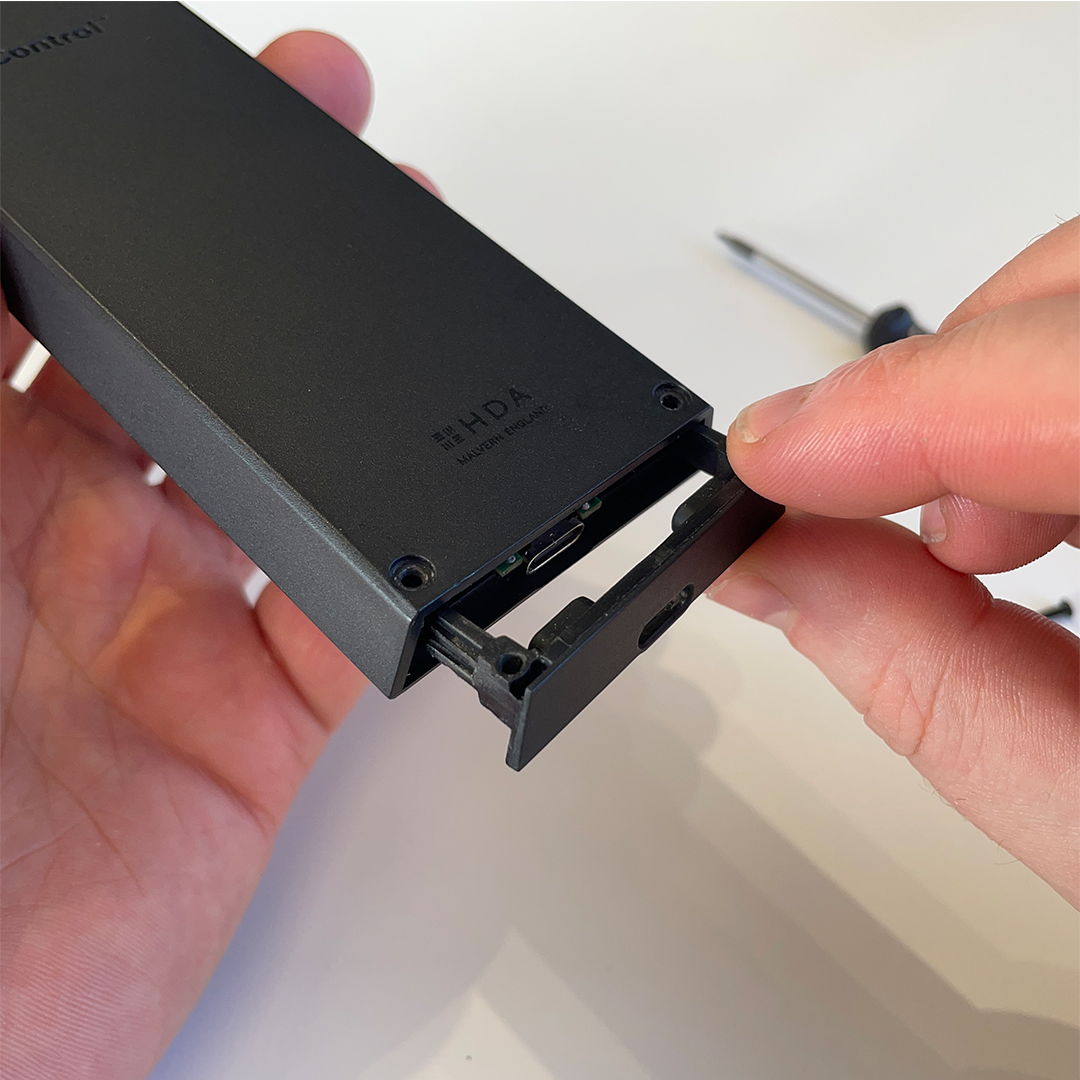
    The screws will release the battery hatch and use your fingers to extract it from the main case.


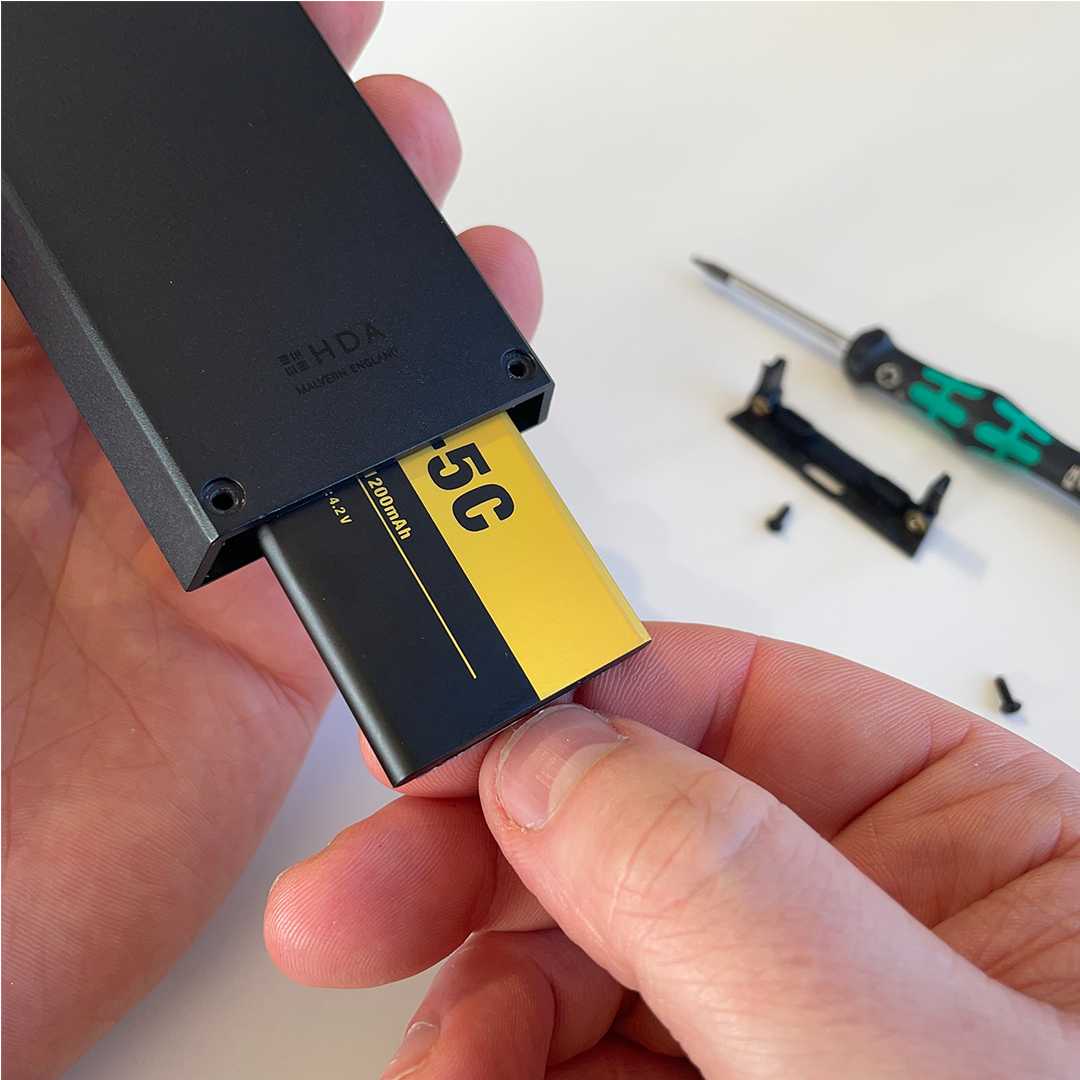
    Gently tip the uControl Remote to remove the battery, it should slide out with little resistance.


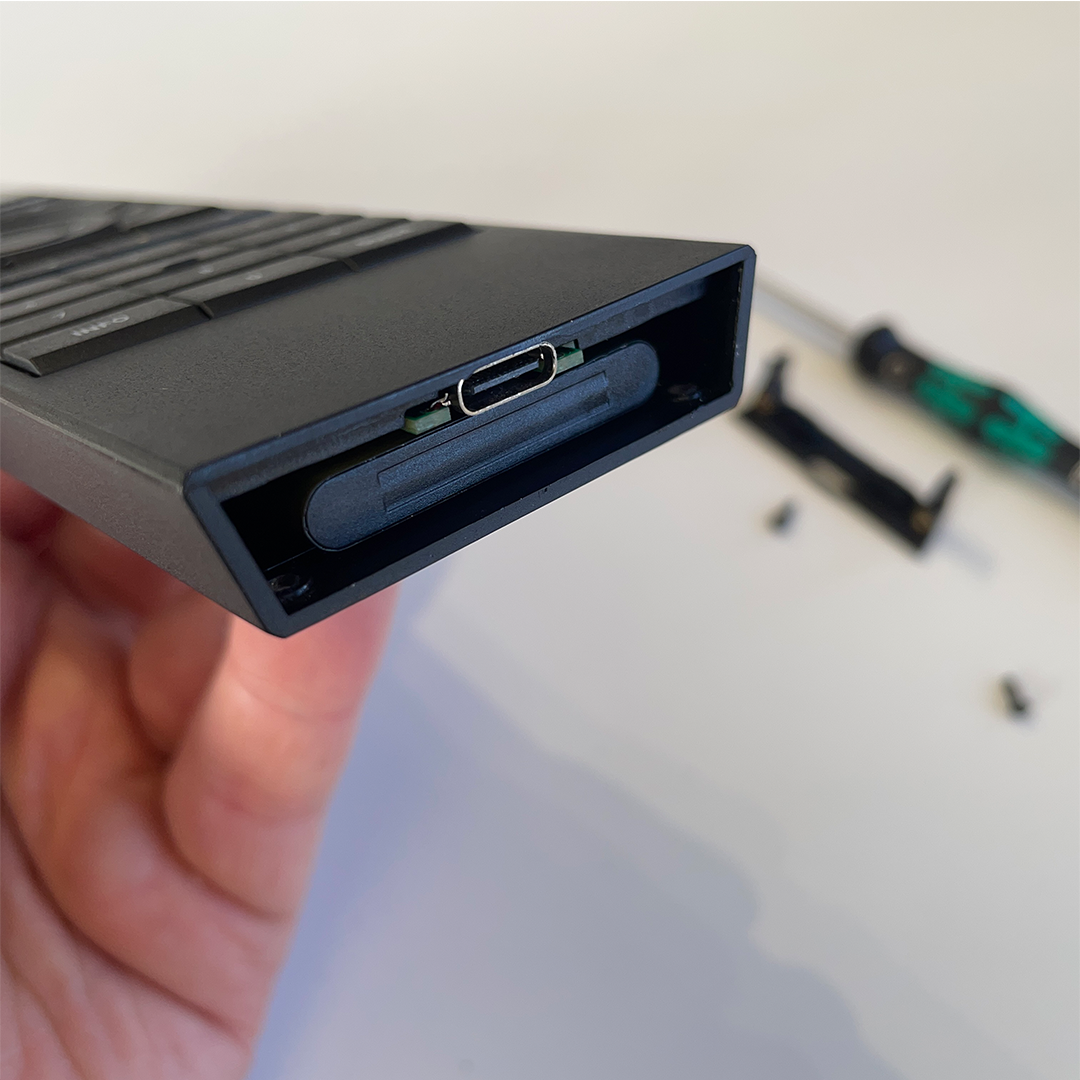
    Insert the new battery with the connector on the right-hand side, ensuring the connectors face inward. Once inserted, the connectors should be hidden. If you can see them, the battery is in the wrong way.


    Ensure that you can not see the battery connector once inserted.


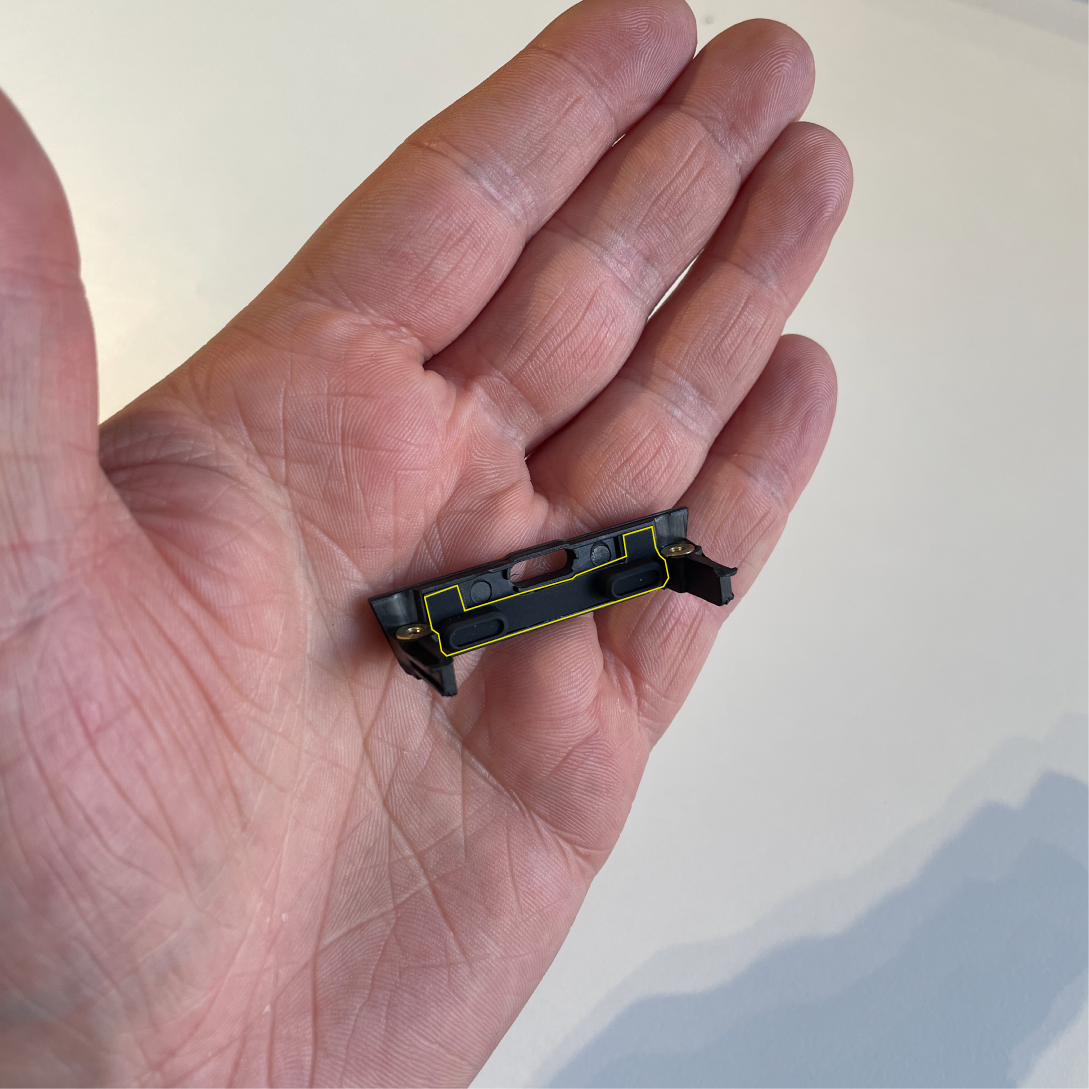
    Before closing the battery hatch, make sure that the rubber stopper is correctly seated as indicated by the yellow outline.
  • Controlling Rako scenes and lights from uOS

    This guide will show you how to trigger Scenes or even individual Lights and Blinds using the Rako API

    • For Rako Hub API click Here
    • For Rako Bridge API click Here


    Rako Hub API


    Before you begin, you will need:


    • The Rako Hub IP address
    • A fully-commissioned Rako system with a Rako Hub on the same network as the HDA system
    • A fully-commissioned HDA or uControl system with the latest version of uOS (MHUB-OS does not support IP integrations) on the same network as the Rako system.
    • A tablet or laptop using any of the most popular browsers (or an iPhone with the uControl app, at the very least) on the same network as the HDA system.


    Step 1:Get data about the Rako system

    You need to know:

    • Room ID
    • Channel ID
    • Scene ID

    Use your browser: type http://[Rako Hub IP]/rako.xml (e.g.http://192.168.1.13/rako.xml)

    The Example below shows Room ID 17, Channel ID 1 and Scene ID 1


    <Room id="17"> -Room ID
    <Type>Lights</Type>
    <Title>Office</Title>
    <Channel id="1"> -Channel ID
    <type>Default</type>
    <Name>Office Spotlights</Name>
    <Levels>FFBF7F3F000000000000000000000000</Levels>
    </Channel>
    <Scene id="1"> -Scene ID
    <Name>White</Name>
    </Scene>
    </Channel>

    If no scenes are listed, default scenes are set as –

    Scene 1 – All on 100%
    Scene 2 – All on 75%
    Scene 3 – All on 50%
    Scene 4 – All on 25%
    Scene 0 – All Off

    Based off this we can build the command

    SUB,BASIC,V4,uControl
    SEND,17,1,SCENE,1


    Step 2:Build an IP Connection in uOS


    command-generator-link
    Examples of the most popular Rako commands – Rako Command Examples


    Rako Bridge API


    Before you begin, you will need:


    • A fully-commissioned Rako system with a Rako Hub on the same network as the HDA system
    • A fully-commissioned HDA or uControl system with the latest version of uOS (MHUB-OS does not support IP integrations) on the same network as the Rako system.
    • A tablet or laptop using any of the most popular browsers (or an iPhone with the uControl app, at the very least) on the same network as the HDA system.


    Step 1:Get data about the Rako system

    You need to know:

    • Room ID
    • Channel ID
    • Scene ID

    – Use Rasoft Pro if you set up the Rako yourself or have been given the Project File.
    – Use your browser: type http://[Rako Hub IP]/rako.xml (e.g.http://192.168.1.13/rako.xml)

    Example of Rako XML data


    Step 2:Build an IP Connection and Function in uOS


    Step 3:Build Functions to control individual Channels or trigger Scenes


    Examples of the most popular Rako commands – Rako Command Examples

  • Controlling Loxone from uOS

    This guide will show you how to trigger events in a Loxone system using a ‘Virtual Text Input’. This allows us to send a command that can trigger switching, lighting actions, shading and more.

    Before you begin, you will need:


    • The Loxone Miniserver IP address
    • A fully-commissioned Loxone system with the Miniserver on the same network as the HDA system
    • A fully-commissioned HDA or uControl system with the latest version of uOS (MHUB-OS does not support IP integrations) on the same network as the Loxone system.
    • A laptop running the Loxone config software
    • Access to uOS using any of the most popular browsers (or an iPhone with the uControl app, at the very least) on the same network as the HDA system


    Step 2:Build an IP Connection in uOS


    Examples of the most popular Loxone commands – Loxone Command Examples

  • Controlling Somfy from uOS

    This guide will show you how to trigger events on a Somfy Tahoma system.

    Before you begin, you will need:

    • A configured Somfy Tahoma hub, with connected devices configured
    • The Tahoma hub registered to a user account
    • The user account login credentials
    • The Tahoma hub pin (located on the bottom of the hub.)


    Step 2:Build an IP Connection in uOS


    command-generator-link

    Examples of Somfy commands – Somfy Command Examples