Category: Miscellaneous

  • uOS 11 – A Guide to Every Page

    IMPORTANT: For the best setup experience, we recommend using a tablet or laptop instead of a smartphone. Using a larger screen makes it easier to navigate the setup process and view all the options clearly.

    Pages
    THIS GUIDE IS FOR uOS 11 AND ABOVE:
    This guide is for HDA devices that are operating uOS 11 or above and have completed the First Boot Process. This guide does not apply to ANY hardware running MHUB-OS or uOS devices that are running on version 11 or lower. How to update your system.


    Accessing the menu

    The uOS interface features a hidden dropdown menu that provides access to all system settings. To reveal the menu, simply click on the uControl logo located in the top left corner of the screen.
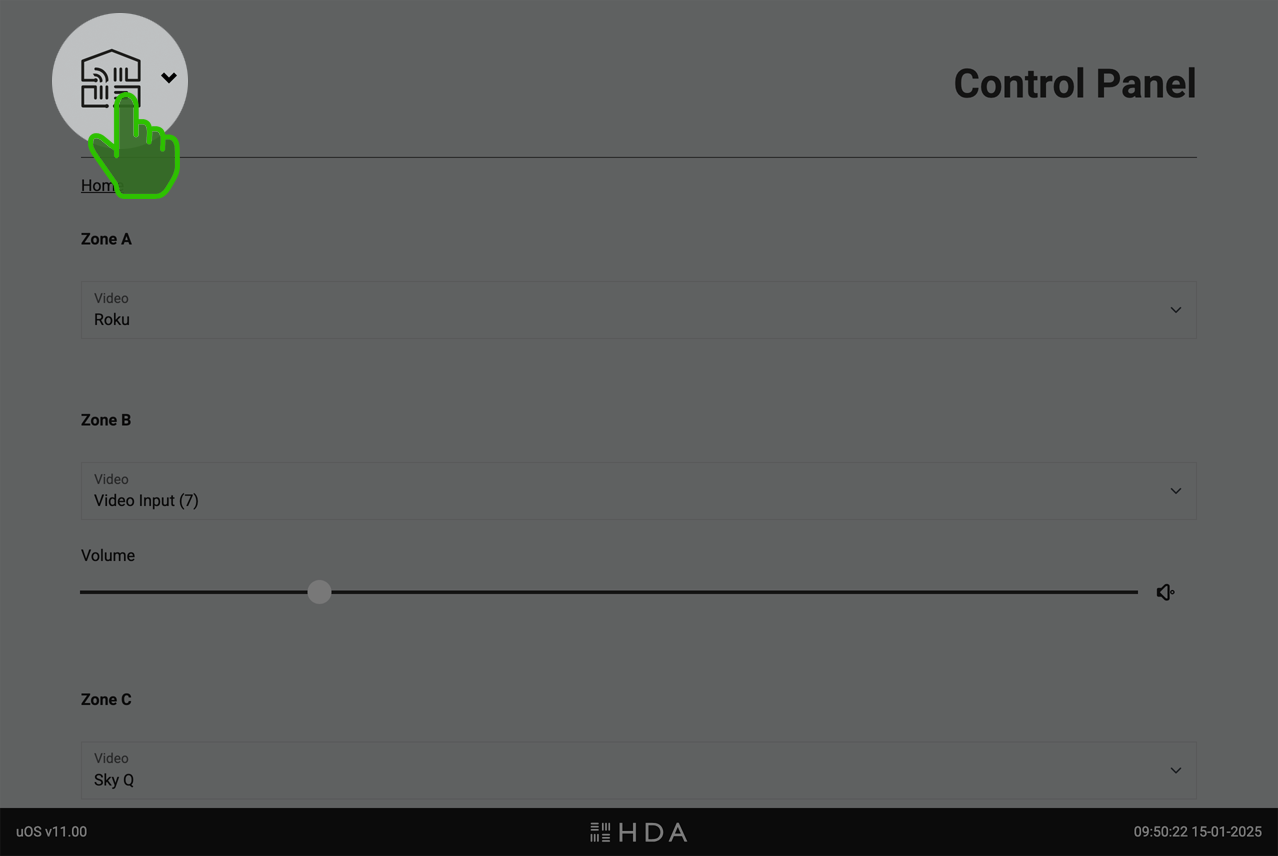
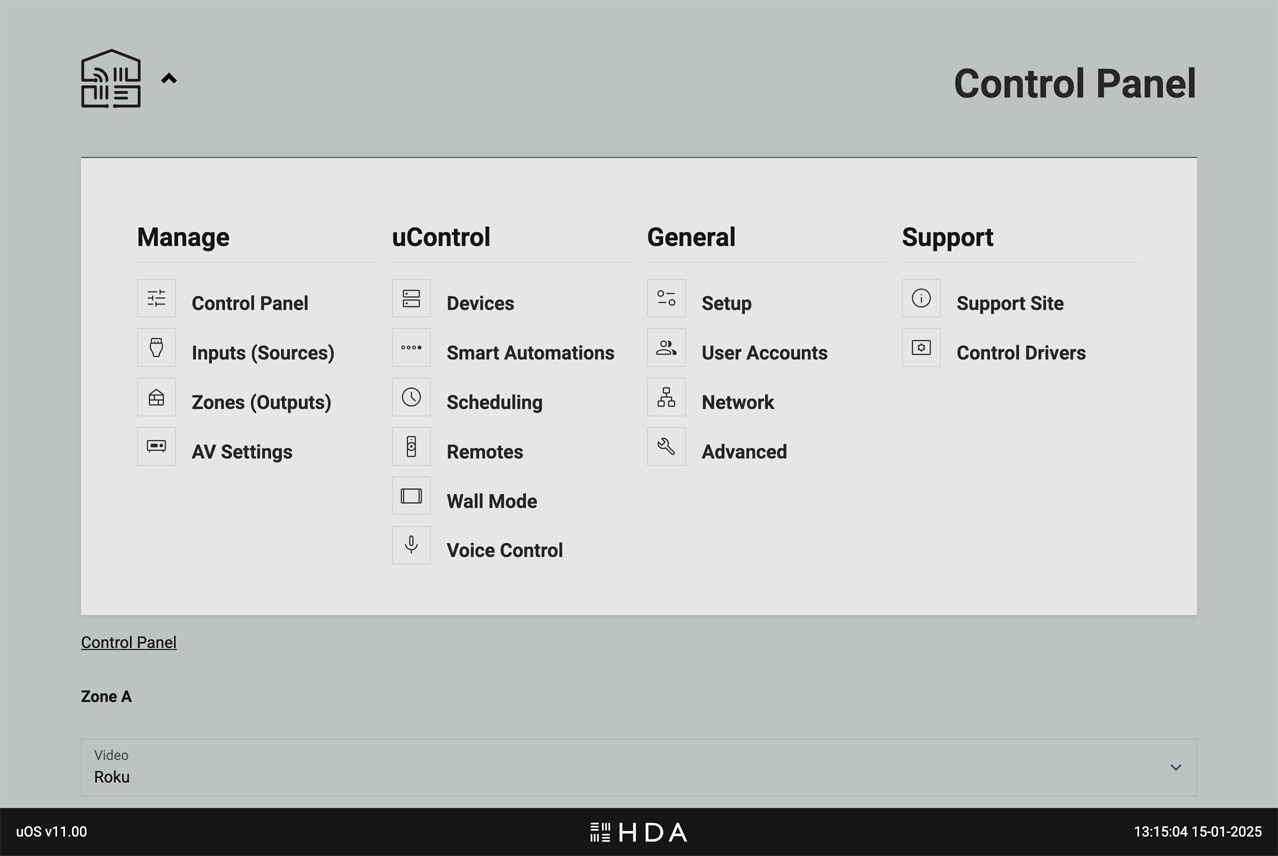
    How to reveal uOS' menu
    Click or tap on the uControl logo to toggle uOS’ navigation menu.
    uOS navigation menu
    uOS’ navigation menu will appear. Select where you would like to navigate from the options provided or tap on the uControl logo to dismiss the menu.

    page_info


    Control Panel

    Web Interface for direct control of system state.
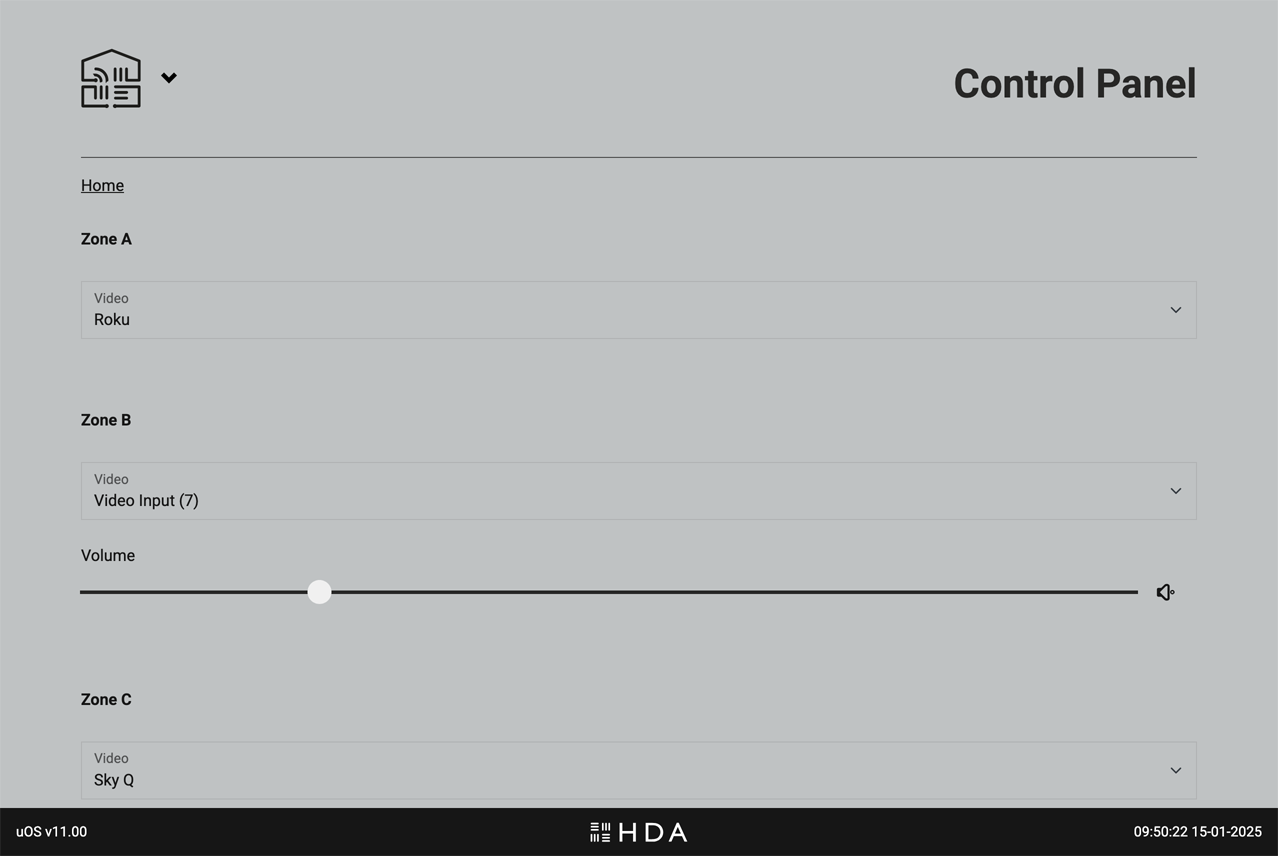
    uOS Control Panel
    Access direct control of system state settings from the Control Panel. This will be the default page that loads when you visit uOS after you system has completed the First Boot Process.

    Gives users direct access to the system state via a web interface, bypassing any other control methods. Control is grouped by Zone and will differ depending on what outputs from your HDA device were assigned to them. For example, if you add a video output and an audio output in a Zone named “Living Room” then uOS will display both video switching, audio switching and (hardware dependent) volume controls in the “Living Room” section of the Control Panel

    What can you control?

    • Source Selection: Choose which video or audio source is routed to the Zone in question.
    • Volume: If your HDA device supports volume control then a slider and mute controls will appear.
    • System Power: At the bottom of the page is power control for the entire system. It is recommended to use this control only if you wish to turn the entire system off.

    What to do if you can not see any controls on this page or controls do not appear to be working correctly.

    Ensure that you have created your Zone and assigned either a video or audio output from your HDA device to it. If you are still experiencing a problem, contact HDA Support.

    When to use the Control Panel

    The web interface is a valuable troubleshooting and backup tool if you have lost control from your normal control method. If you’re experiencing issues with your HDA system, try controlling it directly through this page.


    settings_input_hdmi


    Inputs (Sources)

    Management of connected AV input devices.

    uOS Inputs
    Access direct control of system state settings from the Control Panel. This will be the default page that loads when you visit uOS after you system has been configured.

    This page allows you to manage all the AV source devices connected to your HDA system.

    • Custom Naming: Give your devices meaningful names (e.g., “Blu-ray Player” instead of “Input 1”) for easy identification throughout the system.
    • Global Visibility: Control which input sources are available system-wide. For example, if you have an 8-input system but only use 5 sources, you can disable the unused inputs (6, 7, and 8) so they appear nowhere in uOS. Important: Hiding an input here makes it unavailable across your entire system, unlike Zone-level visibility settings which only control source visibility of active inputs. This is manaaged from the “Zones” page.
    • Manage Connections: Tell uOS how multiple HDA devices are connected to one another if you are operating a Stacked System

    nest_multi_room


    Zones

    Manage the Zones in your system.
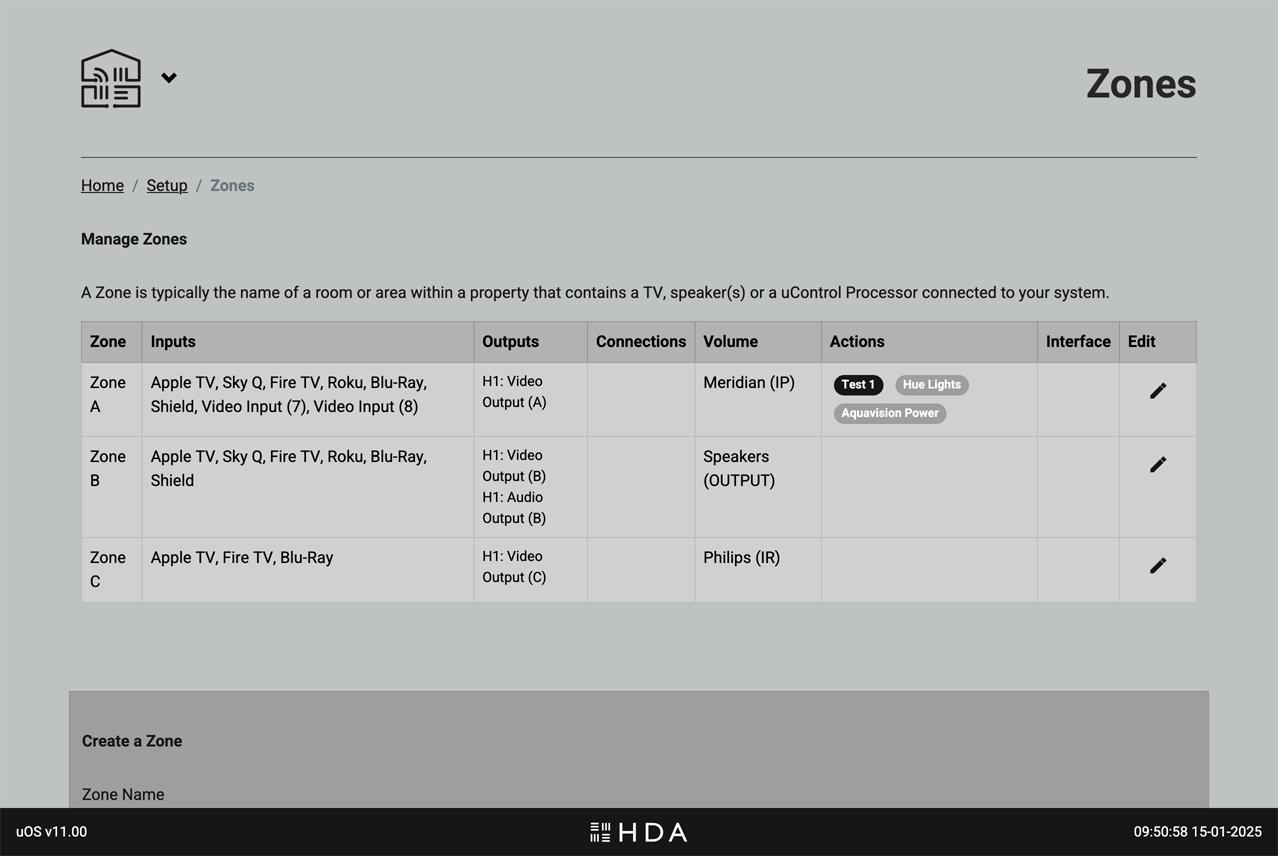
    uOS Zones
    This page is for configuring and customising the Zones within your HDA system. This page provides a clear overview of your entire system from one place.
    .

    This page is for configuring and customising the Zones within your HDA system. This page provides a clear overview of your entire system from one place.

    Key functions on this page

    • Zone Naming: Personalise your Zones with names that make sense to you (e.g., “Living Room” instead of “Zone 2”).
    • Source Visibility: Control which AV input sources are available in each Zone. For example, you might want to make the “Blu-ray Player” source available in the “Living Room” but not in the “Kitchen.”
    • Zone Configuration: Add or remove Zones from your system or change what outputs from your HDA device are assigned to them.

    If you are using uControl to control your system, then these Advanced features are also recommended.

    • Zone (On/Off) Automation: Select what Sequence is assigned to the Zone ON and Zone Off (e.g. TV off, lights off) event.
    • Default Volume Control:Choose which device from your uControl library has primary control over the Zone’s volume.

    Recommendation:Add or remove Zones from your system or change what outputs from your HDA device are assigned to them.


    audio_video_receiver


    AV Settings

    Fine-tune your audio and video settings.
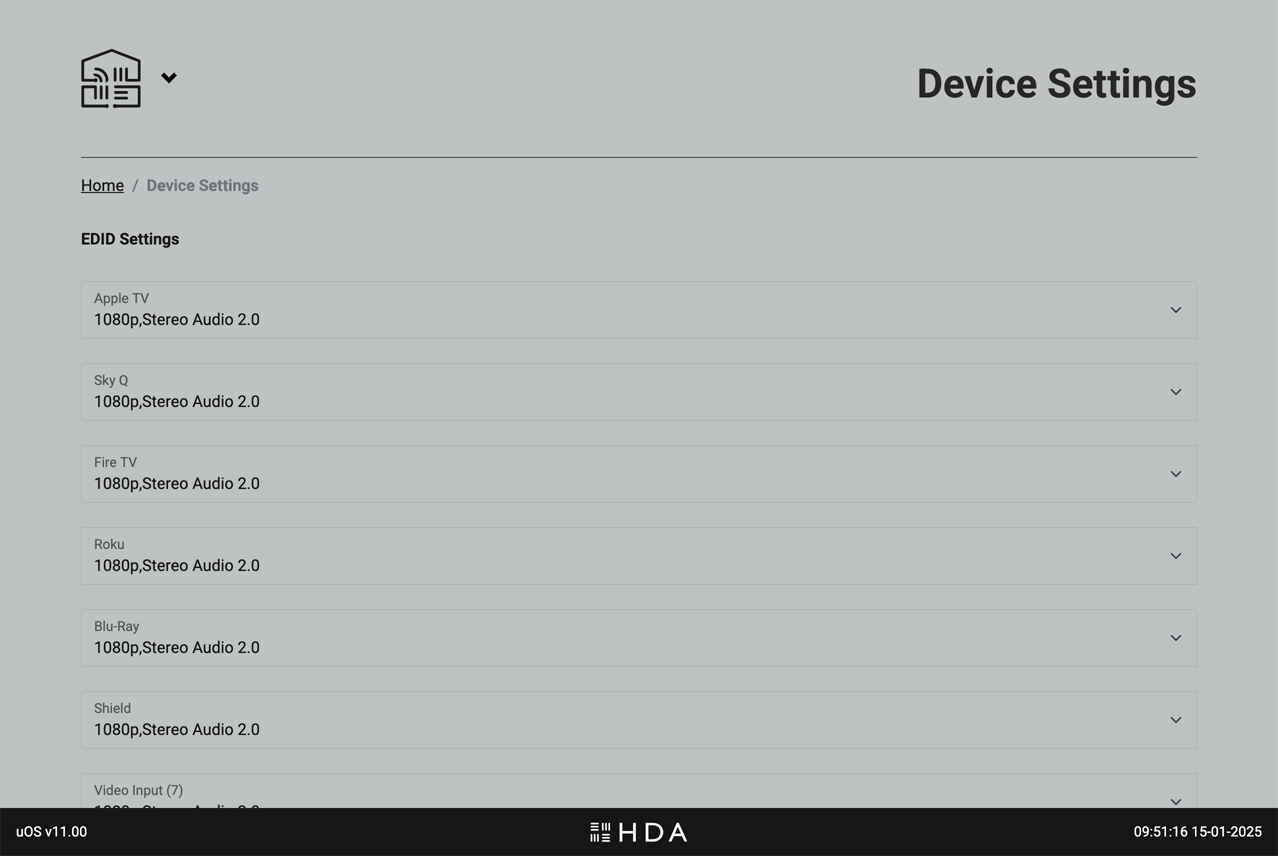
    uOS AV
    This page allows you to customise advanced audio and video settings for your HDA system to achieve optimal AV performance.
    .

    This page allows you to customise advanced audio and video settings for your HDA system to achieve optimal performance. This page displays settings specific to your HDA device hardware. If you have a stacked system with multiple HDA devices, you’ll find settings for each device grouped by hardware name and type. This allows for granular control over each device in your system.

    Key functions on this page

    • EDID Management: Control how your HDA device communicates with displays to ensure compatibility and optimal resolution.
    • Video Scaling: Adjust how video content is scaled and displayed on your screens.
    • Audio Volume Presets:Configure input gain and max volume levels for sources and Zones.
    • EQ Settings:Fine-tune audio equalisation for specific Zones or outputs.

    dns


    Devices

    Add new devices to uControl or manage how they work.
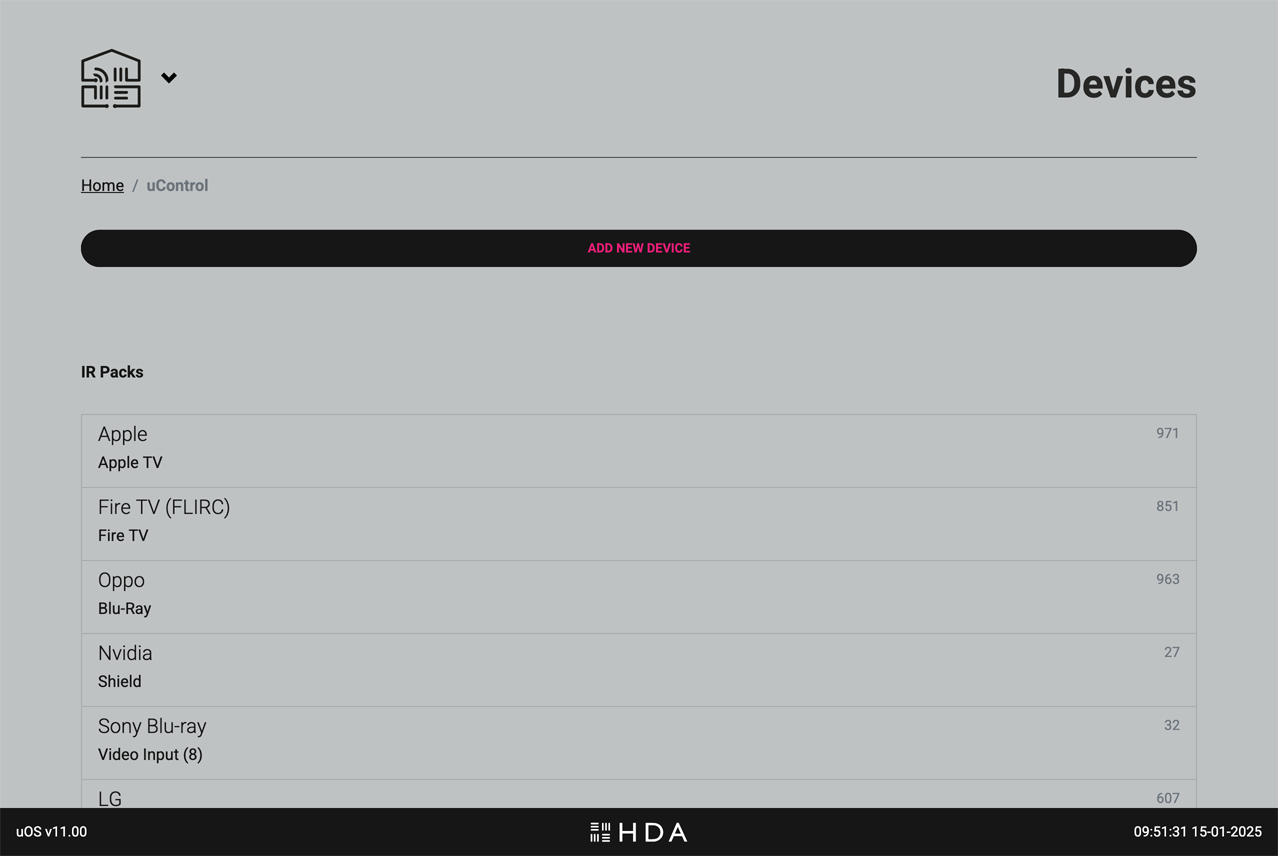
    uOS Devices
    This page is for managing all devices that can be controlled by uControl.
    .

    Control your devices and their features seamlessly through the uControl app, a uControl Remote, or Smart Automations. To get started, click or tap on the button labelled “ADD NEW DEVICE” and simply find and install the appropriate uControl pack, driver or establish a uControl IP connection for any Smart Devices (eg, lights, blinds, PDUs etc).

    Once installed, all devices that uControl can control will appear here along with any important data such as the current IP address, what input or output the pack is assigned to and the ID.

    It is also possible to test CEC commands from the pre-installed uControl CEC pack. This is available at the bottom of the page if your HDA devices supports HDMI-CEC control.

    Add device control to uOS

    AV Device: select between installing a uControl pack (IR, IP or a Driver) for AV devices like TVs, Blu-ray players, AV receivers, and set-top boxes.

    Select “ADD NEW UCONTROL DEVICE” and a window will appear. Select the “uControl Pack” (older uOS versions) or “AV Device” (uOS 11+).

    Choose between a uControl (IR or IP) pack for the device and select which input or output it is connected to. The AV device might not be connected to an input or output, and can be assigned to a Zone instead.
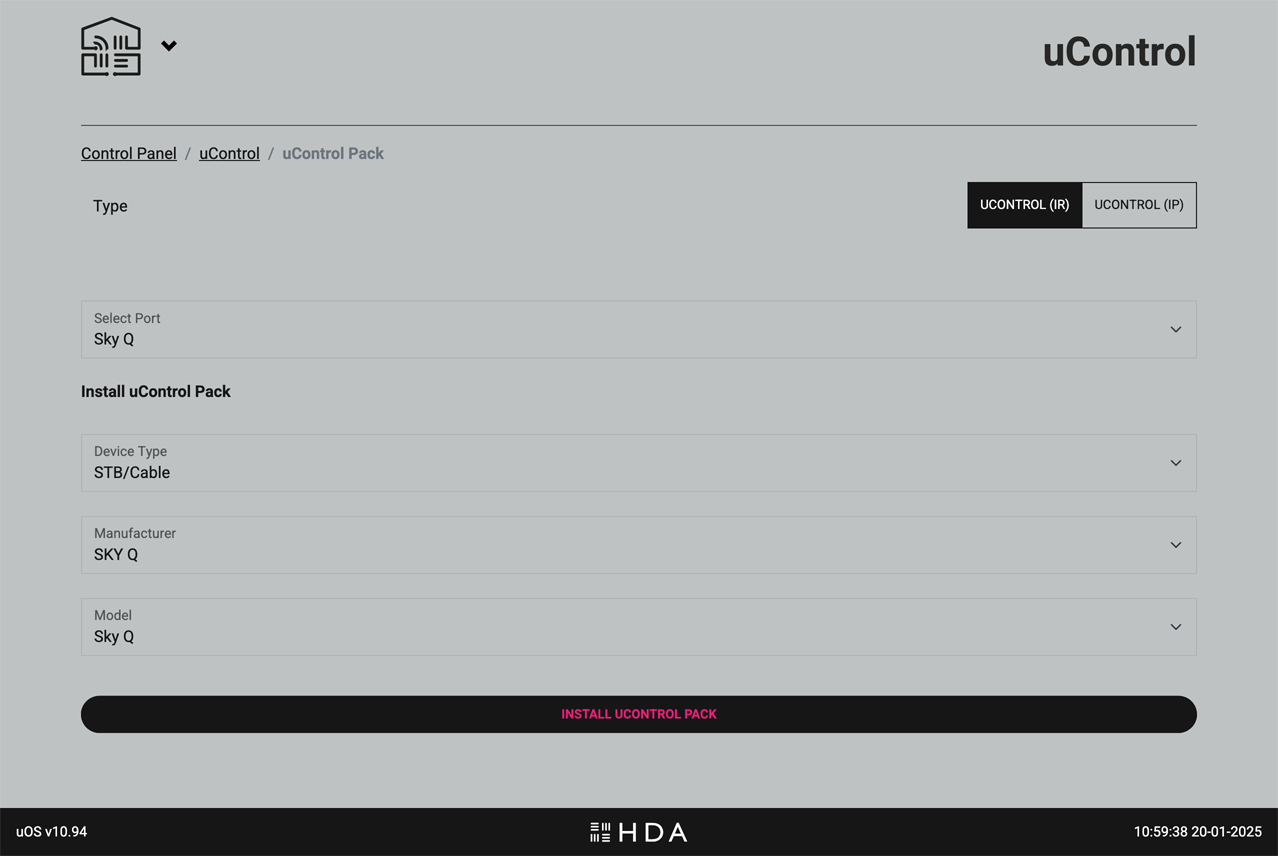
    uOS Devices
    Install an AV Device: Select IR, IP or Driver packs to browse and use the options to filter your choice.
    .
    uOS Devices
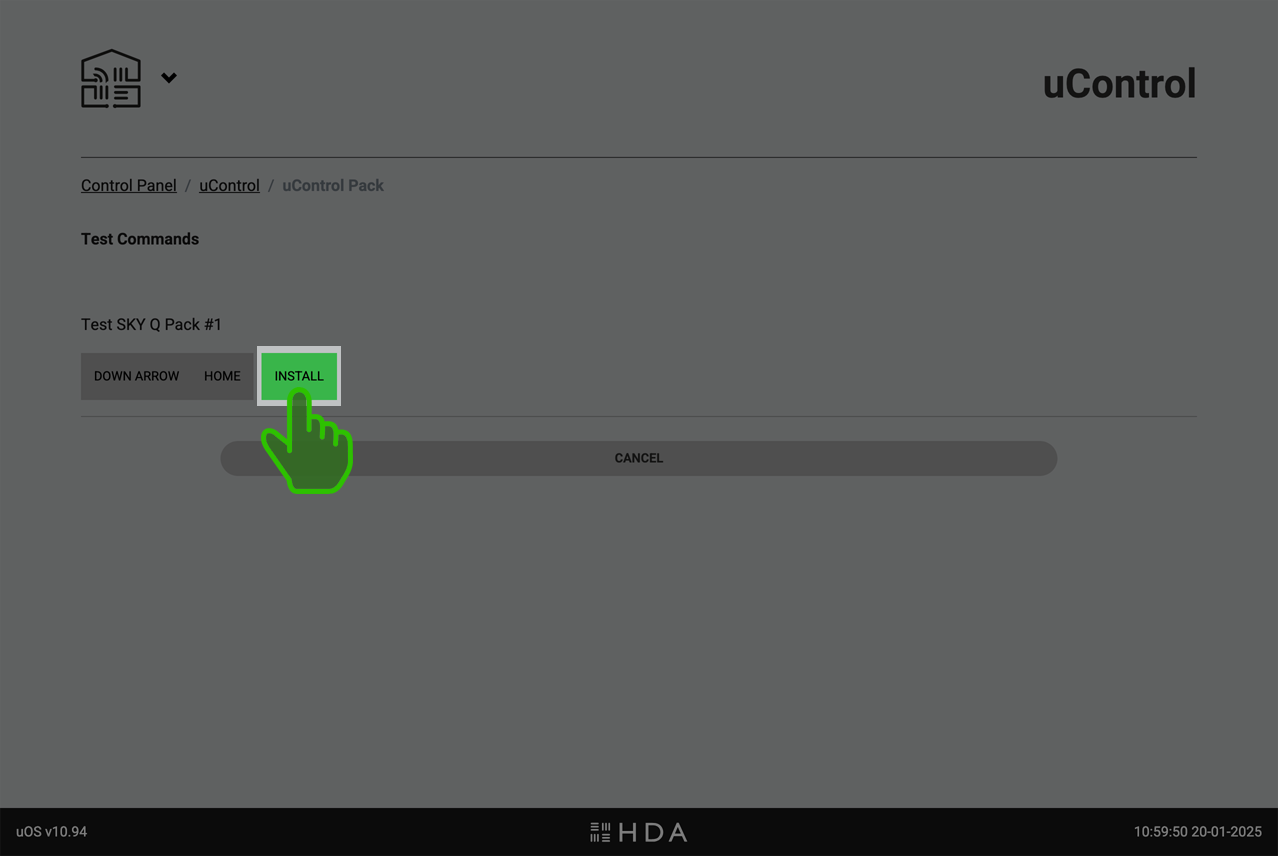
    Install an AV Device: uOS will download the pack and will ask you to test a command. If selected IP, this page will ask you to add connection details (eg IP address) before proceeding. When you have sucessfully tested the pack, continue to compelte installation.
    .

    A detailed step-by-step guide can be found here: How to install a uControl pack.

    Smart Device: Create a manual IP connection to smart home devices such as smart lighting, blinds/shades, and power sockets/plugs within your Zones.

    A detailed step-by-step guide can be found here: Cheatsheets for common Smart Devices.
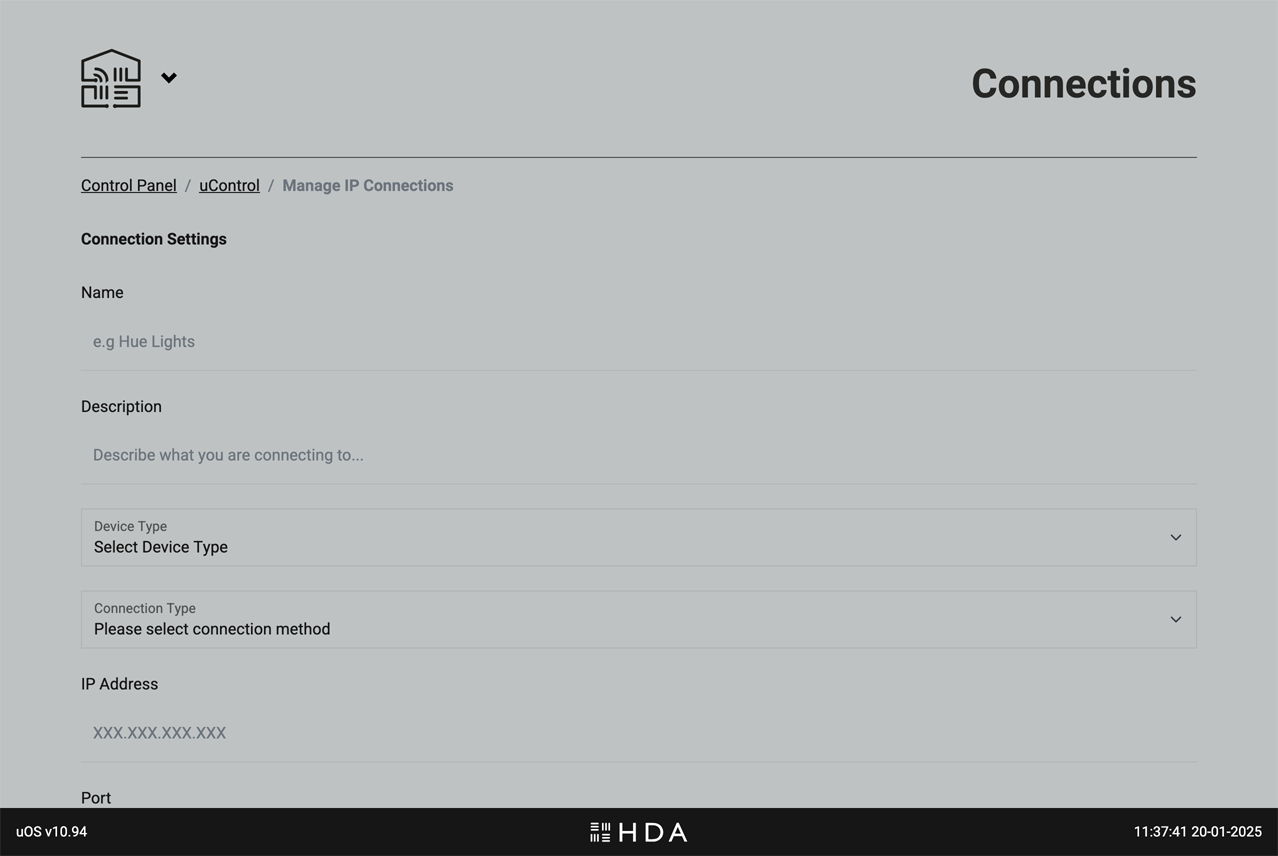
    uOS install uControl pack window
    Smart Device: For devices that are not AV, you can connect directly to them to control them.

    page_control


    Smart Automations

    Powerful automations to enhance your uControl experience.
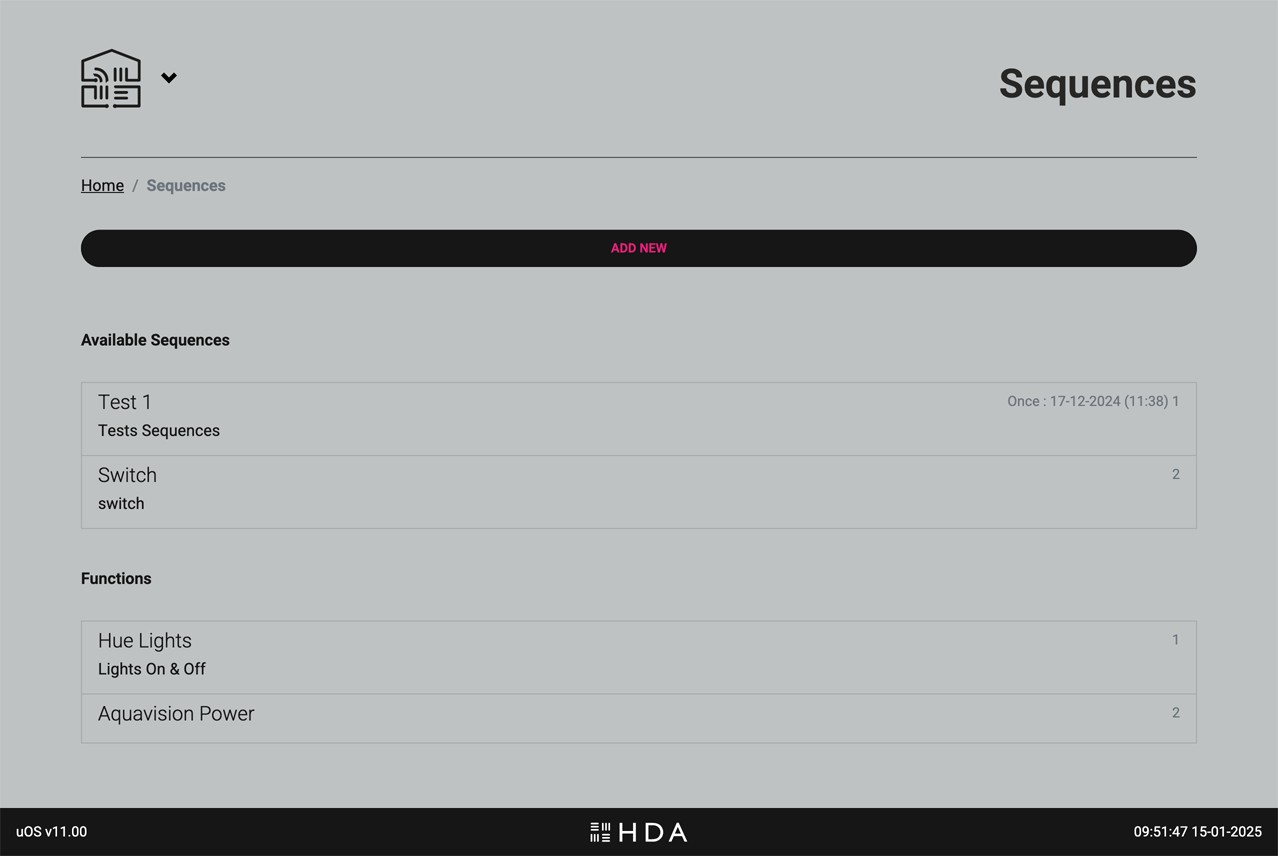
    uOS Smart Automations
    Create Smart Automations called Sequences (a series of commands executed one after another) and add intelligence to them using Functions.

    Create powerful automations, called Sequences (a series of commands executed one after another), and add intelligence to them using Functions with “if this, then that” rules to enhance and automate your uControl experience.

    You can create Sequences that can turn your HDA device on or off, switch and route inputs or control the volume state in any zone. If you wish to enhance these further with AV device or Smart Device control then ensure you have installed uControl packs for them or have established IP connections before creating your Smart Automations.

    Key functions on this page

    • Sequences: A sequence is a series of commands executed one after another. For example, a “Movie Night” sequence might dim the lights, lower the blinds, turn on the TV, and start your Blu-ray player.
    • Functions: Functions add intelligence to your automations. They can be custom commands or (“if this, then that”) logical rules. For example, a function could automatically adjust the thermostat when the temperature outside changes or turn on the lights when motion is detected.

    schedule


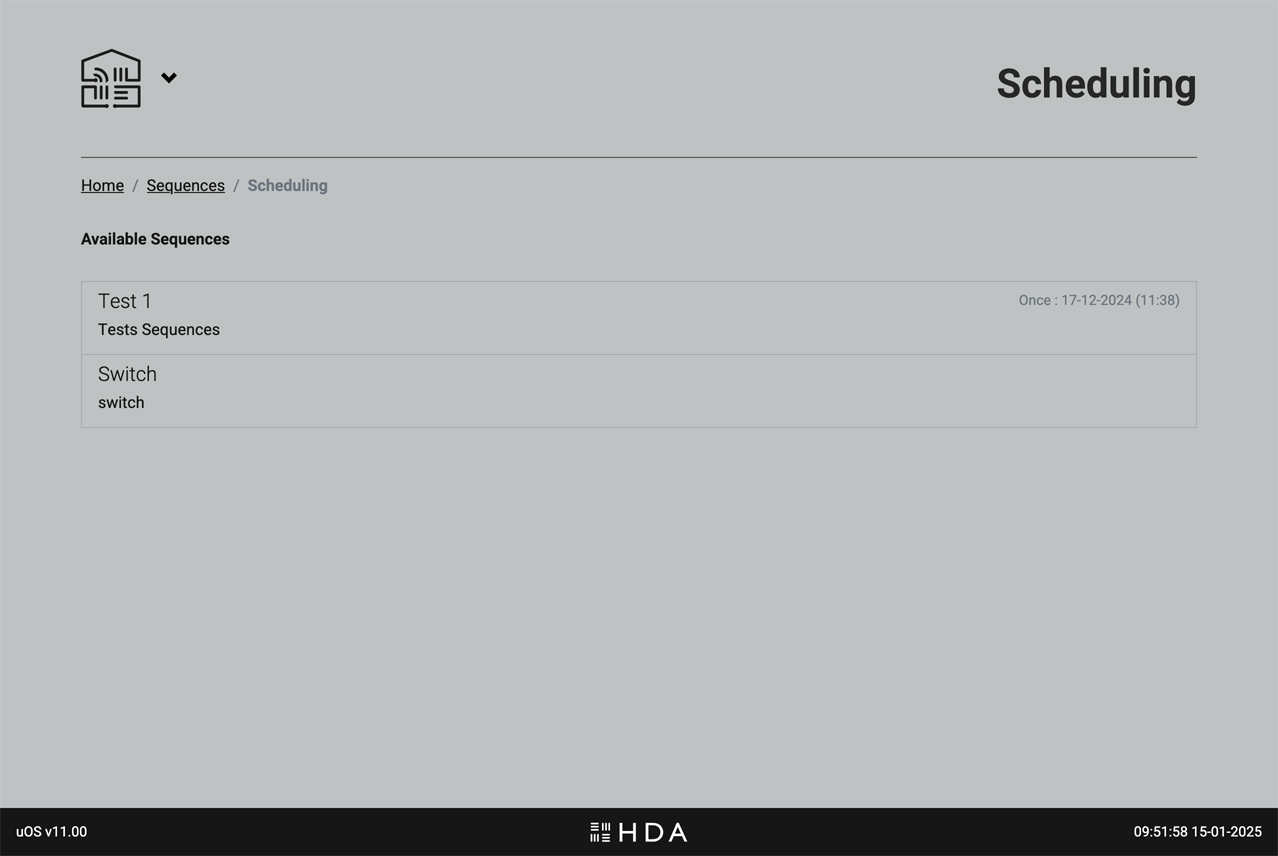
    Scheduling

    Automate your Smart Automations with Scheduling
    uOS advanced
    Take any Smart Automation and instruct uOS to execute them automatically for you.

    After your Smart Automations have been created you can choose to schedule them to suit your project requirements. For example, you may want all displays in an office environment to turn off at 7pm and for this to happen every Monday to Friday.


    tv_remote


    Remotes

    Configure and customise your uControl Remotes.

    ADD YOUR REMOTES LAST:
    Once you’ve configured your system Zones, installed all packs, set up Smart Automations, and tested everything in the uControl app — it’s time to add your uControl Remote.

    Why wait?
    This approach streamlines the Remote setup process. By configuring your system first, the settings are automatically copied to the uControl Remote, making the Remote configuration faster and easier. This ensures that your Remote is ready to use with minimal additional setup.
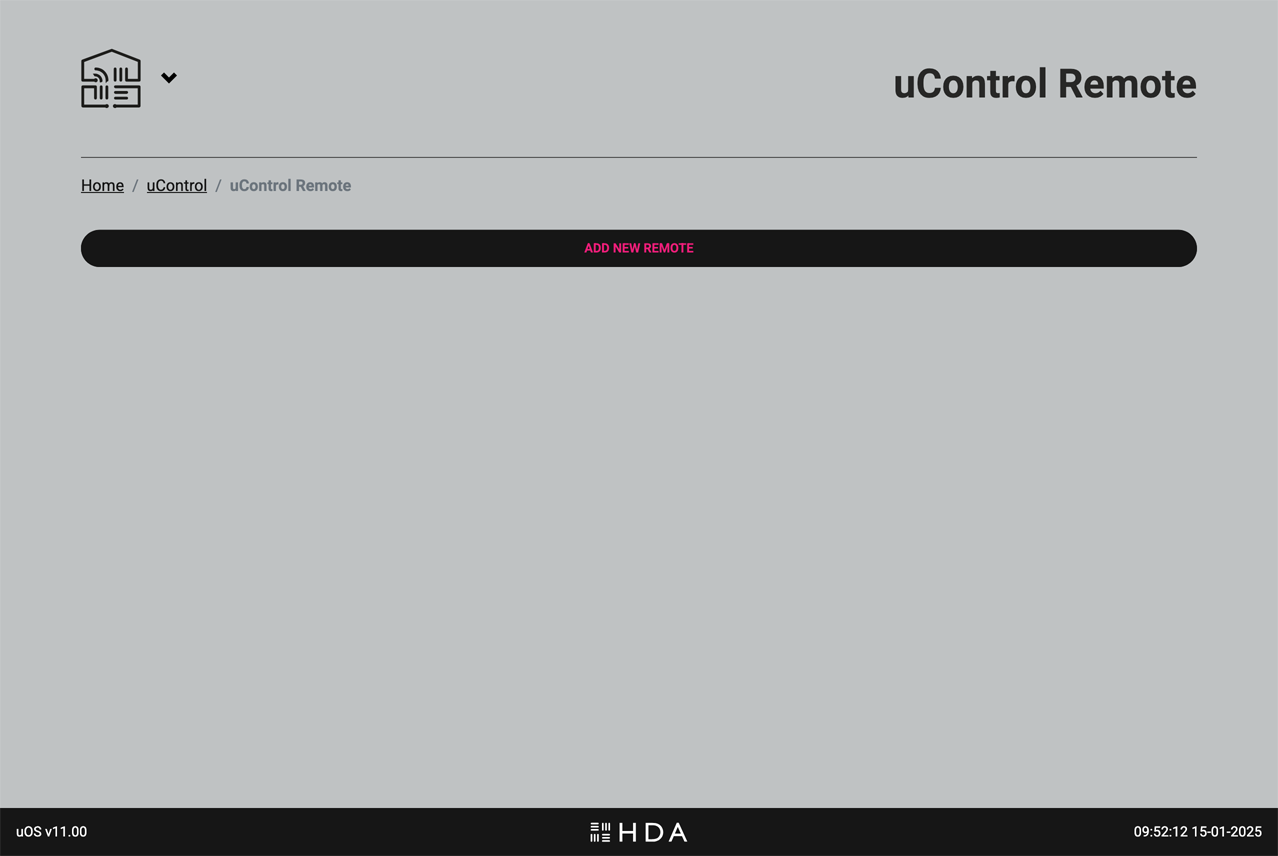
    uOS uControl Remote
    Adding a uControl Remote is a guided process. To add the uControl Remote to your system, ensure that it is on your WiFi network first and is charging before starting.
    .

    Getting the Remote on WiFi & configuring it for use.

    A detailed guide on how to configure the uControl Remote can be found here.


    tablet


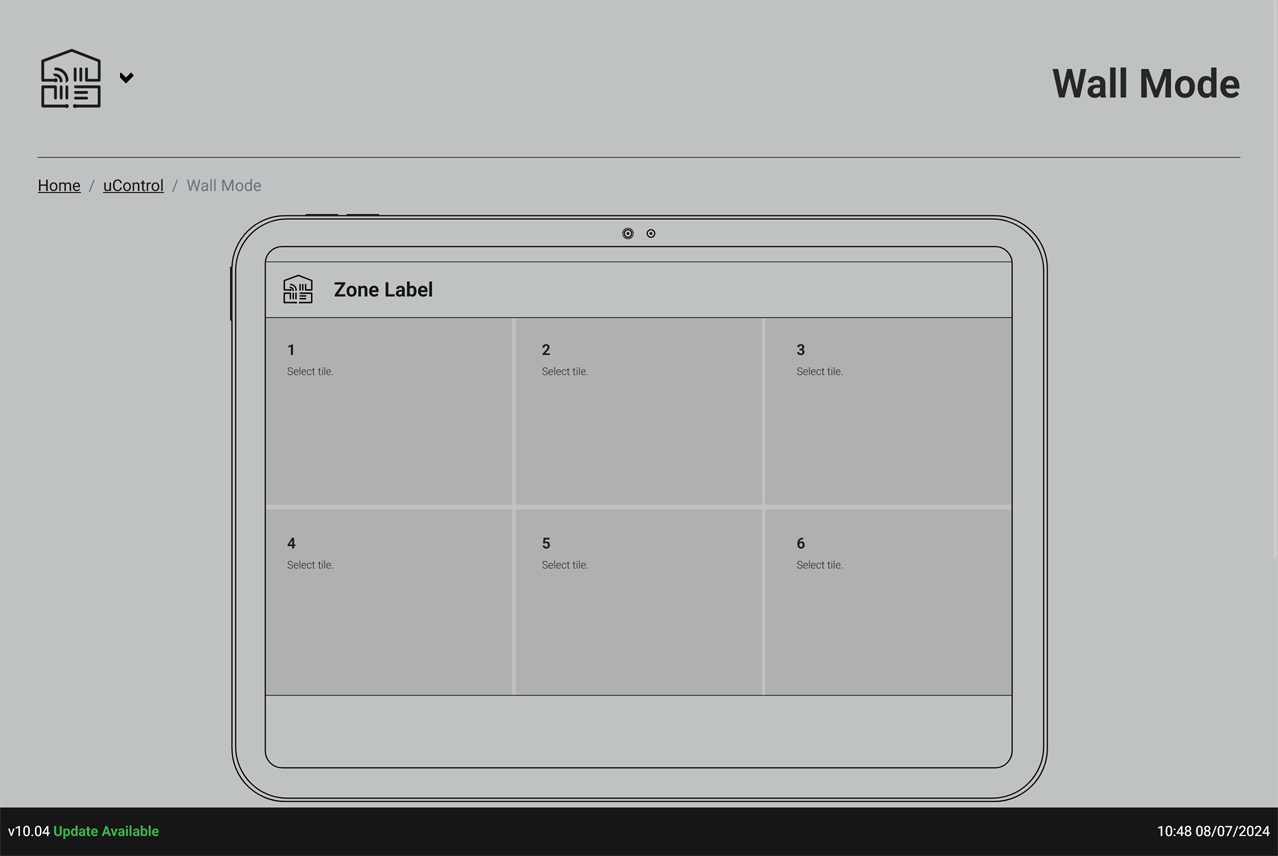
    Wall Mode

    A simple interface for walls and desktop applications.
    uOS Wall Mode
    Create a simple 6-tile interface and fix those controls to a single Zone. Perfect if you are going to mount an iPad to a wall or for desktop applications.
    .

    Design a simplified interface for the uControl app called “Wall Mode.” This mode will display only 6 large tiles on the iPad screen when held in landscape orientation.

    Wall Mode is ideal for iPads mounted on walls or placed on tabletops. It makes using the app easier for newcommers or those that do not know how to use the system by hiding all the other menus and options, and presenting the user with just 6 essential controls for a single zone.

    IMPORTANT:You can not configure Wall Mode until you have setup Smart Automations. It is recommended that Wall Mode is configured after any uControl Remotes.

    To configure a tile, simply click or tap on the tile that you want to configure and add your Smart Automation to it. If uControl driver packs support wall mode configurations then you will have the option to add a driver widget to your tile (e.g Sonos) so that you can see realtime data on that particular tile.


    mic


    Voice Control

    Amazon Alexa voice control

    uOS uControl Remote
    Settings to enable or disable Amazon Alexa voice control if your HDA hardware or configuration supports voice command control.

    This section allows you to enable or disable Amazon Alexa voice control for your HDA system.

    Compatibility

    Please note that voice control functionality depends on your specific HDA hardware and system configuration. If your system supports Alexa integration, you’ll find the following options:

    A detailed step-by-step guide can be found here: How to configure voice control and account linking to your Amazon Account for the “AV Skill”.


    page_info


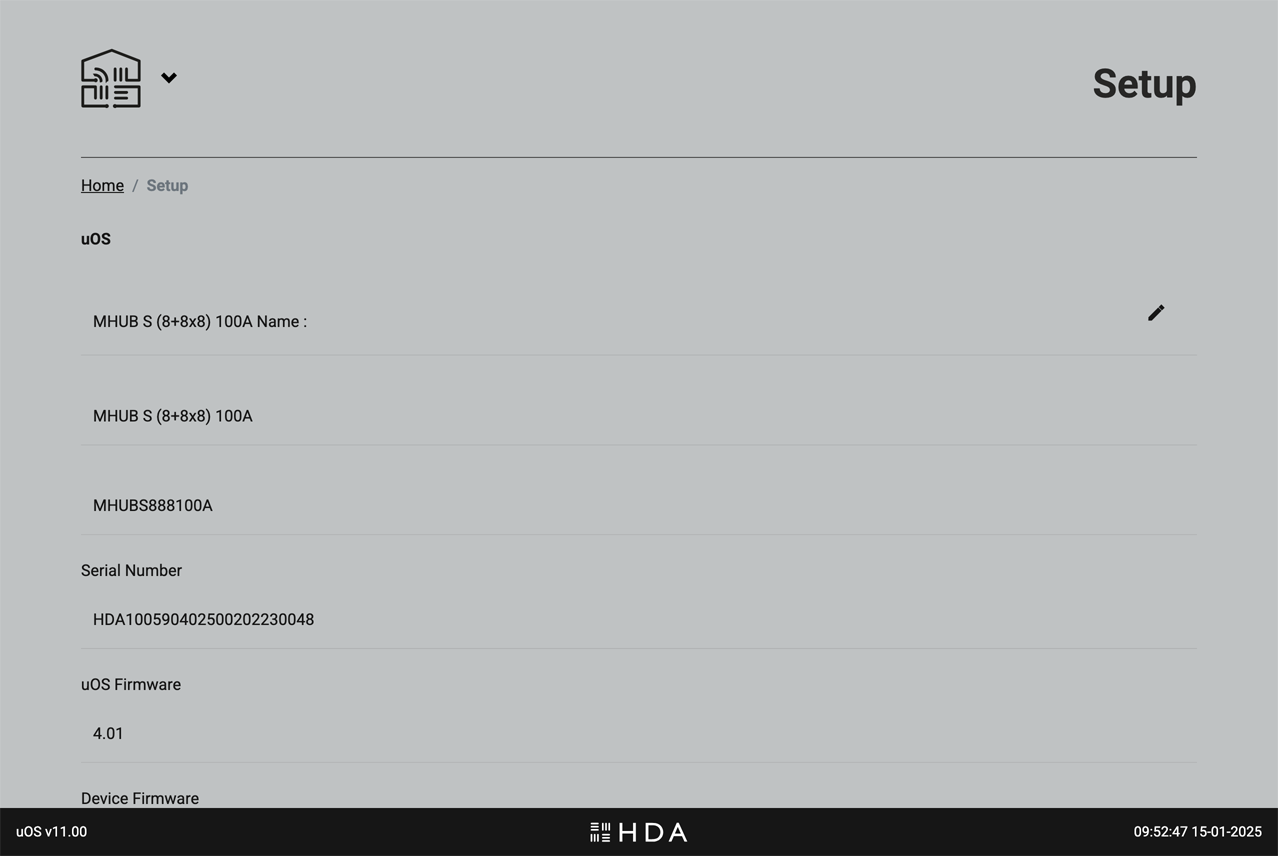
    Setup

    General uOS setup
    uOS Setup
    Configure general settings related to your uOS controller. Don’t confuse this with the AV Settings page, which handles hardware-specific configurations.

    What you will find on this page

    • Names and software versions: The official name for your HDA device(s) along with current software and firmware versions.
    • Timezone: Set the timezone for uOS. By default, uOS will sync its time to GMT clocks. If you intend on using Scheduling to automate your Smart Automations then it is recommended that you set this to your timezone. This is a manual setting.
    • Access control: Set a PIN code to lock access to uOS. It is STRONGLY RECOMMEDED that you keep a record of this PIN somewhere safe or connect your system to HDA Cloud so HDA Support can recover this for you. Once the PIN is set and in the event that it is forgotten or lost, only a system reset will recover your system.

    group


    User Accounts

    Warranty extension and improved customer service
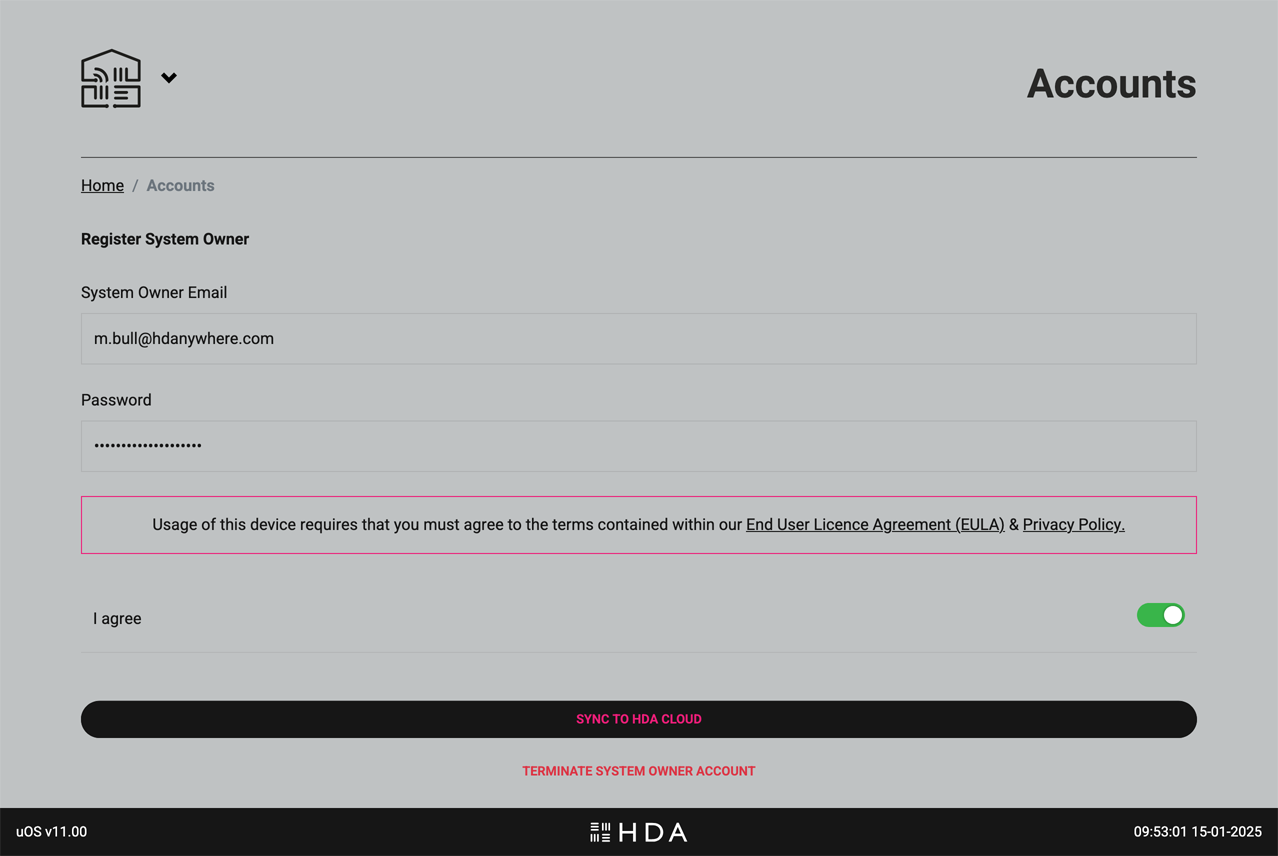
    uOS User Accounts
    Choose if the system is able to communicate with HDA cloud servers for remote management and advanced customer support.

    User Accounts connect your HDA device to HDA Cloud, our global data storage and service delivery platform. There are multiple benefits of connecting your HDA device to our cloud servers but the most common reason is the free warranty extension if this is done within 30 days of purchase.

    There are two types of account: 1) Owner/User Accounts which belongs to the owner of the HDA device(s) being registered and 2) HDA Pro Accounts which can be used for monitoring the system remotely.

    At all times the Owner Account has executive control of uOS, their HDA Cloud account and their HDA device hardware. It is possible to terminate HDA Pro access directly from this page. The absense of an Owner Account will keep the unit technically offline (with the exception of critical updates) and no information about the system or its state will be sent to HDA servers.


    lan


    Network

    Ethernet and WiFi settings for your HDA device(s)
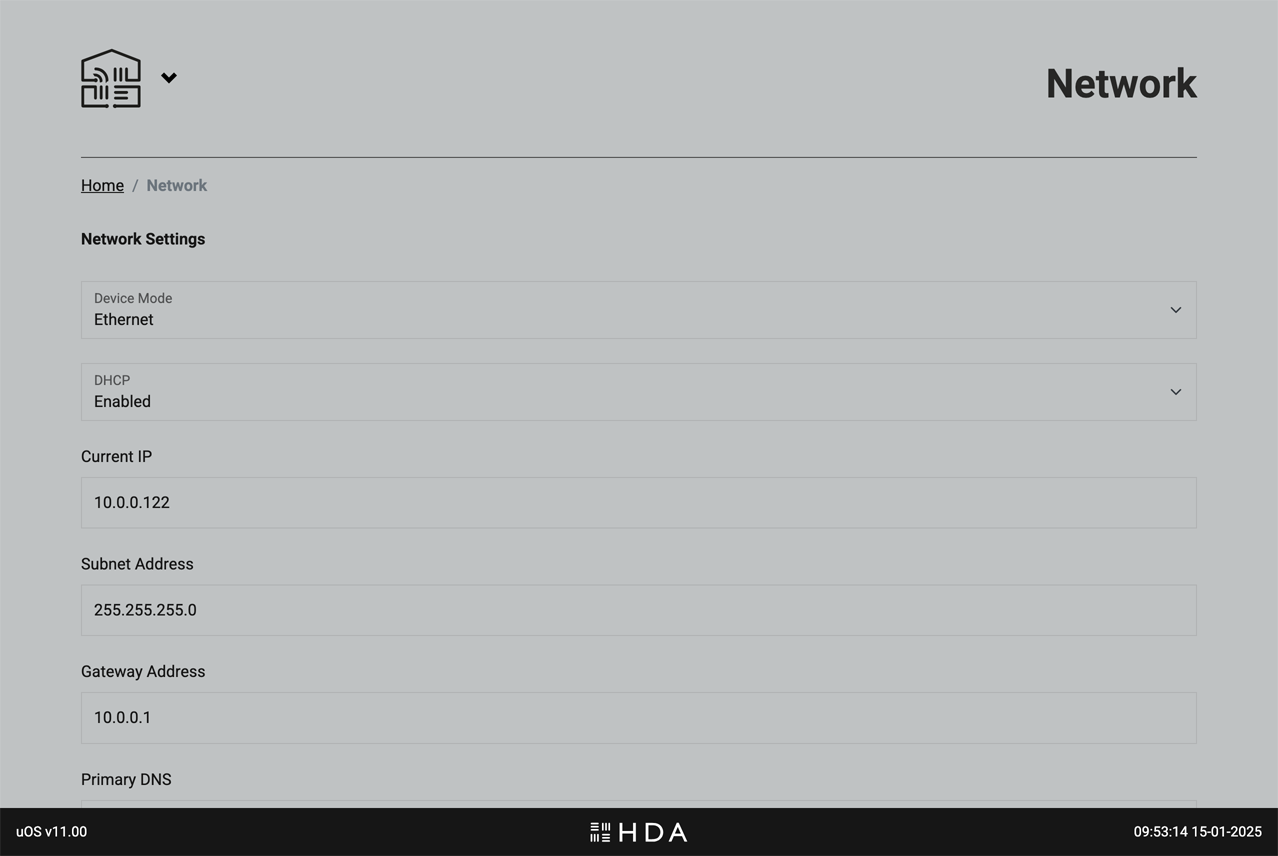
    uOS network
    Change network settings for uOS to suit your LAN environment

    Adjust uOS’ network settings to suit your Local Area Network configuration. IMPORTANT: proceed with care when changing these settings as you can lose connection to your controller if you make a mistake.


    build


    Advanced

    Power-user access
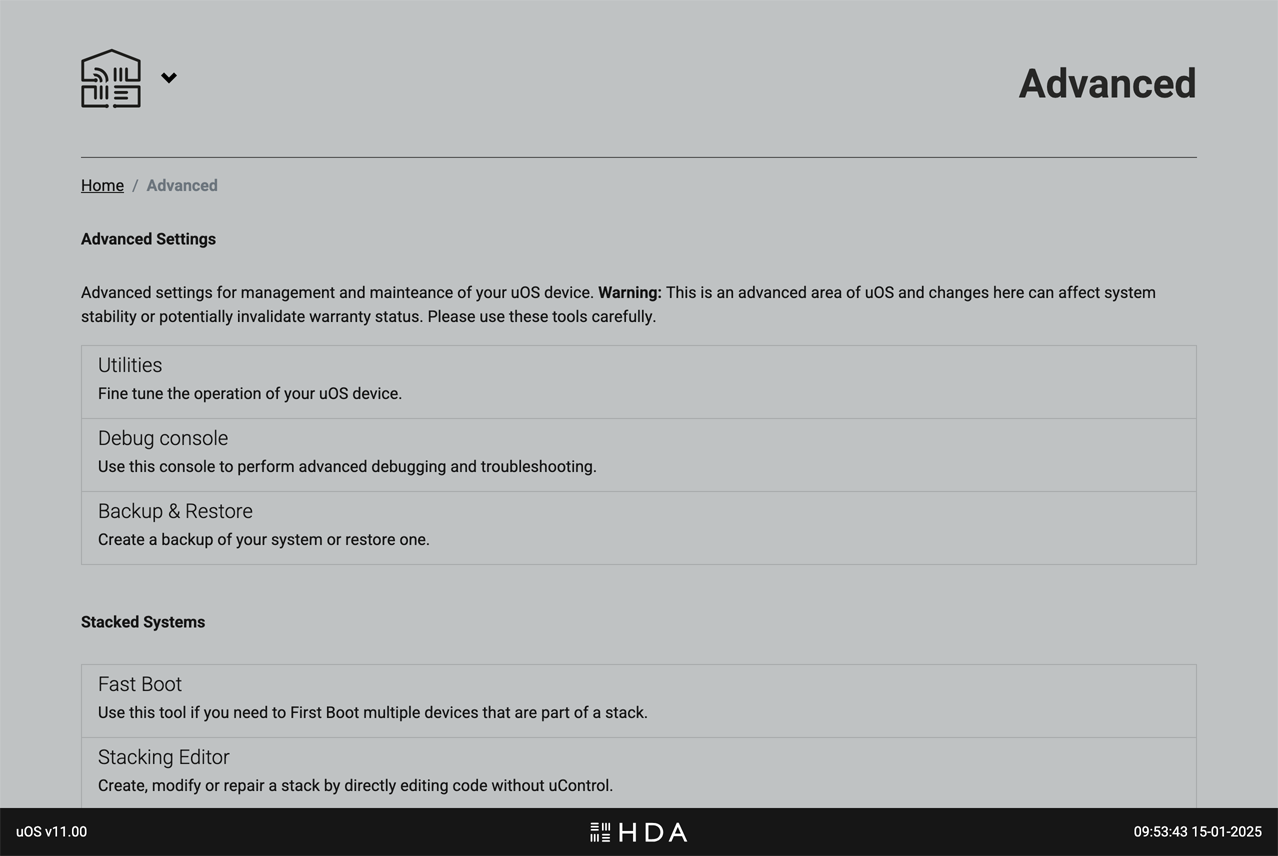
    uOS advanced
    Access advanced tools to troubleshoot or speed up deployment of uOS. Use caution accessing the features of this page.

    Advanced settings for management and maintenance of uOS. Warning: This is an advanced area of uOS and changes here can affect system stability or potentially invalidate warranty status. Please use these tools carefully.

    Before making any changes on this page, ensure you have a thorough understanding of the potential impact. If you are unsure about any settings, please contact HDA support for assistance.

  • First generation HDMI 1.4 spec UHD 4K, next-generation HDMI 2.0 spec UHD 4K and what integrators need to know.

    An analysis of 4K Interim vs 4K Proper by Chris Pinder, Founder and MD of HDanywhere, June 2015.

    blog2

    4K is a complicated subject matter. 4K isn’t one format, it’s an umbrella term for many combinations of resolutions, frame rates and colours. Talking about 4K in too generalised a way is dangerous. When I discuss 4K with anyone, in as non-patronising a way as possible to simplify and aid understanding, I refer to ‘i’ and ‘p’, (like 1080i and 1080p) but my ‘i’ and ‘p’ doesn’t mean interlaced and progressive, I mean first generation 4K and next-generation 4K, or in other words  ‘interim’ and ‘proper’. P could also quite easily stand for ‘premium’.

    This is my take on the two-speed world of 4K UHD devices at the moment. It may be labelled and marketed as 4K, it may even support HDCP 2.2 – but is it 4Ki or 4Kp?

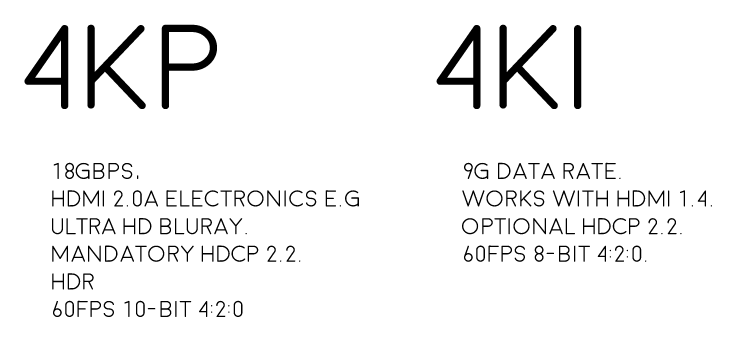
    Proper 4K (4Kp) is next-generation HDMI 2.0 spec 4K, it’s what Ultra HD Blu-ray is and what premium 4K content will be. Ultra HD video refreshes at a smooth 60 frames per second in amazing 10-bit 4:2:0 colour (or if your display doesn’t support 10-bit) 8-bit 4:4:4 colour – basically hugely superior colours than what we have seen before over HDMI. 4Kp can also support HDR content and runs at very high 18Gbps data rates and, as a result, will require all new high-bandwidth HDMI 2.0a* spec electronics.  4Kp will also have HDCP 2.2 copy protection encrypting the content, which I’ll touch on later.

    What is most important from integrator perspective is that single-cable HDBaseT DOES NOT carry 4Kp. It will only carry 4Ki because HDBaseT is max 10.2Gbps and 4Kp requires 18Gbps.

    Most devices out there today labelled as ‘4K’ do not support 4Kp, they only support 4Ki. And by most, I mean over 95%. But this is improving, more and more displays are coming out now that support HDMI 2.0 and have a 10-bit panel. Ultra HD Blu-ray is likely going to be the first 4Kp source device we see. So what is 4Ki?

    Interim 4K (4Ki) runs at a 9G data rate (half that of 4Kp) and doesn’t necessarily require new HDMI 2.0 electronics. It will work on older HDMI 1.4 spec devices. It may or may not have HDCP 2.2 encryption. And colour-wise if it’s running at 60fps it can only be the lesser 8-bit 4:2:0 quarter colours. For 4:4:4 a lower 30fps refresh rate is used instead and smooth panning shots are sacrificed. 10-bit colour content just flatly isn’t supported full stop.

    blog1

    What is so important about colours?

    4Kp/60 and 4Ki/60 if watched in black and white are EXACTLY the same. The same number of pixels wide and high, refreshing at 60 times per second, with the same pixel data for light and dark contrast. So no difference in sharpness, motion or contrast.

    Where they differ is with a compromise on colour. The resolution of the colour layer that gets laid over the top of the black and white frame when combined to make the final image. With 8-bit 4:4:4 each pixel can choose a colour, whereas with 4:2:0 every 4 pixels have to share a single colour choice. Even though a cluster 4 pixels are sharing the same colour, the overlay of the black and white image creates different shades. The resulting 4:2:0 video content, although a lesser quality, is not as substantially different from 4:4:4 as you might think. In fact, when viewing the two from a couple of metres away, the human eye really struggles to differentiate them.

    OK, now that you’re thinking is in tune with there being two primary types of 4K material and you understand the difference between the two.

    You also NEED to be aware of a couple of associated meteors about to hit the AV side of the CI industry that relate to the facilitation of working 4K HDMI systems. (Remember HDMI is a system, NOT a cable) One is called ‘HDMI 2.0’ and the other is ‘HDCP 2.2’. The two meteors should really hit simultaneously, but not necessarily.

    Meteor 1: HDMI 2.0 is the new twice-as-big digital pipeline to accommodate the higher data rates of proper 4K jumping from 9G to 18G bandwidth. Its not a new cable design, its new electronics at either end of the existing (short) HDMI cable we use. So that is new source devices (Ultra HD Blu-ray players for example) and new displays (10-bit SUHD Samsung panels for example). However for longish cable distances, say 3m and over, current passive cables may struggle with the higher data rates. We’ll begin to see some new breeds of HDMI cable types appear to solve this. Some will use integrated active/powered boosting chips and others are likely to be a copper/fibre hybrid cable. Existing long length HDMI cables, that may be buried in walls for example will be able to be utilised through the use of restorative dongles that can be placed at the start and end of the cable run. I expect to see this HDMI cable rescue/fixer market grow over the coming years sharply.

    Meteor 2: HDCP 2.2 is the new 128 bit encryption designed to secure 4K content from being pirated. It is the same level of security encryption as credit card issuers use for internet transactions. Unless every device in the signal path is HDCP 2.2-capable, theoretically the content will not be shown. Source, matrix, AVR, balun, display, projector must all support HDCP 2.2. One weak link means black screen. The thing about HDCP 2.2 support is that it’s essential to ensure the best chance of displaying 4K content from your favourite content providers (i.e Hollywood and sports). The HDCP 2.2 event horizon will largely be determined by the release of Ultra-HD 4K Blu-ray and 4K content being delivered via our set-top-boxes.

    Conclusion

    In summary, until more next-gen 4Kp source devices, like Ultra HD Blu-ray, set-top-boxes, and media players are released we live in a kind of interim 4K limbo land, a phoney, interim 4K world with no proper, premium 4K content to enjoy. In addition to this, more displays with HDMI 2.0, HDCP 2.2 and 10-bit panels need to be released so that users can take full advantage of the advancements in picture quality offered by 4Kp. Month-on-month this situation improves.

    From an integrator perspective, quite rightly there is a lot of emphasis currently on HDCP 2.2 support within matrixes. But even when HDCP 2.2 compliant, single-cable HDBaseT is a bottleneck in many video distribution systems, which will result in premium 4K content video quality being downgraded when distributed. There is a quality compromise currently in order to deliver a distributed solution over a single network cable.

    SIDELINE RED HERRING: What about 4K streaming like Netflix?

    Well it’s not 4Kp and it’s not 4Ki… It’s dynamically compressed, streamed 4K content using AVC H.264 and HEVC H.265 codecs with varying quality from home to home according primarily to the speed and quality of their network. For the purposes of this article, I am talking about uncompressed 4K content.


  • Using control drivers which require authorisation before use.

    update-mos

    HDANYWHERE are now working with Intrinsic Dev for control driver integration.

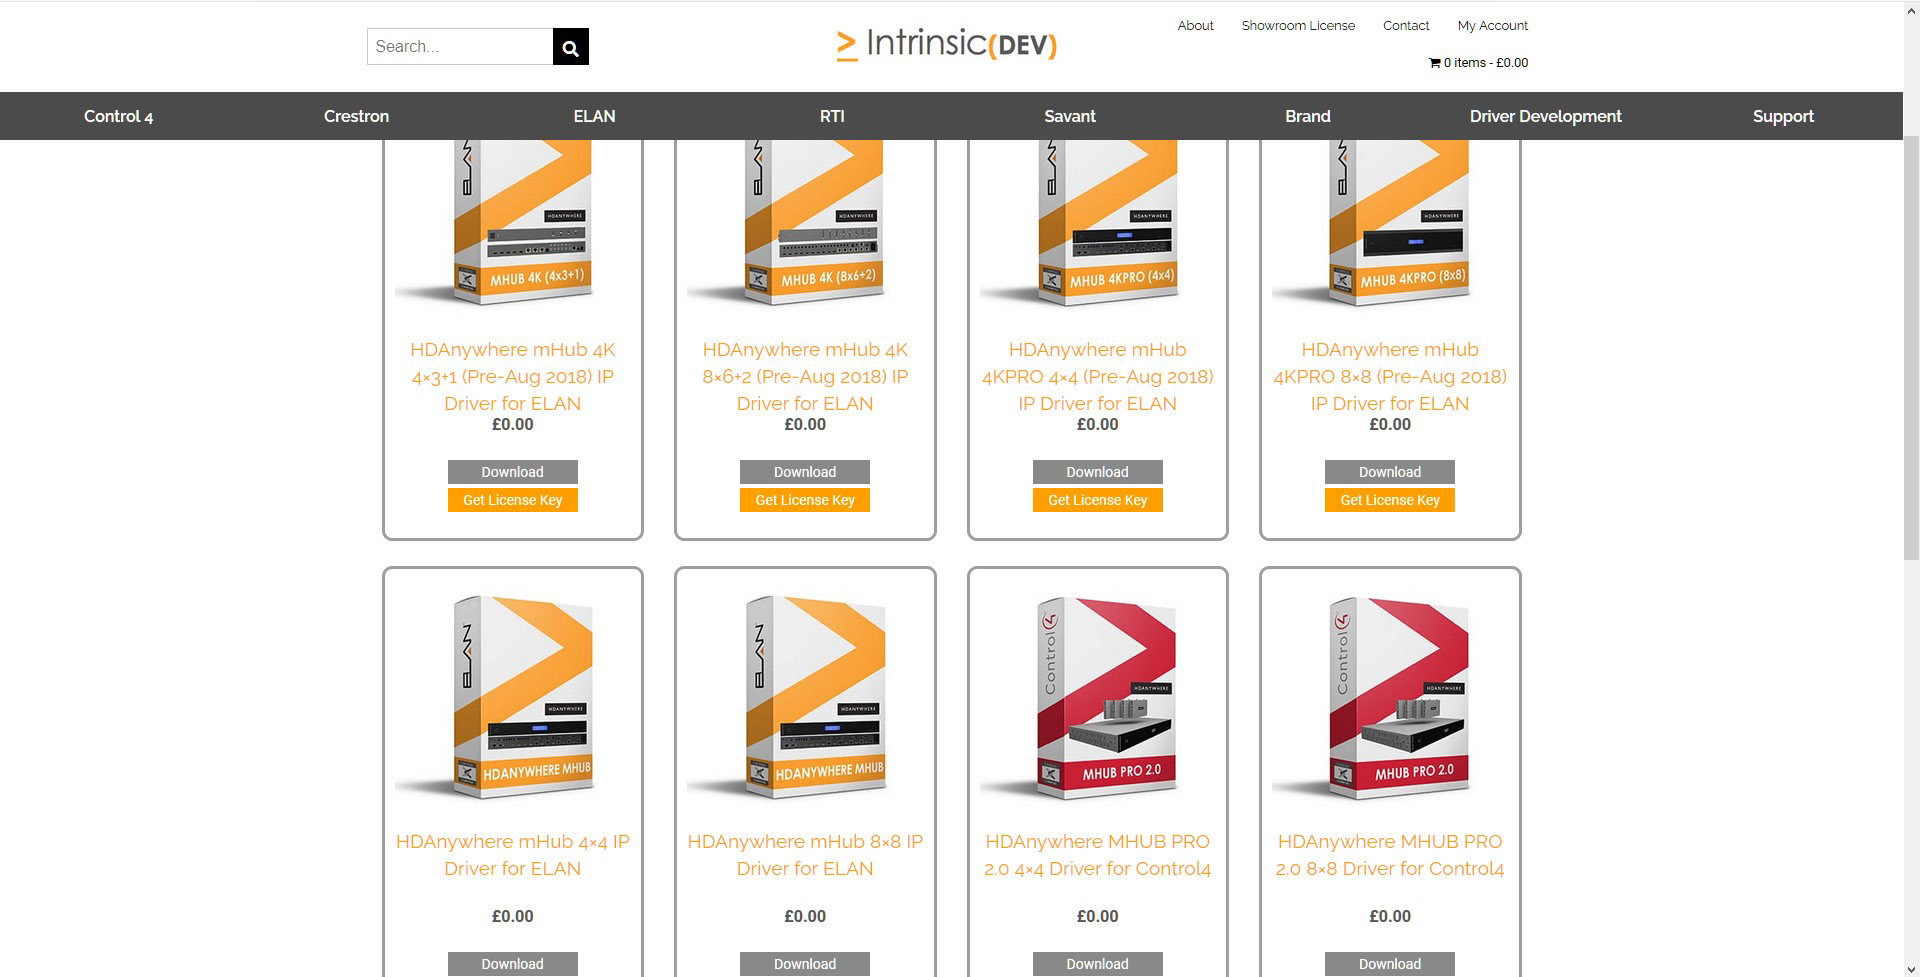
    If you see the label “DRIVER REQUIRES LICENSE ACTIVATION FROM VENDOR” then this means you need to create an account and generate a license key before the driver will work. As always, the driver remains FREE OF CHARGE. The process takes under 5 minutes to complete and offers HDA Pros the following benefits:

    1. Track and find your drivers for every install you commission.
    2. Be kept updated if the driver gets patched or improvements are added.
    3. Check to see if the driver is operating correctly.
    4. The ability to improve your HDA Pro listing

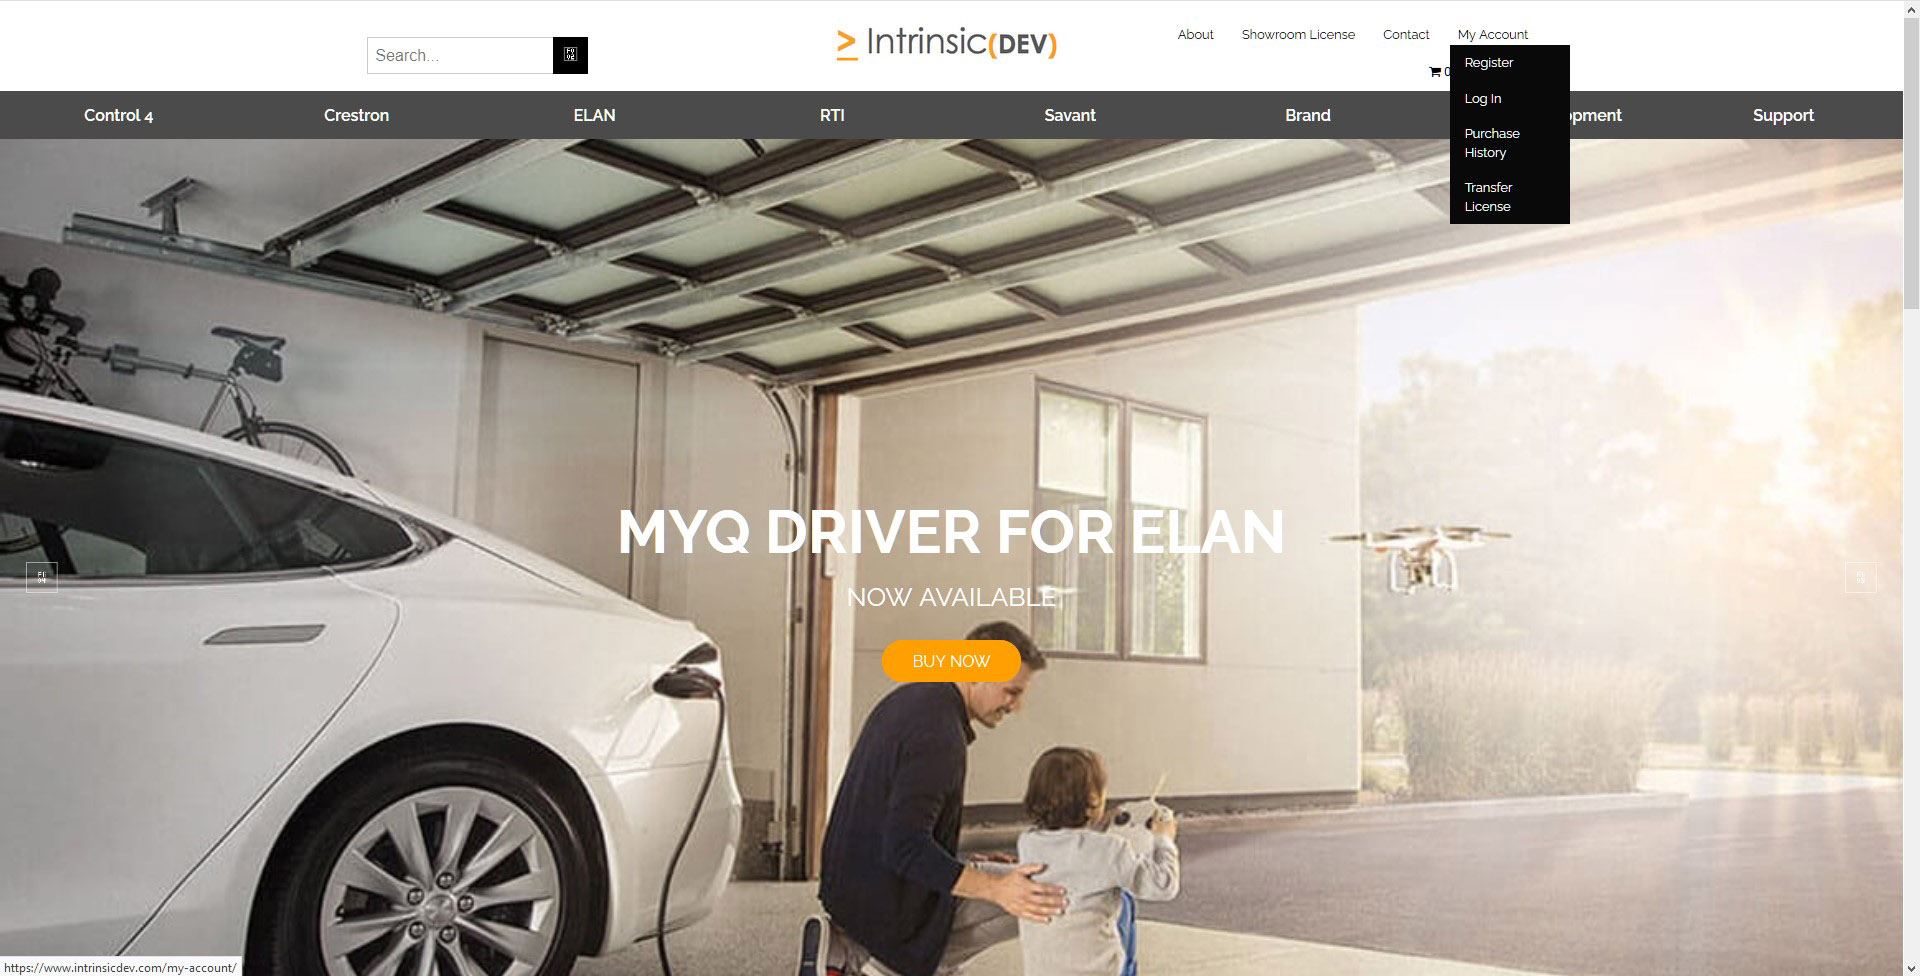
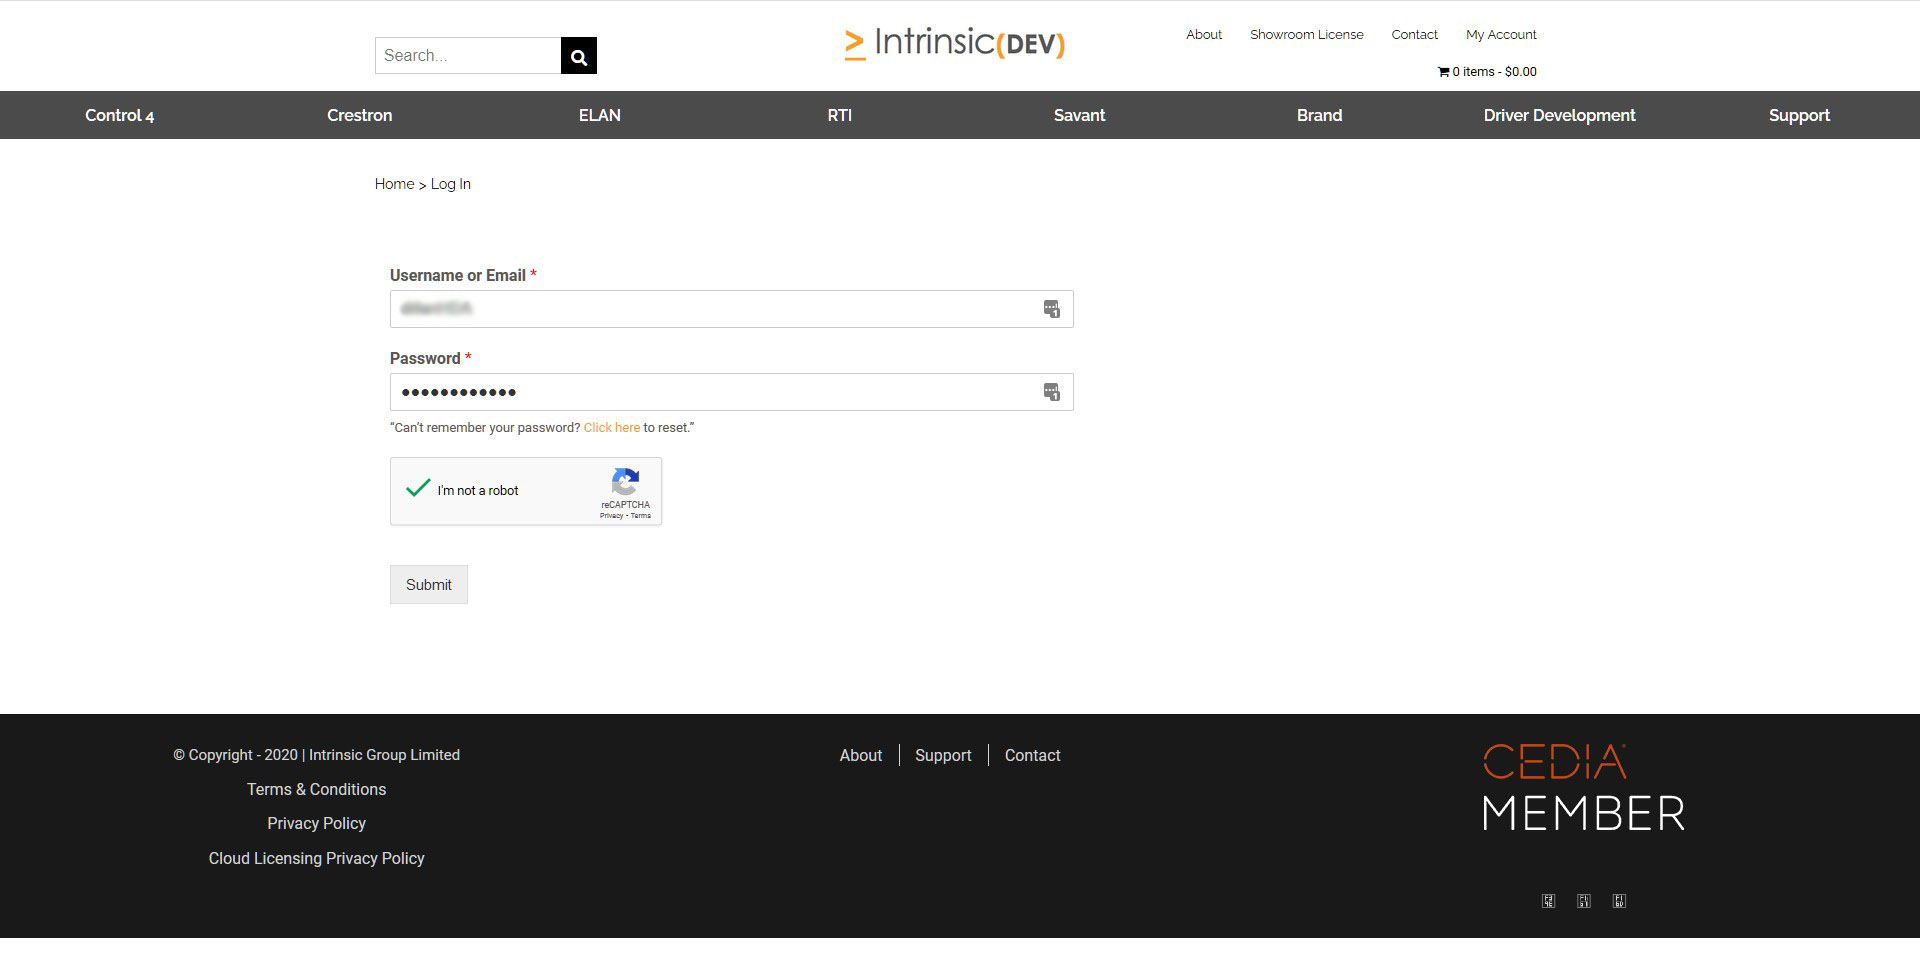
    2. Ensure that you are logged in.

    3. Find the HDA driver you want to download https://www.intrinsicdev.com/brands/hdanywhere


    4. Click on “Get License Key”


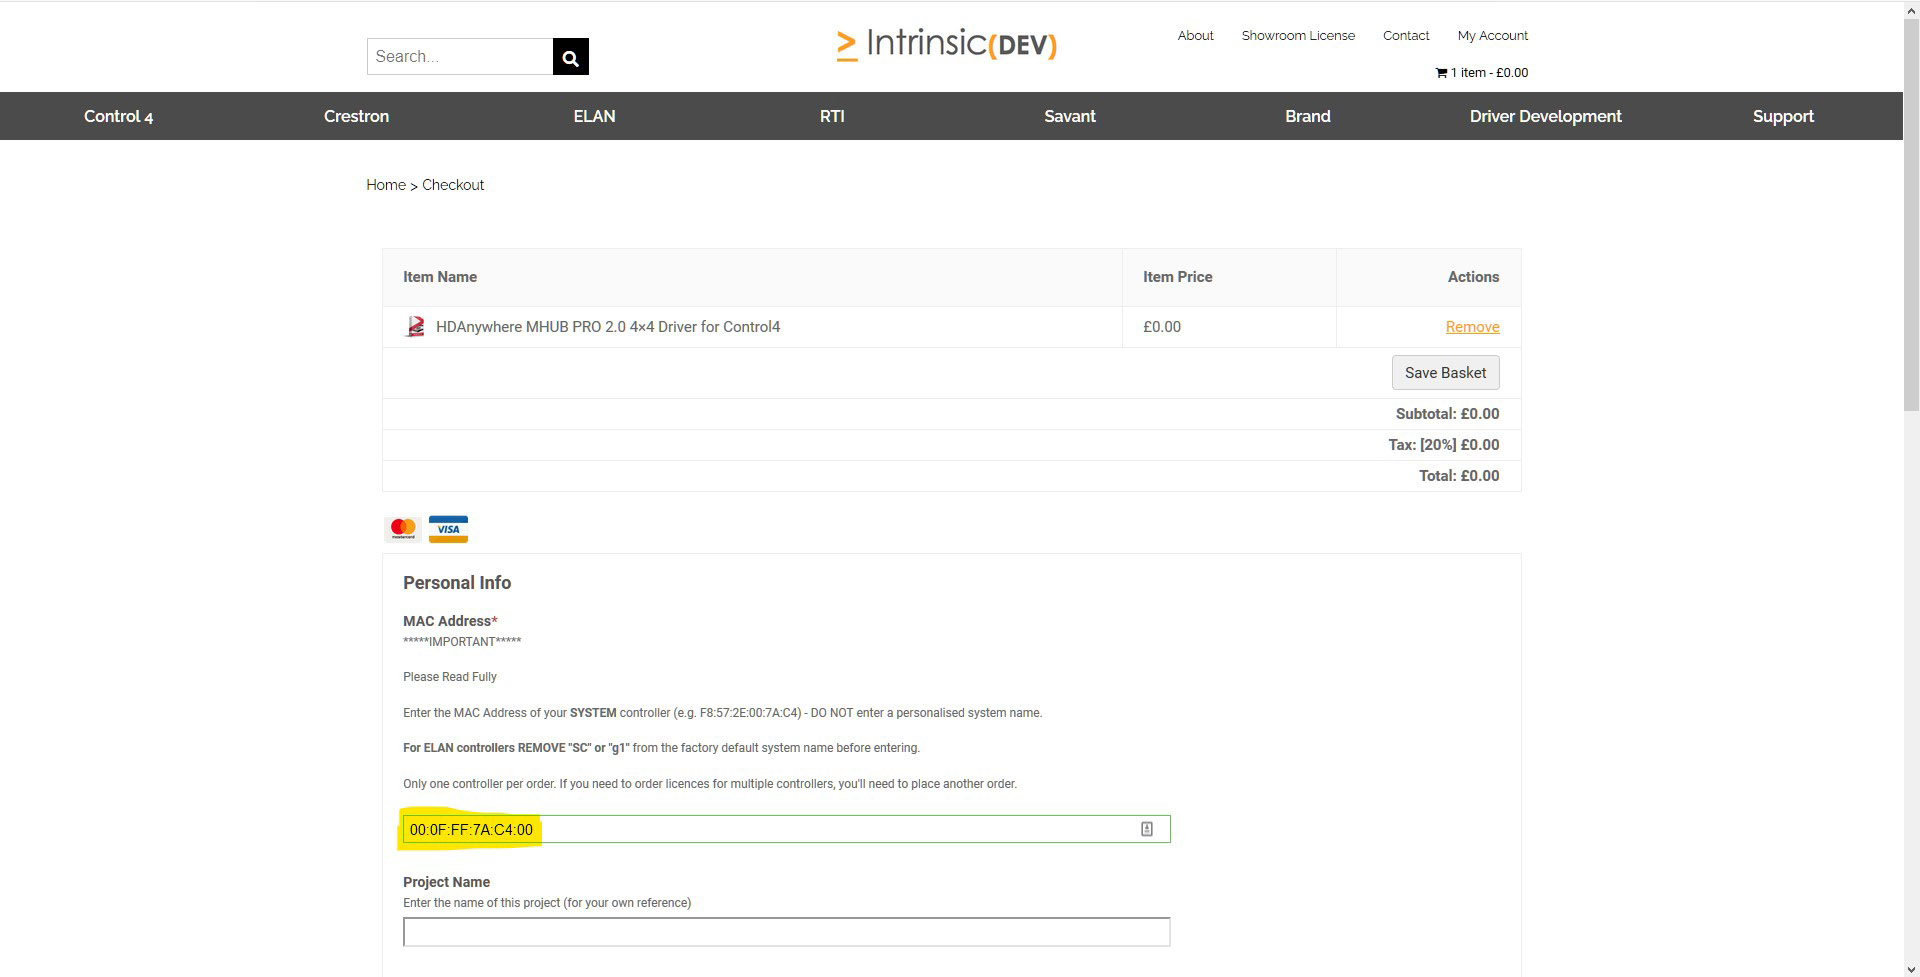
    5. You will need to provide the MAC address of your controller and some site details. Scroll to the bottom of the page and a button will appear to proceed/download. If you have not completed this step correctly then the button to download will not appear.


    6. Download the driver and make a note of the activation code.

  • Setting up WiFi and Zone Processors

    WiFi on Zone Processor Setup Guide

    This guide will walk you through the process of changing your Zone Processor (ZP) device’s network connection from a wired Ethernet setup to a wireless (WiFi) setup.
    This process involves three main phases:

    1. Initial Setup: Configuring the device while it’s connected via Ethernet.
    2. Temporary AP Mode: Using the device’s own Access Point to connect to it directly.
    3. Final WiFi Mode: Connecting the device to your building’s main WiFi network.

    Part 1: Initial Wired Setup

    Before you can configure the WiFi, the ZP device must first be set up on your network using an Ethernet cable.

    1. Connect the ZP device directly to your router or network switch using an Ethernet cable.
    2. Power on the device.
    3. On a computer connected to the same network, you will need to find the ZP’s current IP address.
      Note: You can typically find this by using the uControl app or a network scanner.
    4. Open a web browser and type that IP address into the address bar to access the device’s web interface (GUI).
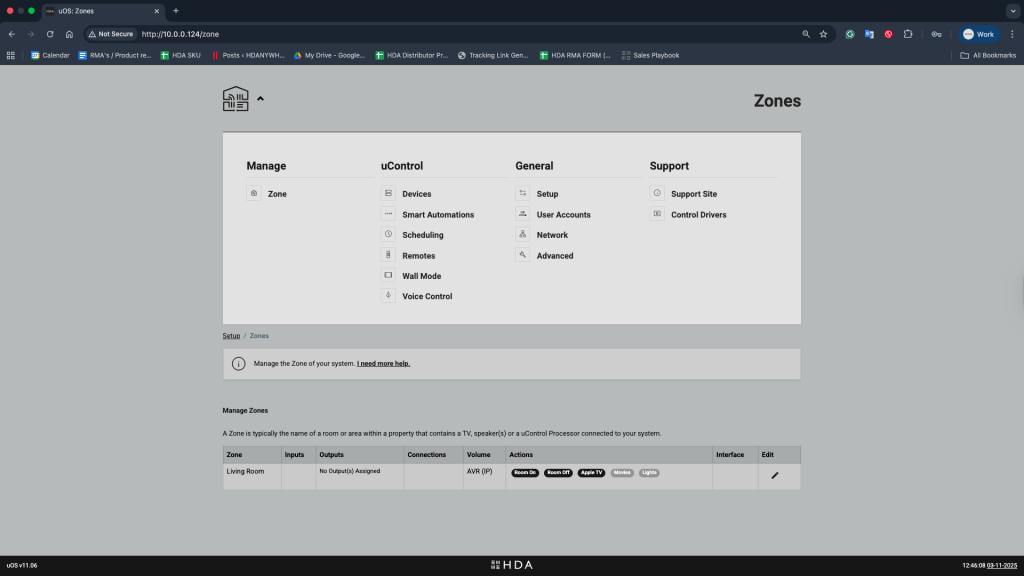
    Screenshot 2025-11-03 at 12.46.08
    Figure 1: ” The uOS GUI Home page navigation to go to the Network settings”

    Part 2: Switch to Access Point (AP) Mode

    Next, you will temporarily turn the ZP device into its own wireless hotspot.

    1. In the ZP’s web interface, navigate to the “Network” section.
    2. Find the “Device Mode” setting.
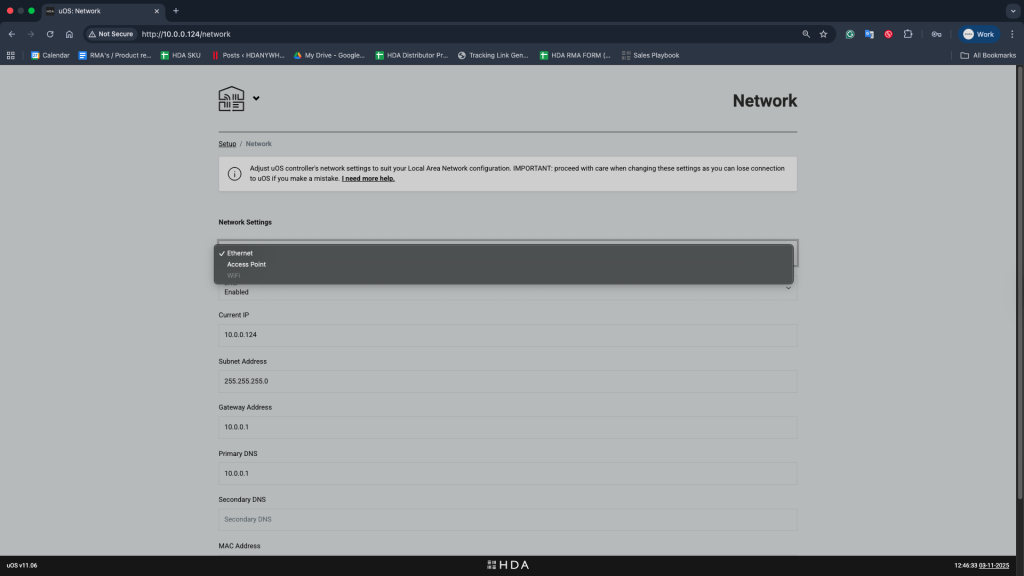
    3. Change the mode from Ethernet to Access Point.
    4. Save the settings.
    Screenshot 2025-11-03 at 12.46.34
    Figure 2: ” Changing Device Mode from Ethernet to Access Point in the Network Settings”

    Part 3: Connect to the ZP’s Temporary Network

    Your computer will lose connection to the device when it restarts. You must now connect to the new temporary network it is broadcasting.

    1. On your computer or mobile device, open your WiFi settings.
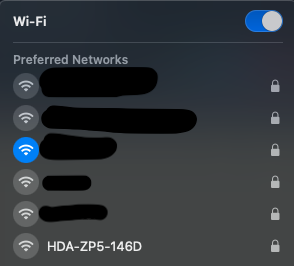
    2. Look for a new network name (SSID) broadcast by the ZP device. It starts with HDA-ZP (Example: HDA-ZP5-146D).

    Screenshot 2025-11-03 at 15.44.061

    1. Connect to this network. You will be prompted for a password.
      Password: hdanywhere
    2. Your device is now connected directly to the ZP, not to your main network.

    Part 4: Switch to WiFi

    Now that you are connected to the ZP’s temporary network, you will give it your main WiFi network’s details.

    1. Open a web browser.
    2. In the address bar, type: 192.168.100.1
      This is the ZP’s default IP address when it is in Access Point mode.
    3. Once the web interface loads, navigate to the “Network” section again.
    4. Change the “Device Mode” from Access Point to WiFi.
    5. Save the settings.
    Screenshot 2025-11-03 at 12.57.56
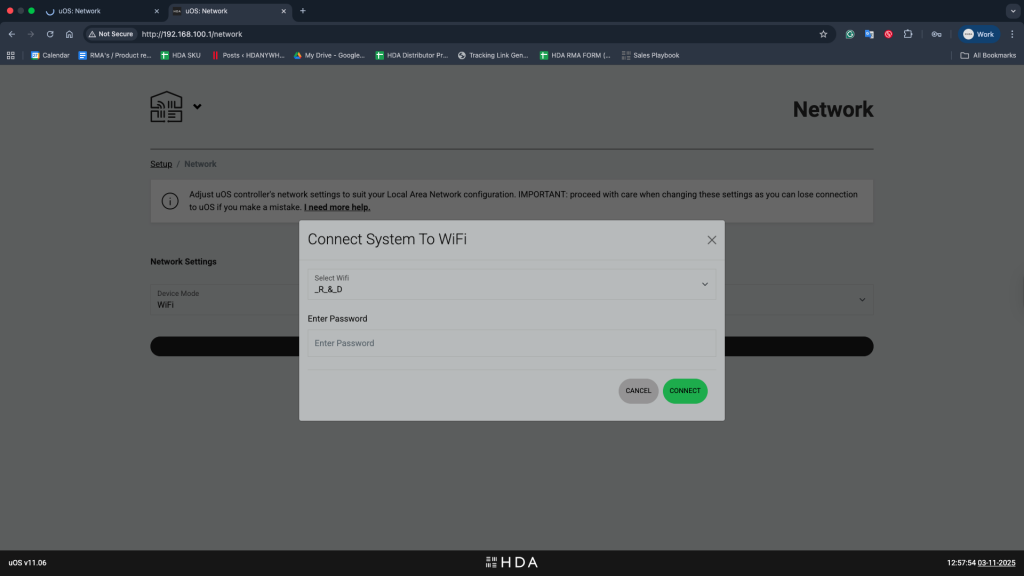
    Figure 4:” Selecting your WiFi SSID and Password in Navigation Settings to connect your Zone Processor to WiFi”
    1. Enter your WiFi Network and password then Save the settings again. The device will disconnect you from its temporary network.
    Important: At this point, the temporary network will disappear as the ZP device is now attempting to connect to your main WiFi network. You can now reconnect your computer to your main WiFi network.

    Part 5: Locate Your Device on WiFi

    Once the ZP device reboots, it will be connected to your network via WiFi. It will have a new IP address assigned by your main router.

    You must now find this new IP address to access the device:

    • Using the App: The simplest method is to use the uControl app, which has a built-in network scanner to find the device.
    • Using Your Router: You can log back into your router’s administration page and check the “DHCP Client List” for the ZP device to see its new IP.
    • Using a Network Scanner: You can use a third-party application (like Fing on mobile or Angry IP Scanner on a desktop) to scan your network and locate the ZP’s new IP address.

    Once you have the new IP address, you can use it to access the ZP’s web interface as normal. Your device is now successfully connected via WiFi.

  • Creating a sequence in uOS

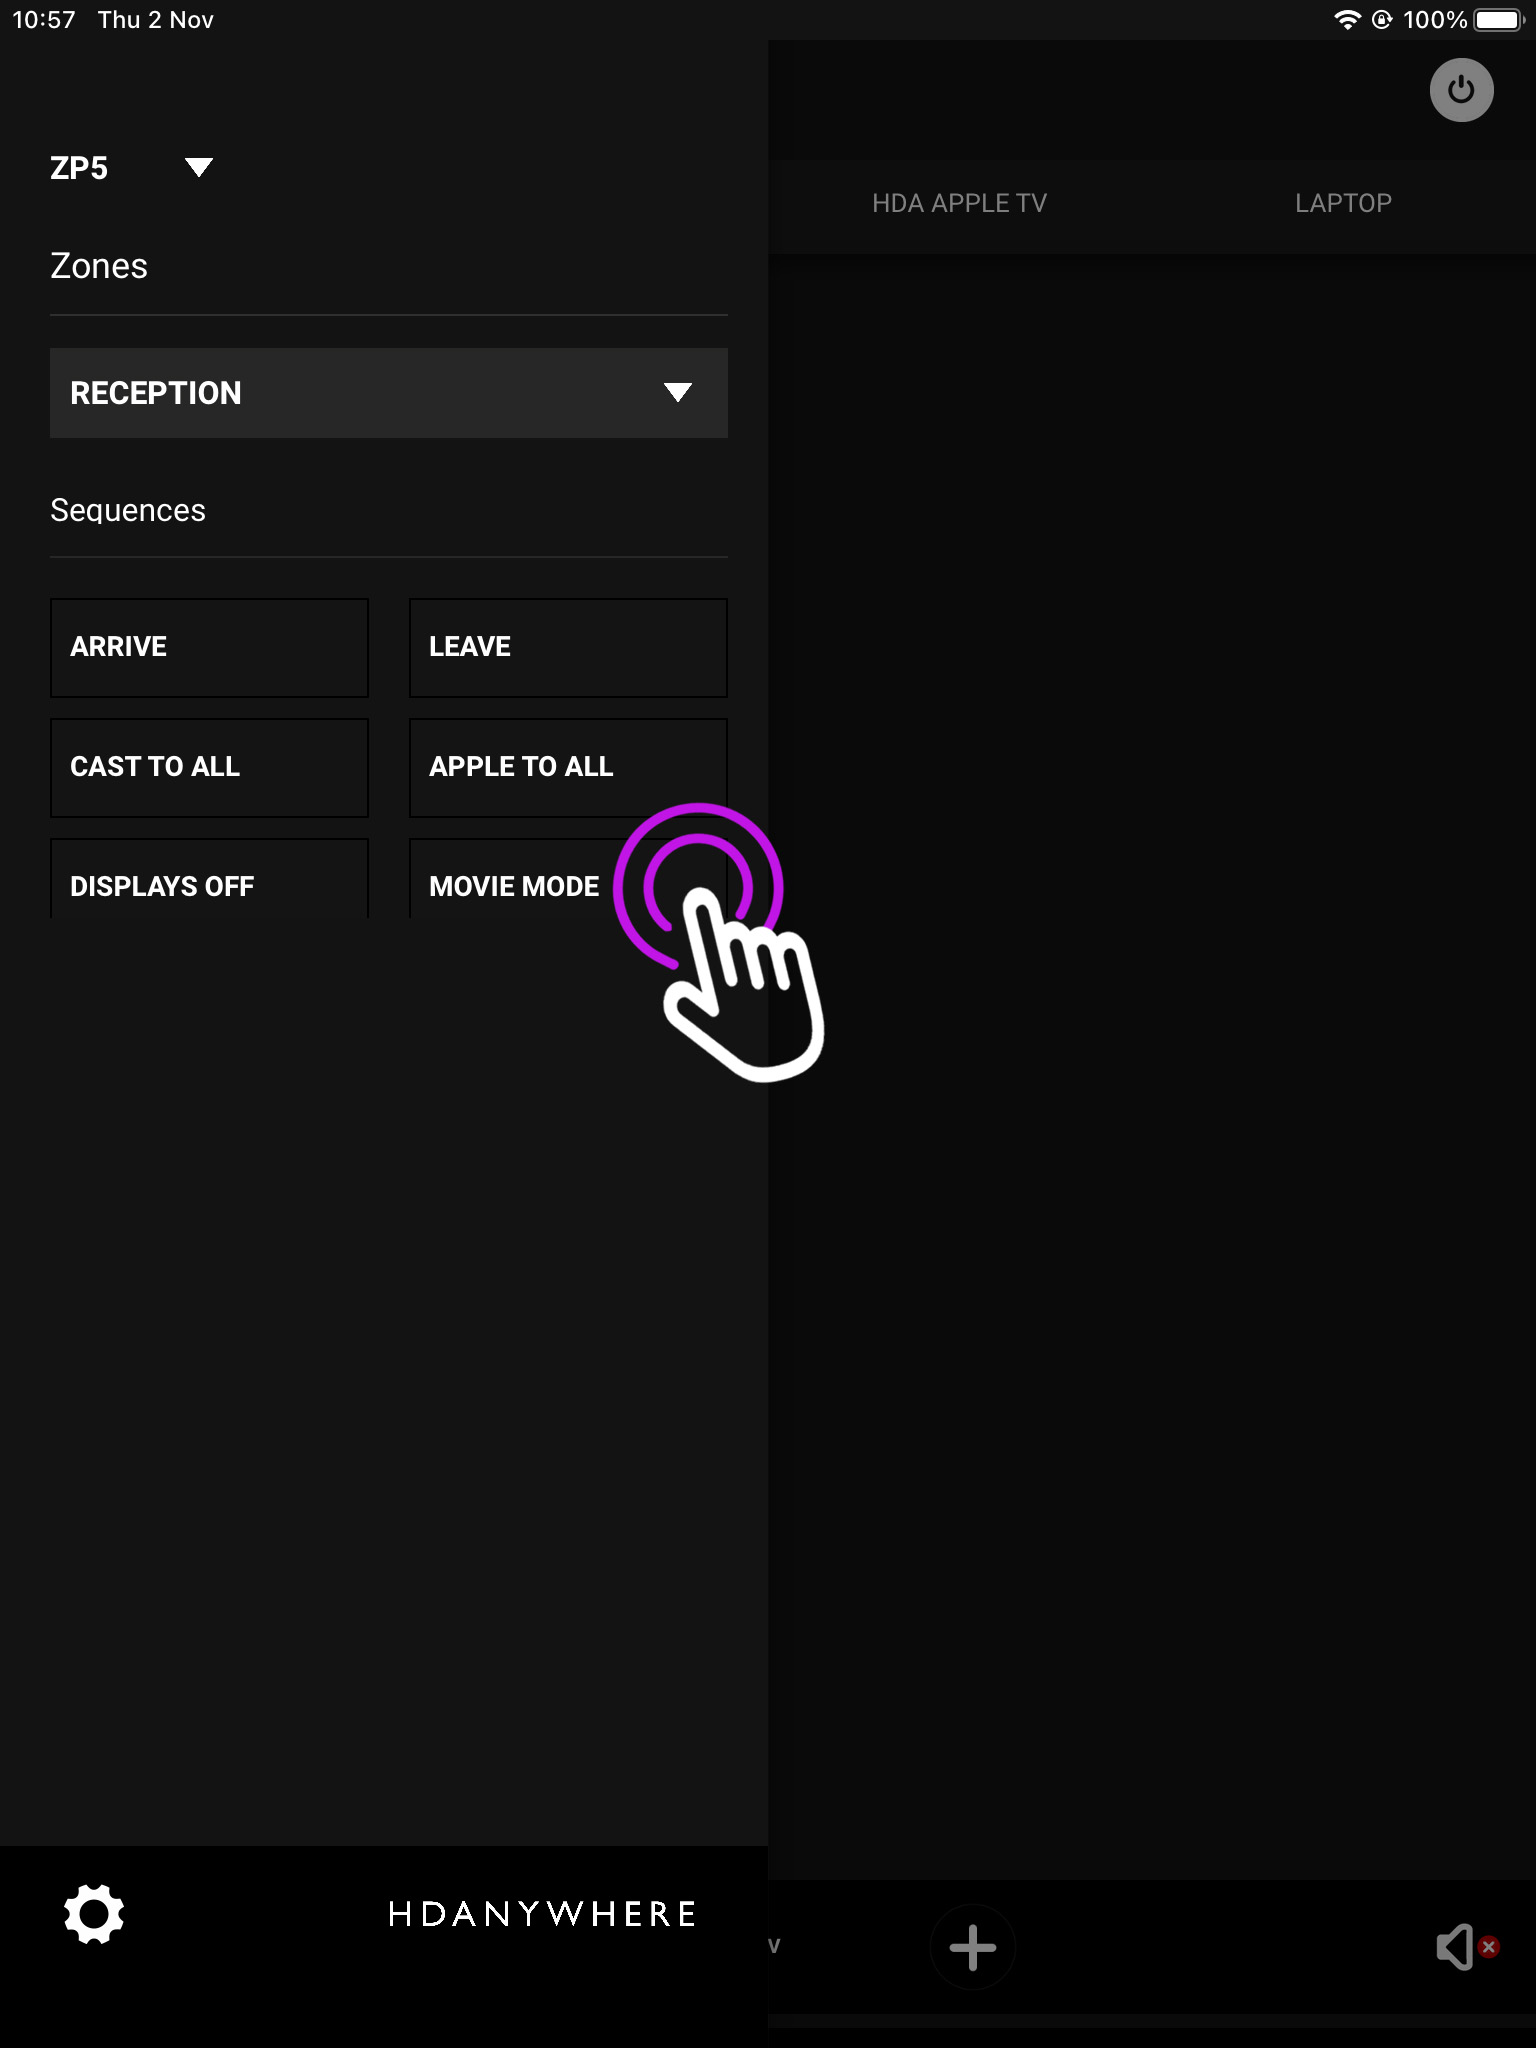
    If your HDA device has uControl, you are able to setup Sequences which allow you to combine commands together to trigger a response from the system. This can be useful for scheduling certain actions like switching on/off a rooms devces at the push of a button.


    In this support article:


    Creating a Sequence in uControl

    1. Open uControl

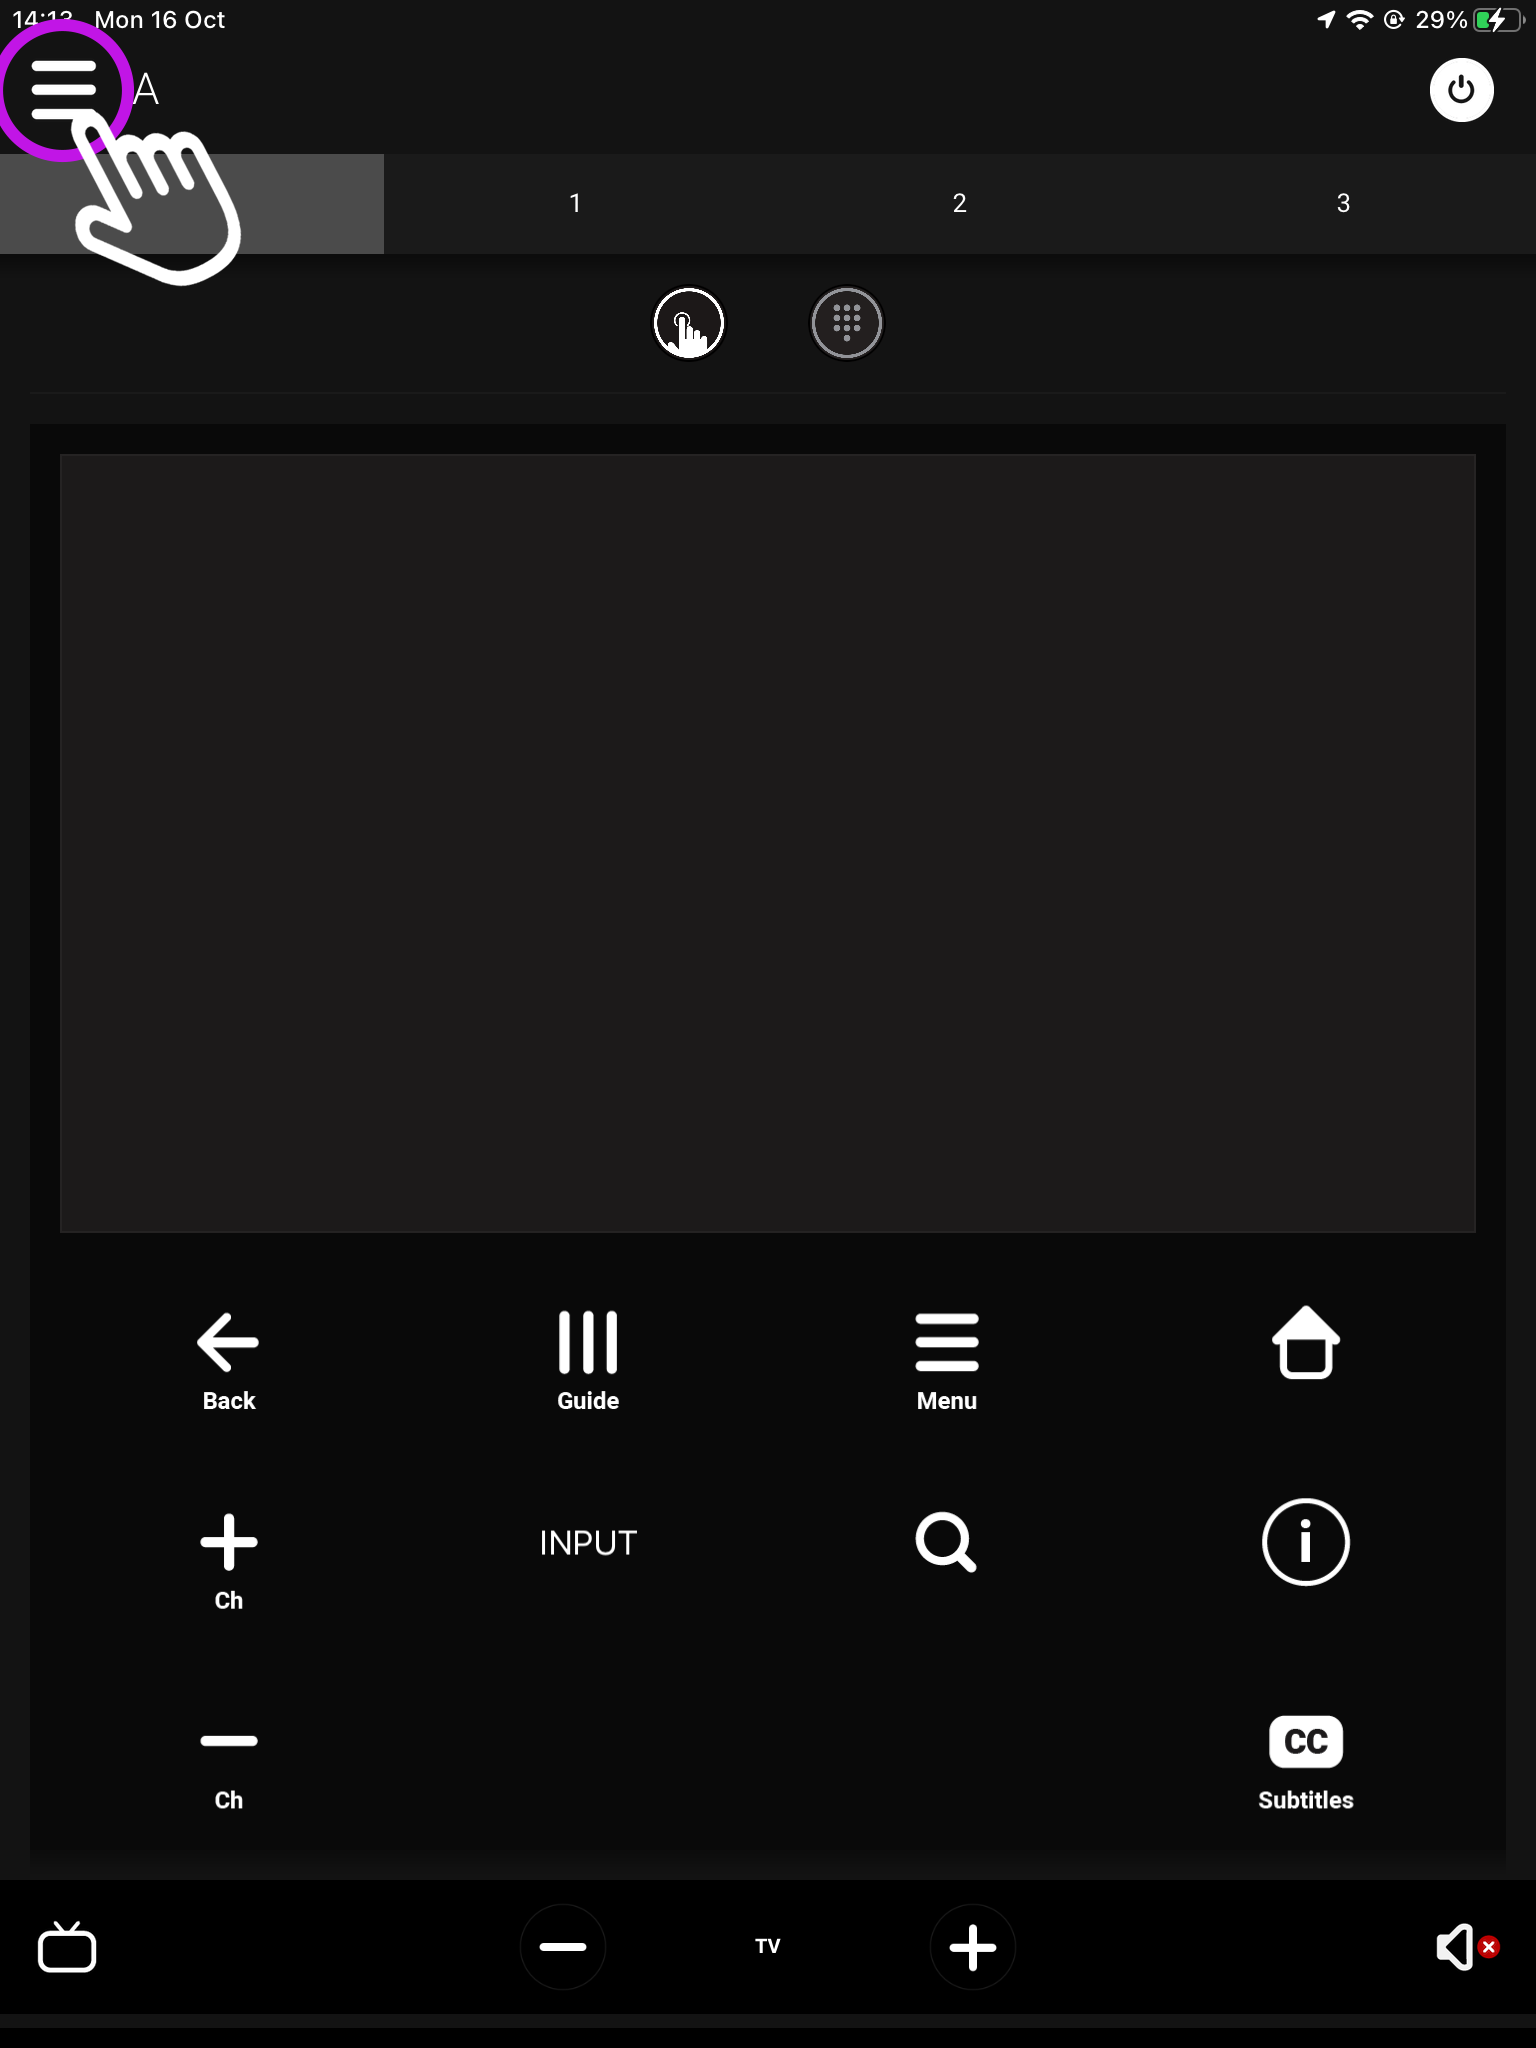
    From the main screen navigate to the menu in the top left.

    What you see on the main screen may differ, however, the three lined menu bar will still be there.

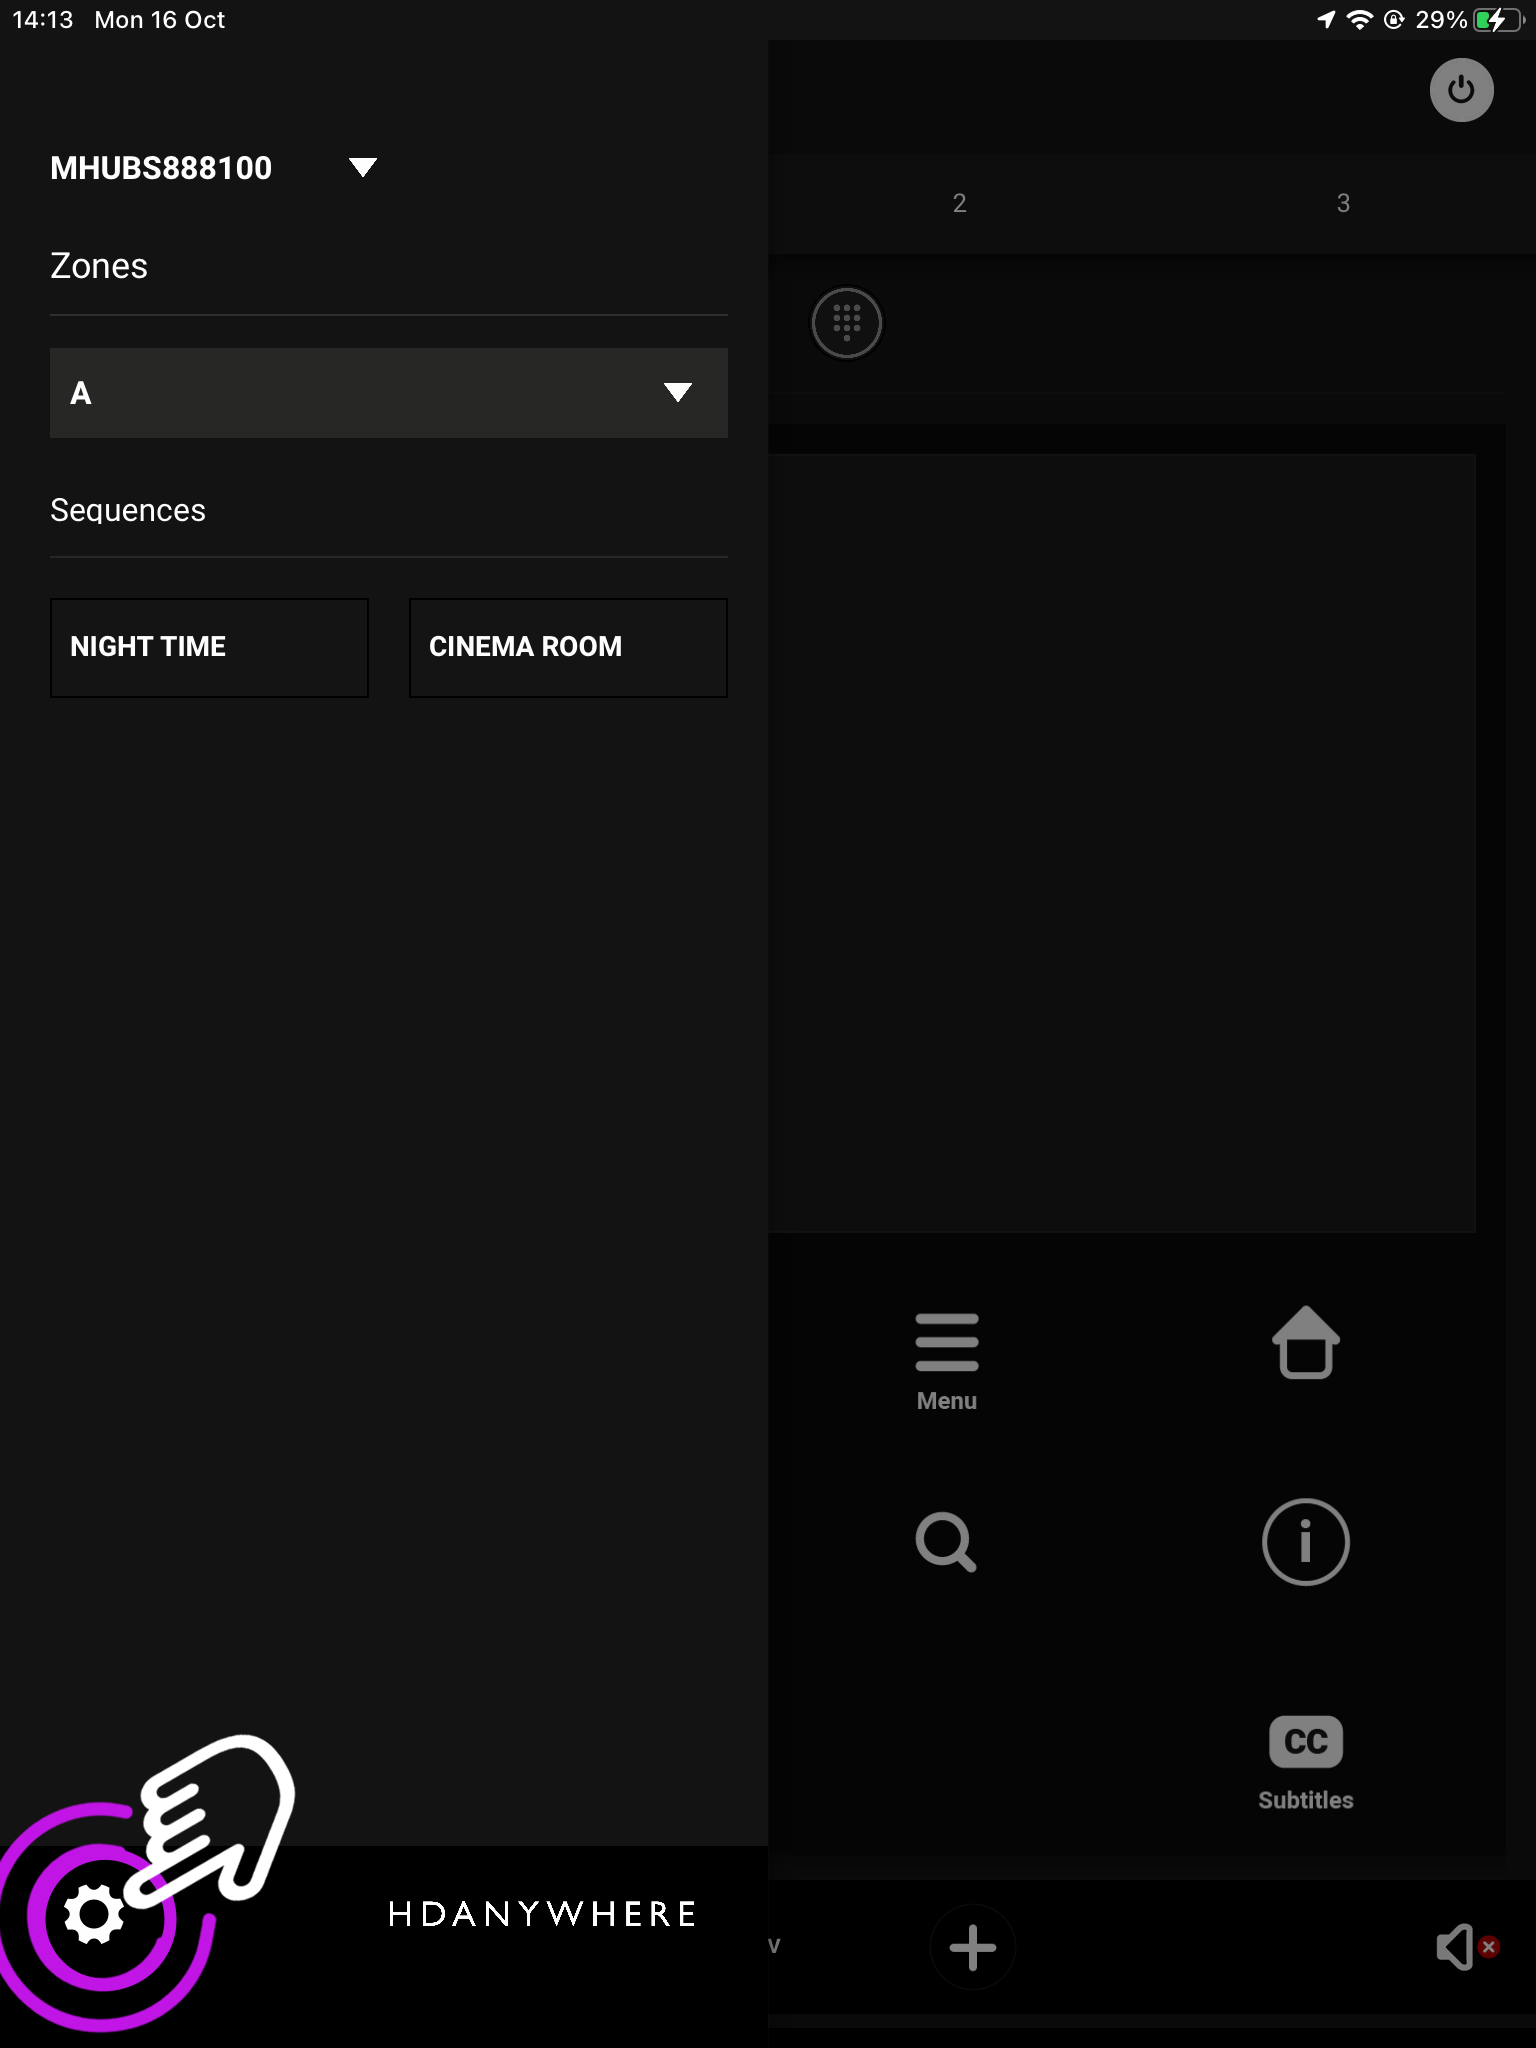
    2. Navigate to your settings

    Look for the settings icon located in the bottom left corner.

    The icon may vary depending on your mobile devices size, although it will still be in the bottom left corner.

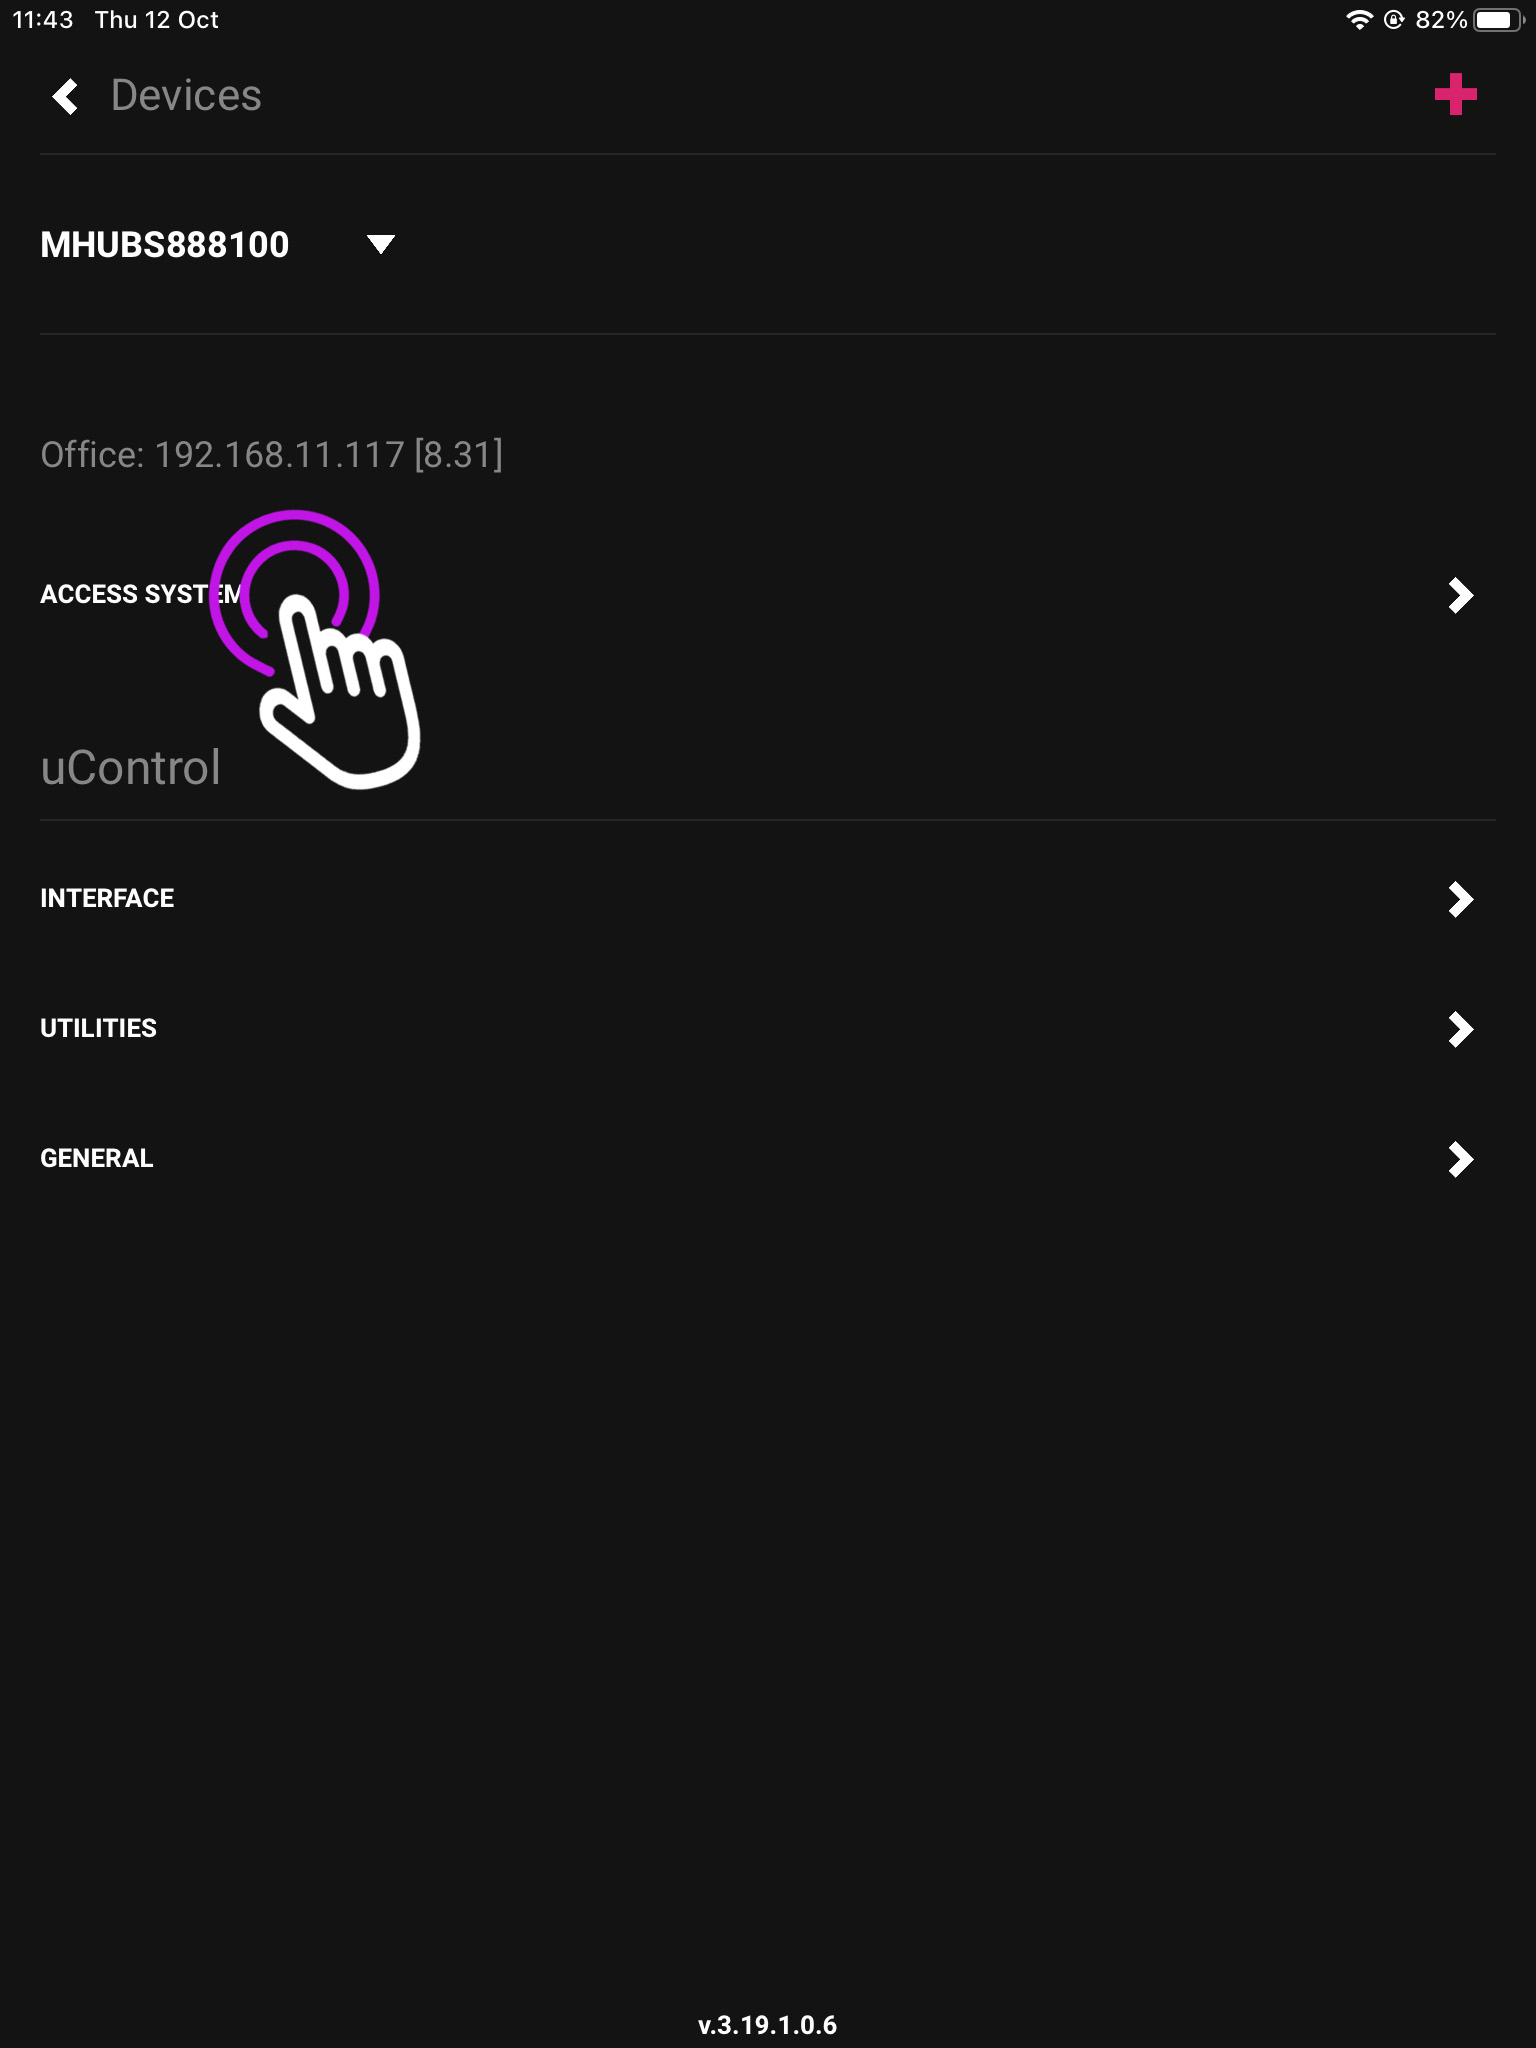
    3. Access System

    From here press “Access System”.


    This is your device page which displays your units model and IP address.

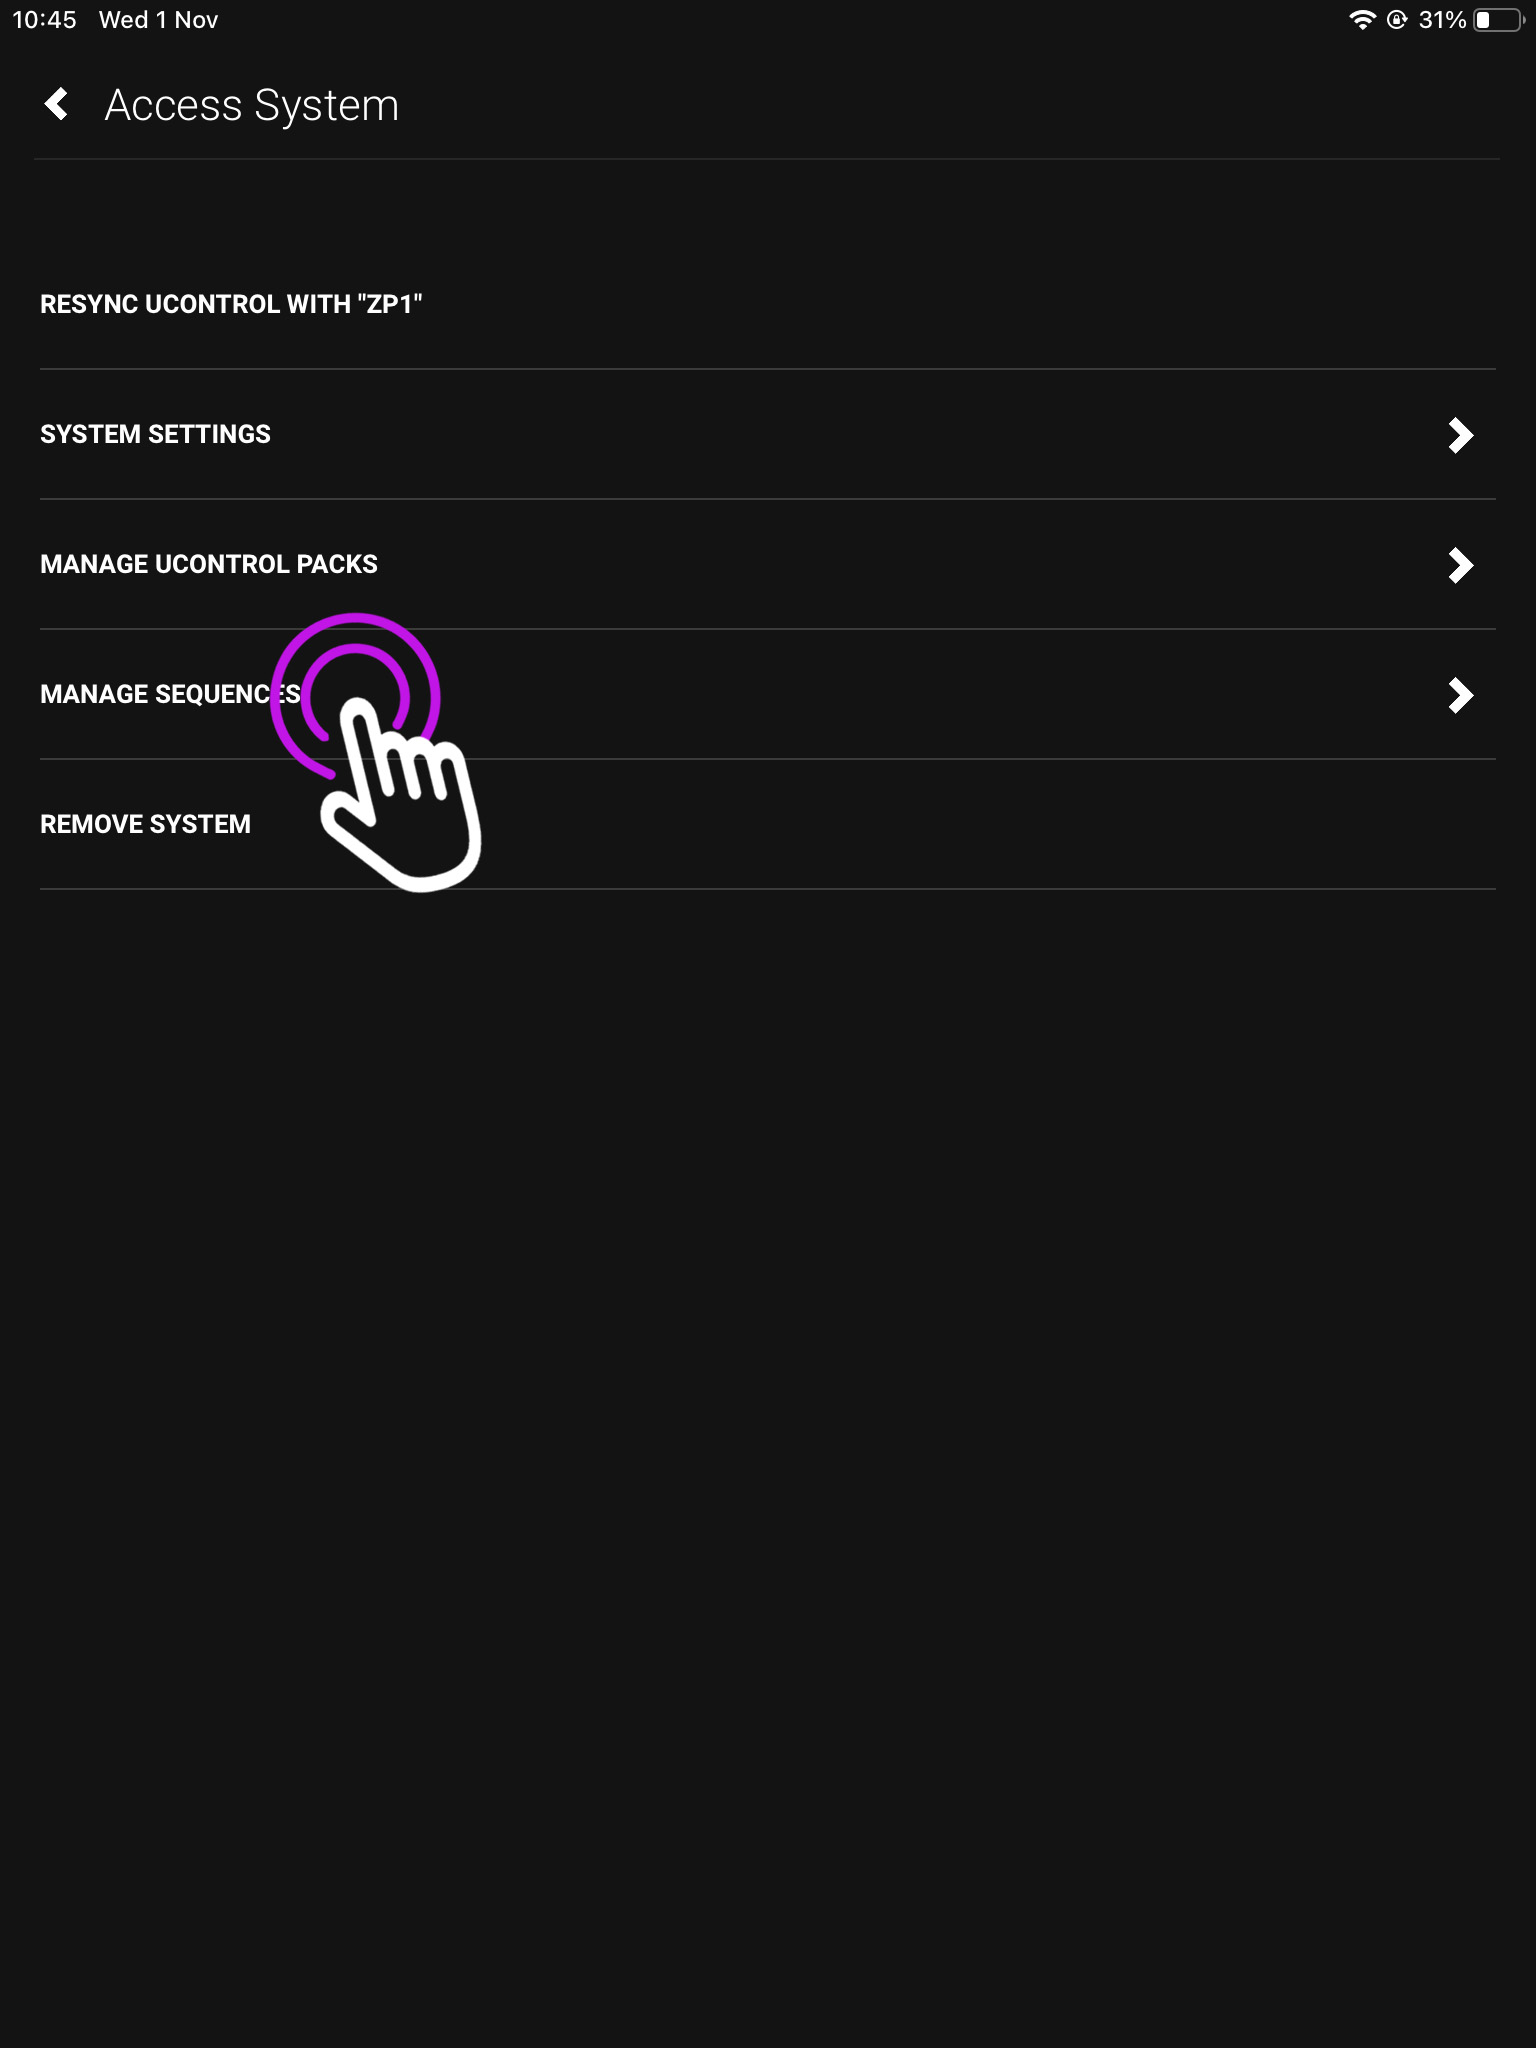
    4. Sequences

    In this menu press “Manage Sequences”.


    From this page you can also manage uControl IR/IP packs.

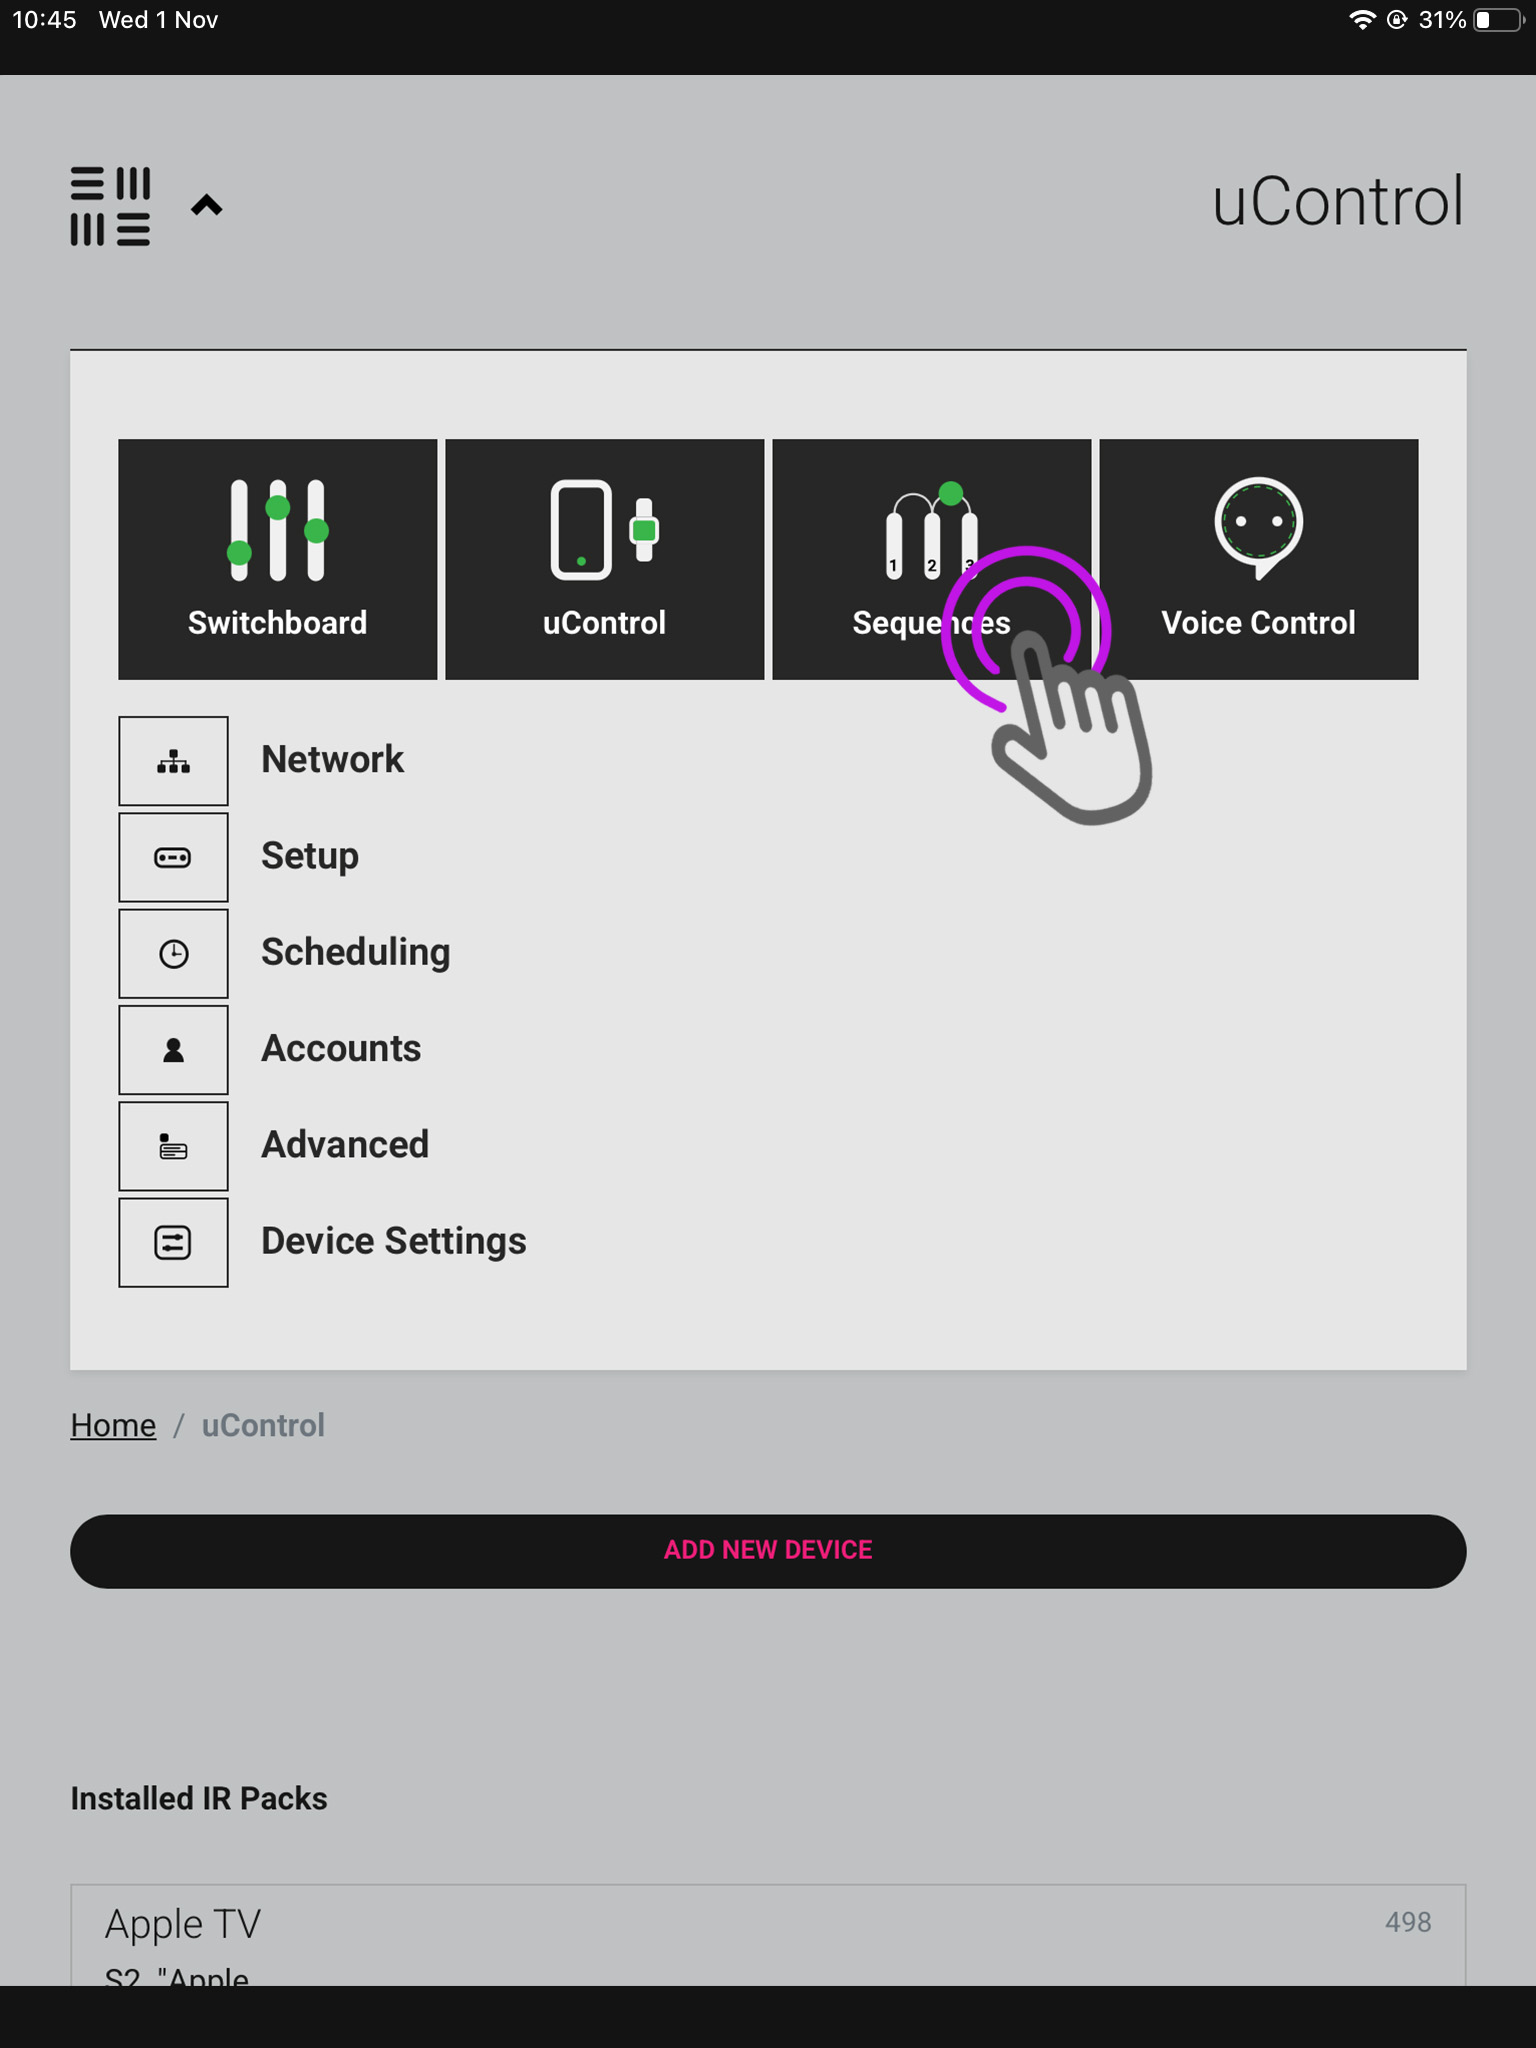
    5. webUI

    The webUI can also be easily accessed by typing you devices IP address into a website URL.

    You will be taken to the uOS home page, open the menu in the top left and select “Sequences”.

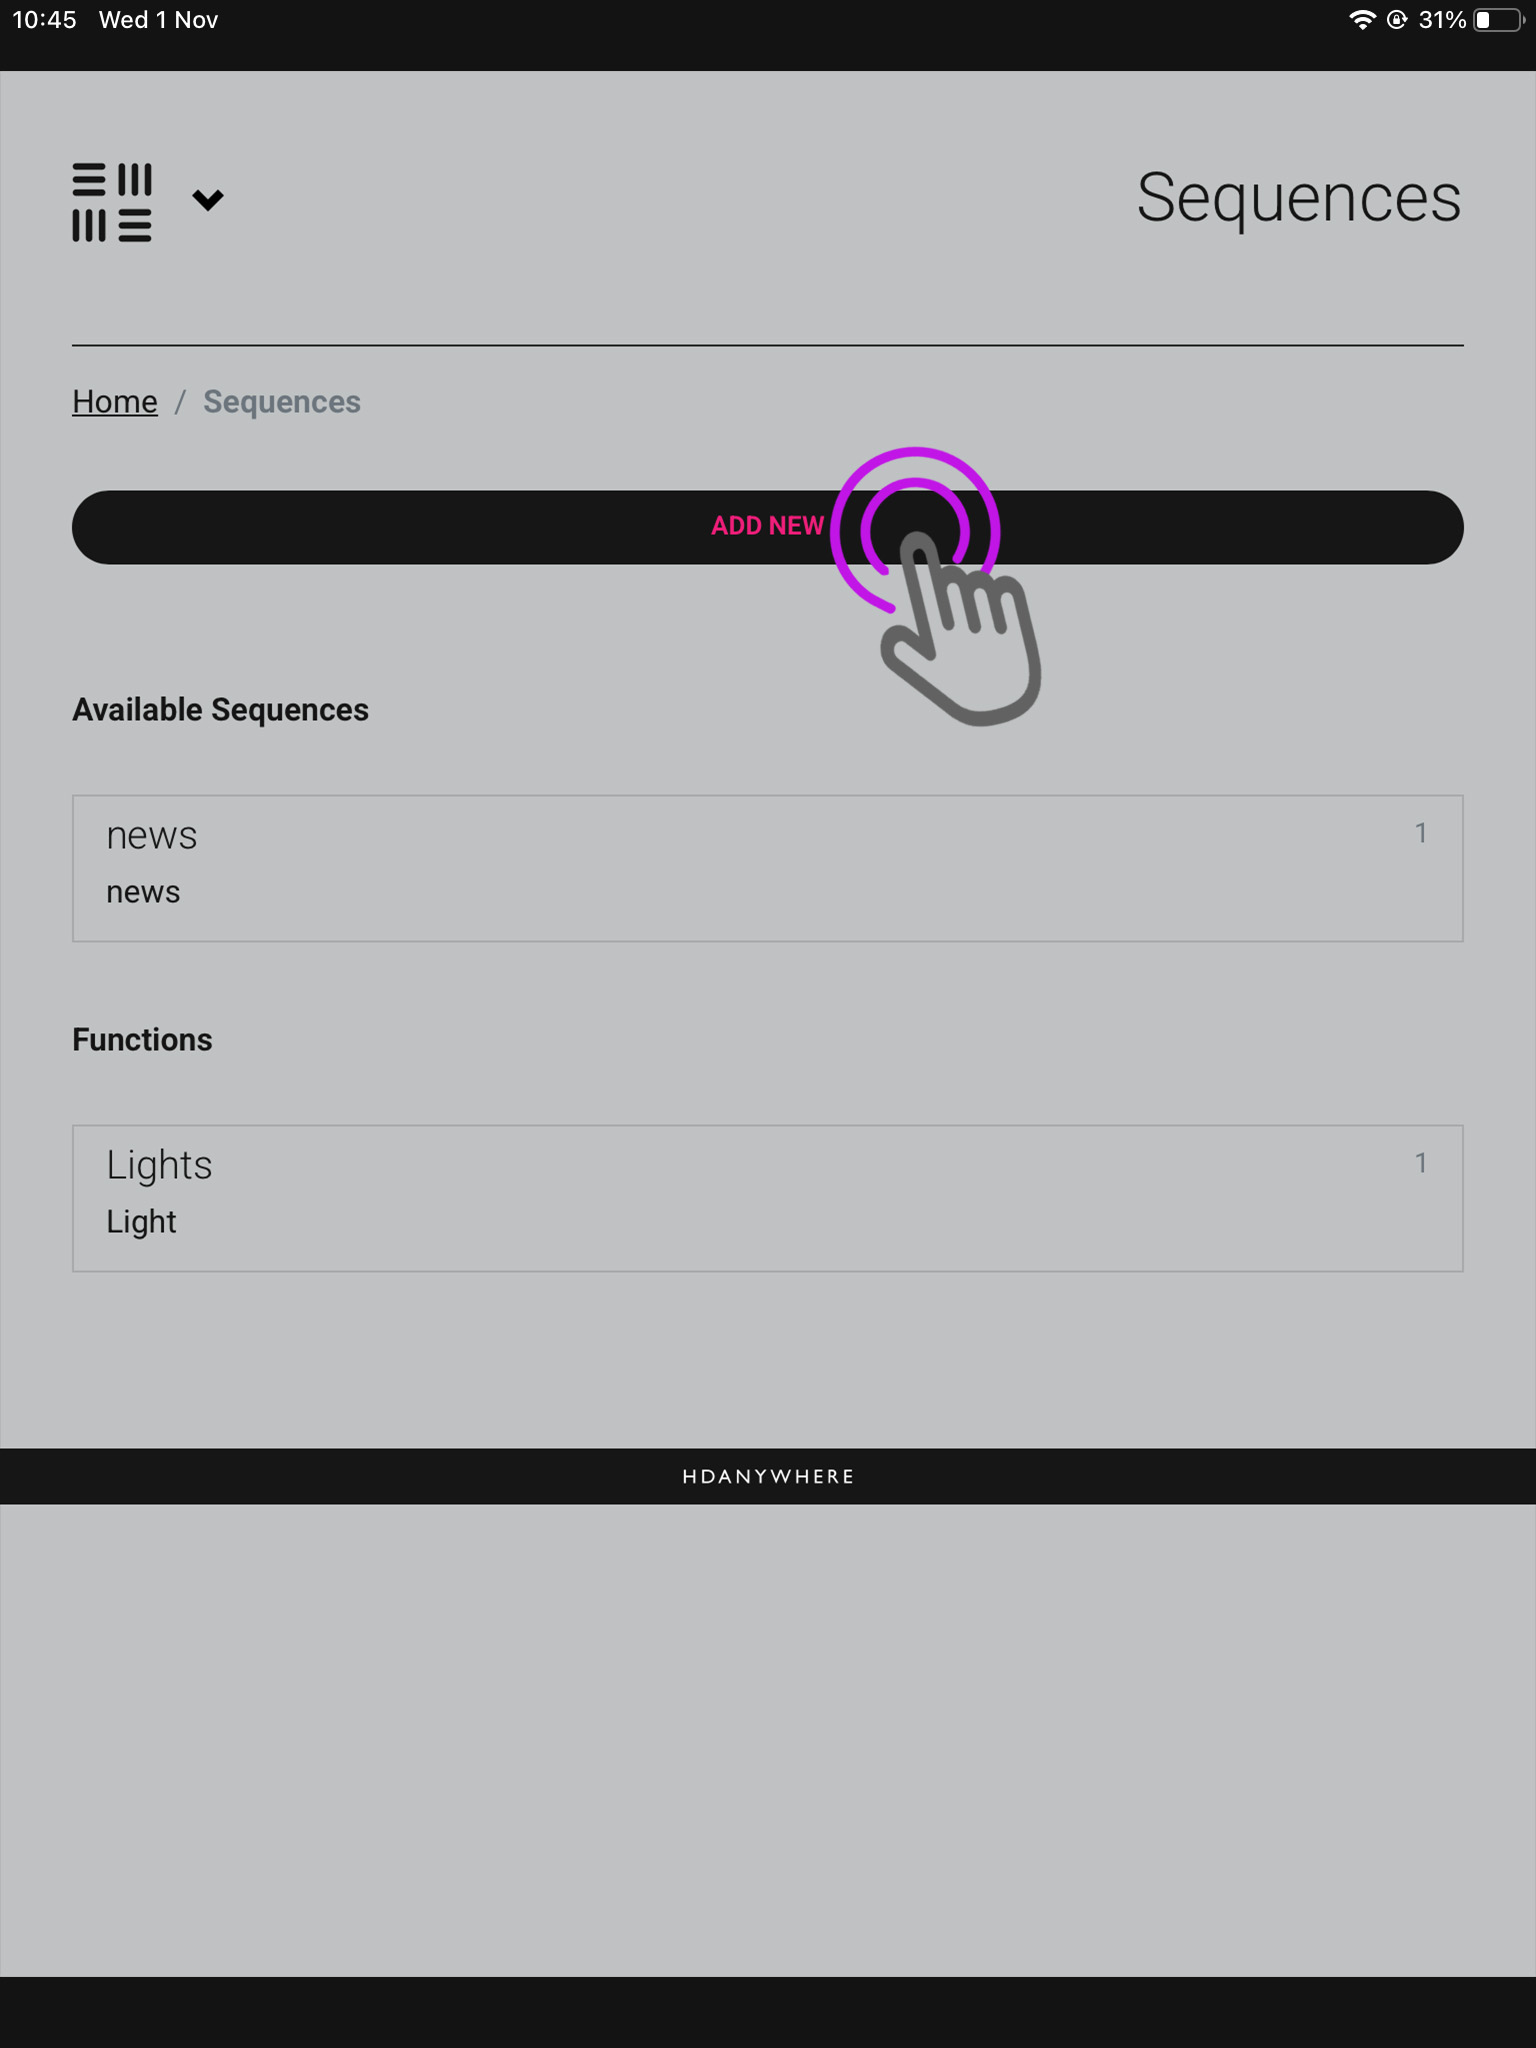
    6. Add new Sequence

    We are now in the sequences page where you can see your available sequences, and current functions. Press “Add New”.

    A pop-up will appear asking if you’re creating a Function or Sequence, choose Sequence.

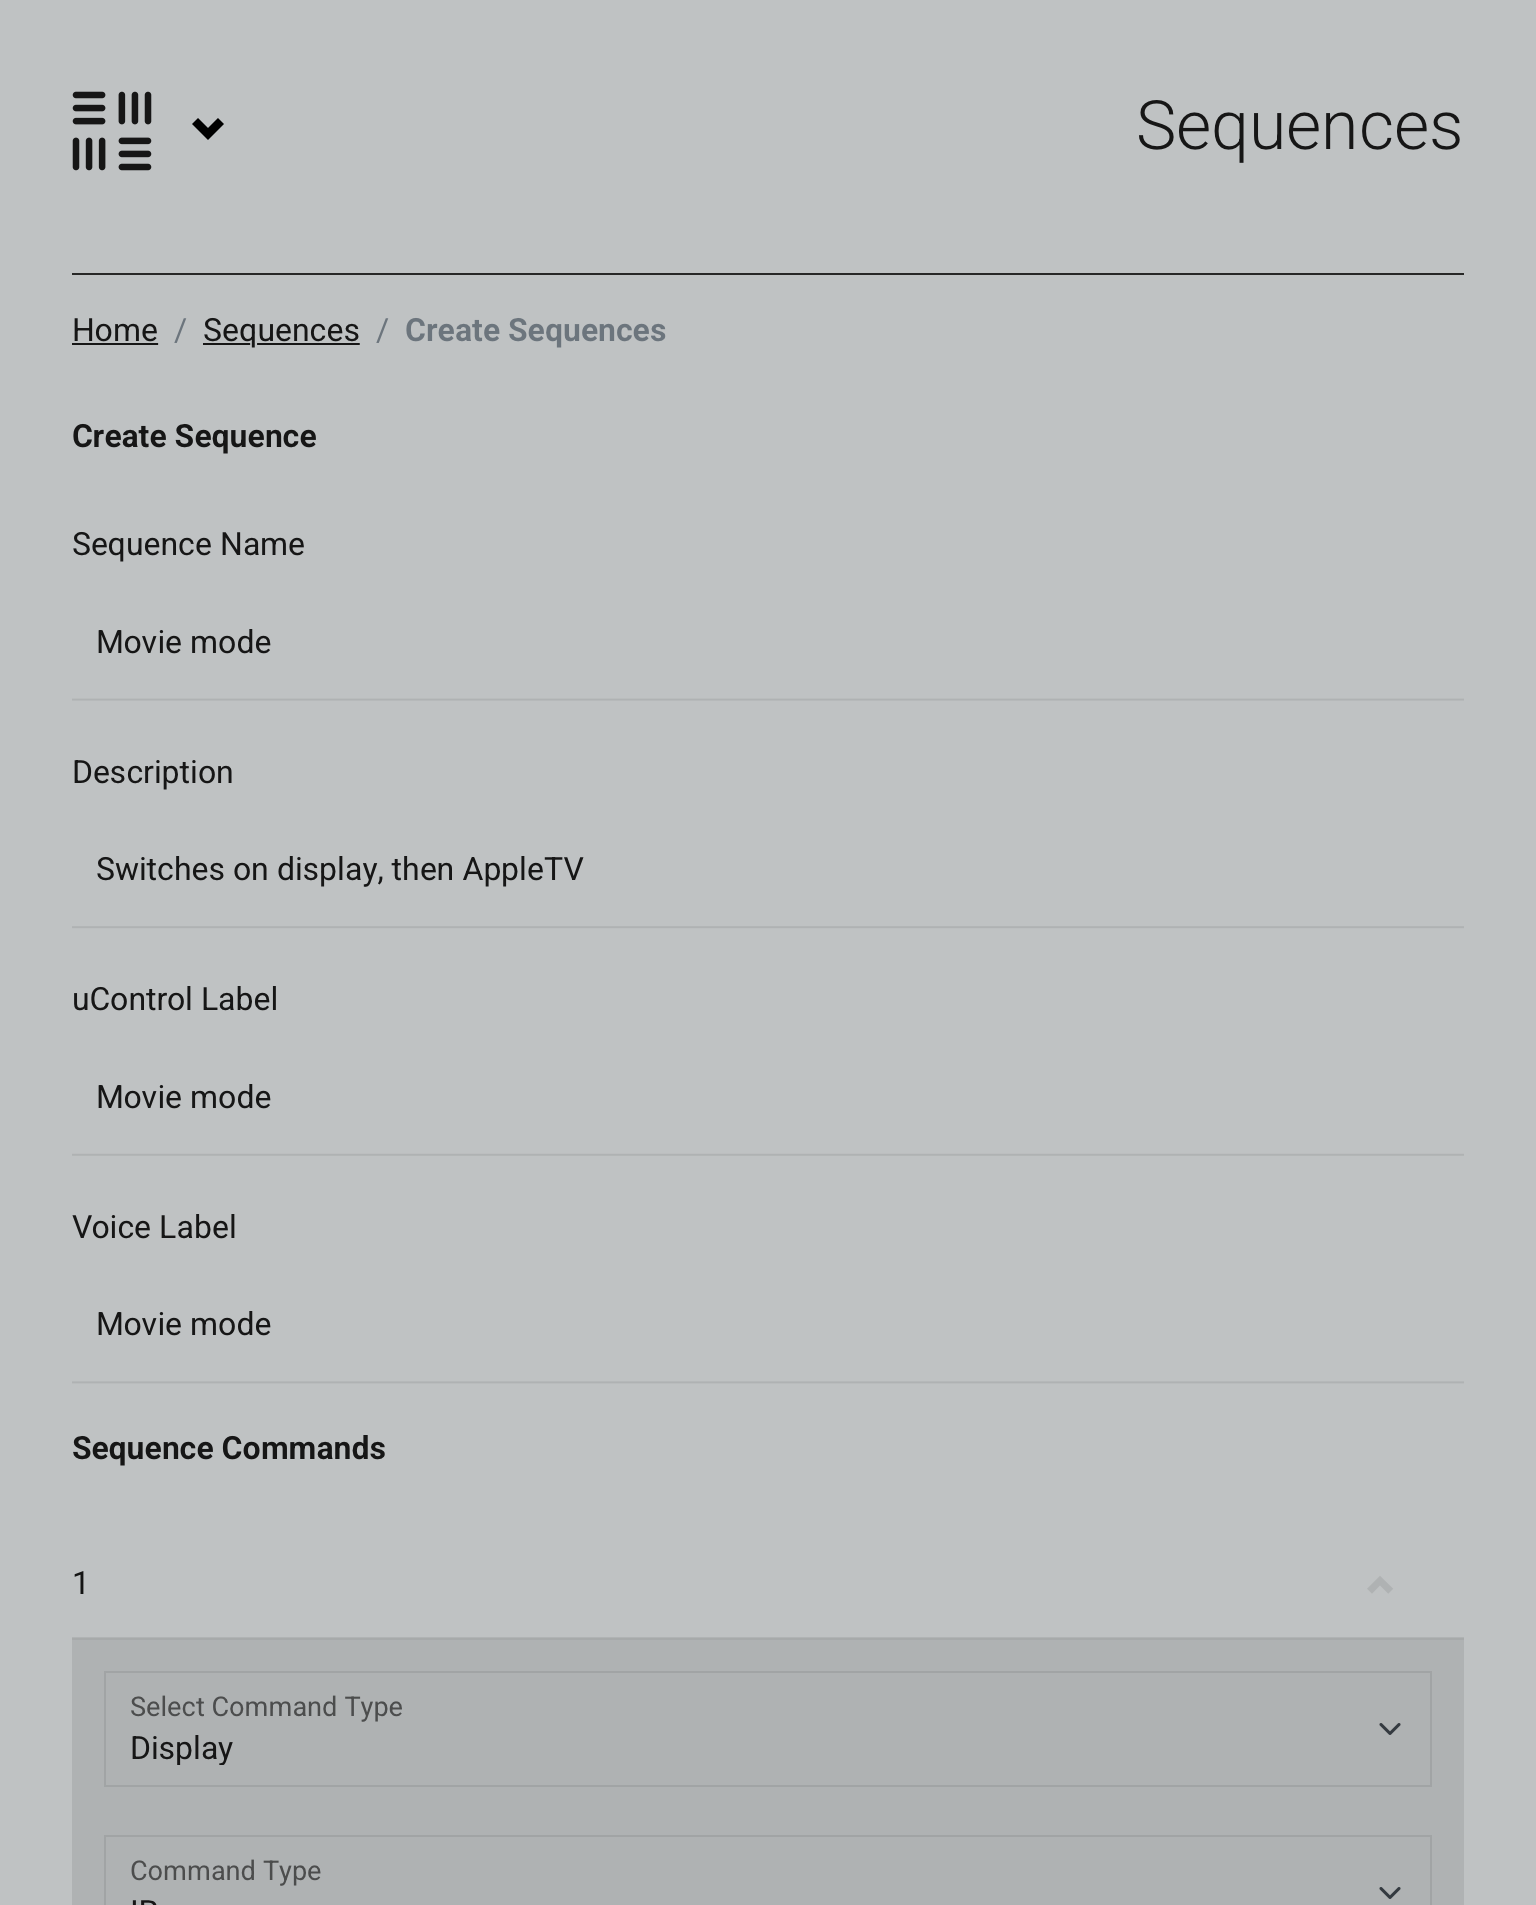
    7. Input details

    Now we need to input the details of your Sequence.

    Make sure to label it so its clear what your sequence performs when you execute it.

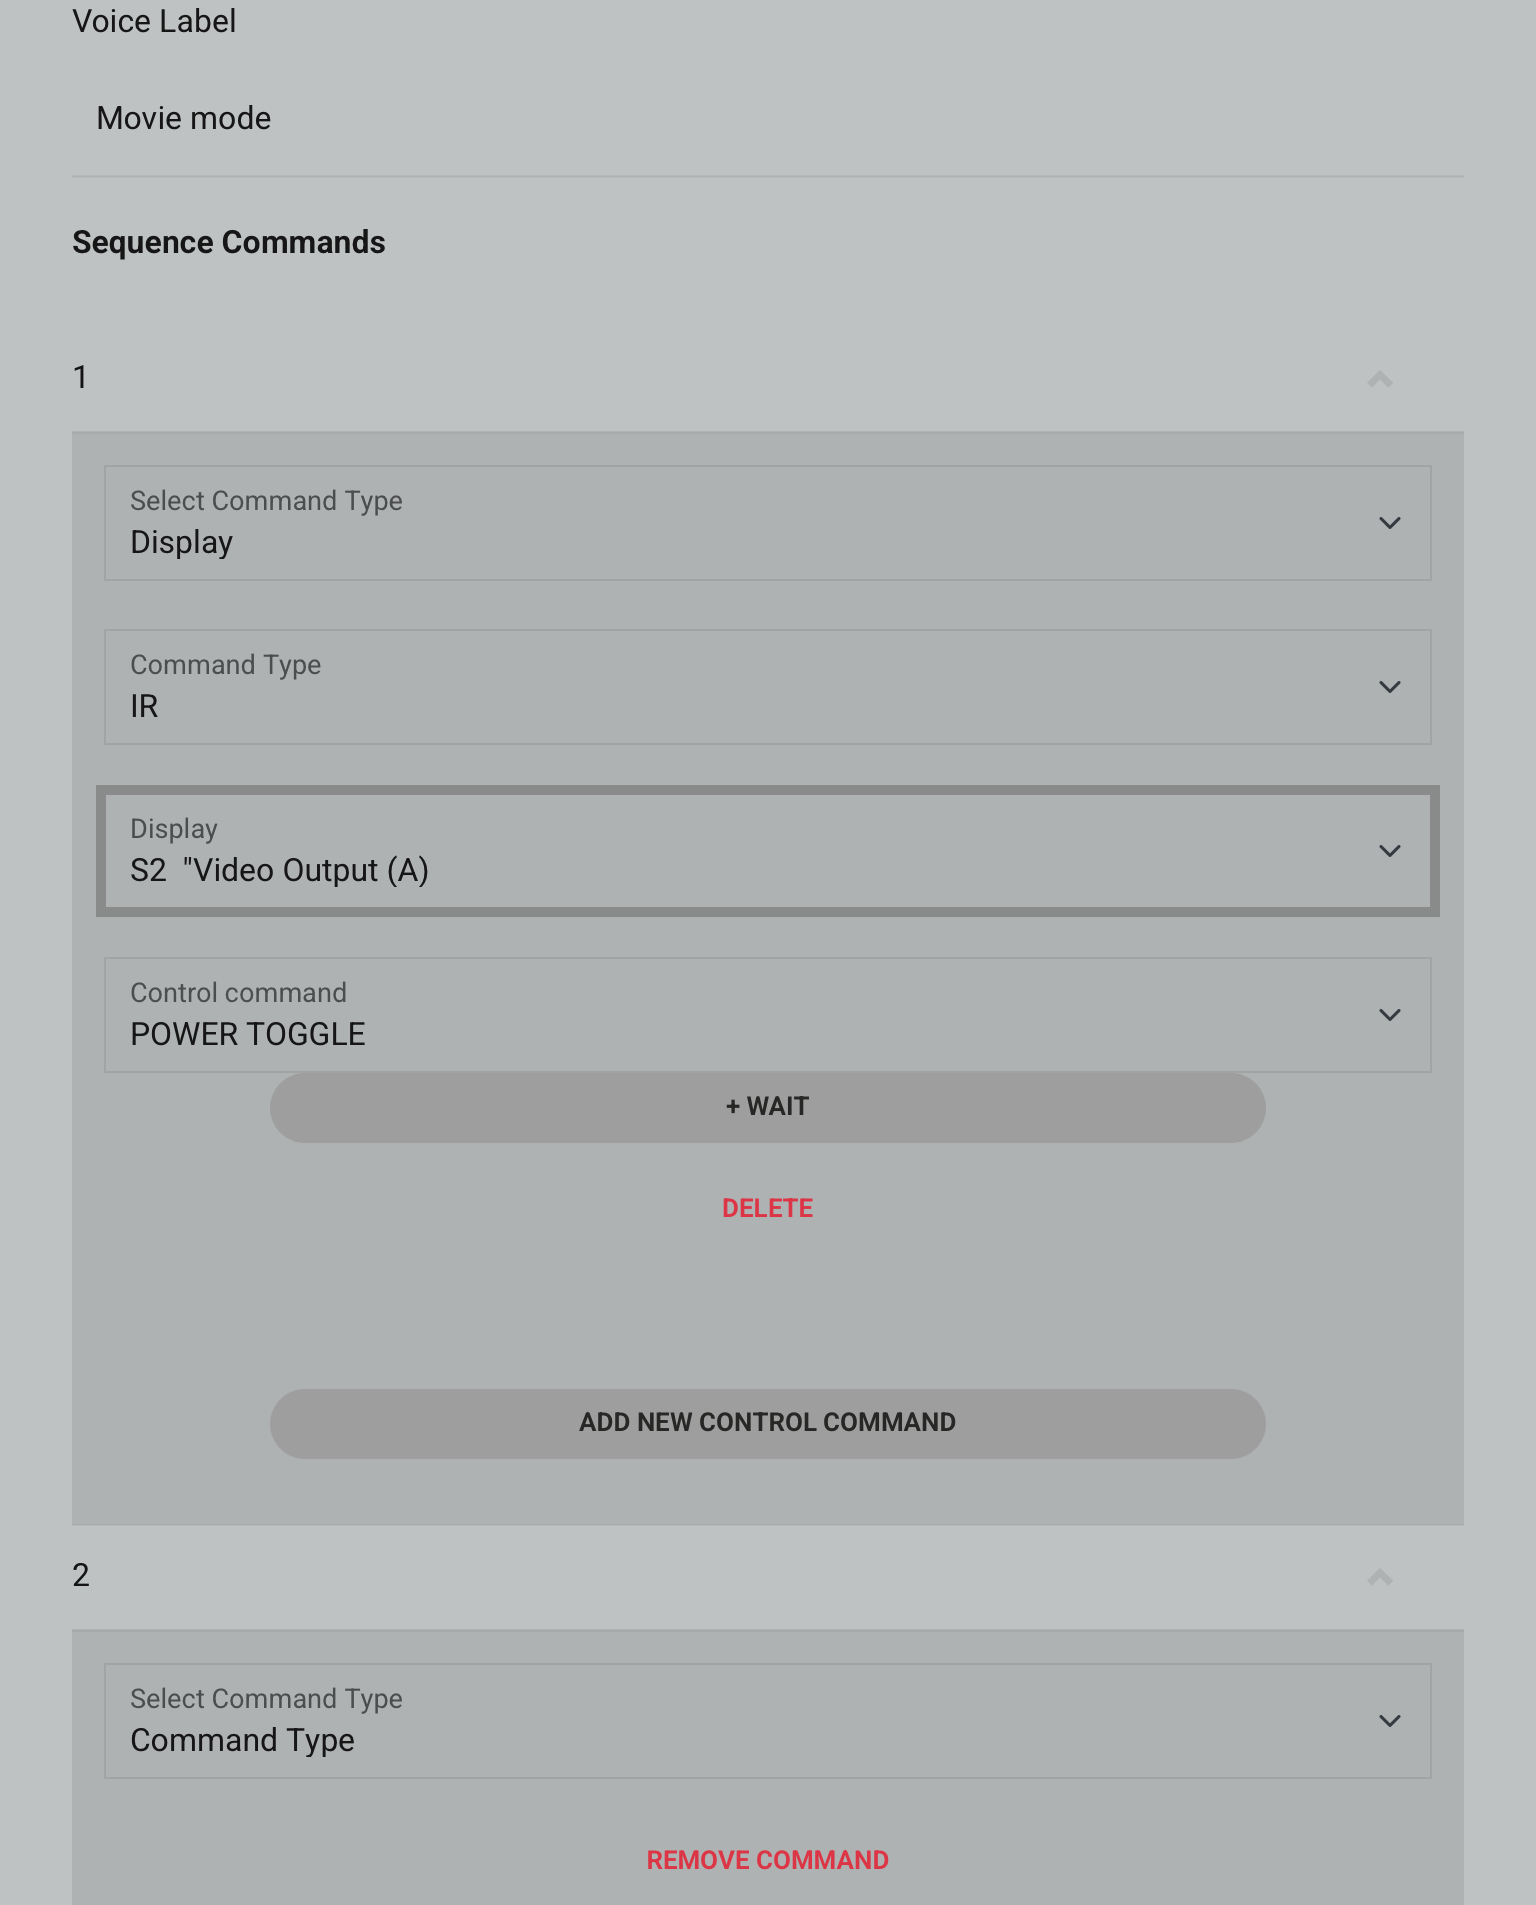
    8a. Adding your command(s)

    We have the description of our Sequence, but now need to add the commands.

    This first command is to switch the TV on or off, depending on the condition you set (True/False).

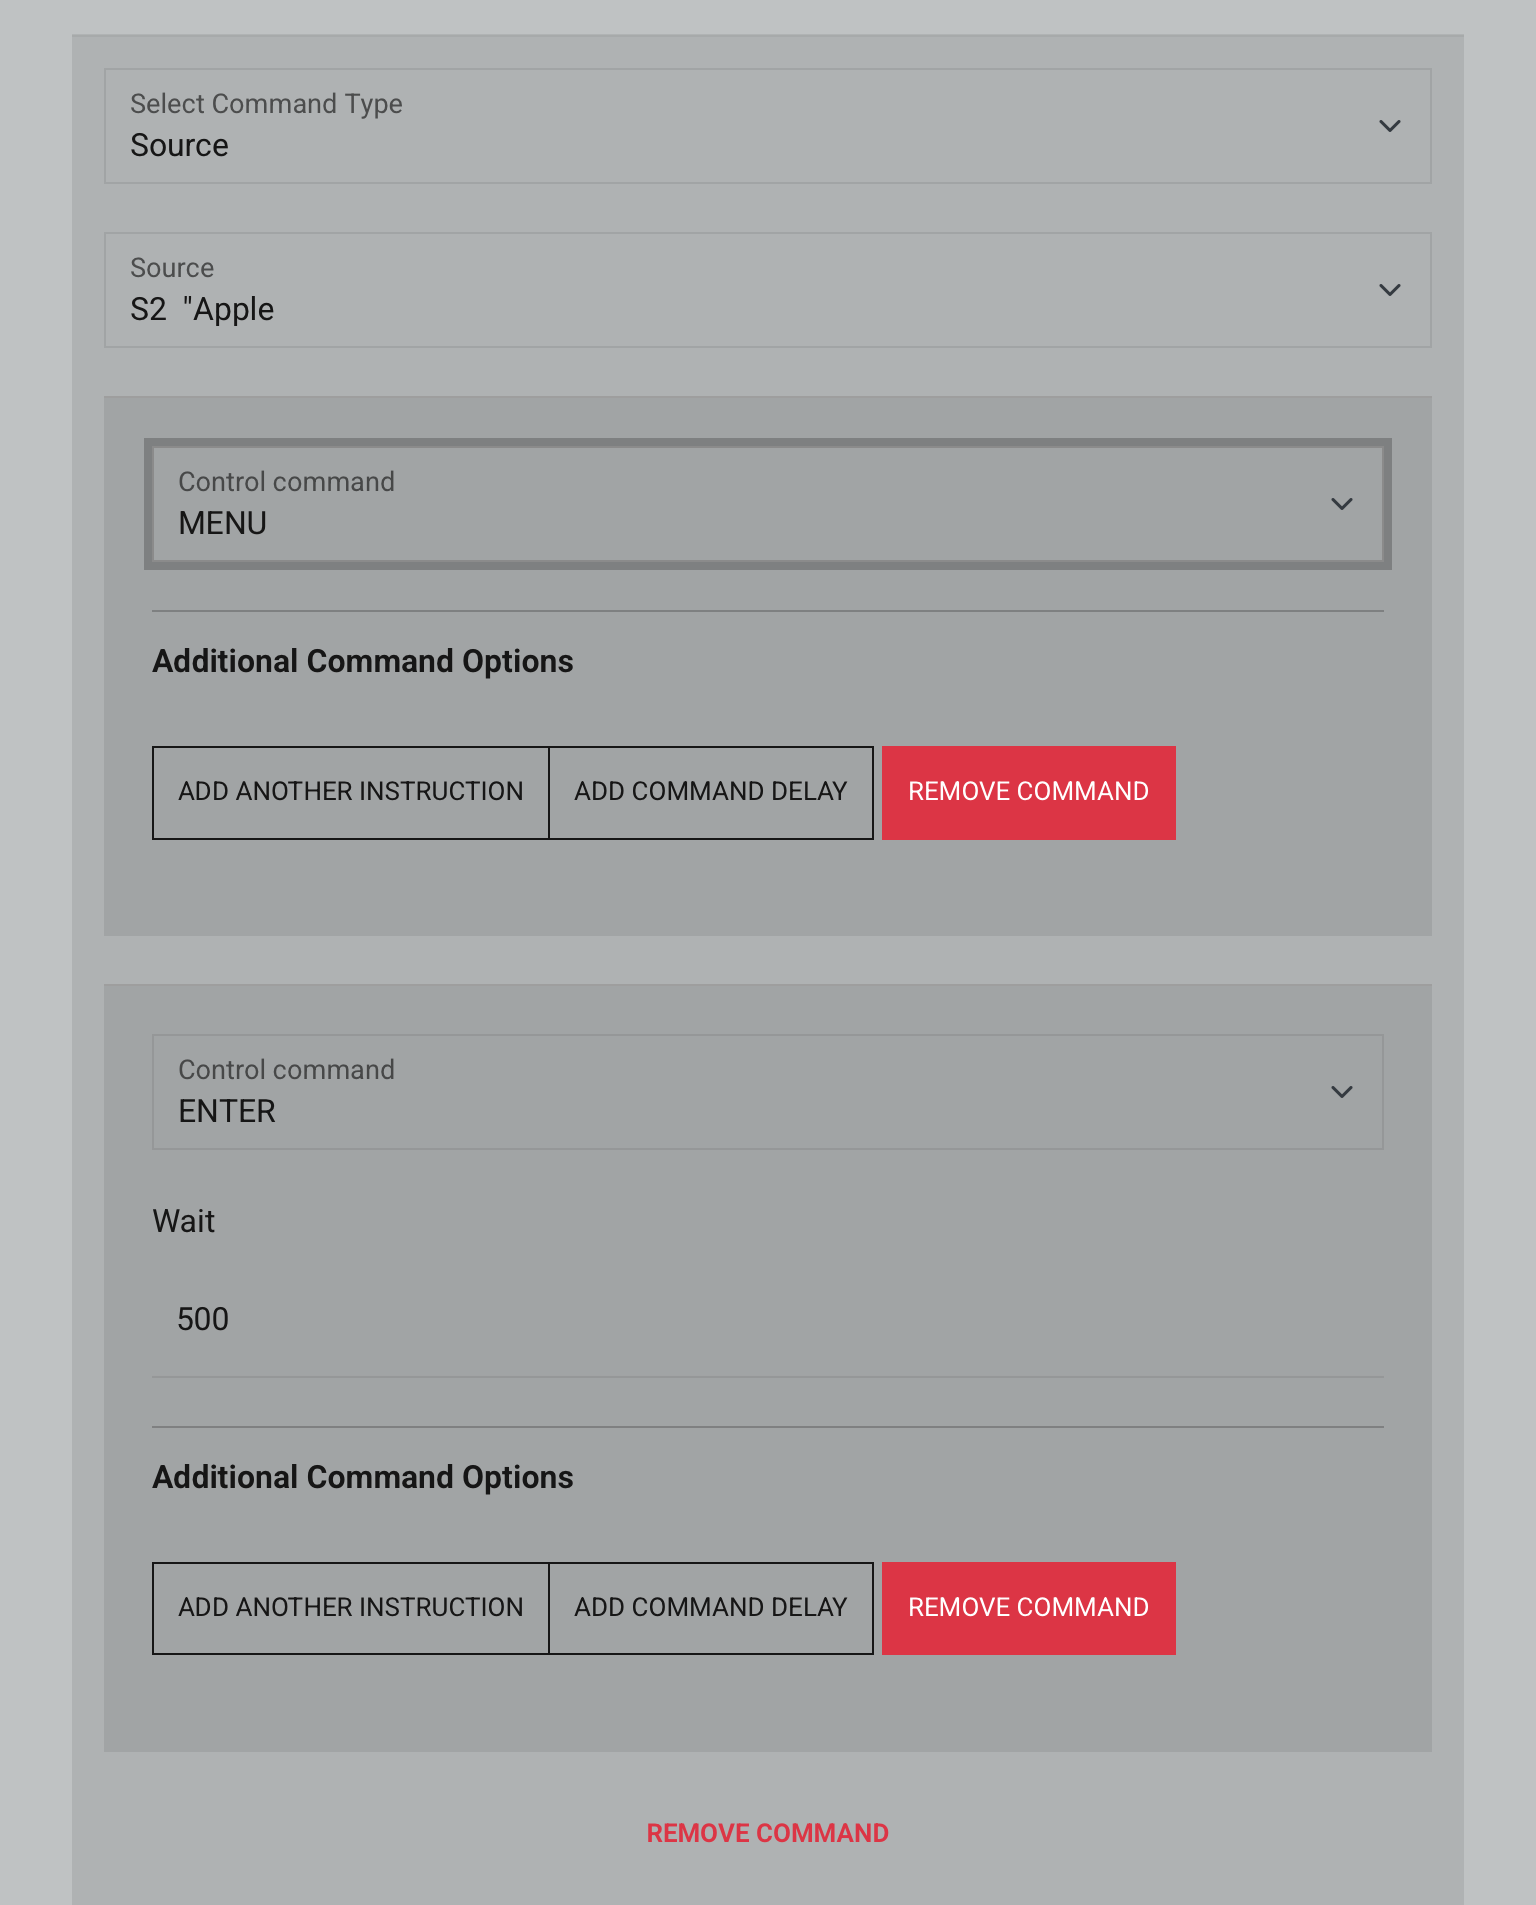
    8b. Adding your command(s)

    The next command speaks to the source device AppleTV by firstly going to the main menu. From here the next action command is “Enter”, which will open up AppleTV movies as it is the first icon in the menu. It also has a half a second delay before the second action is executed.

    There are plenty of commands to choose from and you can get quite creative.

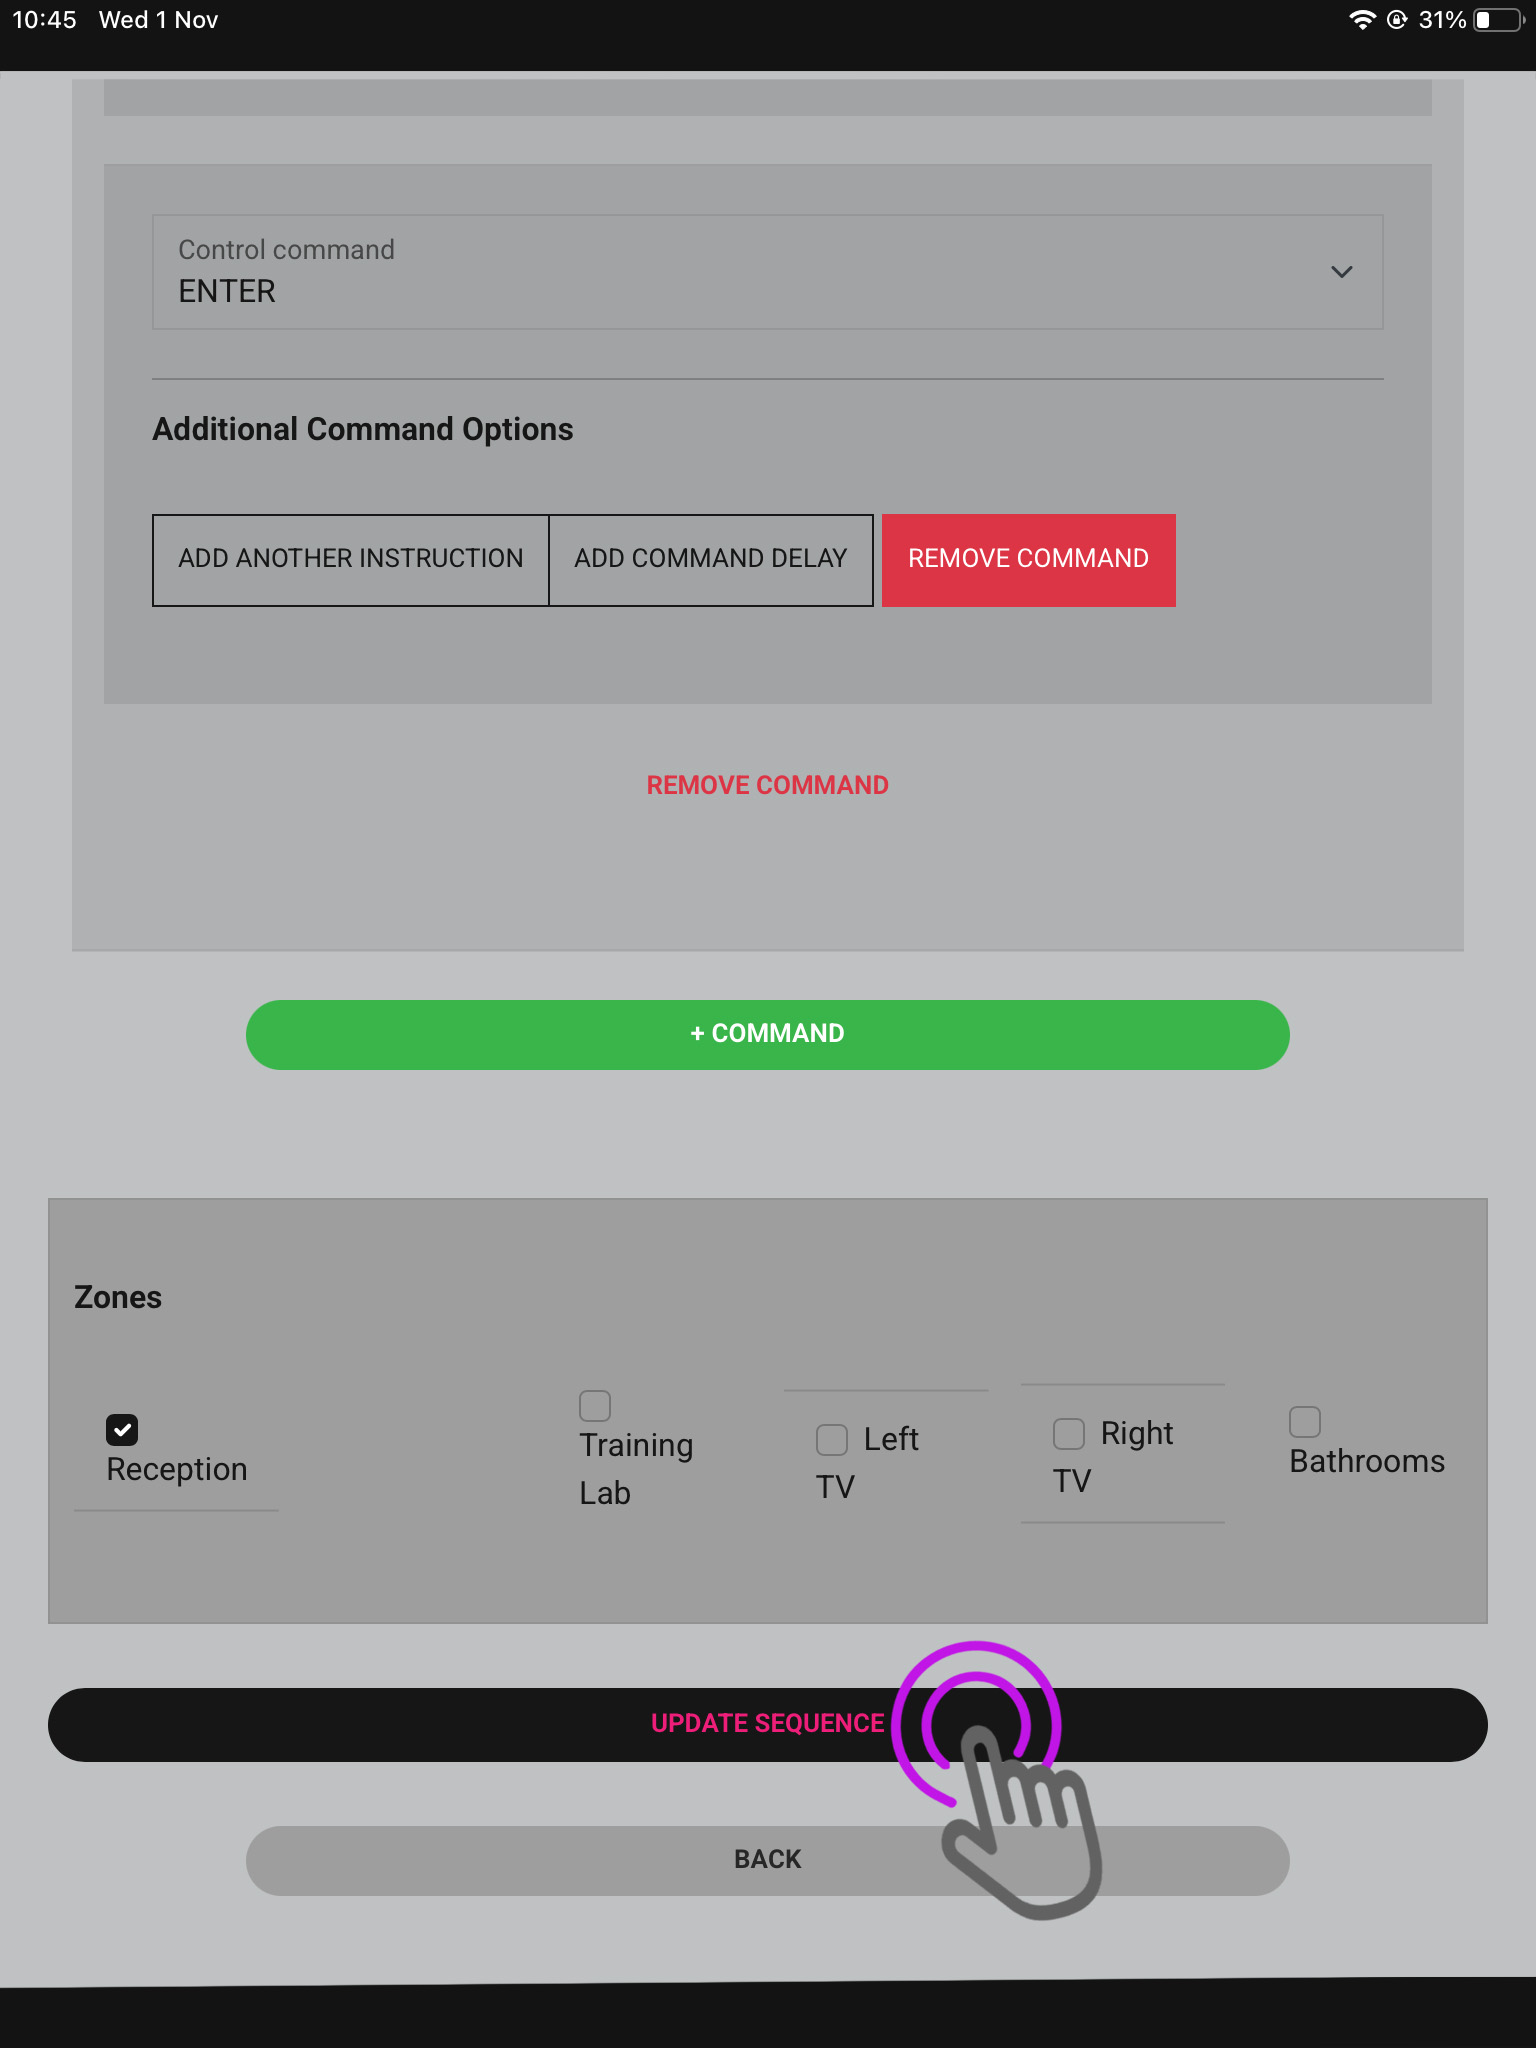
    9. Zone selection

    Certain rooms won’t require sequences to be present in them as the devices you’re controlling are in another room, so select which Sequences are required where appropriate.

    There are plenty of commands to choose from and you can get quite creative. Once finished press Update Sequence.

    10. Activating your sequence

    Open the menu in the top left and you will see your available Sequences.

    You may have only selected a certain zone for your Sequence to be available in, to chnage between zones press the downward arrow and you can switch between them.

  • HDBaseT compatibility with Panasonic CX/CS series

    blog

    The recent release of Panasonic’s new CX/CS HDTVs feature no support for the HDBaseT transmission technology found in HDanywhere’s multiroom matrices (Modular 4×4 and 8×8 / mHub 4K / 100m Pro Extender).

    This software incompatibility caused these displays to be unable to display picture from HDanywhere products. Please note that this only affects NEW Panasonic CX/CS range displays.

    Yesterday, Panasonic released firmware updates resolving this issue. There is now full compatibility between HDanywhere products and Panasonics entire range of displays.

    A Quick tip for updating the TVs on a network: if you select update firmware in the normal way, it will probably say that it’s already up to date. You need to go to apps then select Netflix, and that will force it to check the update server.

    If your TV isn’t downloading the update automatically you can manually update it.

    For CX you need version 3.206 or higher and for CS you need 3.014 and up.

  • How to use MHUB with an AVR

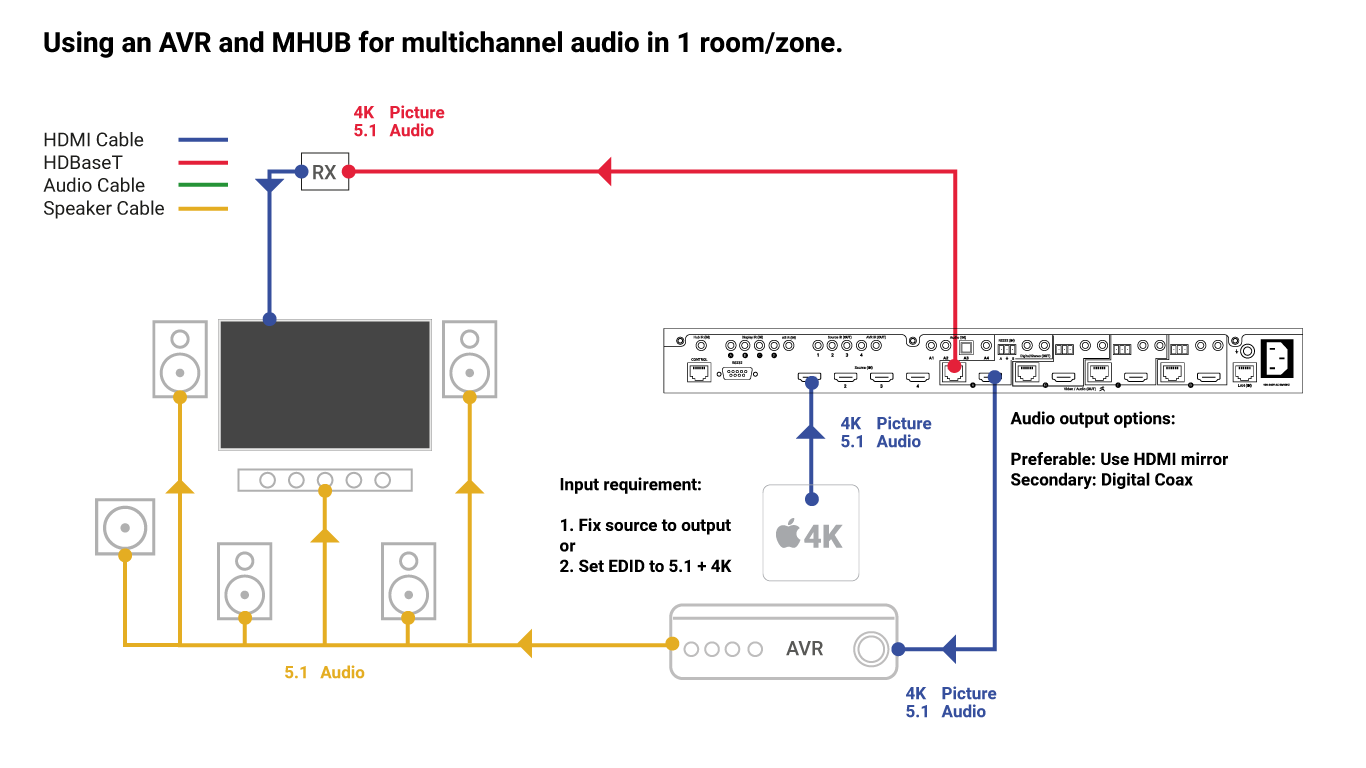
    Using an AVR and MHUB for multichannel audio in 1 room/zone.

    Adding a cinema or media room to MHUB is a relatively easy task for the MHUB to do but if you are planning to have a room with equipment inside it that is of a higher specification to the rest of the property then you need to do a little pre-planning beforehand.

    multichannel-1

    For best results the source(s) that will be watched in that room should be fixed to serve just that room.

    The chances are that this room will have the best display capability and the best audio capability. Because all HDMI sources (bluray, AppleTV, Amazon Fire etc) can only output one format of video and one format of audio at any given time you should ideally serve this room with sources dedicated to it. This way the source can be set to output the correct video resolution and audio format without having to readjust when the stereo 1080p TV accidentally tries to request a picture from the source.

    If you have MHUB PRO then we recommend using the HDMI cable direct to your AVR and then the digital coax after.

    … Then tell MHUB to only request what that room can handle

    Other displays in your property (like that 1080p display in the kitchen) are able to contact your source device to downgrade it’s audio and video capability. You can block this from happening by selecting an appropriate EDID profile for your source from within MHUB-OS.

    You don’t need to do this if you fix the output from the source device to your room but we recommend it to make sure your system doesn’t suffer from strange behaviour.

    I would like that source available throughout my property? What happens if I fix the source and set EDID above?

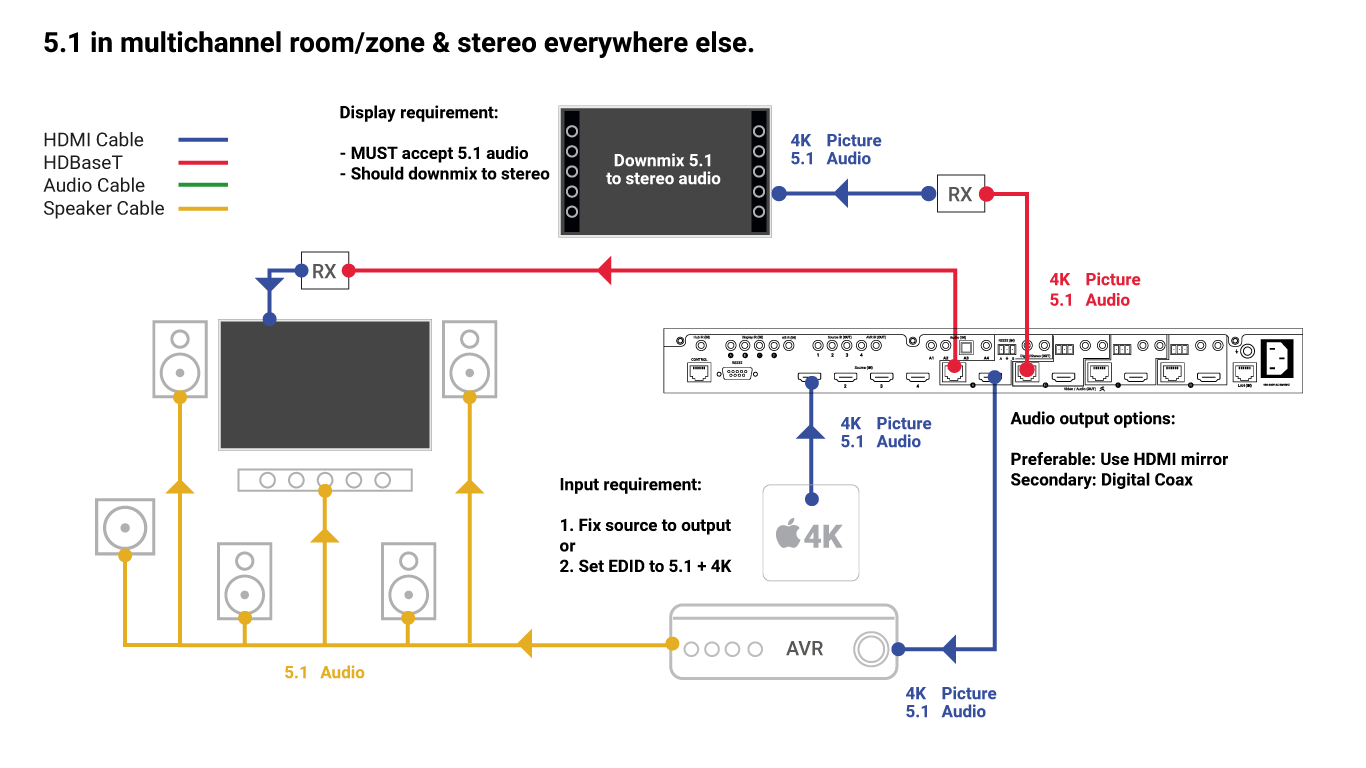
    If the source is fixed to output 5.1 then MHUB will deliver 5.1 audio to all HDBaseT outputs connected to MHUB. If your TV or display can decode and downmix multichannel audio into stereo (many now do) then you will hear the content correctly in stereo. If the TV is unable to decode the 5.1 audio then you are likely to have audio problems or hear nothing at all.

    Listening to content on all displays.

    Are there any ways around this problem?

    Yes. Many modern TVs can accept a 5.1 audio signal so that they can work with 5.1 compatible soundbars over HDMI ARC or Optical connections. Depending on the TV specification, it can work in two ways:

    1. MHUB outputs 5.1 audio to the TV and it passes the audio directly to a compatible soundbar (additional soundbars required).
    2. MHUB outputs 5.1 audio to the TV and the TV downmixes the audio back into stereo.

    multichannel-2

    This will mean that you get 5.1 audio in rooms where you need it and stereo everywhere else. It is important that you check the specification of your displays carefully before considering this option. Older TVs are not likely to handle multichannel audio at all ruling out this option entirely.


  • Update MHUB or Zone Processor Firmware Utility

    Please read the instructions (included in the .zip file) carefully before using this software.

    In most cases the core system firmware for your device will not require updating. Most updates for uOS or MHUB-OS can be downloaded from our cloud via the uControl app. This update utility is designed to update low-level firmware and should be carried out carefully.

    Download Update Utility

    Please contact us to confirm if your system requires an update and to request your update file.

  • Creating a Function in uOS

    If your HDA device has uControl, you are able to use Functions which allow you to manage the on/off, up/down, mute/unmute and open/close state of your devices and include them into your sequences.


    In this support article:


    Creating a Function in uControl

    1. Open uControl

    From the main screen navigate to the menu in the top left.

    What you see on the main screen may differ, however, the three lined menu bar will still be there.

    2. Navigate to your settings

    Look for the settings icon located in the bottom left corner.

    The icon may vary depending on your mobile devices size, although it will still be in the bottom left corner.

    3. Access system

    From here press “Access System”.

    This is your device page which displays your units model and IP address.

    4. Sequences

    In this menu press “Manage Sequences”.

    This will take you to the page where you manage both Sequences and Functions.

    5. webUI

    The webUI can also be easily accessed by typing you devices IP address into a website URL.

    You will be taken to the uOS home page, open the menu in the top left and select “Sequences”.

    6. Add new

    We are now in the sequences page where you can see your available sequences, and current functions. Press “Add New”.

    A pop-up will appear asking if you’re creating a Function or Sequence, choose Function.

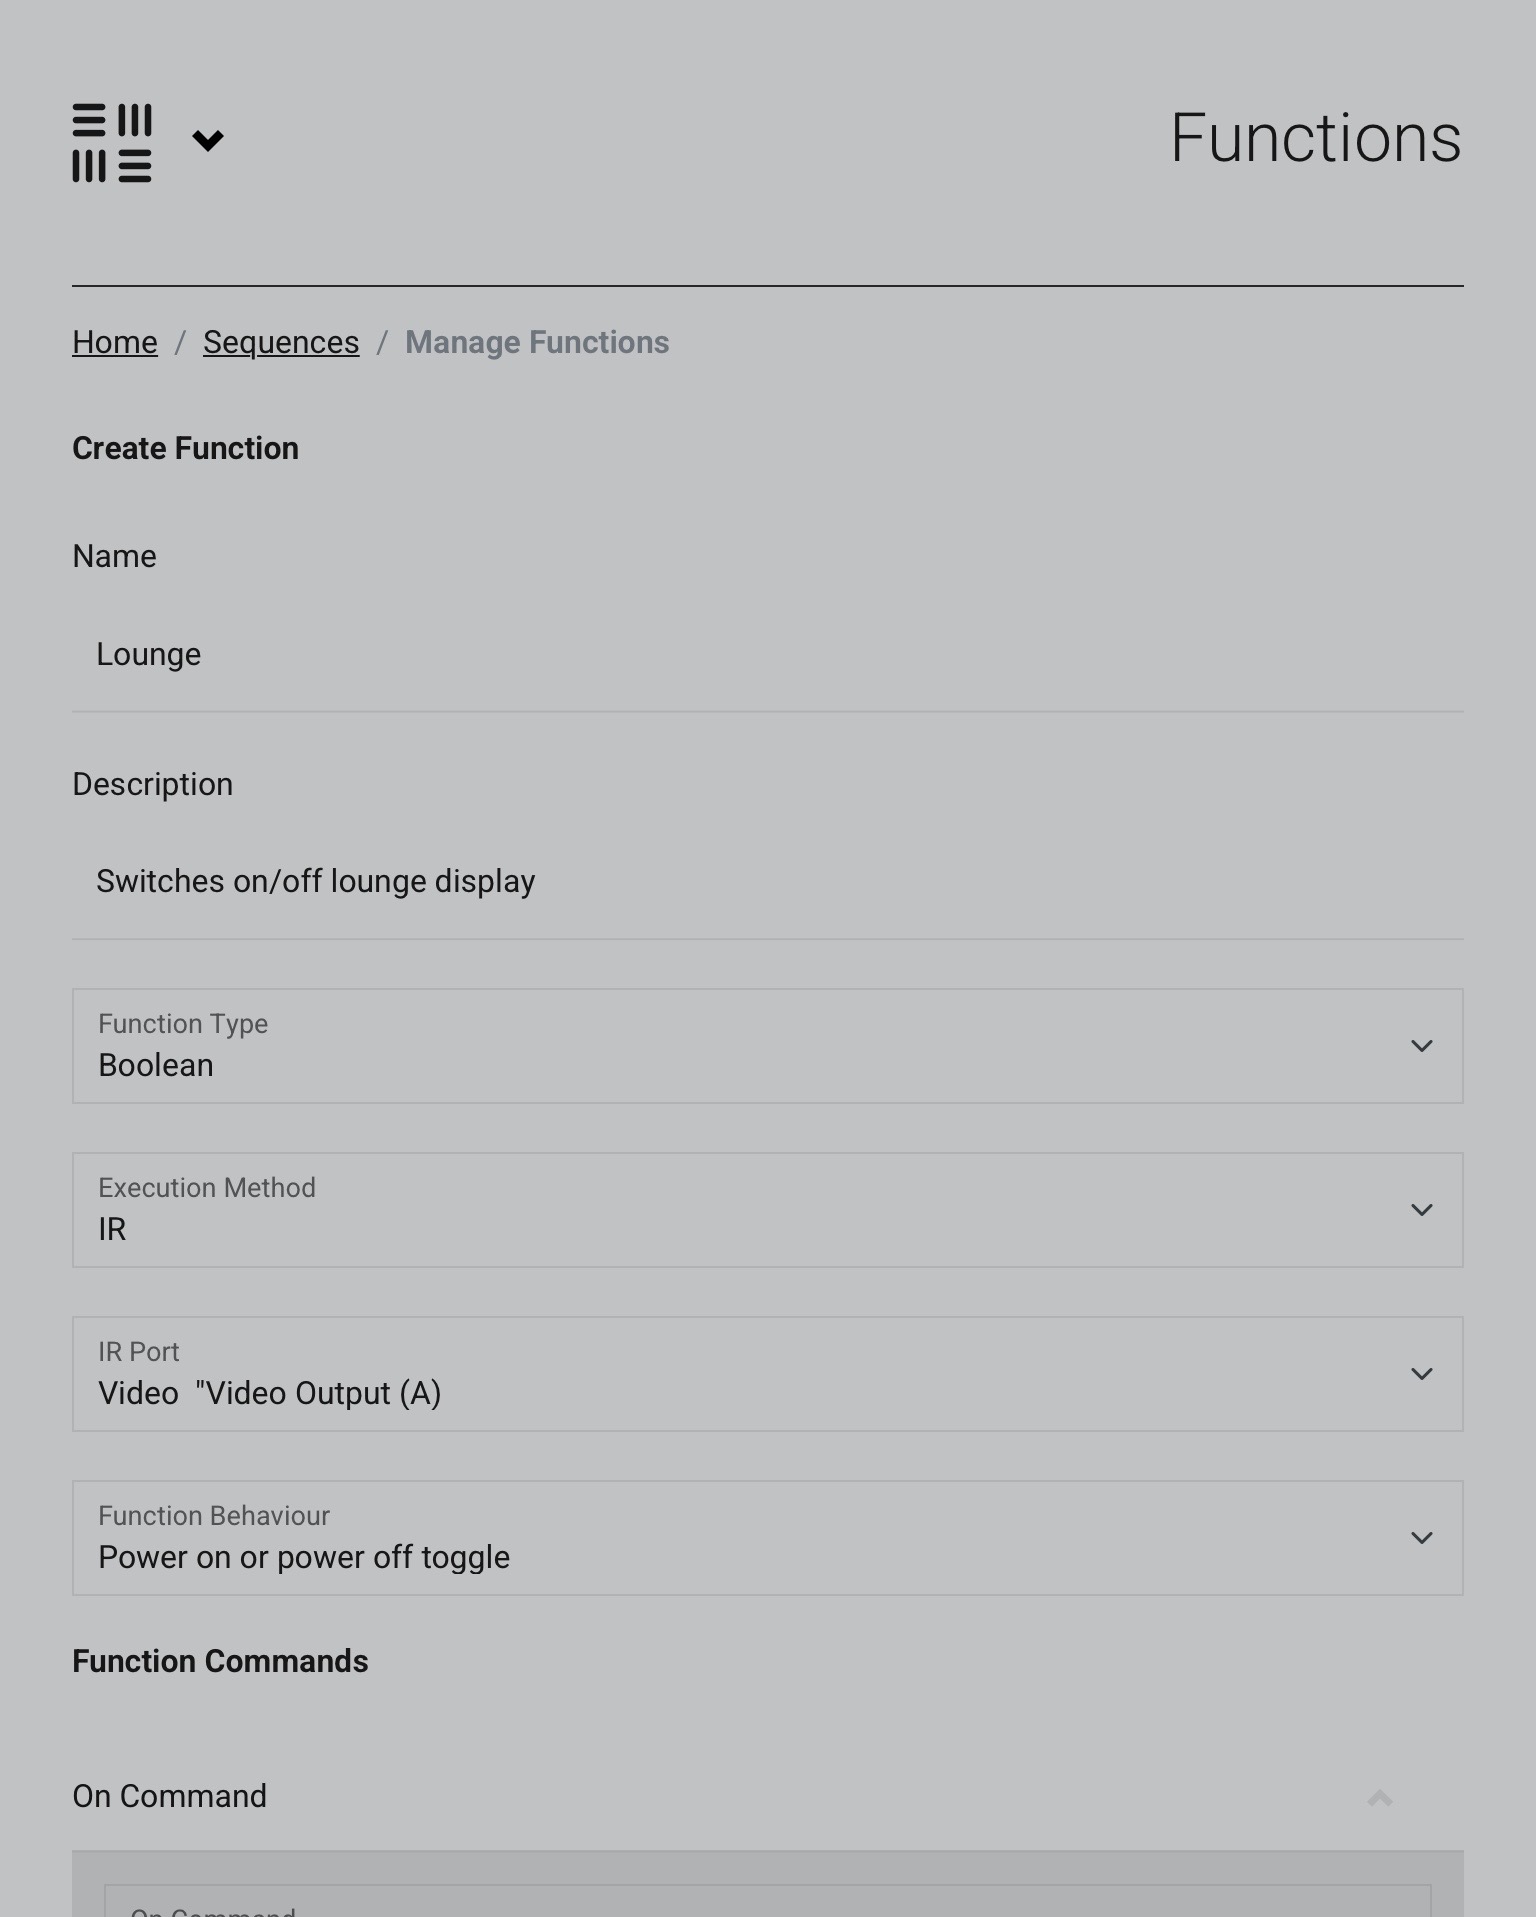
    7. Functions

    Now we need to create your Function.

    In this page label what your Function does, choose Boolean and whatever method you have been controlling this device by (in this case IR), and then the port at which the device is plugged into along with the command you wish to execute.

    8. Zone selection

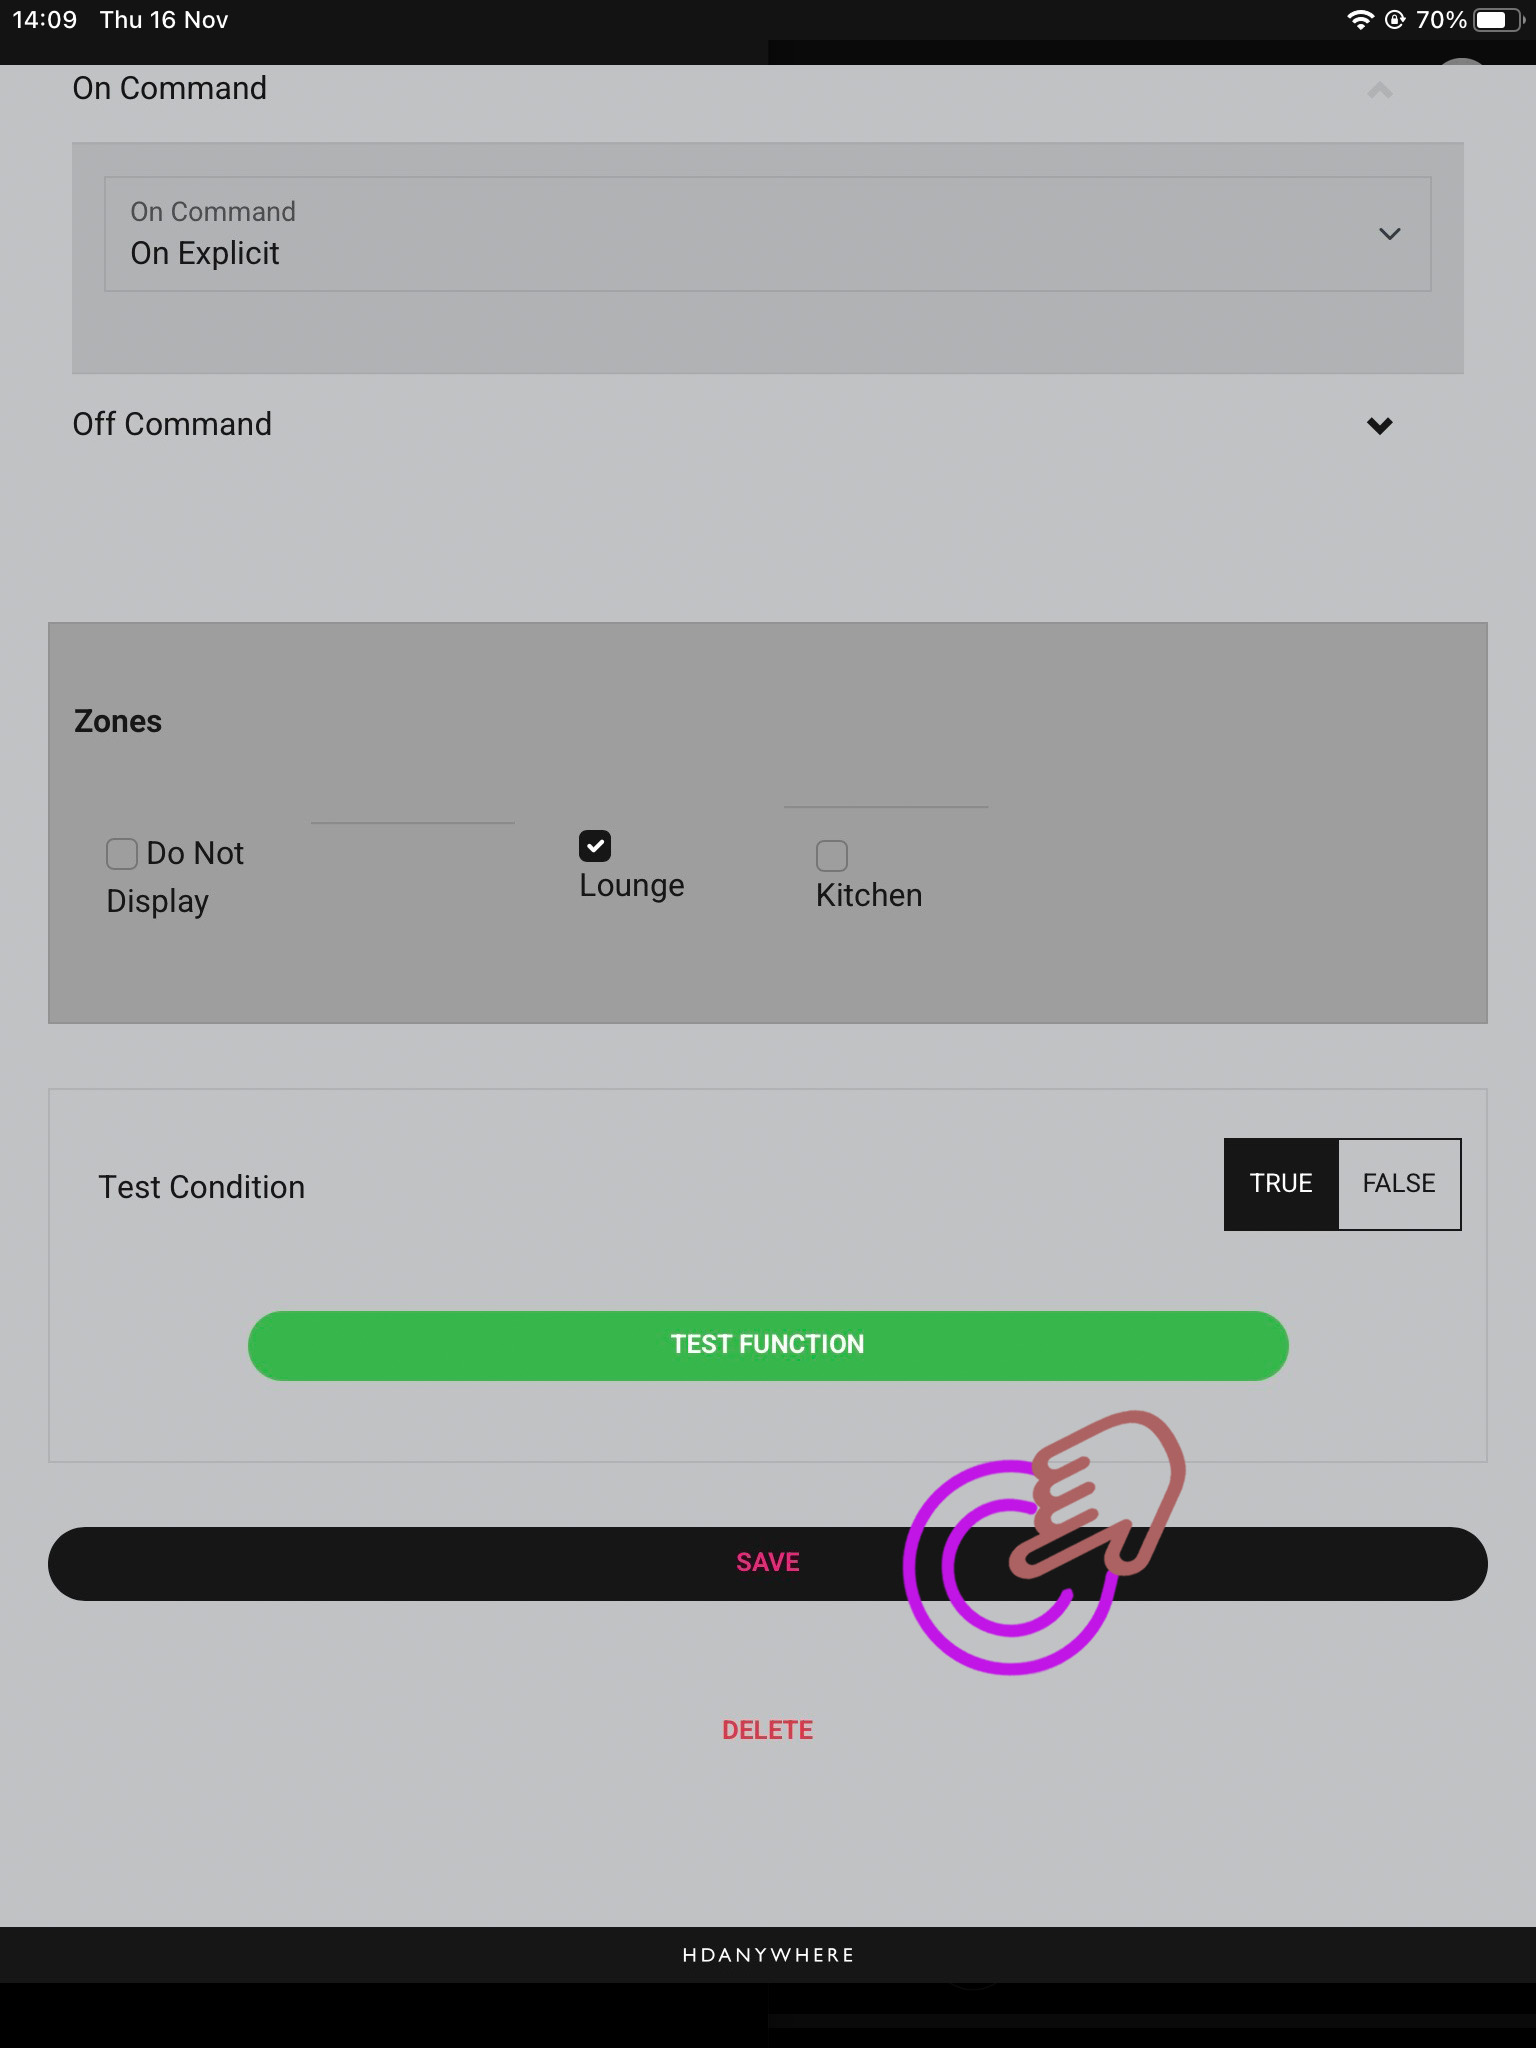
    Certain zones won’t require your Functions to be present in them as the devices you’re controlling are in another room, so select which Functions are required where appropriate.

    As the method is Boolean, there will always be an on and an off command which can be toggled by pressing the Function in the app.

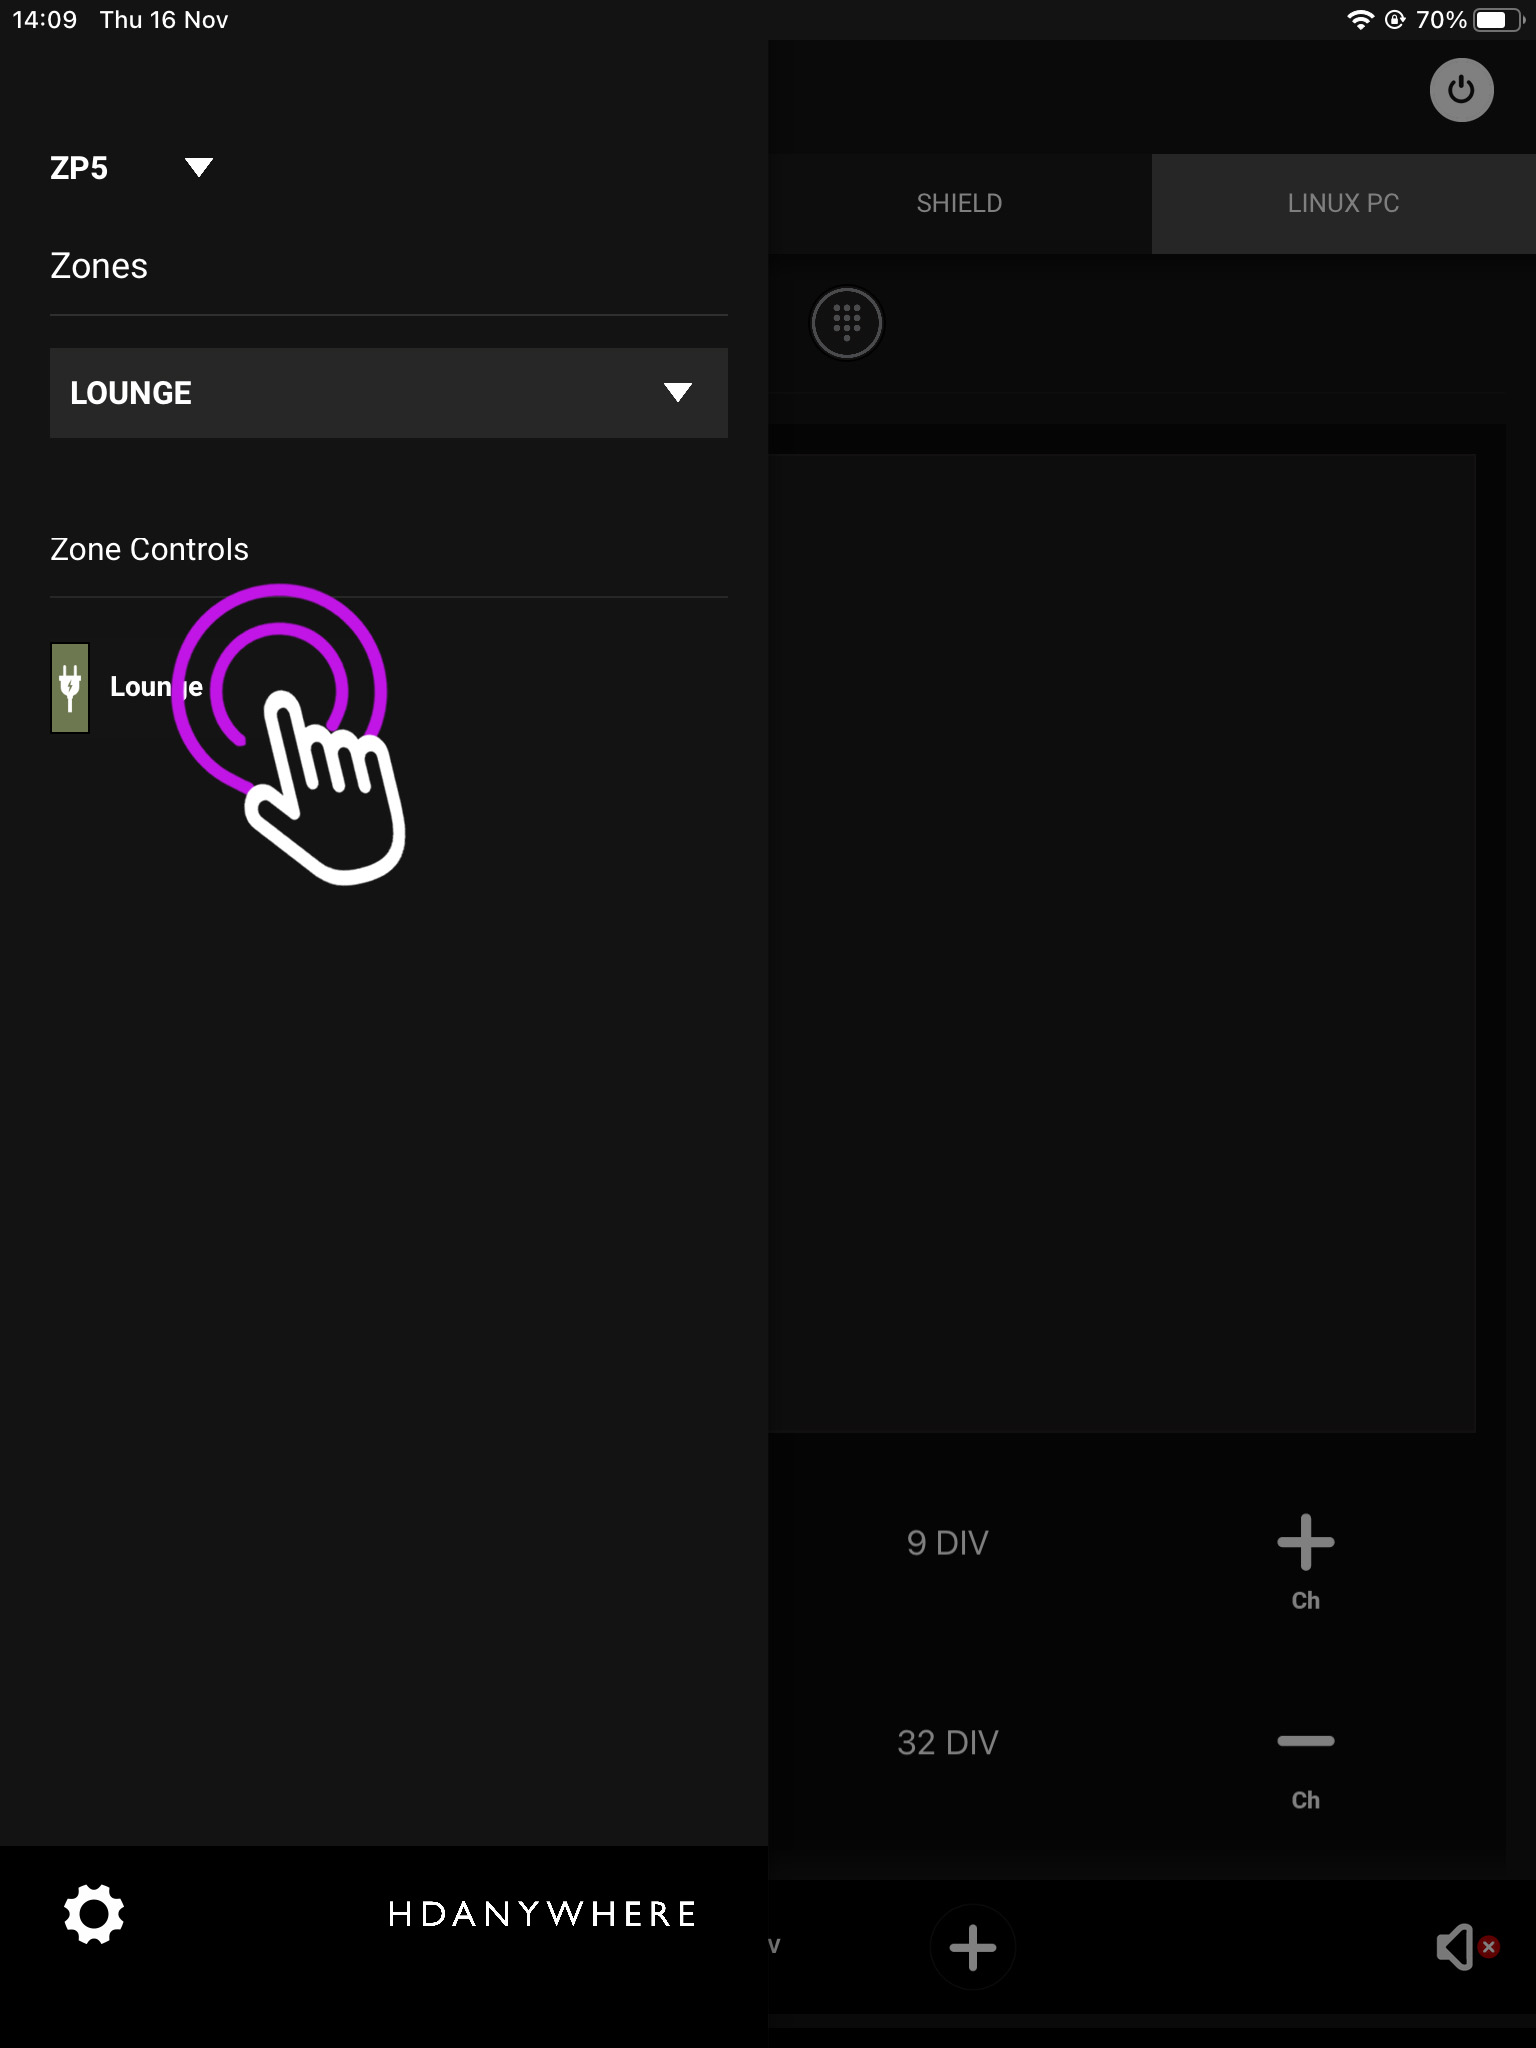
    9. Activating your Function

    Open the menu in the top left and you will see your available Sequences.

    You may have only selected a certain zone for your Sequence to be available in, to chnage between zones press the downward arrow and you can switch between them.

  • mHub 2K control system integration

    The mHub 2K range has full support for most popular control systems via serial (RS232) or IP.

    All control strings and current available drivers are available in the mHub control pack, available here – mHub Control Pack

    To control the mHub 2k unit via IP you will first need to discover it by using the mHub controller software available in the control pack.

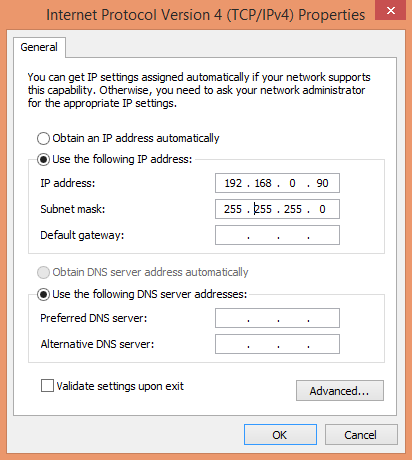
    The mhub 2K’s IP address is pre-configured as 192.168.0.100, your computer will need to have it’s IPV4 range configured to be within the same range initially while you setup the matrix. To configure your IPV4 settings you will need to navigate to the following menu

    ->Network and sharing center
    —>Ethernet
    —–>Properties
    ——->Internet Protocol Version 4 (TCP/IPv4)
    ———>Properties

    IPV4

    Configure your settings as shown in the image, this will change your computer IP range and you will temporarily lose internet connectivity (if your previous IP range was different from this)

    Once you have changed the IP settings on your PC, open the Mhub controller software

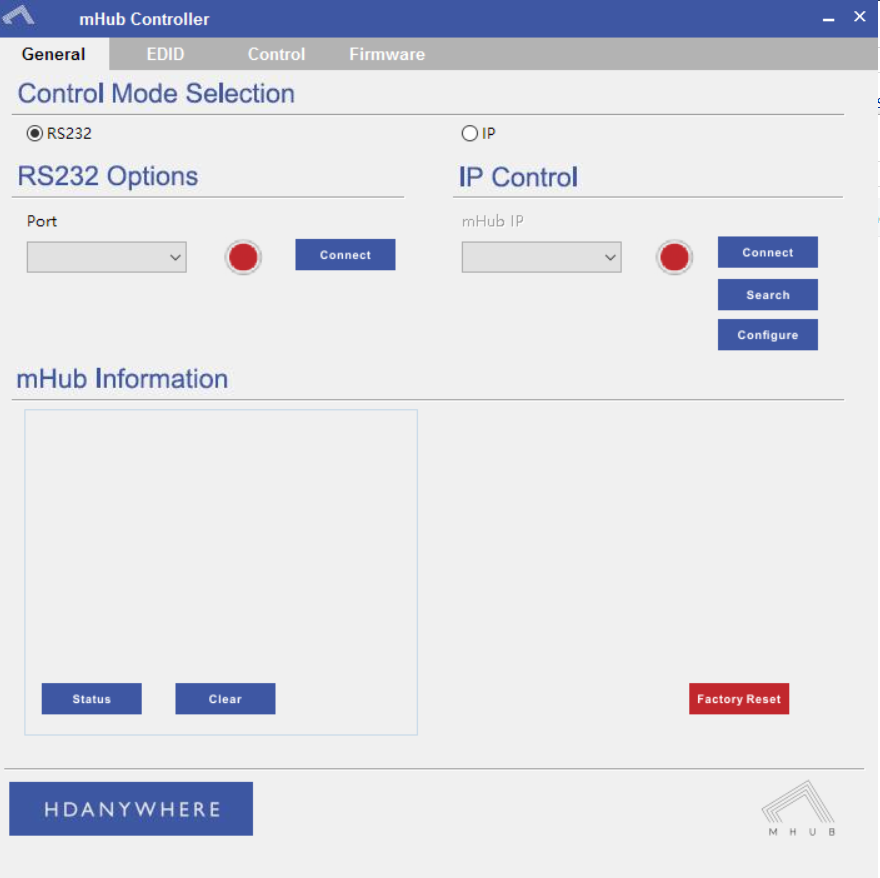
    mhub controller pic 1

    In the mHub controller software select IP and then press the ‘search’ button, this should locate your mHub matrix. Press ‘connect’ the red button should turn green.

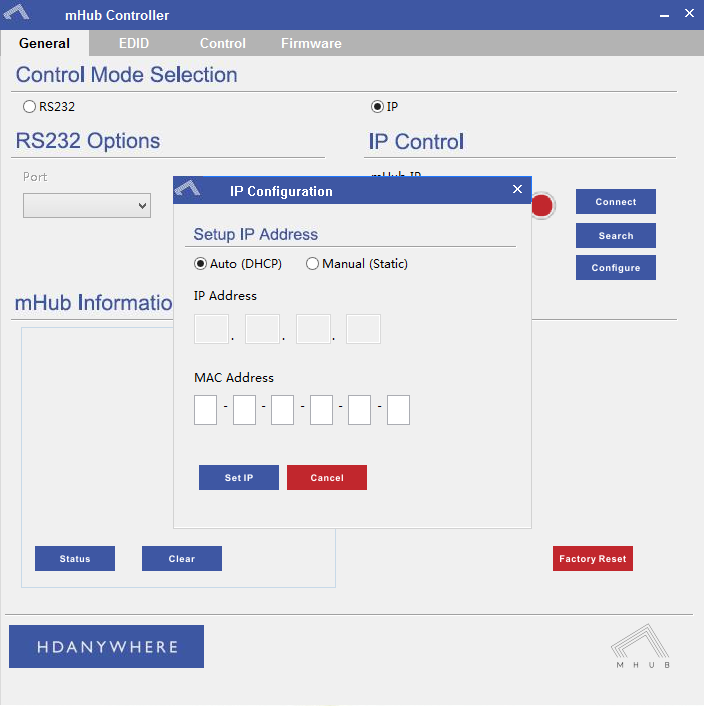
    Press the configure button

    mHub IP

    Change the IP configuration to manual (static), and then enter an IP address within your home network range that is not currently being used and then click ‘Set IP’.

    You can now go back into your IPV4 settings and set them back as they were before (obtain an IP address automatically)

    Your matrix is now on your home network and will be able to receive IP commands from whatever control system you are using.

    Looking for the mHub 4K information, go here – mHub 4K