Category: Miscellaneous

  • Using the HDC Trade Modular System Builder

    The Modular System Builder is an invaluable tool when you need to get a quote or setup a Modular system quickly and correctly. But before you do start configuring your system make sure that you note the following:

    1. The Modular Chassis options for the 4×4 and 8×8 have different power requirements.
      1. The 4×4 can be fitted with an optional PSU module if a redundant power supply option is needed. It’s should be set to 1 as a default.
      2. The 8×8 has its power supplies built in to the unit. There is no need to add any if you are specc’ing one of these.
    2. IEC power cables
      1. You will need x1 cable per PSU module, again the default should be set to 1
      2. 8×8’s will require x2 IEC cables are the main unit contains two power supplies
    3. Blank plates for unused ports can only be added to 8×8 systems
    4. Forwards IR is only supported by the 8×8 and needs additional configuration – please call us 01684 576 348 if you need this functionality or contact us.
    5. IR hardware is sold as an individual units, you will need to add as many transmitters and receivers as you need, HDMI Input/Output modules do not support IR Passback
    6. HDanywhere SmartControls are pre-programmed to operate with the Modular Chassis included in the builder.
  • mHub 4K Network Discovery Tool

    mHub 4K Network Discovery tool

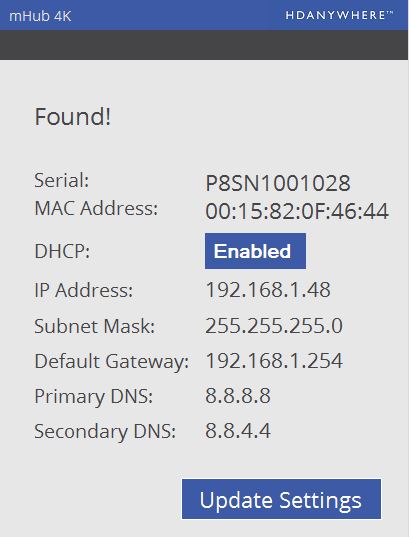
    To enable access to the mHub 4K web interface, you will require the IP address of the unit.

    This is found using the Network Discovery tool. Simply download and run the software below and this will give you the current IP settings of your unit, and also the option to change the settings to suit you network infrastructure.

    Discoverytool

    To change to fixed IP settings, please click ‘Enabled’. This then allows you to manually enter network information. Finally click ‘Update Settings’ to store entered information.

    Download software – Network Discovery Tool

  • MHUB-OS 8 first boot process

    The first boot process for MHUB-OS has remained largely unchanged with the exception of zones.

    The slideshow below walks you through the steps within MHUB’s first boot process and how to setup zones to refect the different rooms or areas within you property.

    If you wish to configure a stacked system please watch this video – Creating a MHUB stacked system.

    You should be able to complete the process in under 10 minutes.

    MHUB-OS first boot steps are as follows:

    1. EULA and Privacy policy
    2. Name your MHUB
    3. Name your source devices
    4. Create zones
    5. Assign outputs to zones
    6. Confirm zones
    7. Connect MHUB to HDA Cloud
    8. Complete setup

    HDANYWHERE(HDA) recommends that every MHUB install goes through its first boot process to ensure that the MHUB is setup correctly.

    How long does the process take to complete

    If you have an update to install then then first boot usually take about 10 minutes. If there is no update you can normally finish the entire process and have an operational MHUB system well within 5-7 minutes.

    Yes. You do not need to access MHUB-OS if you don’t want to. But this is only recommended if you intend to control you MHUB via a control system. You will also miss the opportunity to increase your warranty period and open your MHUB to additional features or services.

    I don’t want to use MHUB-OS or go through the first boot process, will MHUB work like a normal?

    Yes. You do not need to access MHUB-OS if you don’t want to. But this is only recommended if you intend to control you MHUB via a control system. You will also miss the opportunity to increase your warranty period and open your MHUB to additional features or services.

    I made a mistake in the first boot process, can I go back or make a change?

    Yes. You can go all the way back to the update step and correct any incorrect information you entered. Alternatively, you can also access MHUB-OS (after you have completed first boot) and change anything then.

  • How to change Bluetooth to IR on Sky Q remotes

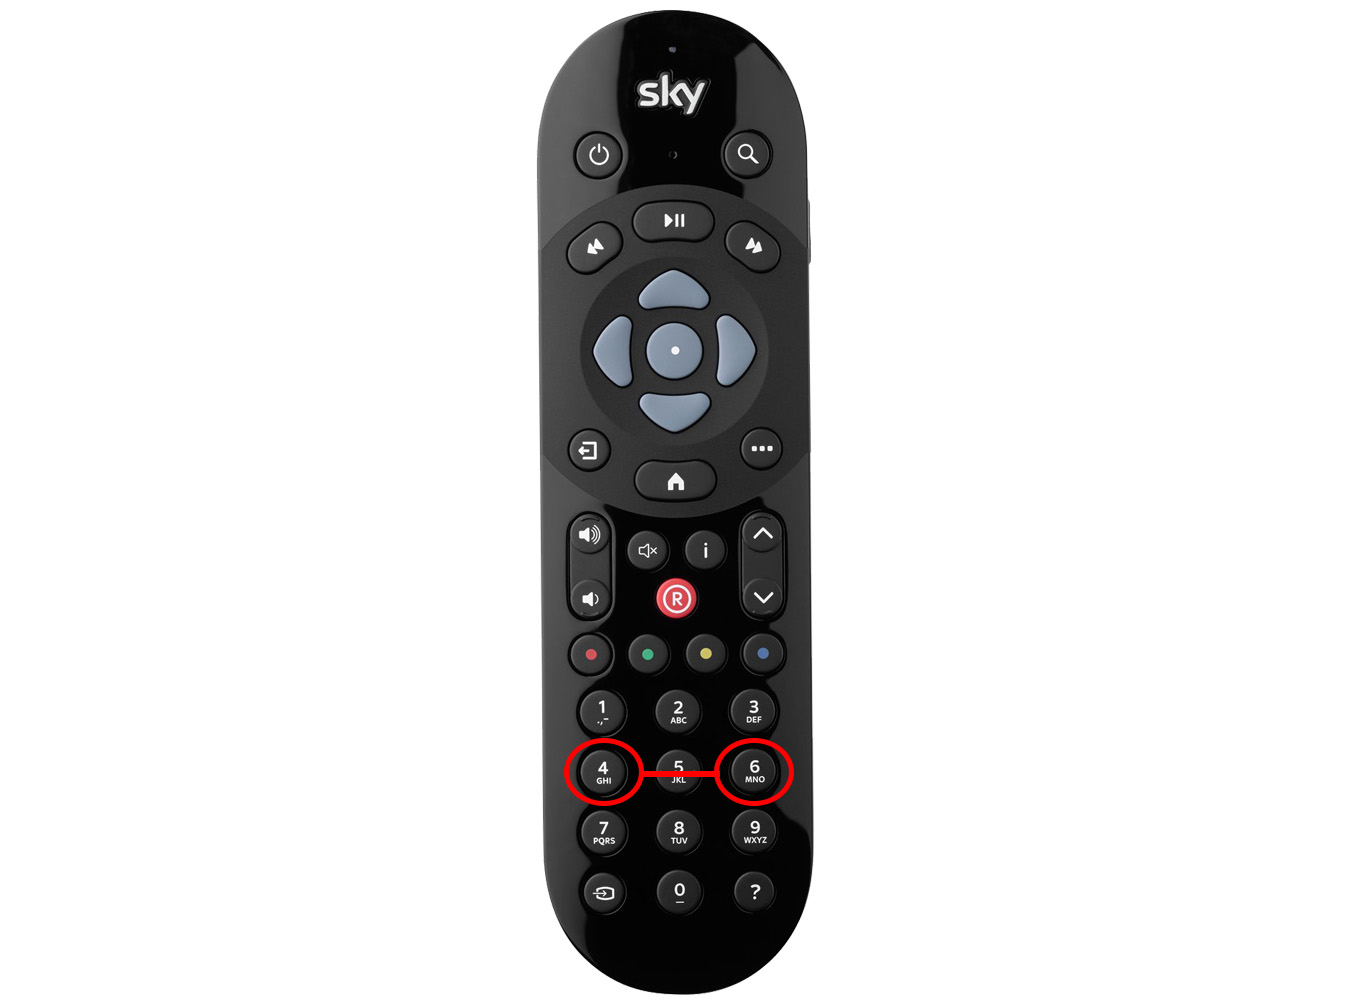
    MHUB and XTND systems use IR passback to pass signals from your Sky remote back to the Sky Q box. By default, these remotes ship to customers with IR disabled. In order for your remote to work with your HDANYWHERE system you will need to change the mode of operation from Bluetooth to IR.

    If you would like to change your Sky Q remote from Bluetooth to IR and vice versa just press 4 & 6 together AFTER you have paired the remote.


    Sky Q remote Bluetooth to IR

  • How to find available systems through uControl

    Your HDA device will be displayed as an available system when connected to uControl. You may have more than one device connected, or be operating a stack and need to see which devices are connected.


    In this support article:


    When you’re not connected in uControl

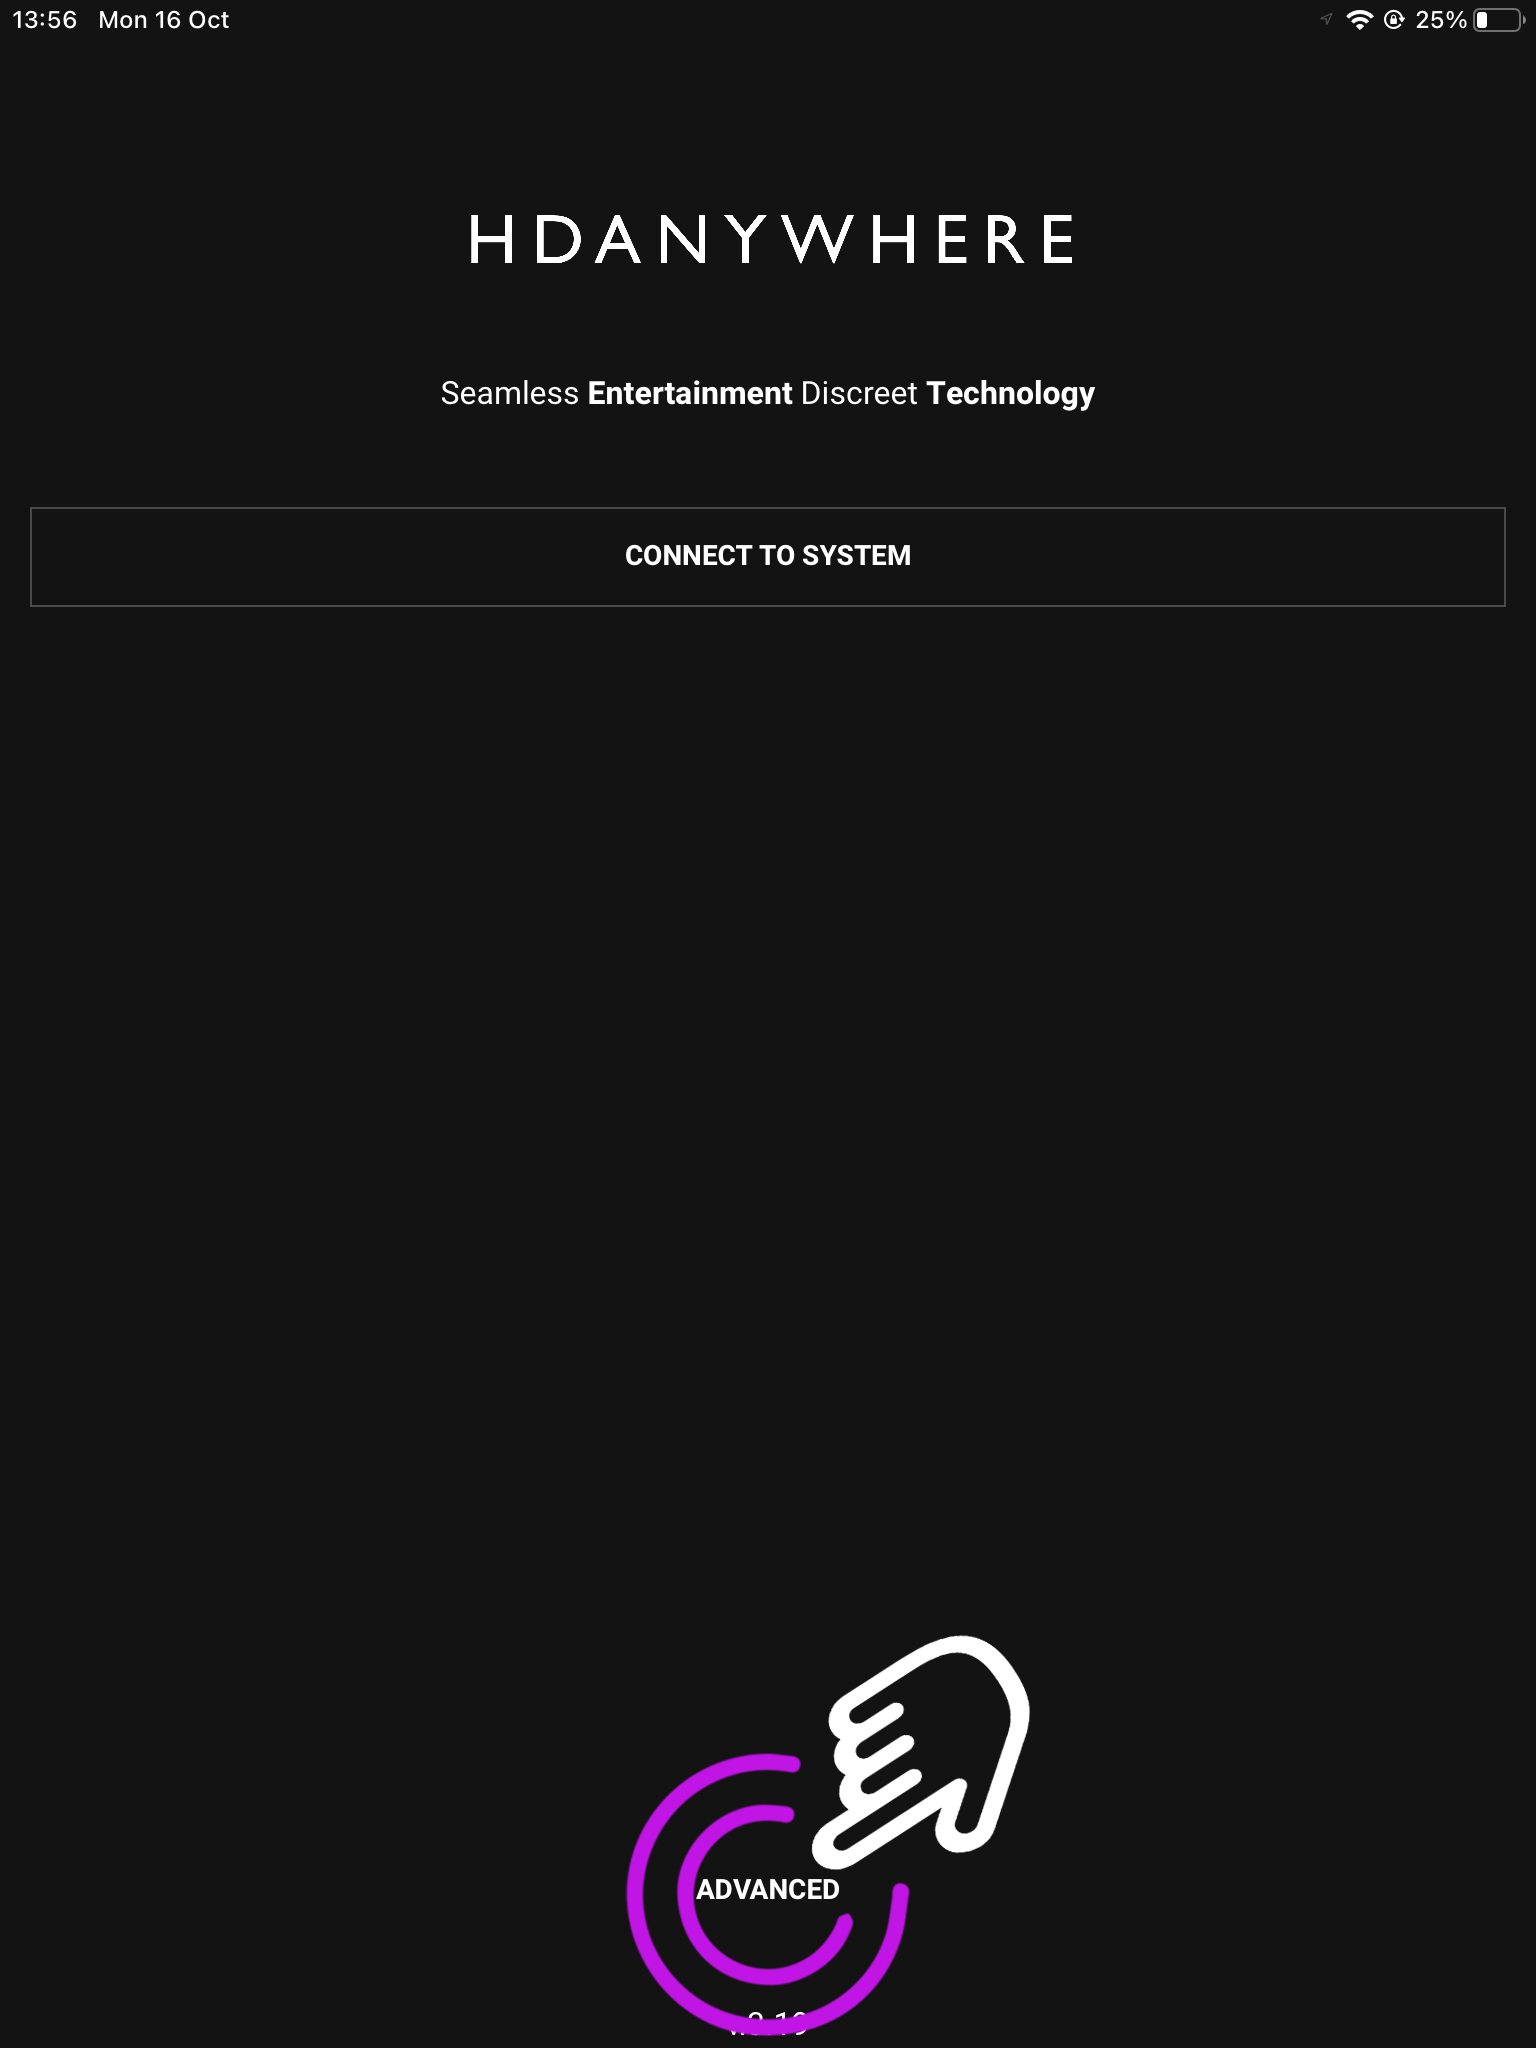
    1. Open uControl app

    Launch uControl and you will see the home page.

    You now need to press advanced.

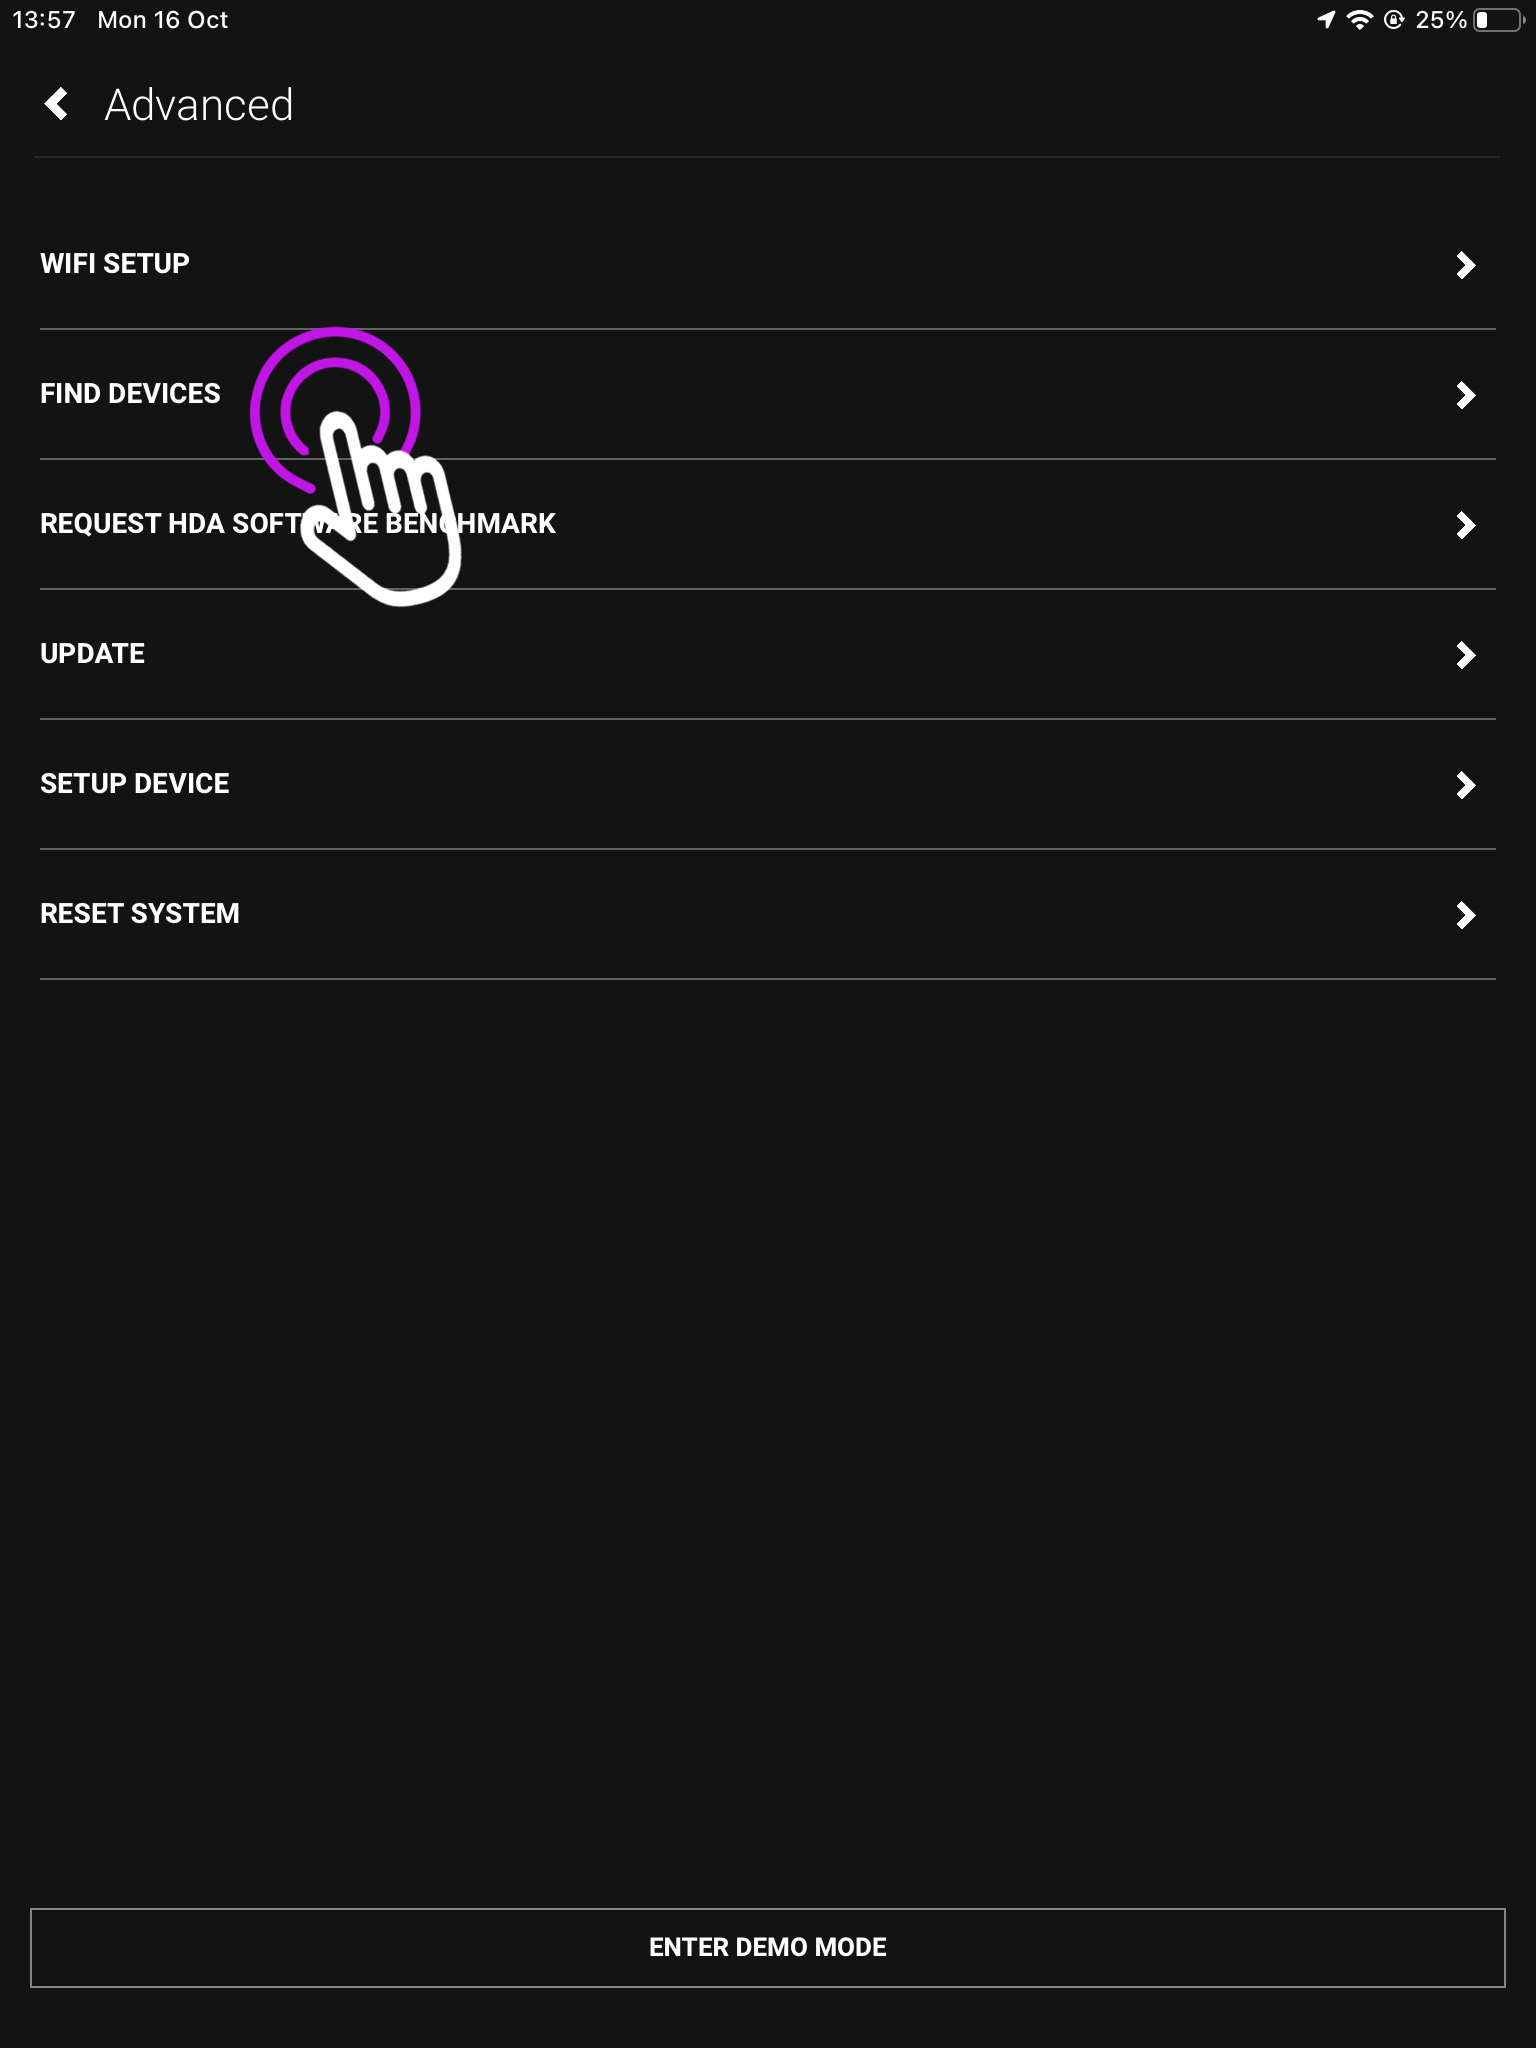
    2. Press “Find Devices”

    This is the advanced screen where you can find your devices, connect over WiFi, reset your system and more.

    It is the main navigation page for your devices options.

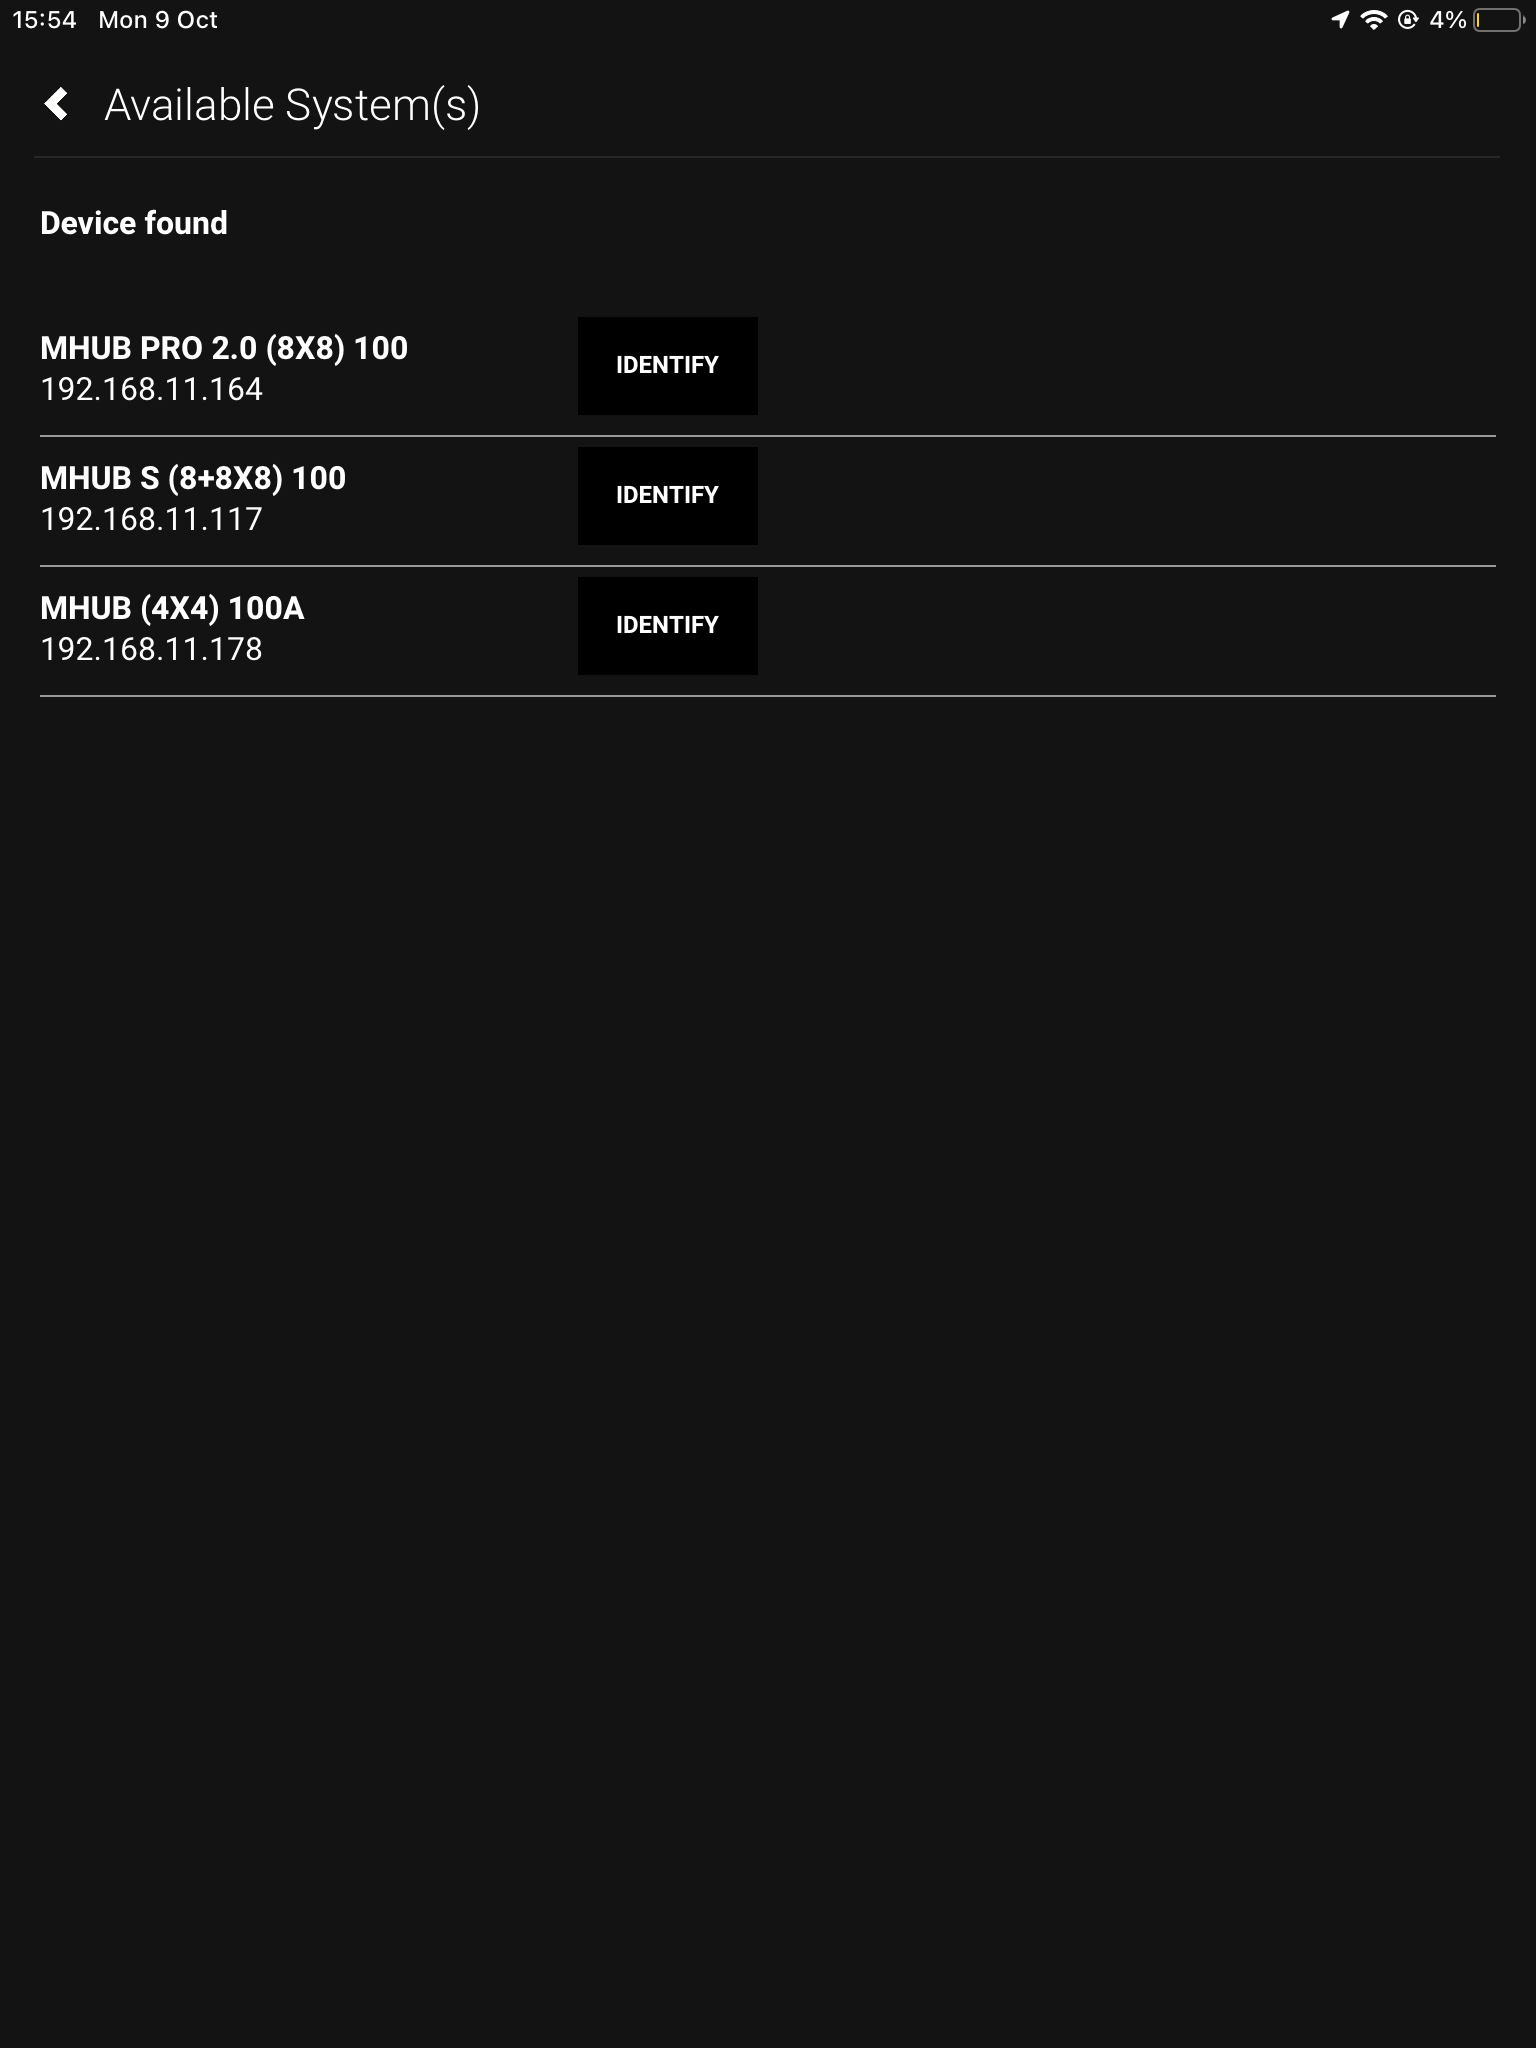
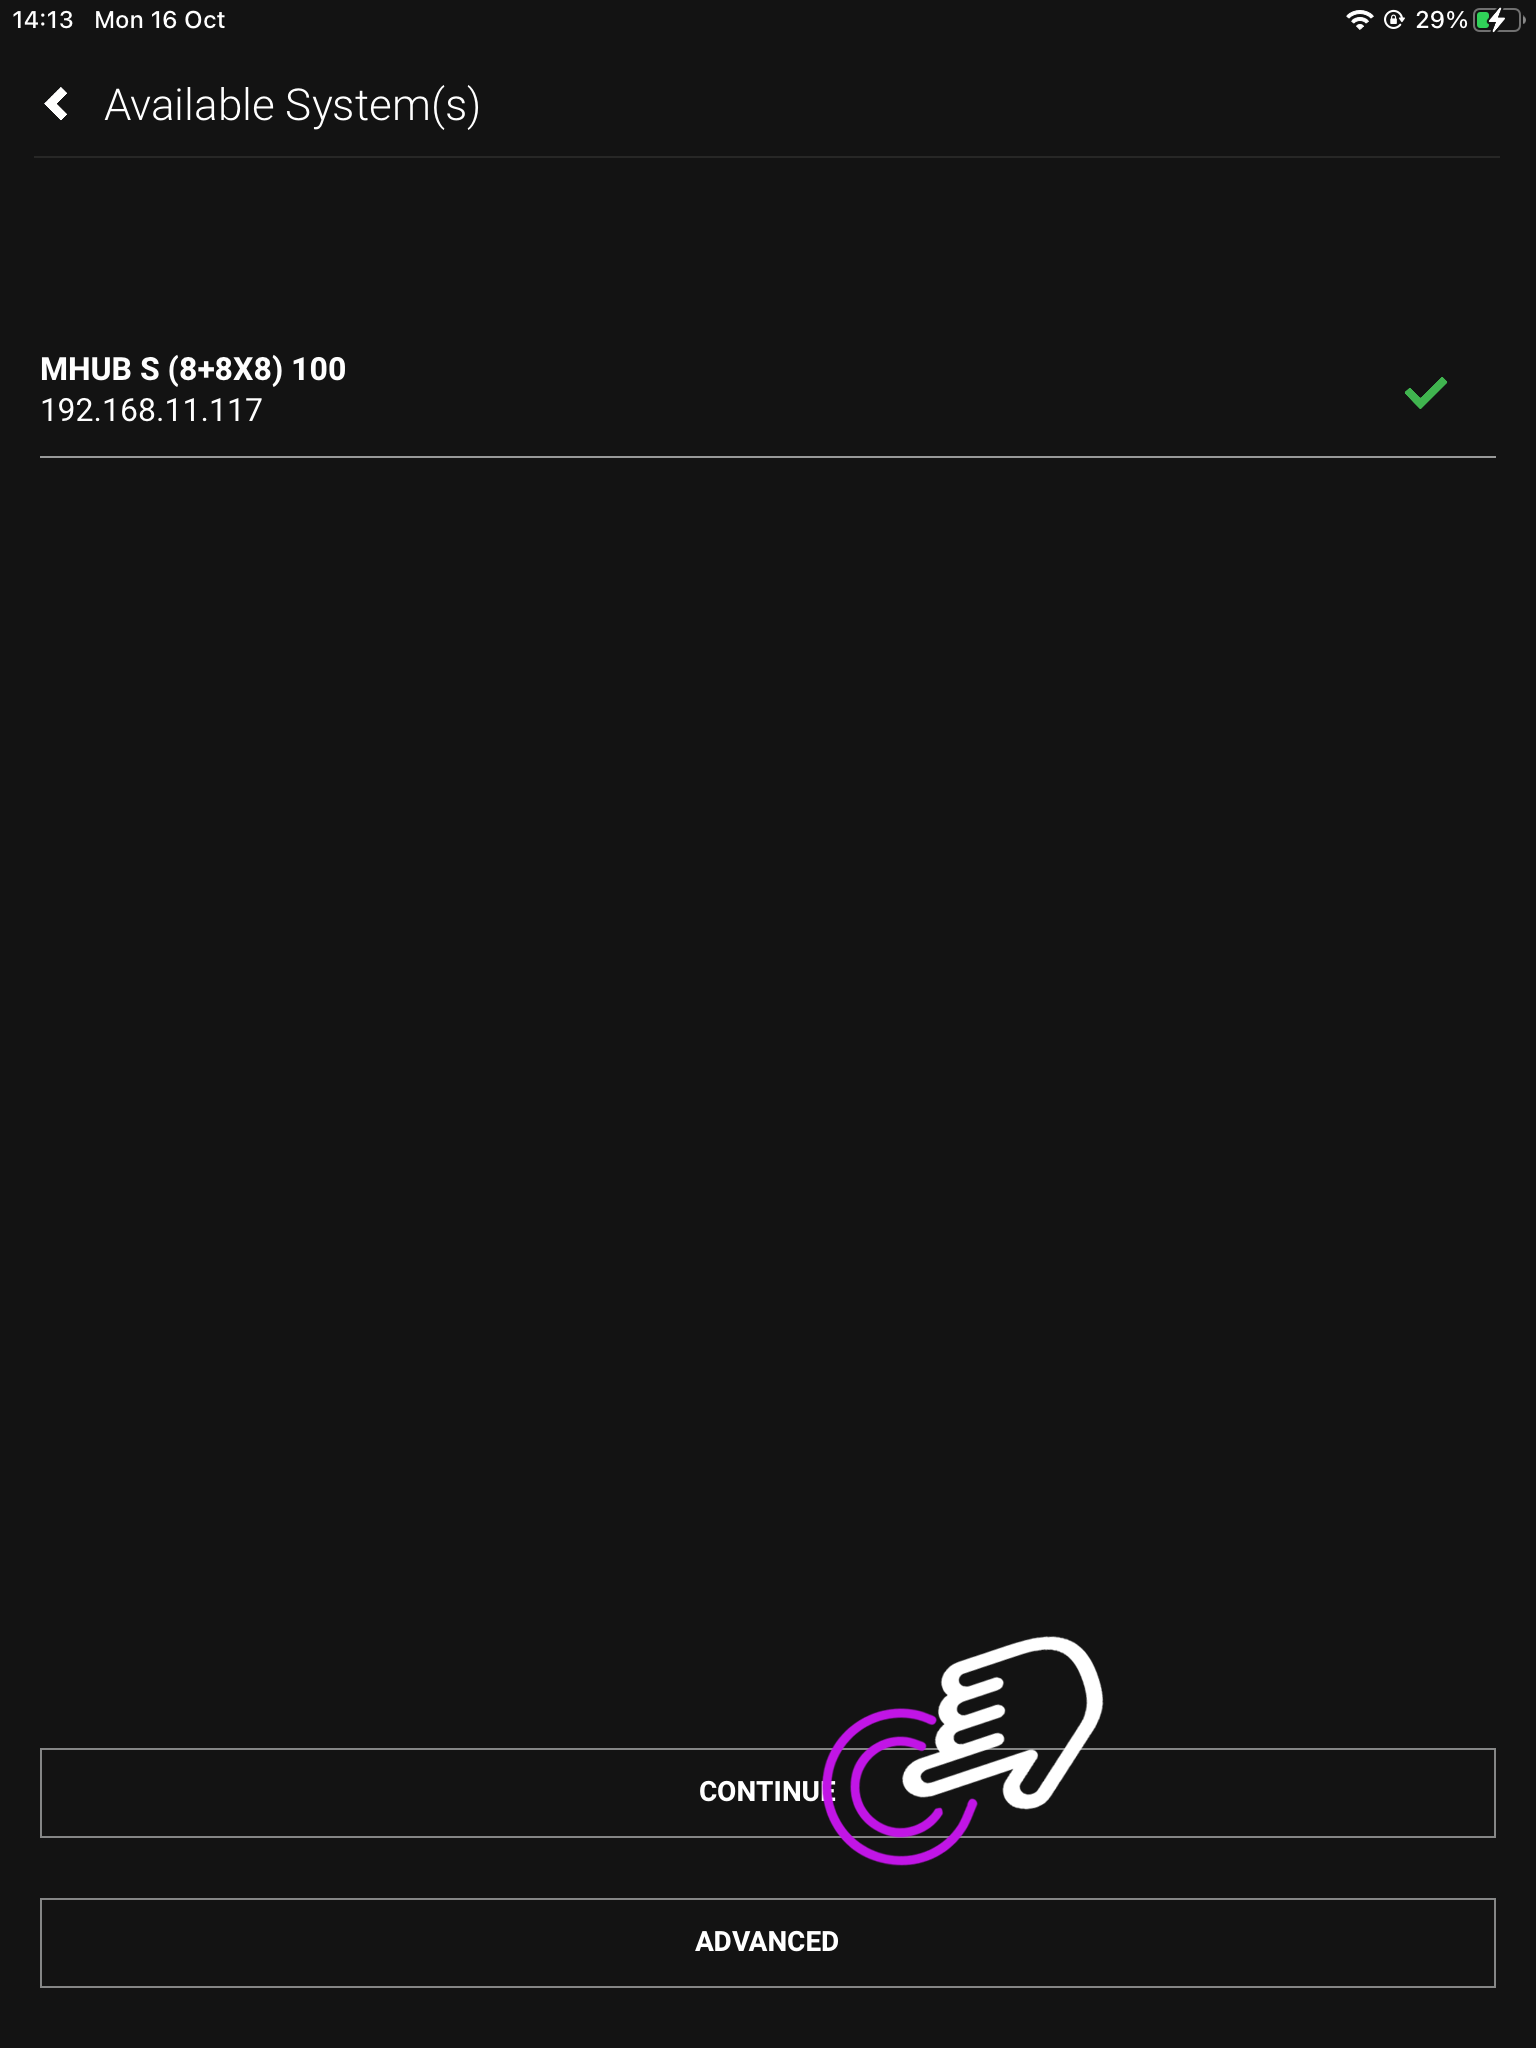
    3. Available Systems(s)

    This is where your connected devices will show.

    If you have more than one connected device, you can click “identify” to make the power LED of that unit flash.

    When you’re connected in uControl

    1. Open up uControl

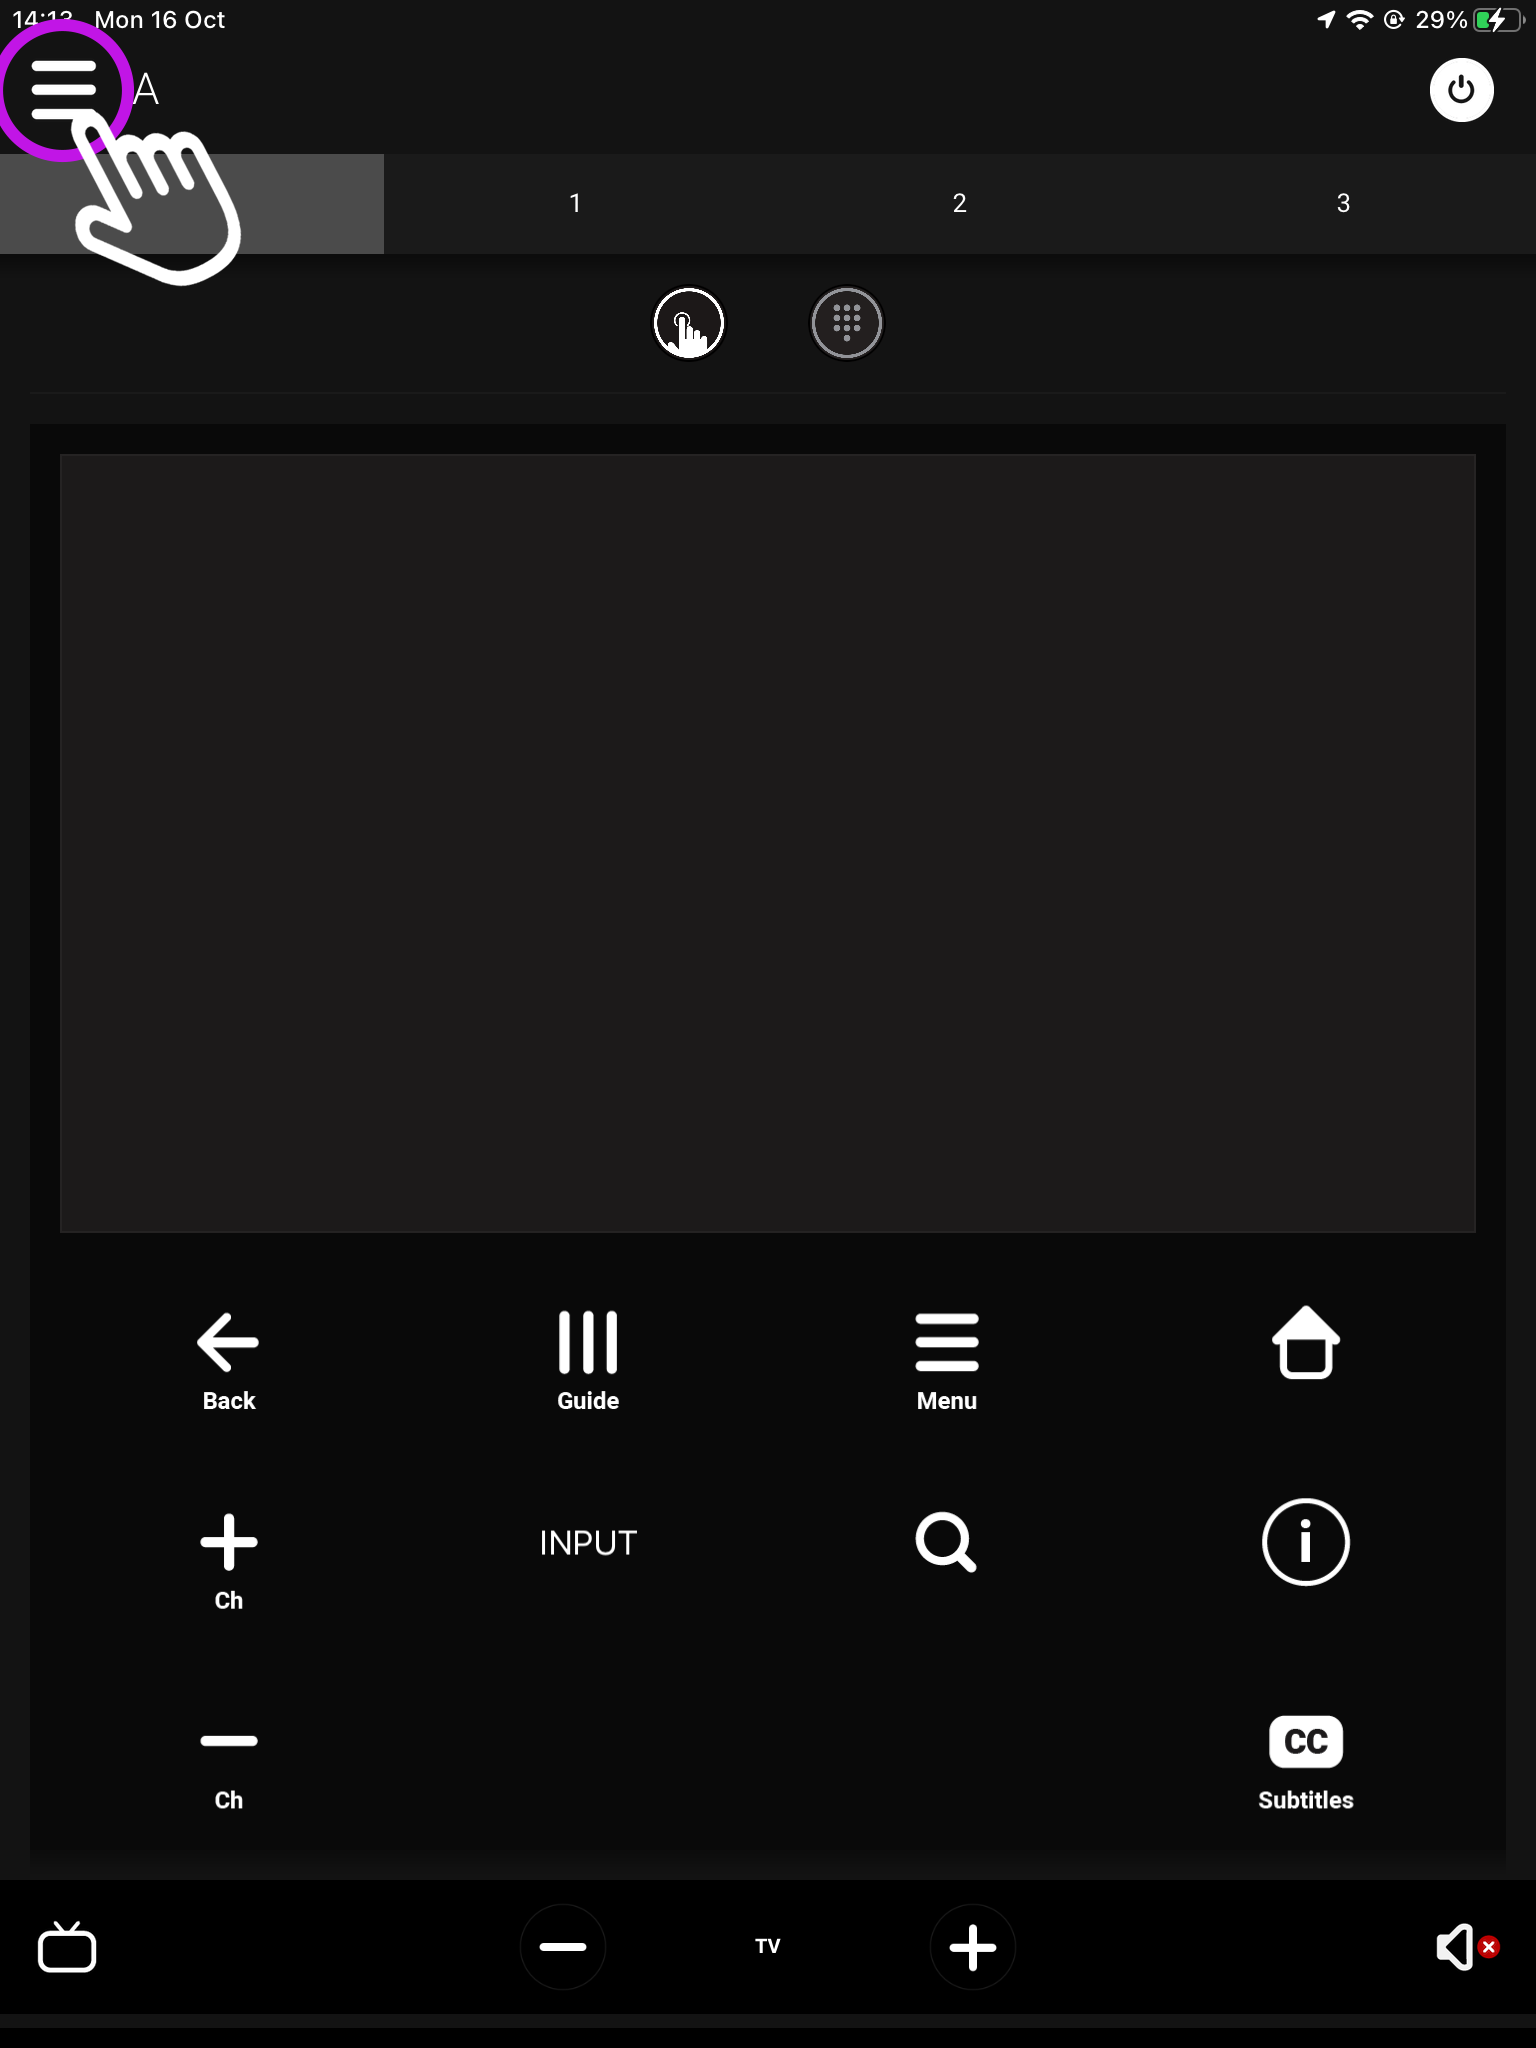
    If you’re already connected to a system then you will need to access uControl’s settings. From the main screen you will see something similar to this (see below). From here, look for a menu icon (three horizontal lines) in the top left corner, press that to reveal the Zone selector and Zone control menu.

    What you see on the main screen may differ, however, the three lined menu bar will still be there.

    2. Navigate to your settings

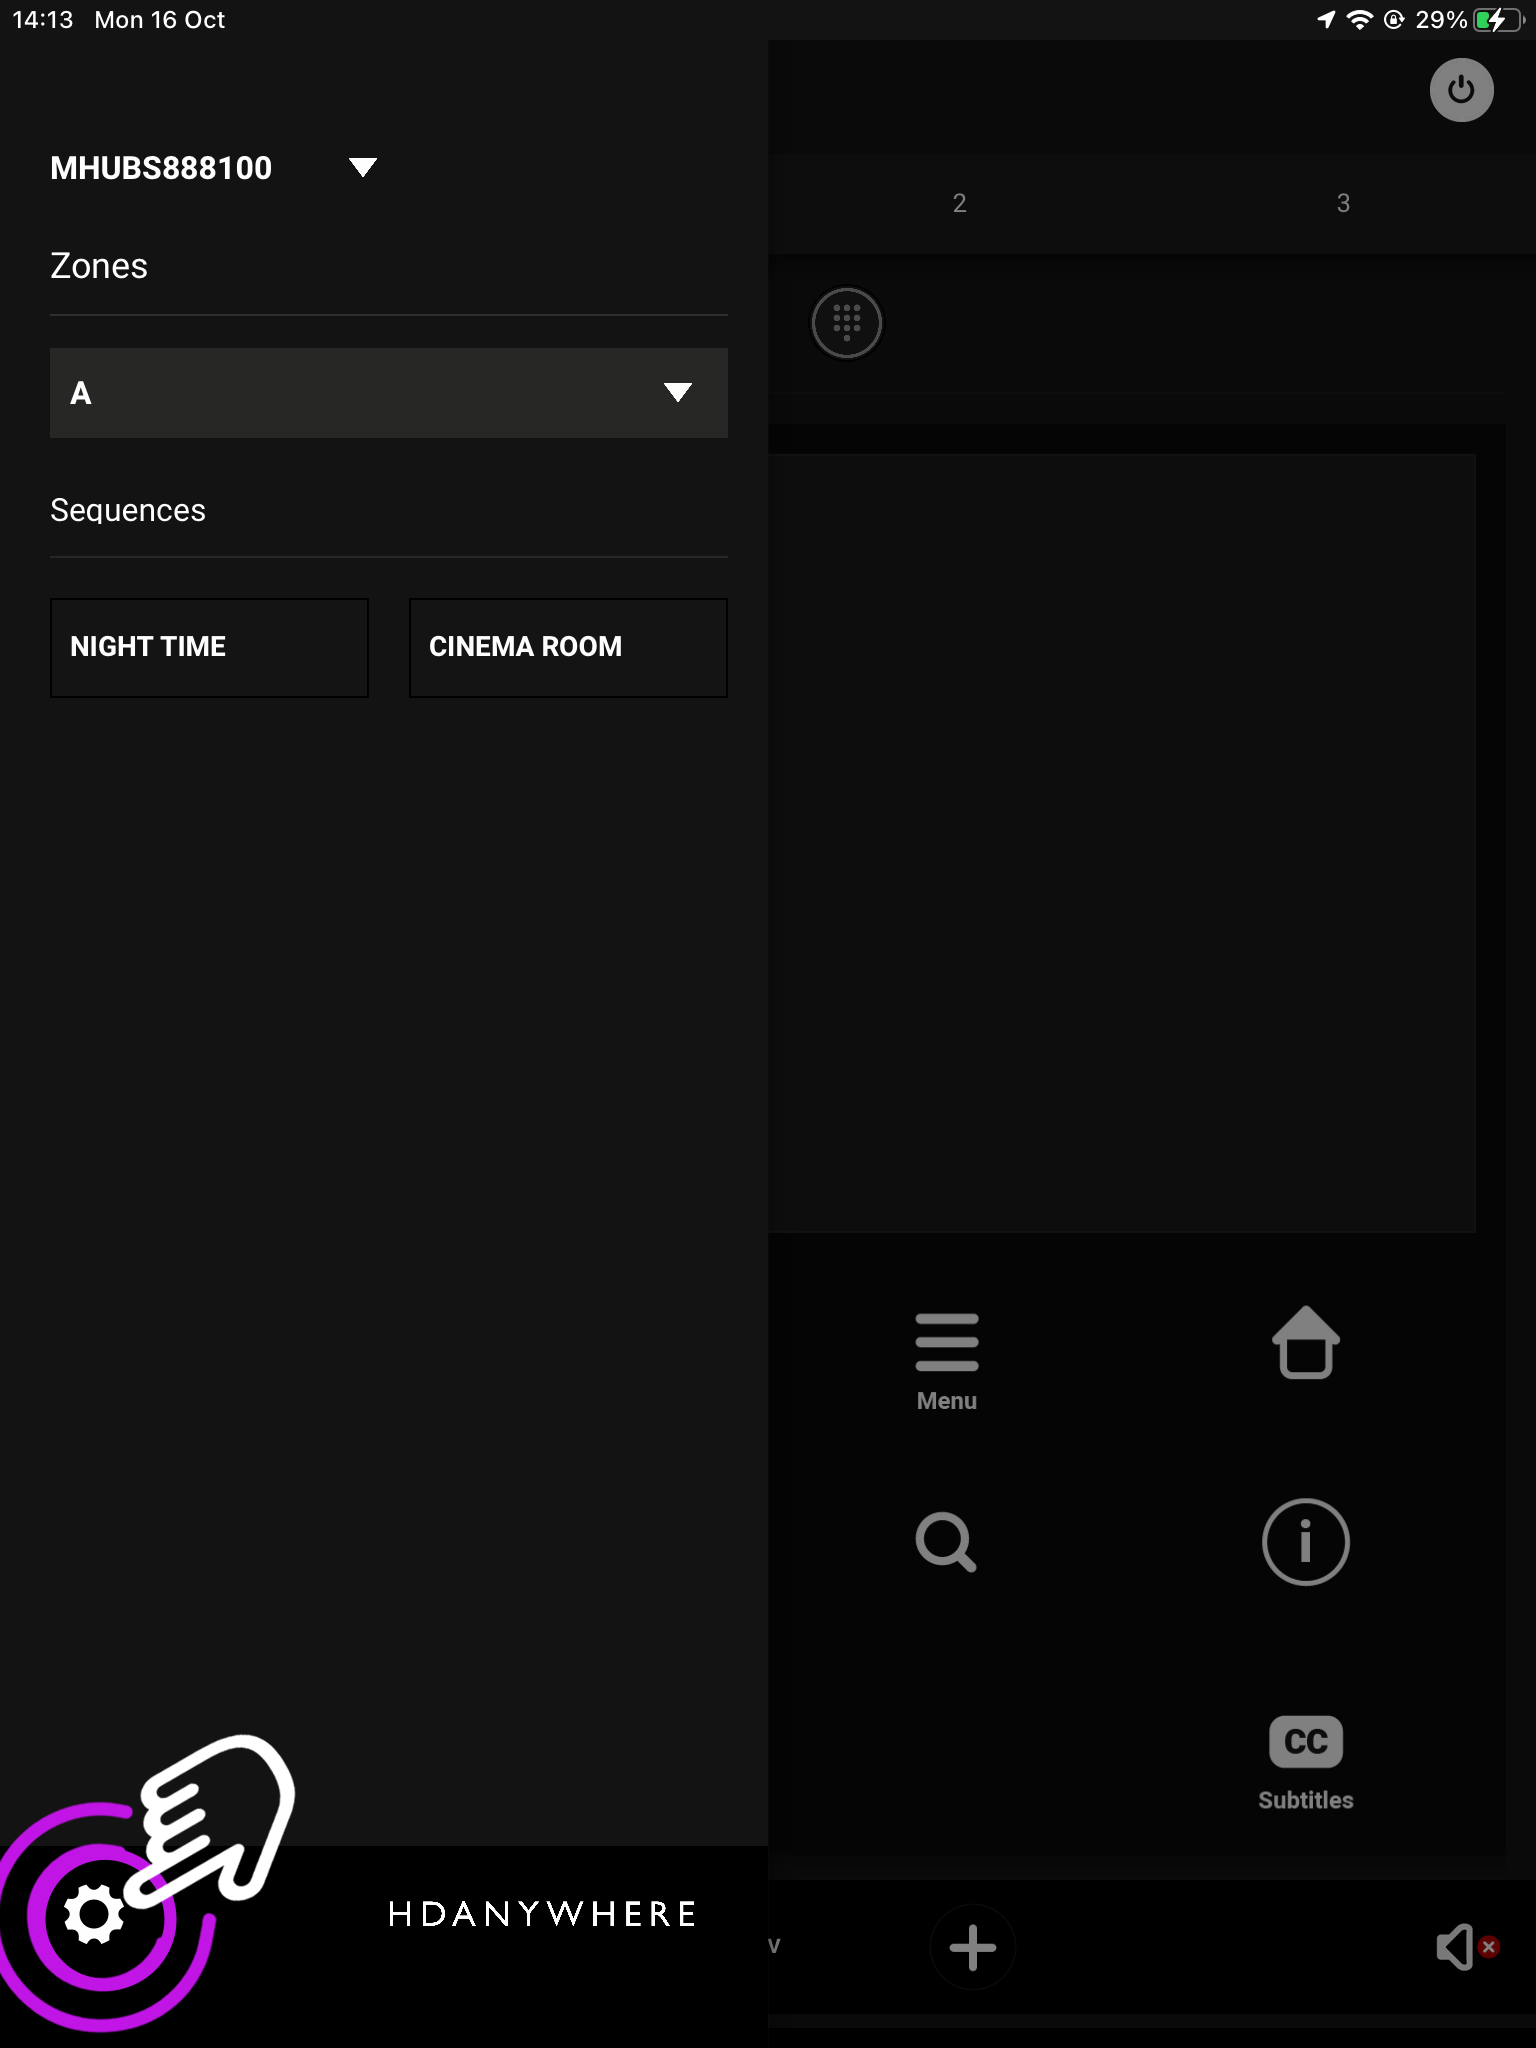
    Look for the settings icon located in the bottom left corner.

    The icon may vary depending on your mobile devices size, however, it will still be in the bottom left corner.

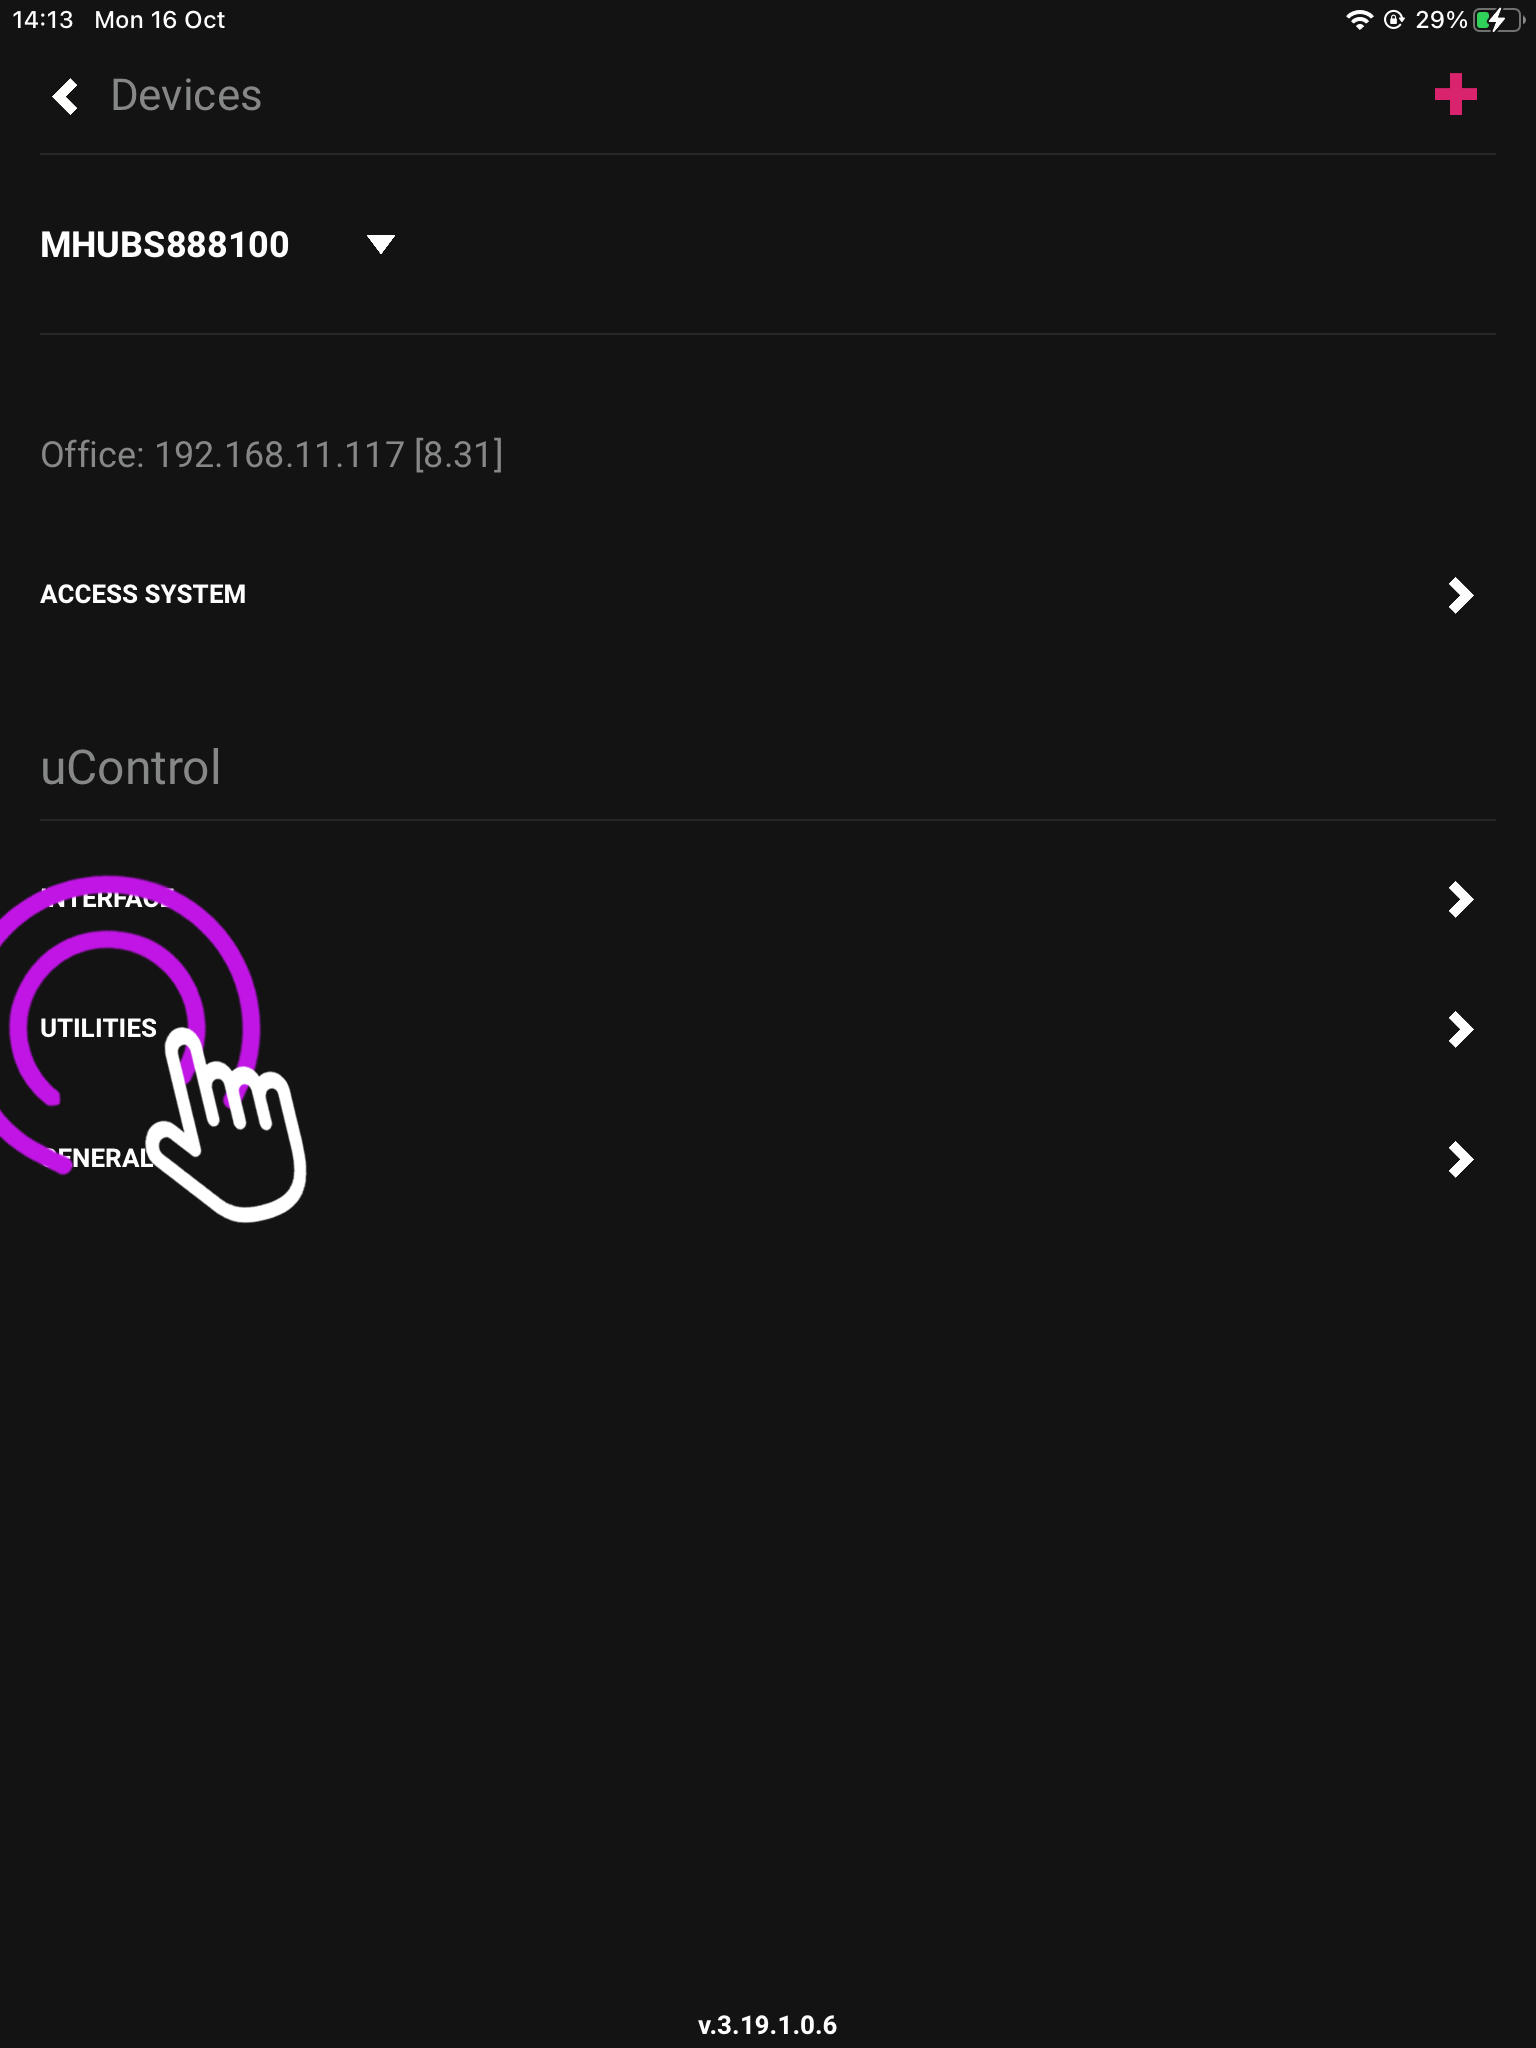
    3. Press “Utilities”

    This will take you to your devices service page.

    From here you can also see the IP address of the device you’re currently controlling.

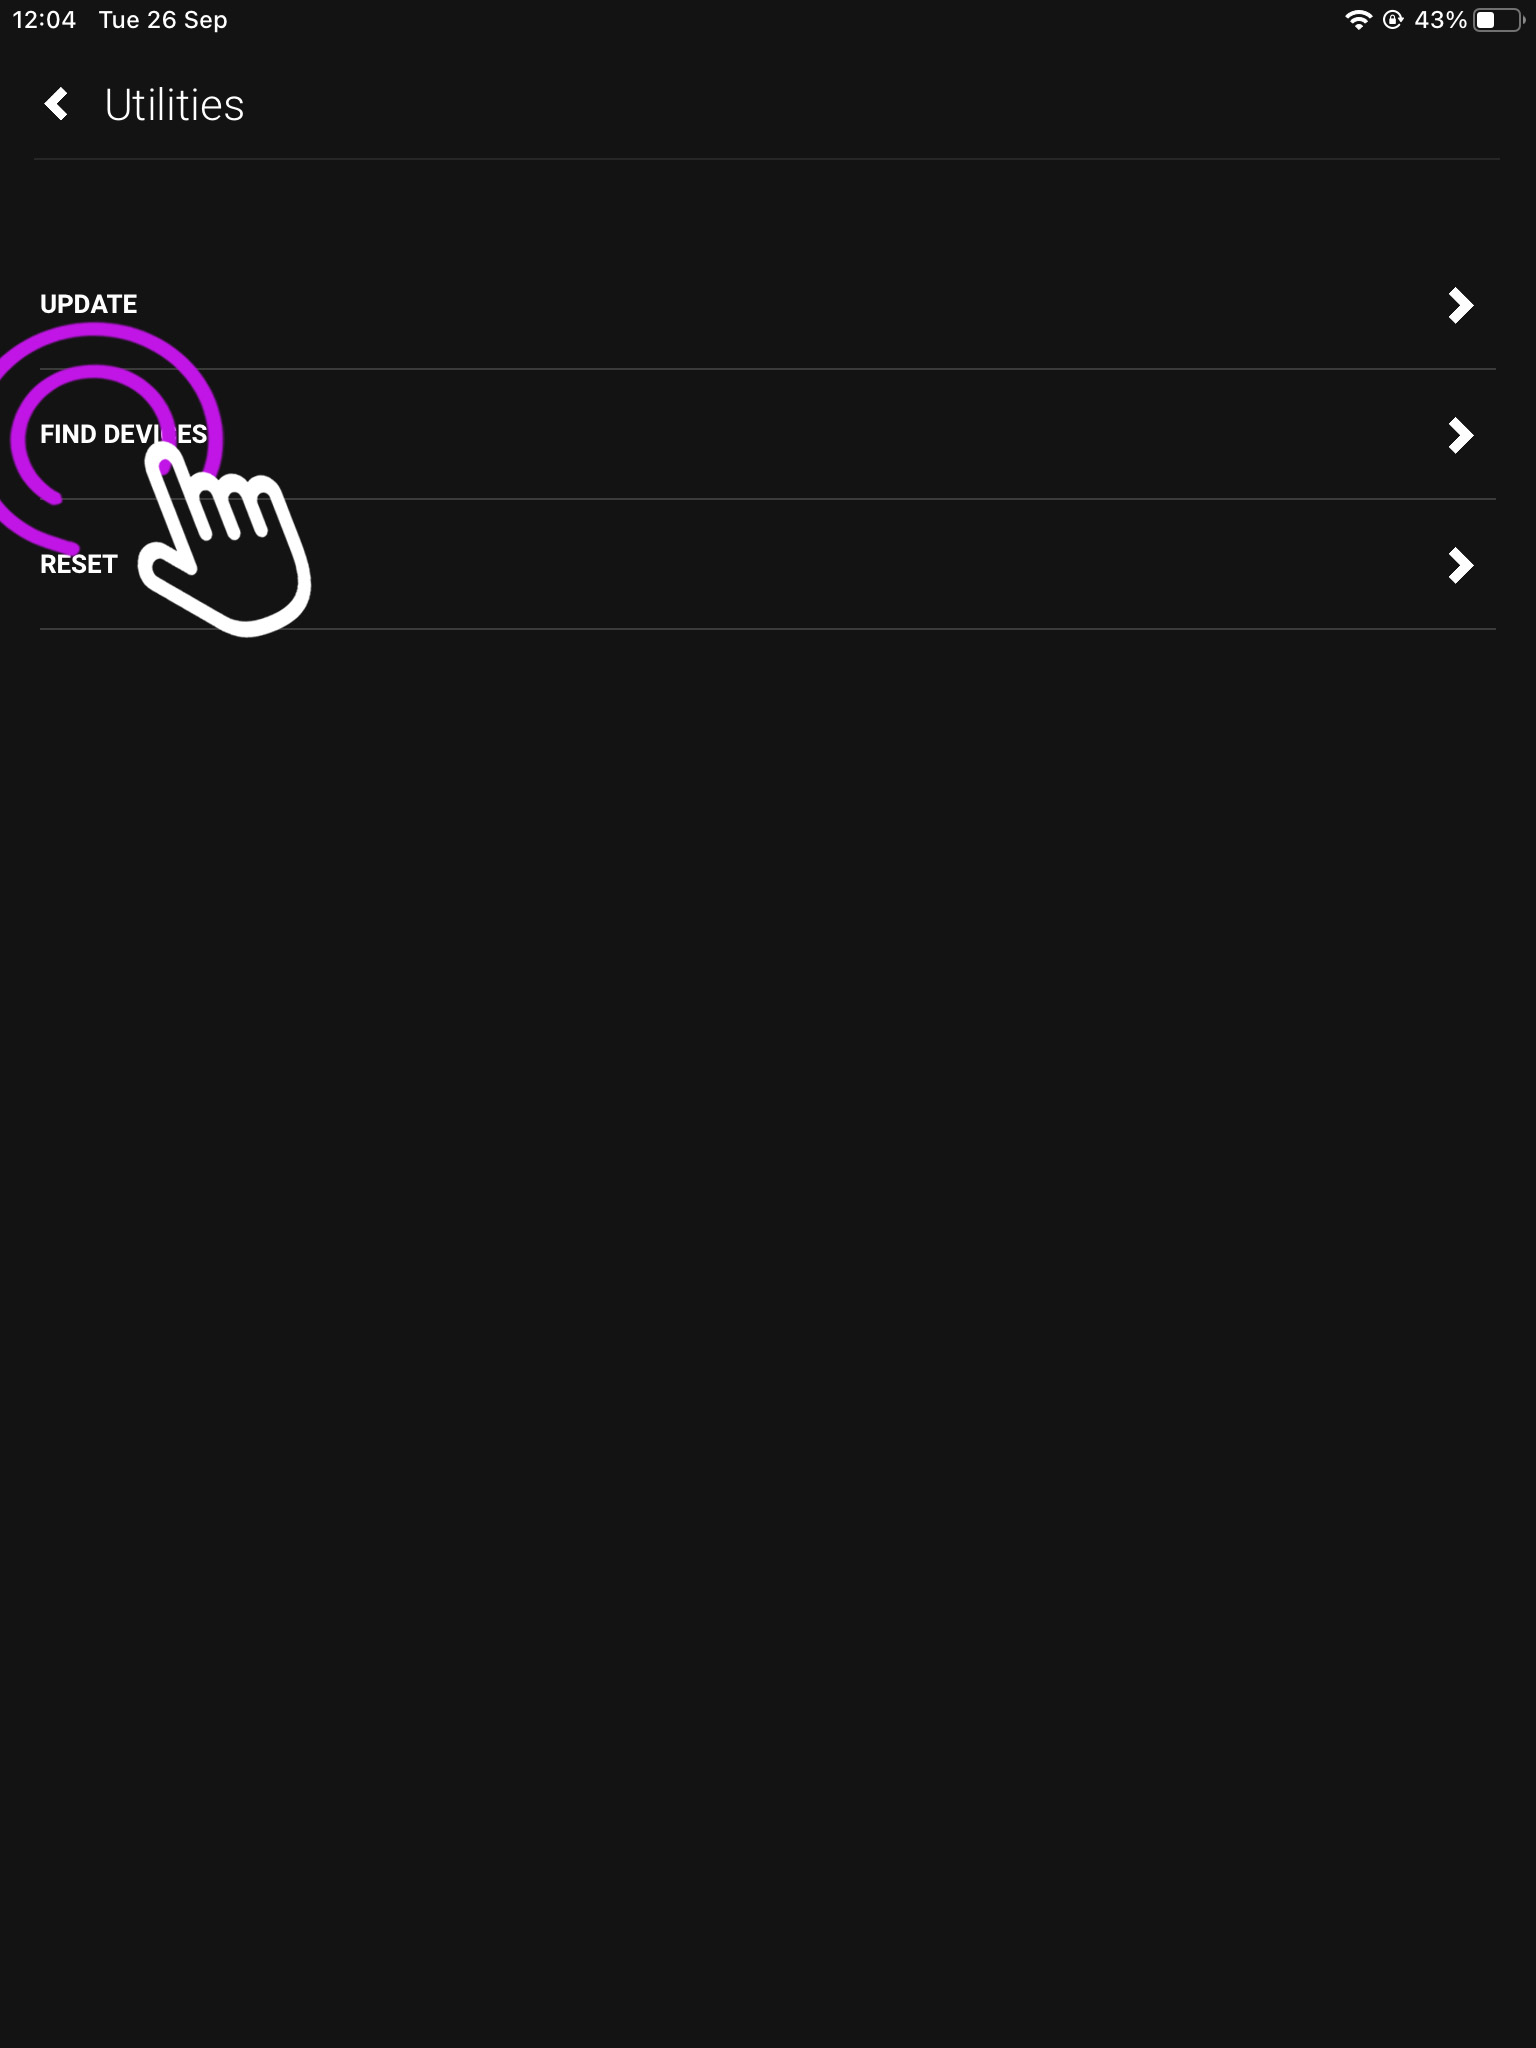
    4. Press “Find Devices”

    From this page you can also update, and reset your HDA device. To find out more check out our uOS Utilities page.

    The next page will show you your connected HDA devices.

    5. Available Systems(s)

    If you have a stacked system, or multiple devices they will show here.

    If you have more than one connected device, you can click “identify” to make the power LED of that unit flash.

  • Troubleshooting Control4 with HDA

    mhub-s-hero-guide

    Included below are some troubleshooting steps we recommend carrying out if having issues with integrating Control4 with HDA devices:

    Unable to connect your MHUB to the driver?

    • There are many drivers to choose from so you must ensure you have the correct one installed, a link to our drivers page can be found here. There are drivers for basic switching or product specific drivers that offer a more in dpeth form of control, so it is vital the correct one is downloaded and that you are not using an old copy. If you are unsure which driver to download please contact support.
    • Ensure that your HDA device has not changed its IP address.
    • Try manually connecting to the system by inputting the HDA devices IP address into the driver, making sure to disable auto-discovery.
    • Make sure that the devices are up to date.
    • Go through first boot on MHUB-OS or uOS.
    • Make sure you have set the unit to be powered on at all times in the driver by setting the state to true.

    Connected but having issues controlling the system?

    • In a Stacked System you will need to download a separate instance of the driver for each unit.
    • Make sure the correct ports are assigned in the driver.
    • If you’re using IR pass-through make sure to use our IR Transmitters.
  • EDID management: Modular 4×4 and 8×8

    EDID (Extended Display Identification Data) is information provided by a display to describe its capabilities to a source. It contains information including resolution, audio formats and frame rates. Modular has the ability to ‘Fix’ the EDID profile to allow a source to always pass video with a fixed resolution and/or specific audio output (i.e 1080p 60Hz, with 5.1 multi-channel audio)

    If the system is functioning as normal, then no EDID management is required, however if you have a source that will not output the correct resolution/audio type, this can be resolved by following the instructions below

    Please remove the SD card from the unit and connect it to a PC (Please do not use a MAC). On the route of the SD card is a file called ‘settings.ini’, this is the file that will be edited. Open the file in a text editor such as notepad, then scroll down to the bottom of the file

    Enter one or more the following lines where required

    edidprofile1 = x     ; sets the EDID profile for source connected to input 1
    edidprofile2 = x     ; sets the EDID profile for source connected to input 2
    edidprofile3 = x     ; sets the EDID profile for source connected to input3
    edidprofile4 = x     ; sets the EDID profile for source connected to input4
    edidprofile5 = x     ; sets the EDID profile for source connected to input 5  (8×8 only)
    edidprofile6 = x     ; sets the EDID profile for source connected to input6 (8×8 only)
    edidprofile7 = x     ; sets the EDID profile for source connected to input 7 (8×8 only)
    edidprofile8 = x     ; sets the EDID profile for source connected to input 8 (8×8 only)

    where x equals:
    0 – Presents the source with the 1080p template EDID
    1 – Fixes the EDID
    2 – presents the source with the 4K template EDID
    3 – presents the source with the 1080p template EDID with 5.1 enabled
    101  – presents source with the EDID of the Sink connected to Output 1
    ..

    108  – presents the source with the EDID of the Sink connected to Output 8


    Once all editing has been done, save the settings.ini file, and reinsert the SD card back into the Modular unit.

    Also please reboot any source where the EDID profile has been modified to allow the new EDID data to be passed.

  • MHUB-OS 8: a quick guide to zones

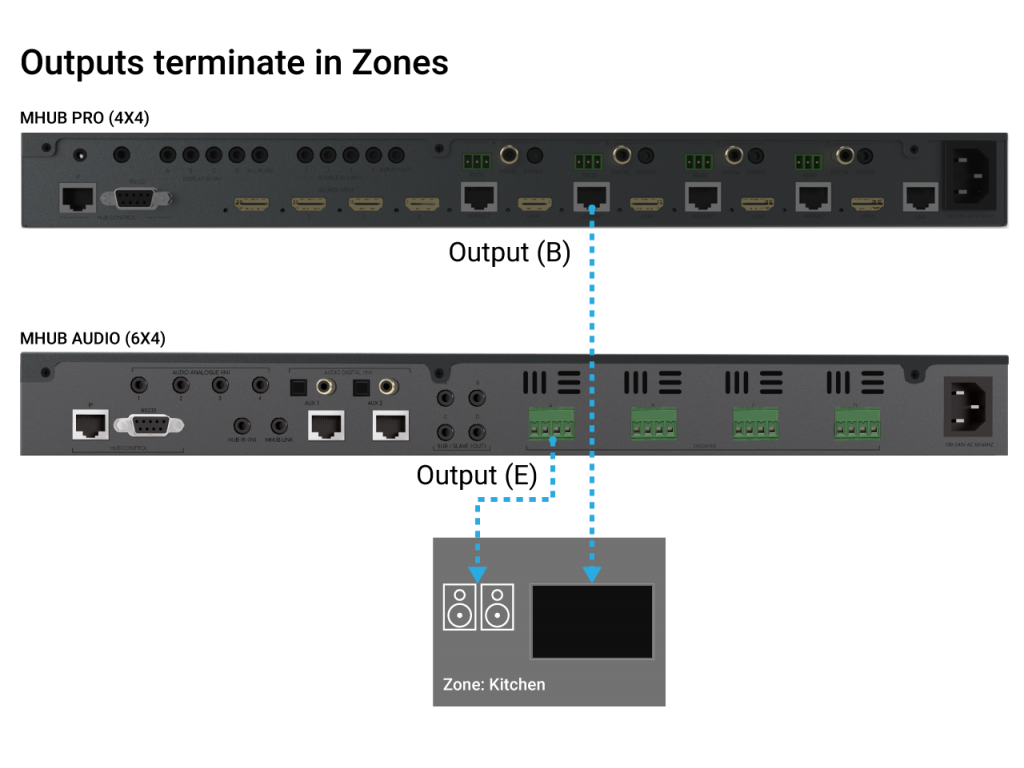
    Zones define a physical space in a property where outputs from MHUB terminate.

    A Zone can include a maximum of 1 video output and a maximum of 4 audio outputs. For example, you can create a zone called “Kitchen” and assign 1 video and 1 audio output to it to provide you with viewable TV and sound. A Zone must contain at least 1 output from an MHUB for it to be addressable for control. Note: outputs can not be shared or split to more than 1 Zone.


    MHUB zones

  • Using Sky Q and MHUB on maximum video and audio settings

    If you have a Sky Q 4K capable box and 4k capable displays this support post will guide you through getting the most out of your setup when using HDA systems.

    Does my HDA system support Sky Q maximum output

    You will need to confirm if your system is capable of passing the signal from your Sky box. Only the following systems are supported –

    1. MHUB PRO 2.0
    2. MHUB S
    3. MHUB U systems running MHUB-OS version 8.26 or greater

    If your system isn’t listed above it may still support Sky Q at 4K, however, HDR will not be supported.

    Configuring the MHUB System

    You may need to do some minor configuration on the MHUB to get the most out of the Sky Q. To do this you will need to adjust the MHUB’s EDID settings for the input where the Sky is connected. Where possible we would recommend copying the EDID from your display. To configure EDID settings follow this guide – EDID Settings

    Setting Sky Q to output 4K 10 bit

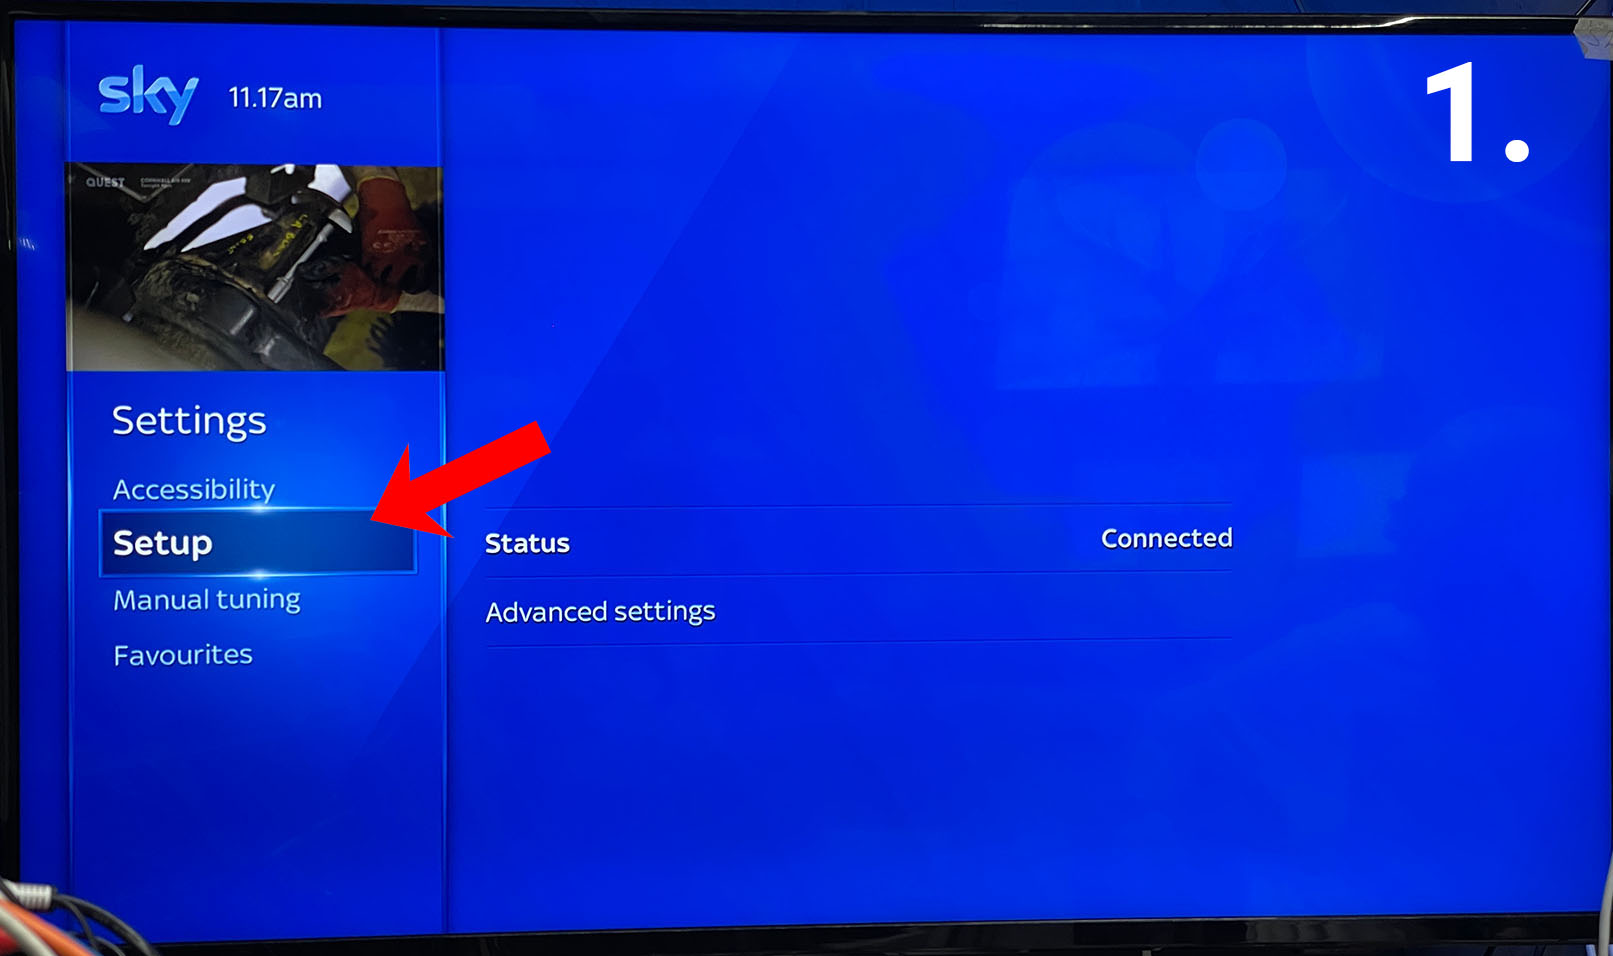
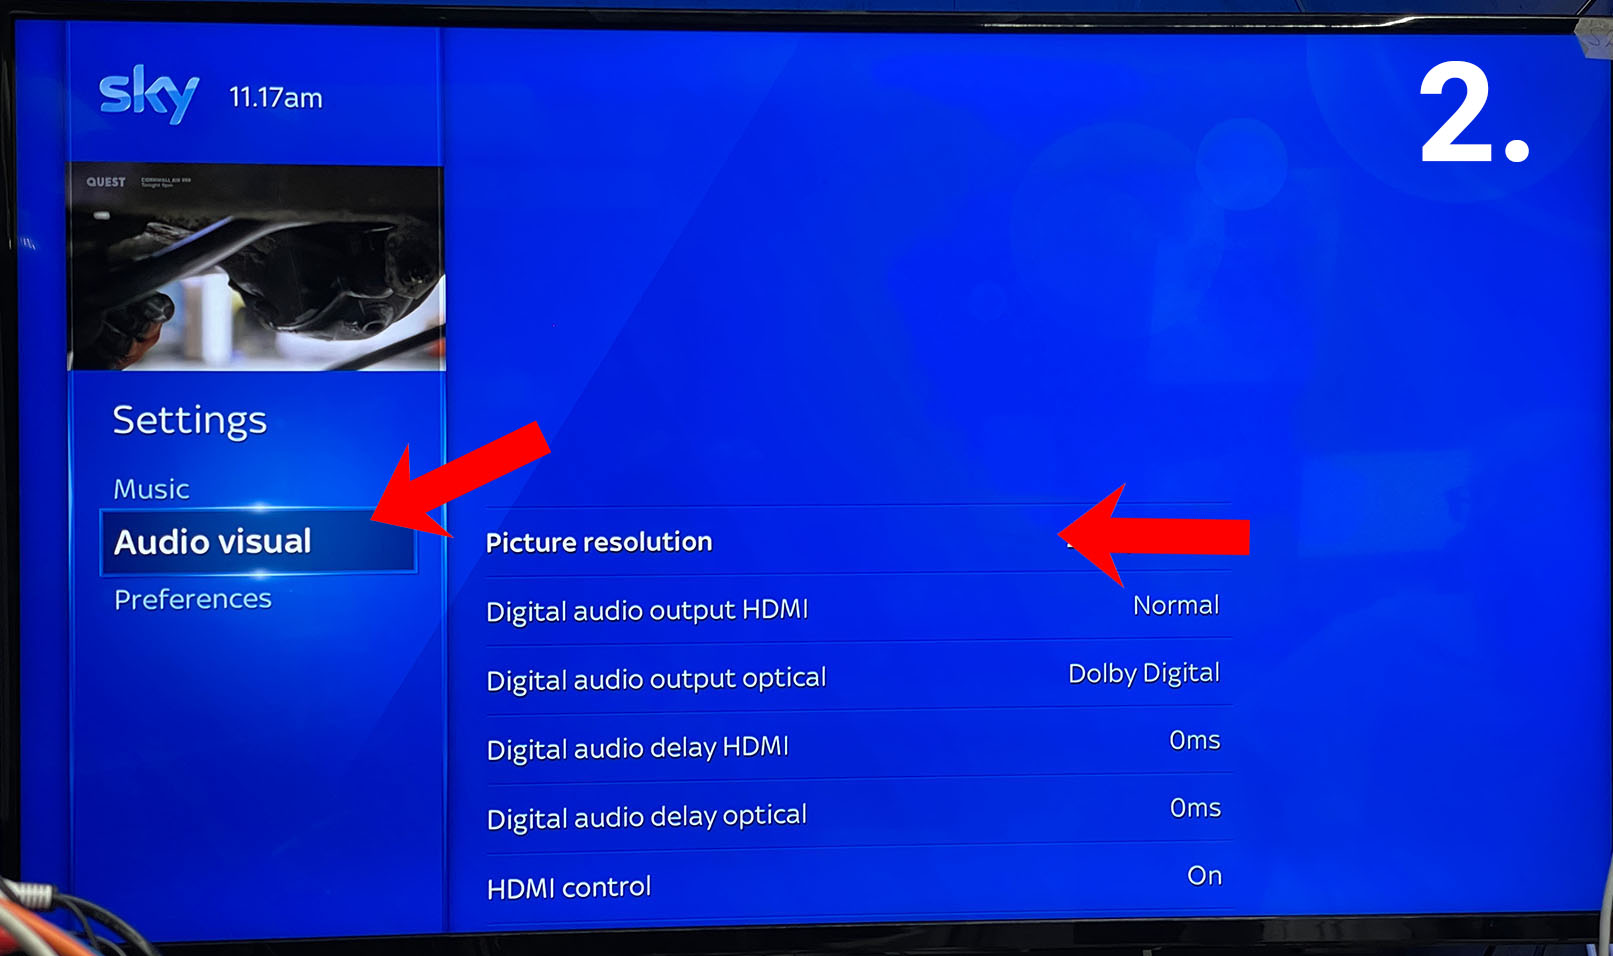
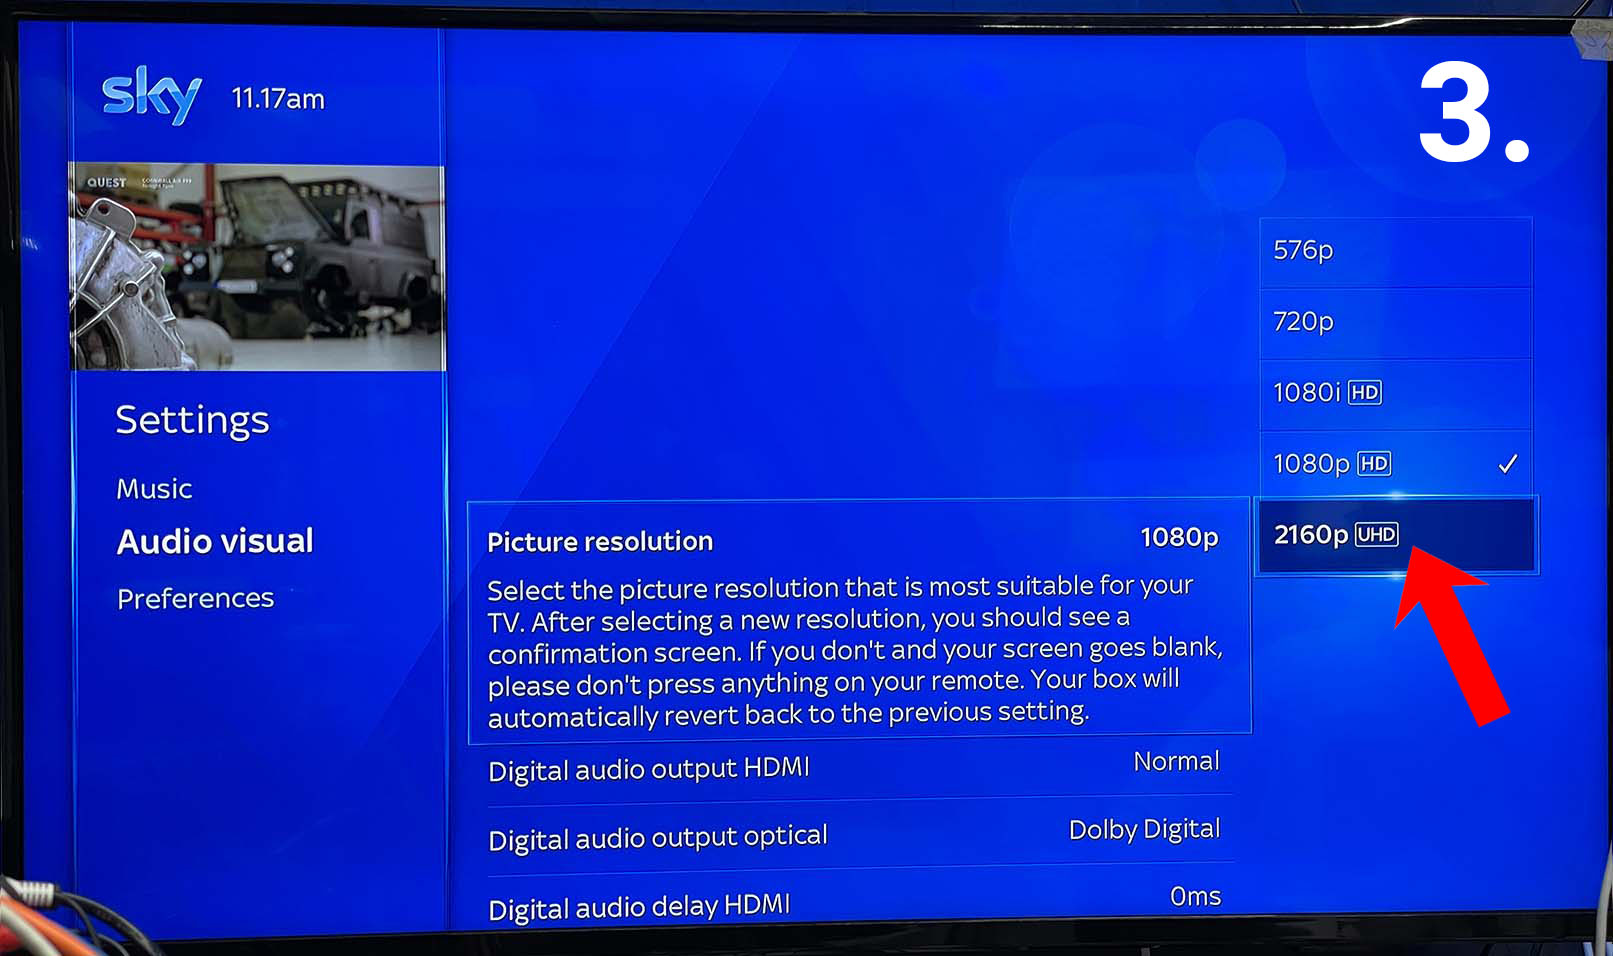
    After setting the EDID on your MHUB you will then need to set the output of the Sky Q system. To do this Press the HOME button and scroll down to settings. Then in the settings menu scroll down to SETUP, then AUDIO VISUAL.

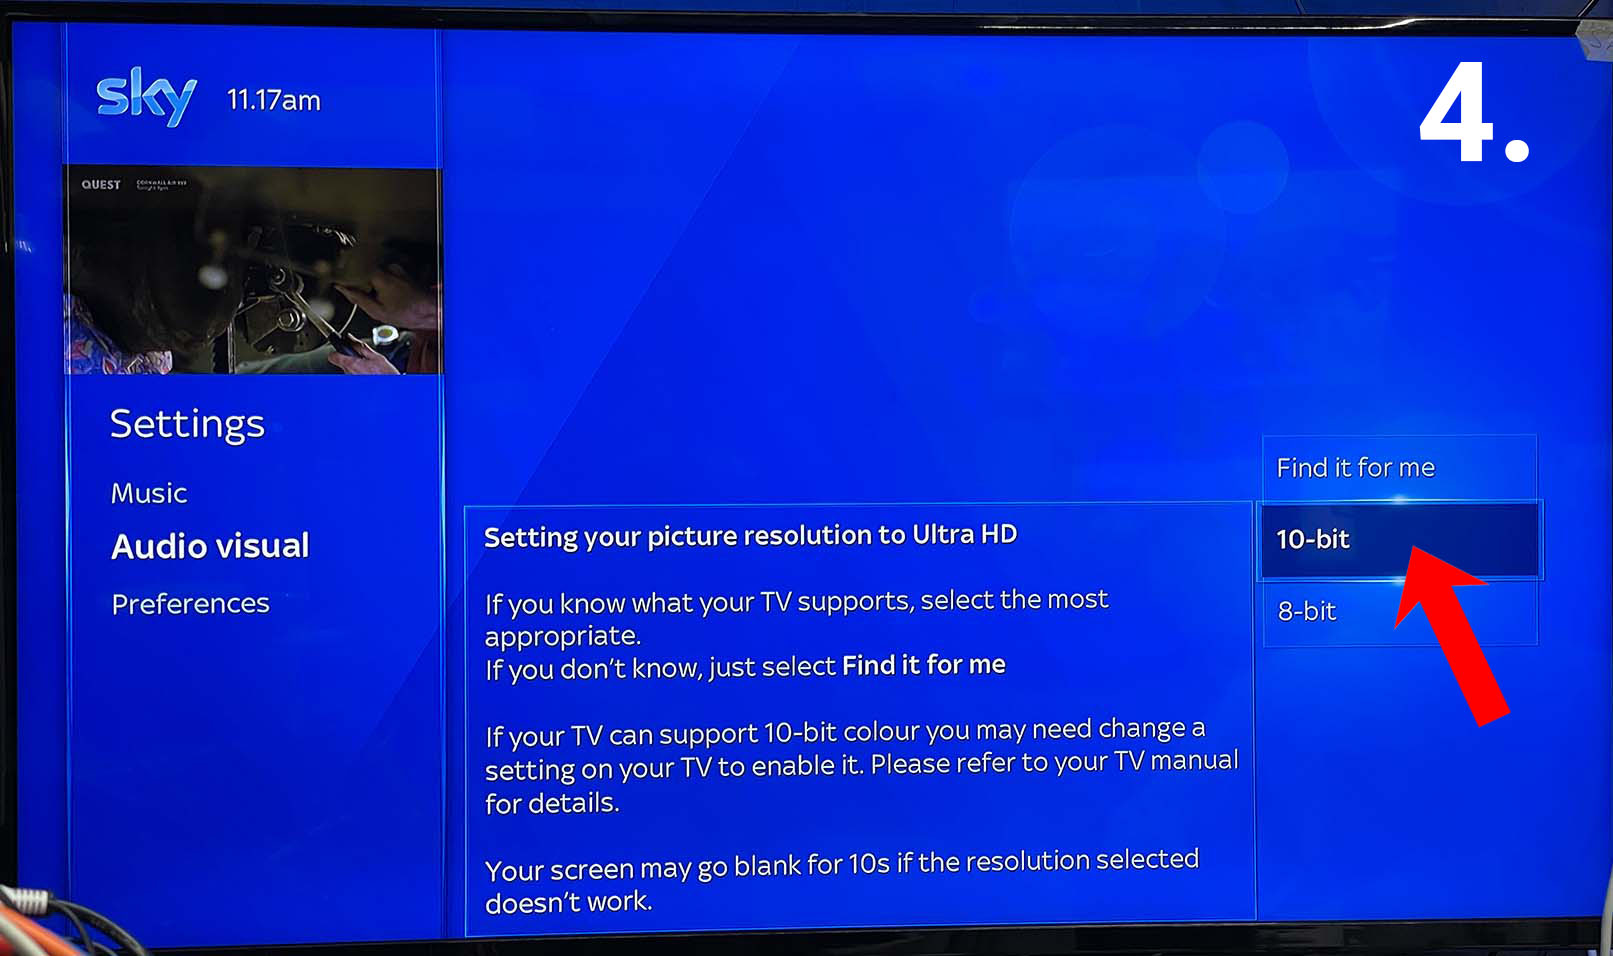
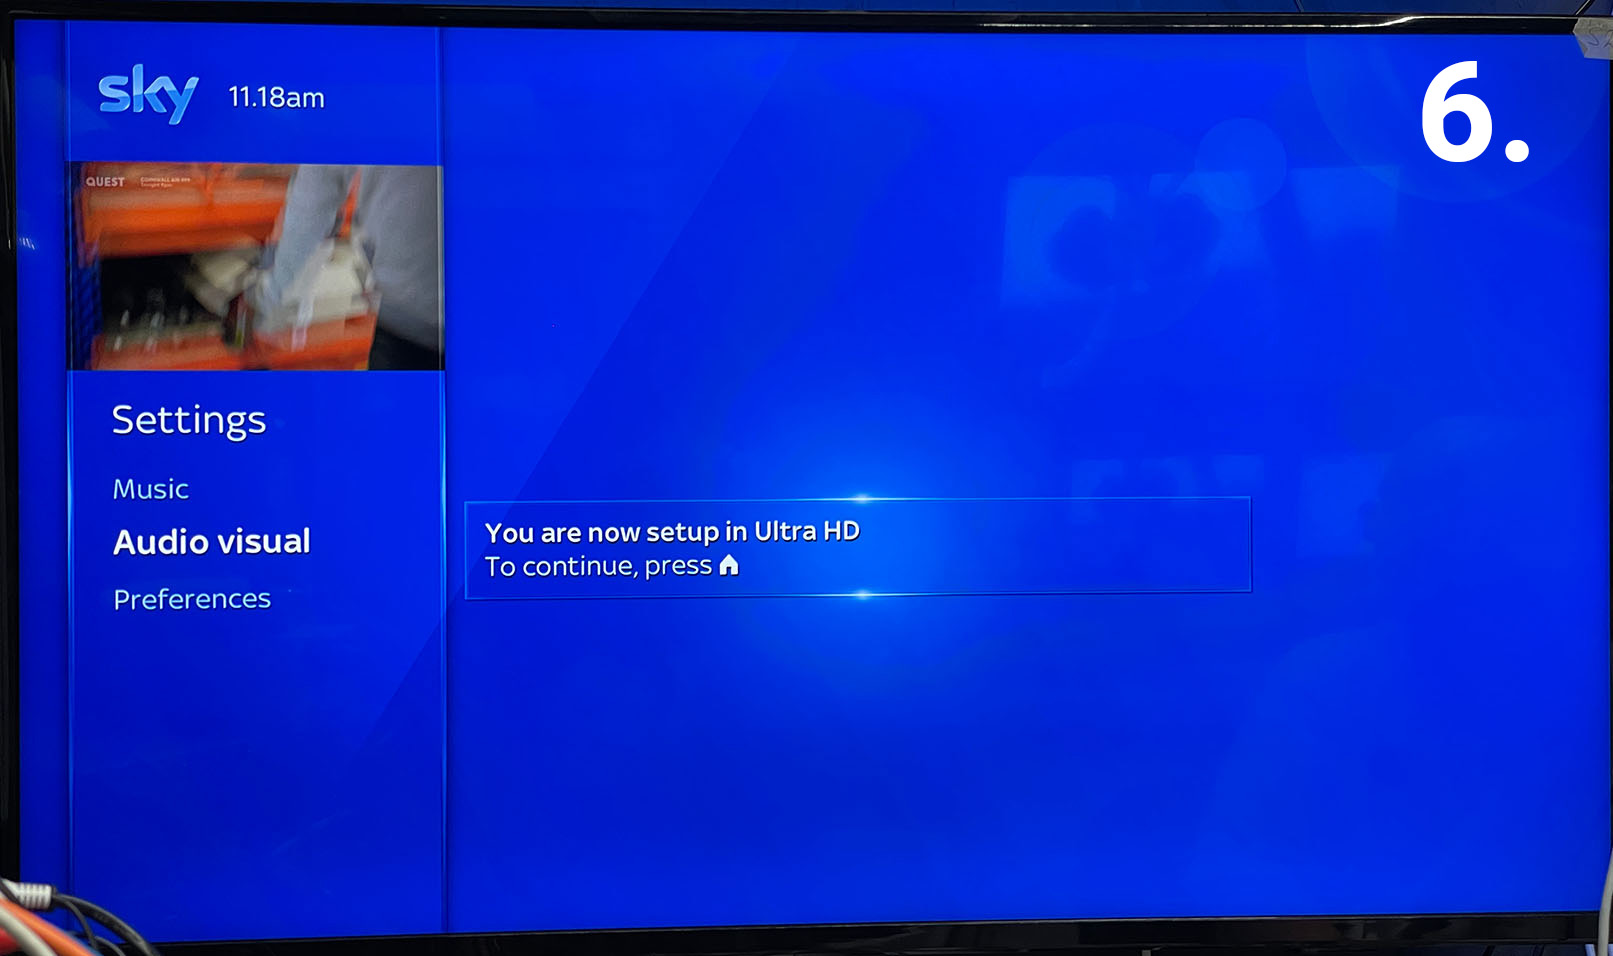
    The first option will be Picture resolution, use the D-Pad and select 2160 [UHD]. You will then get onscreen instructions to select either 10-bit or 8-bit colour. Select 10-bit colour, then confirm everything is fine by following the onscreen instructions. You can also check out Sky’s guide here – Changing Resolution

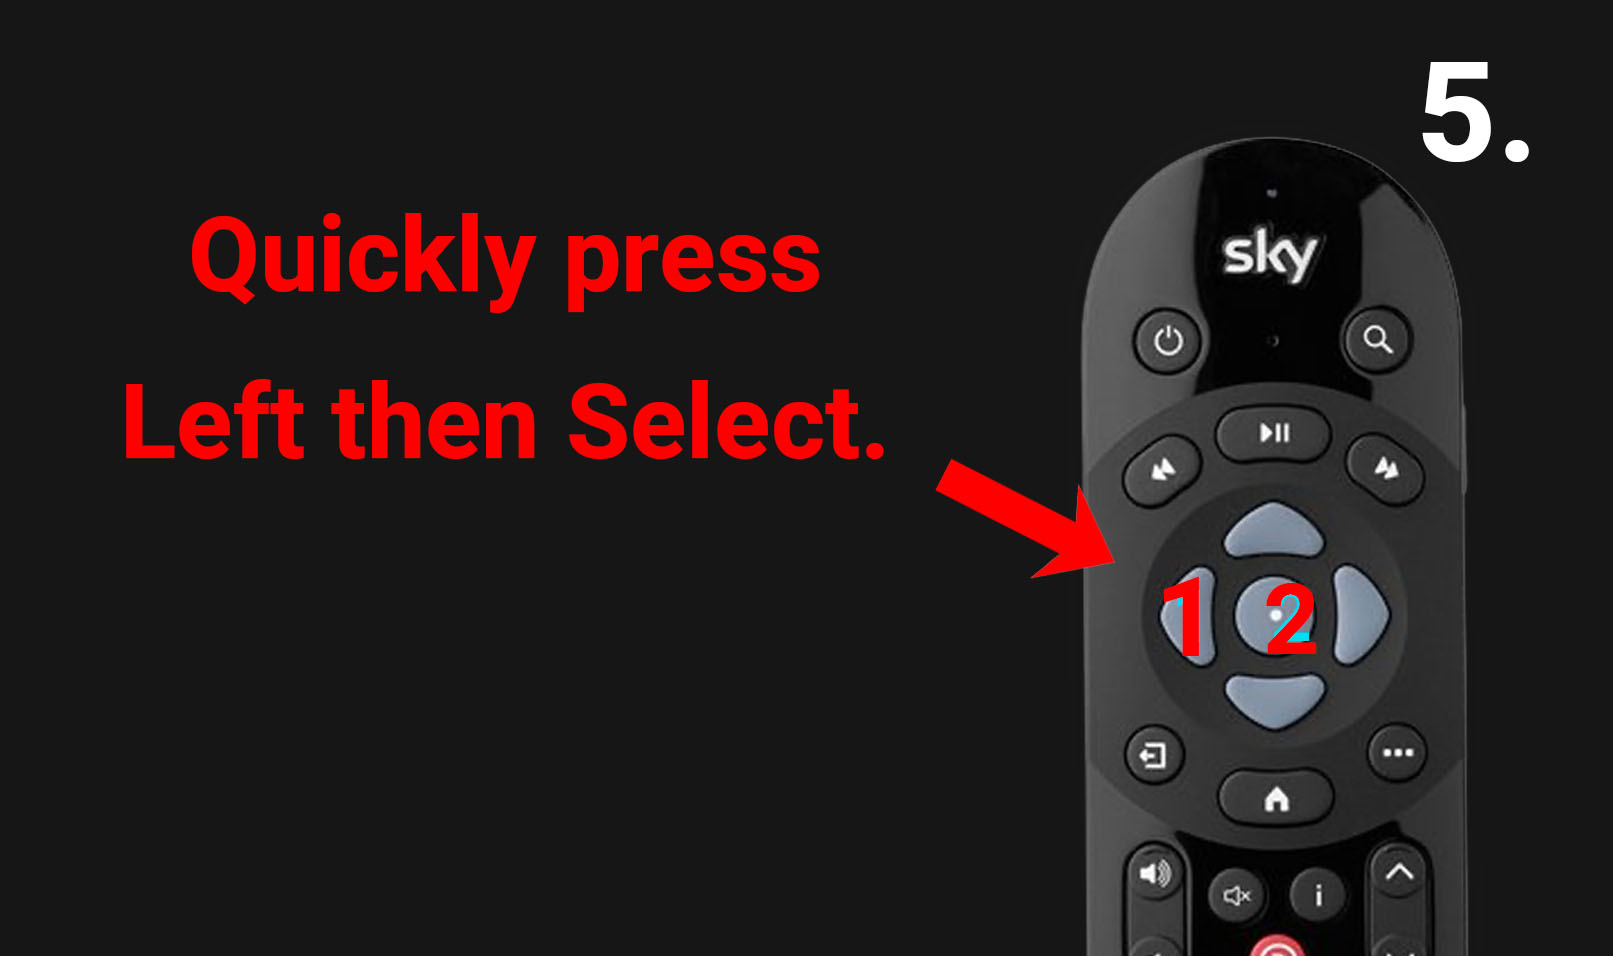
    There is a timer to confirm the picture is fine, if it expires before you can confirm simply press LEFT and ENTER after selecting 10-bit colour whilst the screen is still black.

    Setting Sky Q to output Dolby Atmos Audio

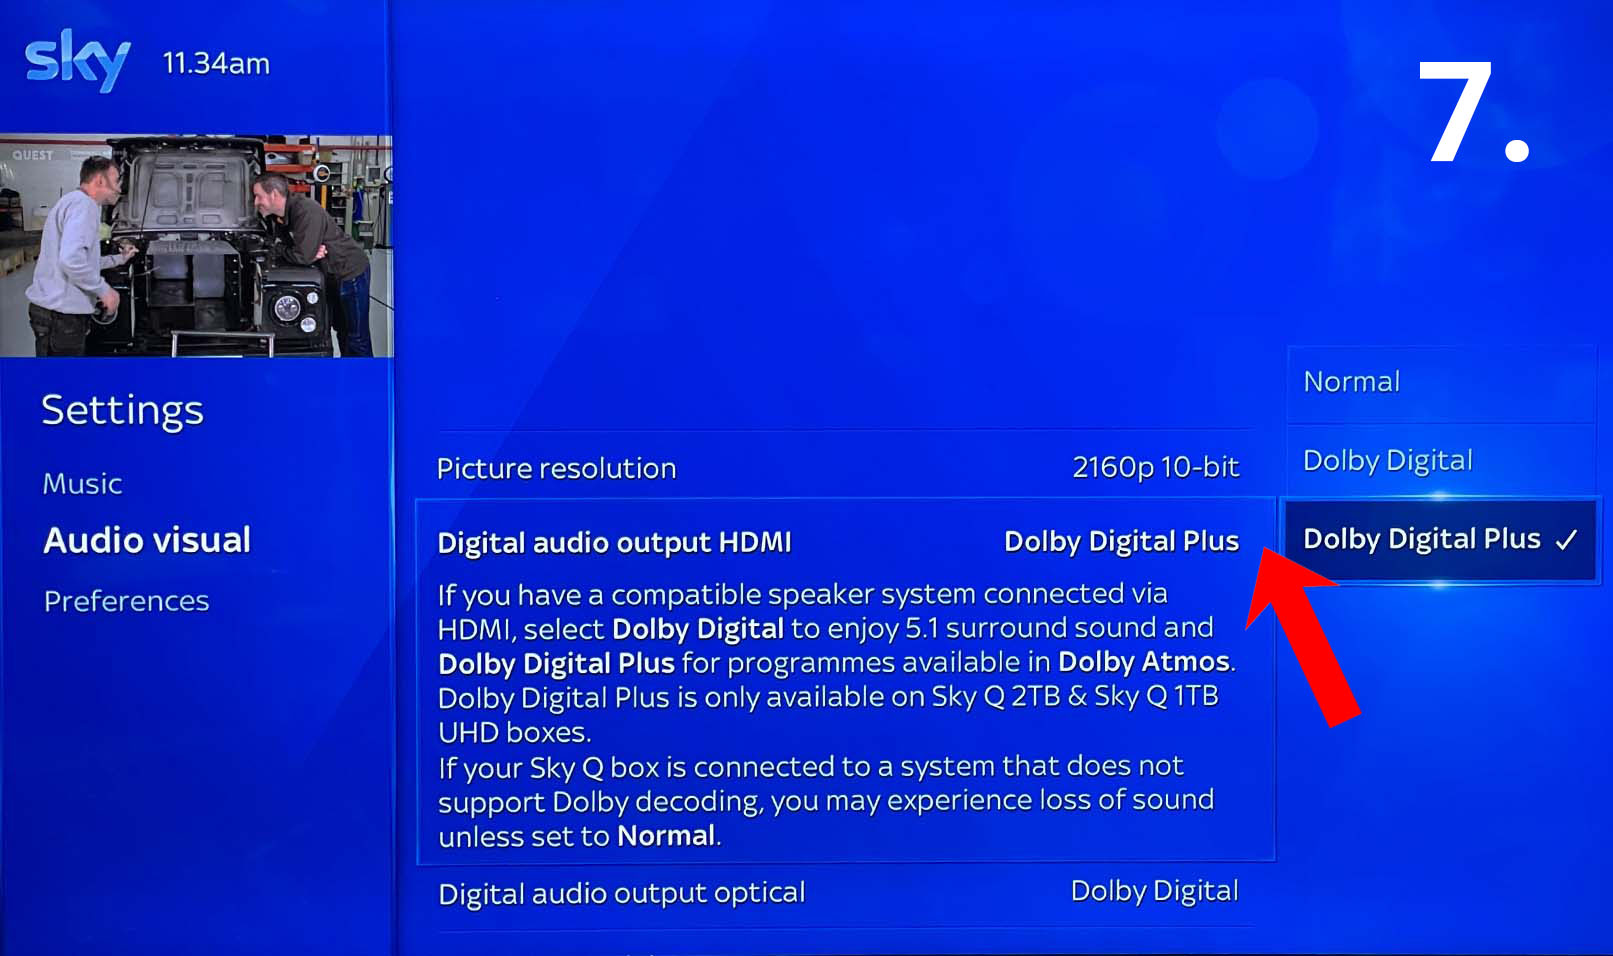
    to get Dolby Atmos from your sky box you need to change the Audio settings. These are located in the same menu as the video settings above. Scroll down to DIGITAL AUDIO OUTPUT HDMI. The setting required is ‘Dolby Digital Plus’.

    Please be aware if any display cannot handle a 4K output and decode Dolby Digital Plus you may get no video and audio. If this happens you may have to adjust these settings.

    1

    2

    3

    4

    5

    6

    7

  • Updating OS through uControl

    Your HDA device will be supplied with the latest stable software version already installed. To access the latest features or maintain your system, it is recommended that you perform periodic updates to the OS. This process must be done manually as we do not push updates to systems automatically. Ensure that your system has access to a good internet connection and that power to your HDA device is stable during the process.


    In this support article:


    If you are not connected to a device

    1. Open uControl app

    Launch uControl and you will see the home page.

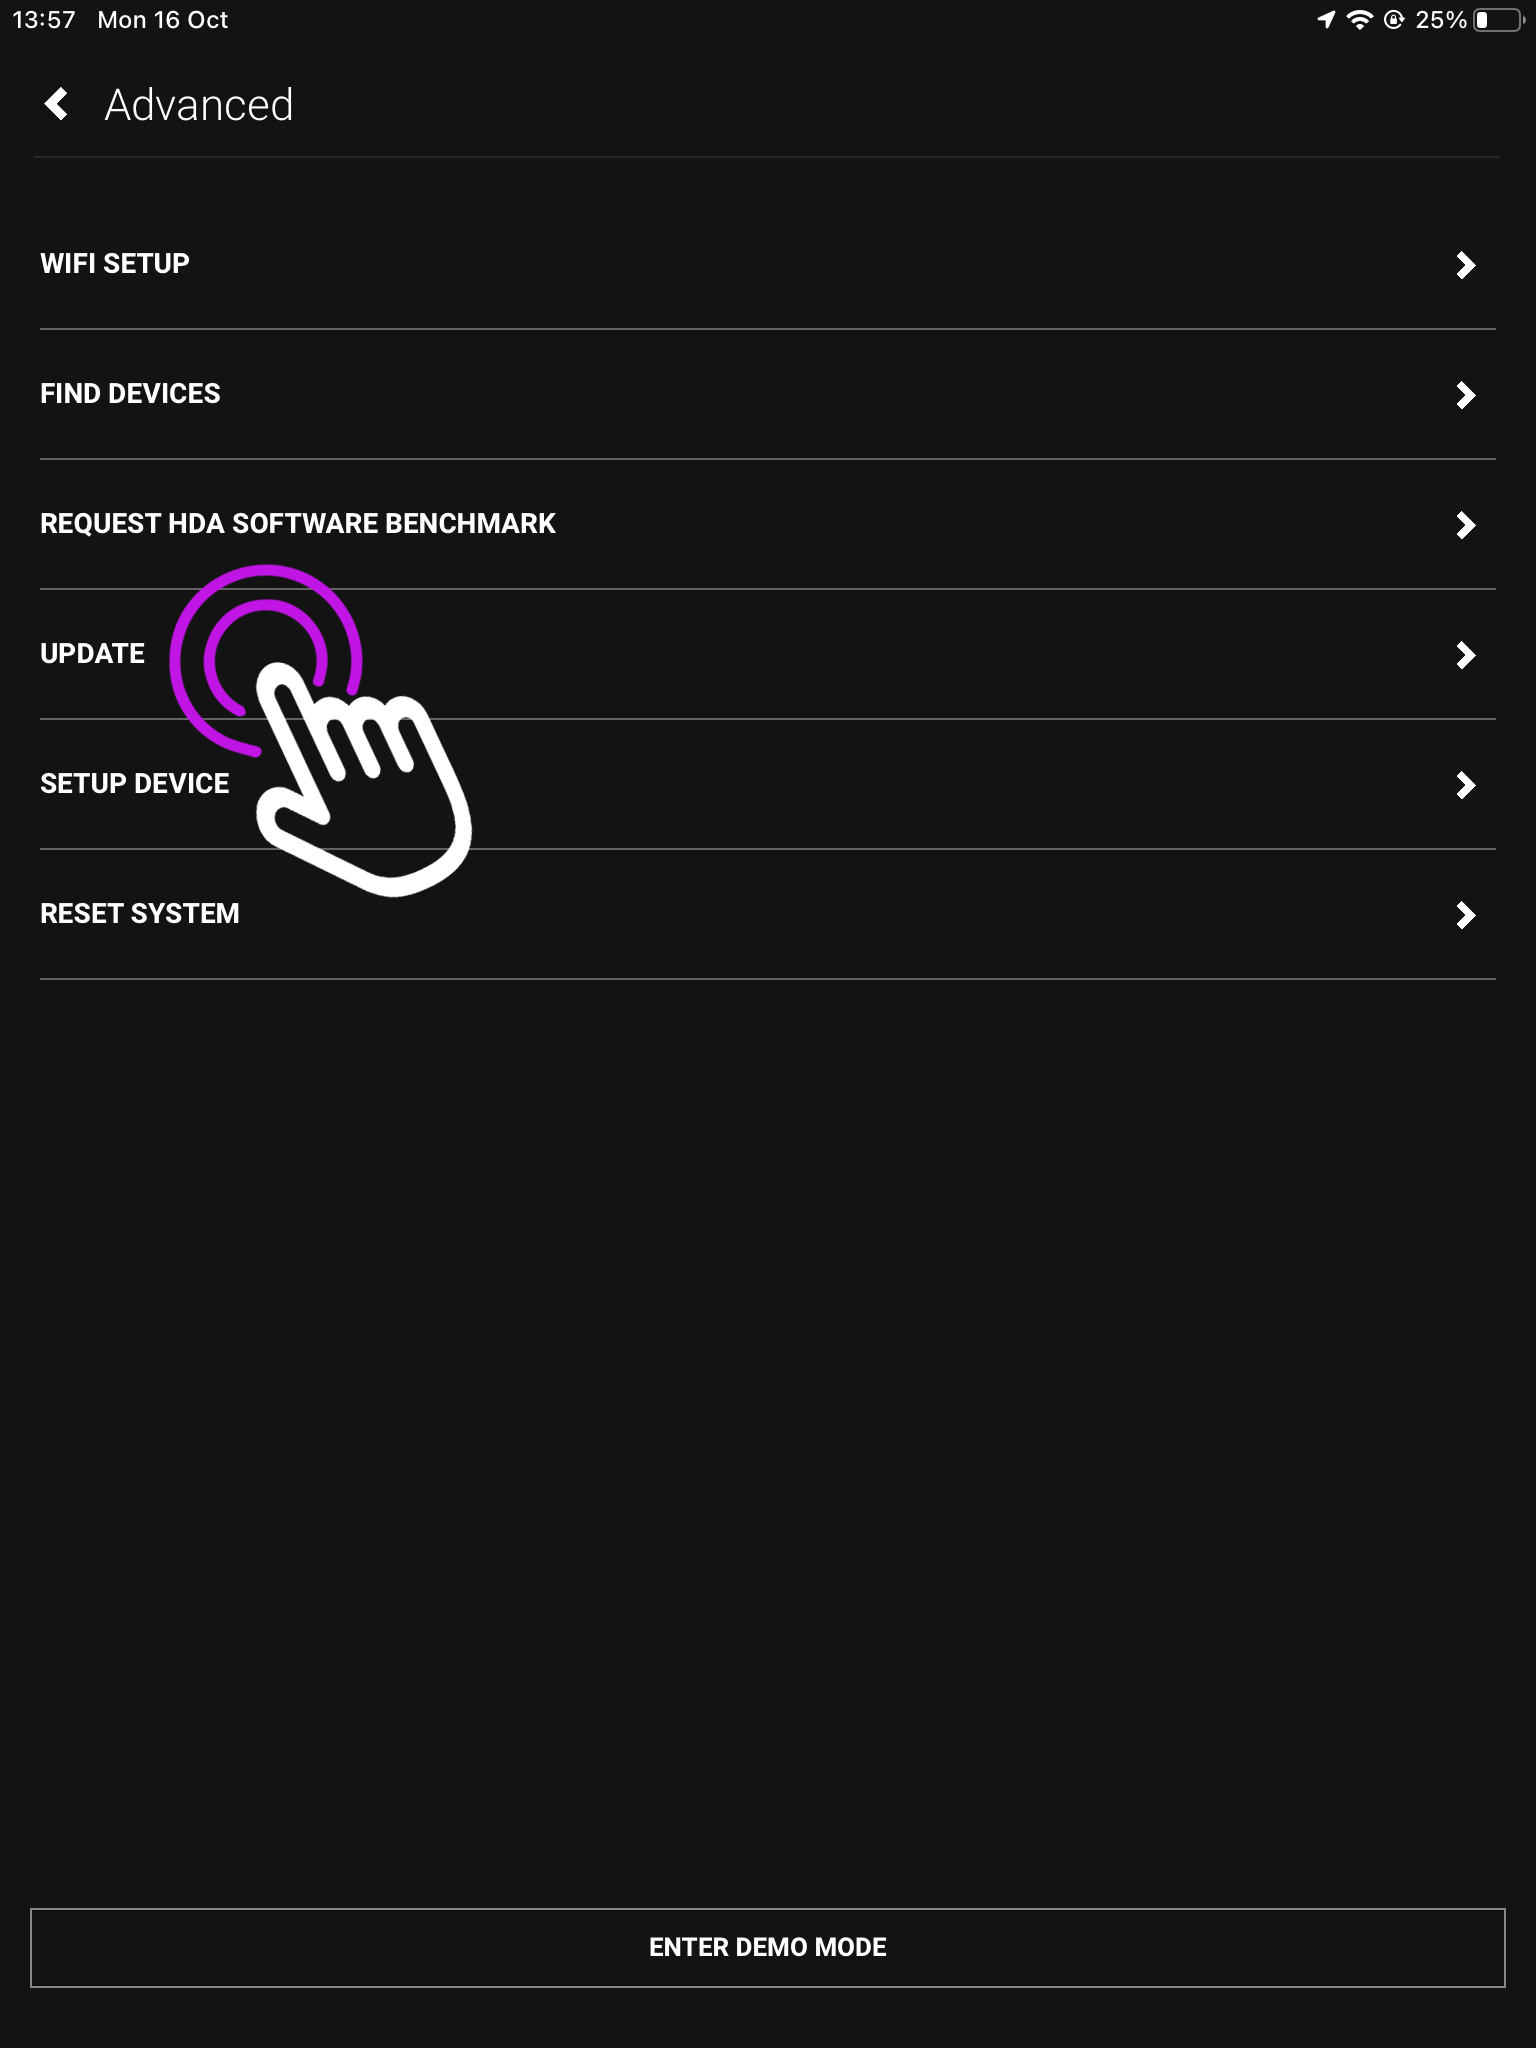
    You now need to press advanced.

    2. Press “Update”

    This is the advanced screen where you can find your devices, connect over WiFi, reset your system and more.

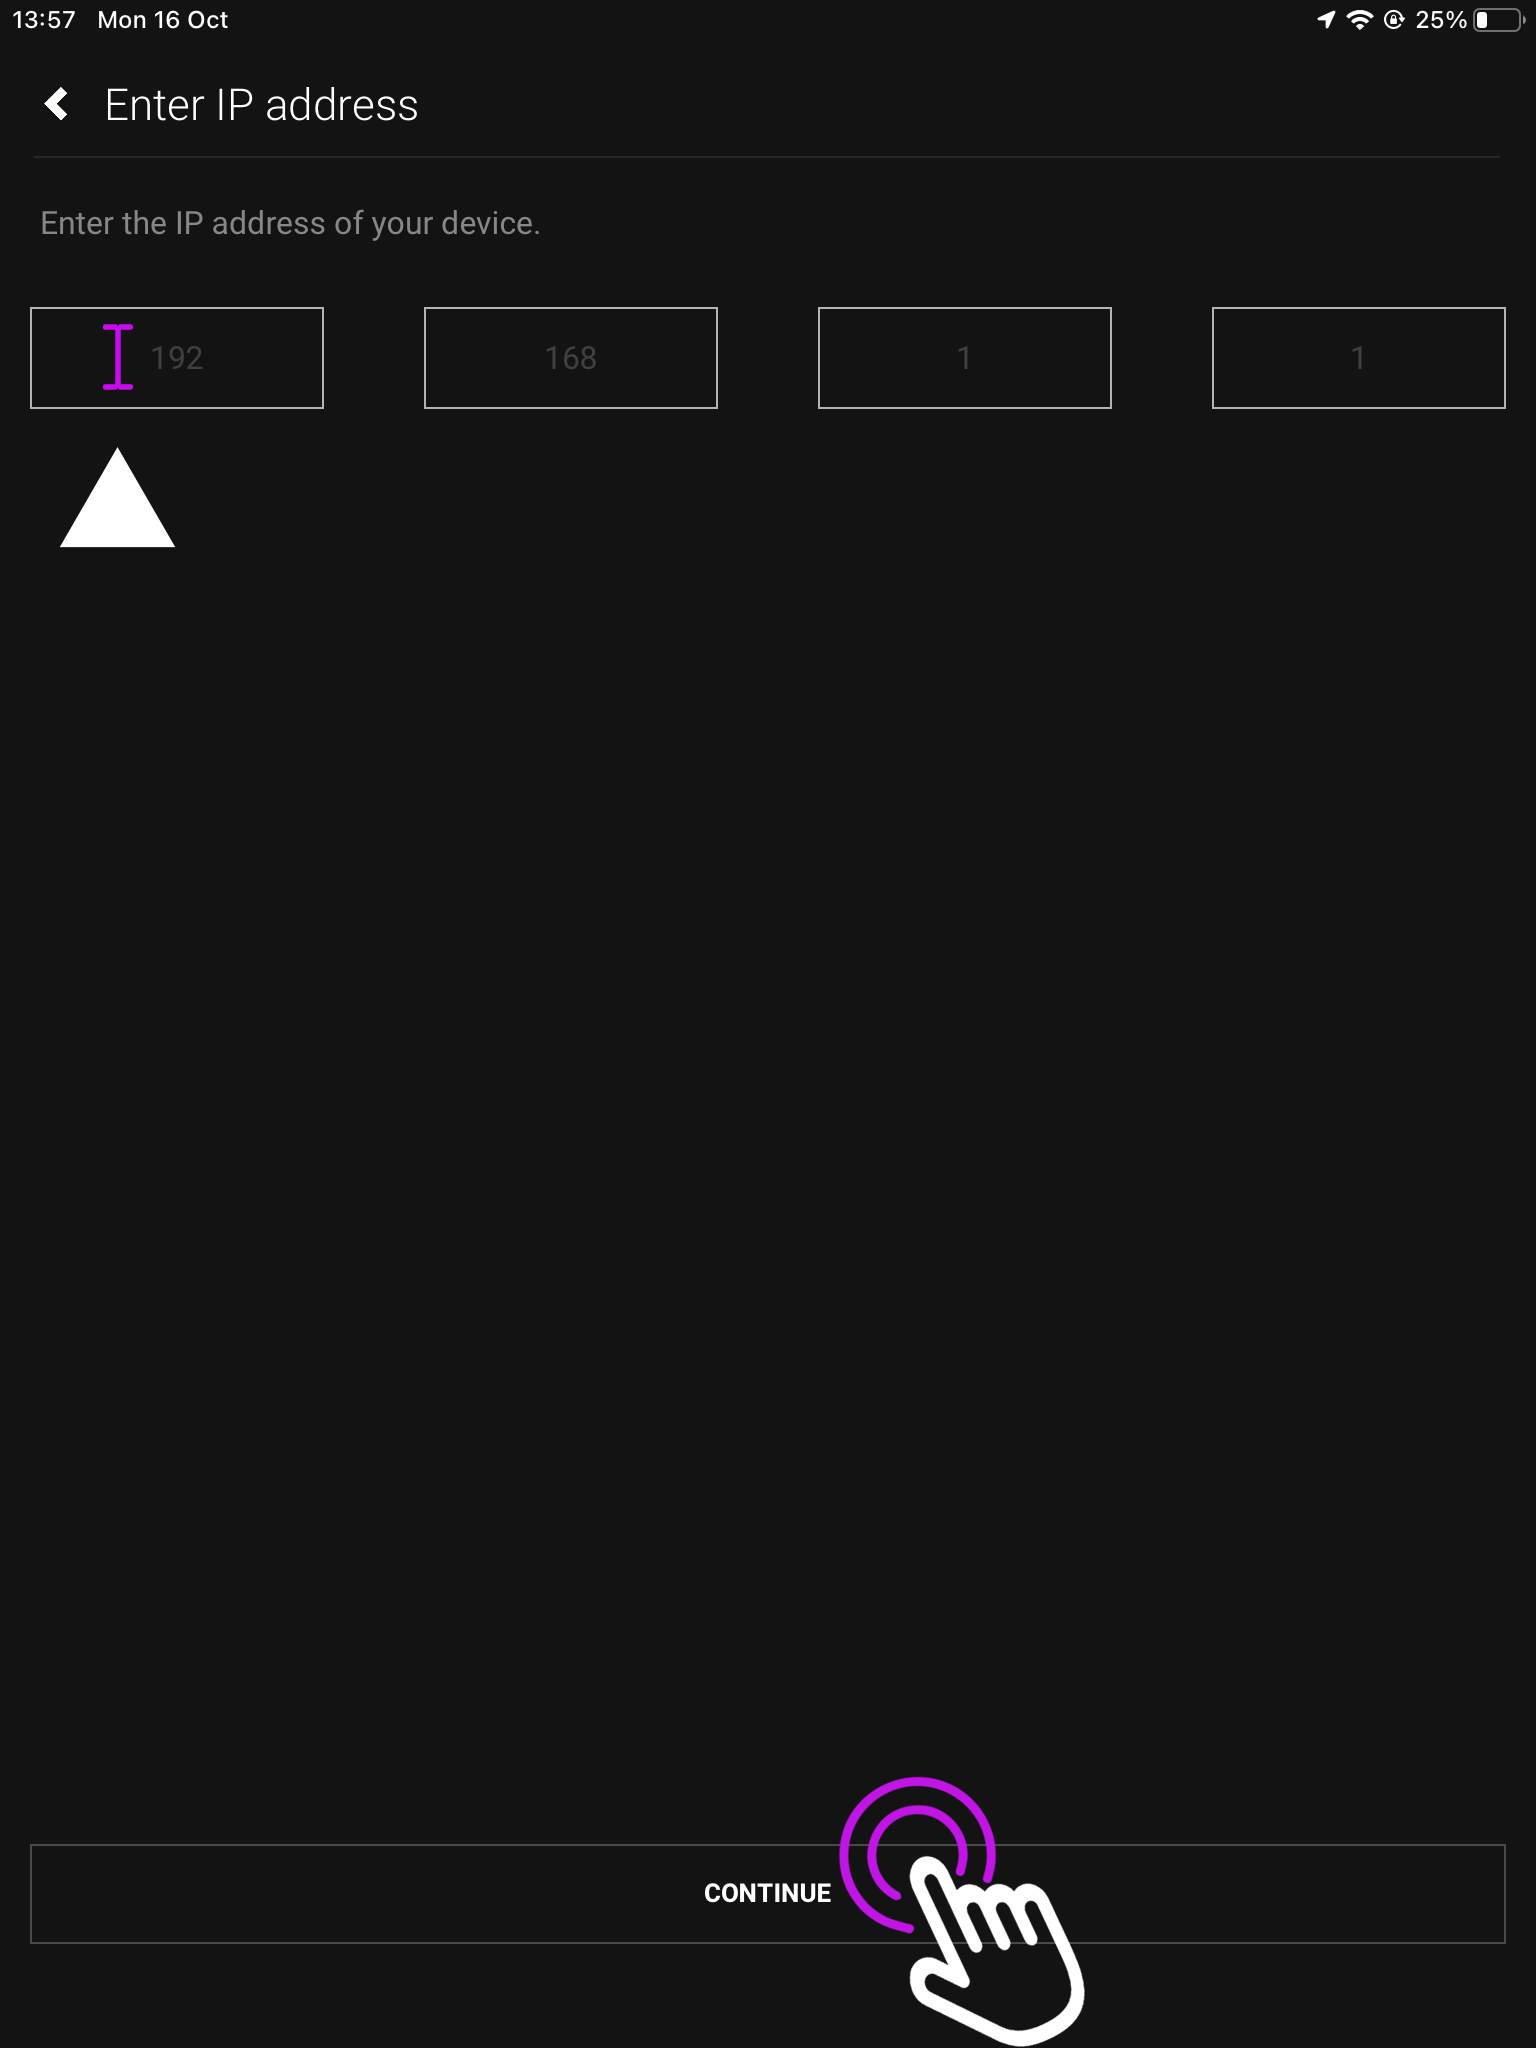
    Your IP address will be needed here so uControl knows which device is looking for an update.

    3. Enter the devices IP address

    If you don’t have this you can get it by finding the IP address of your device.

    Once you have typed in your IP address, press “Continue”.

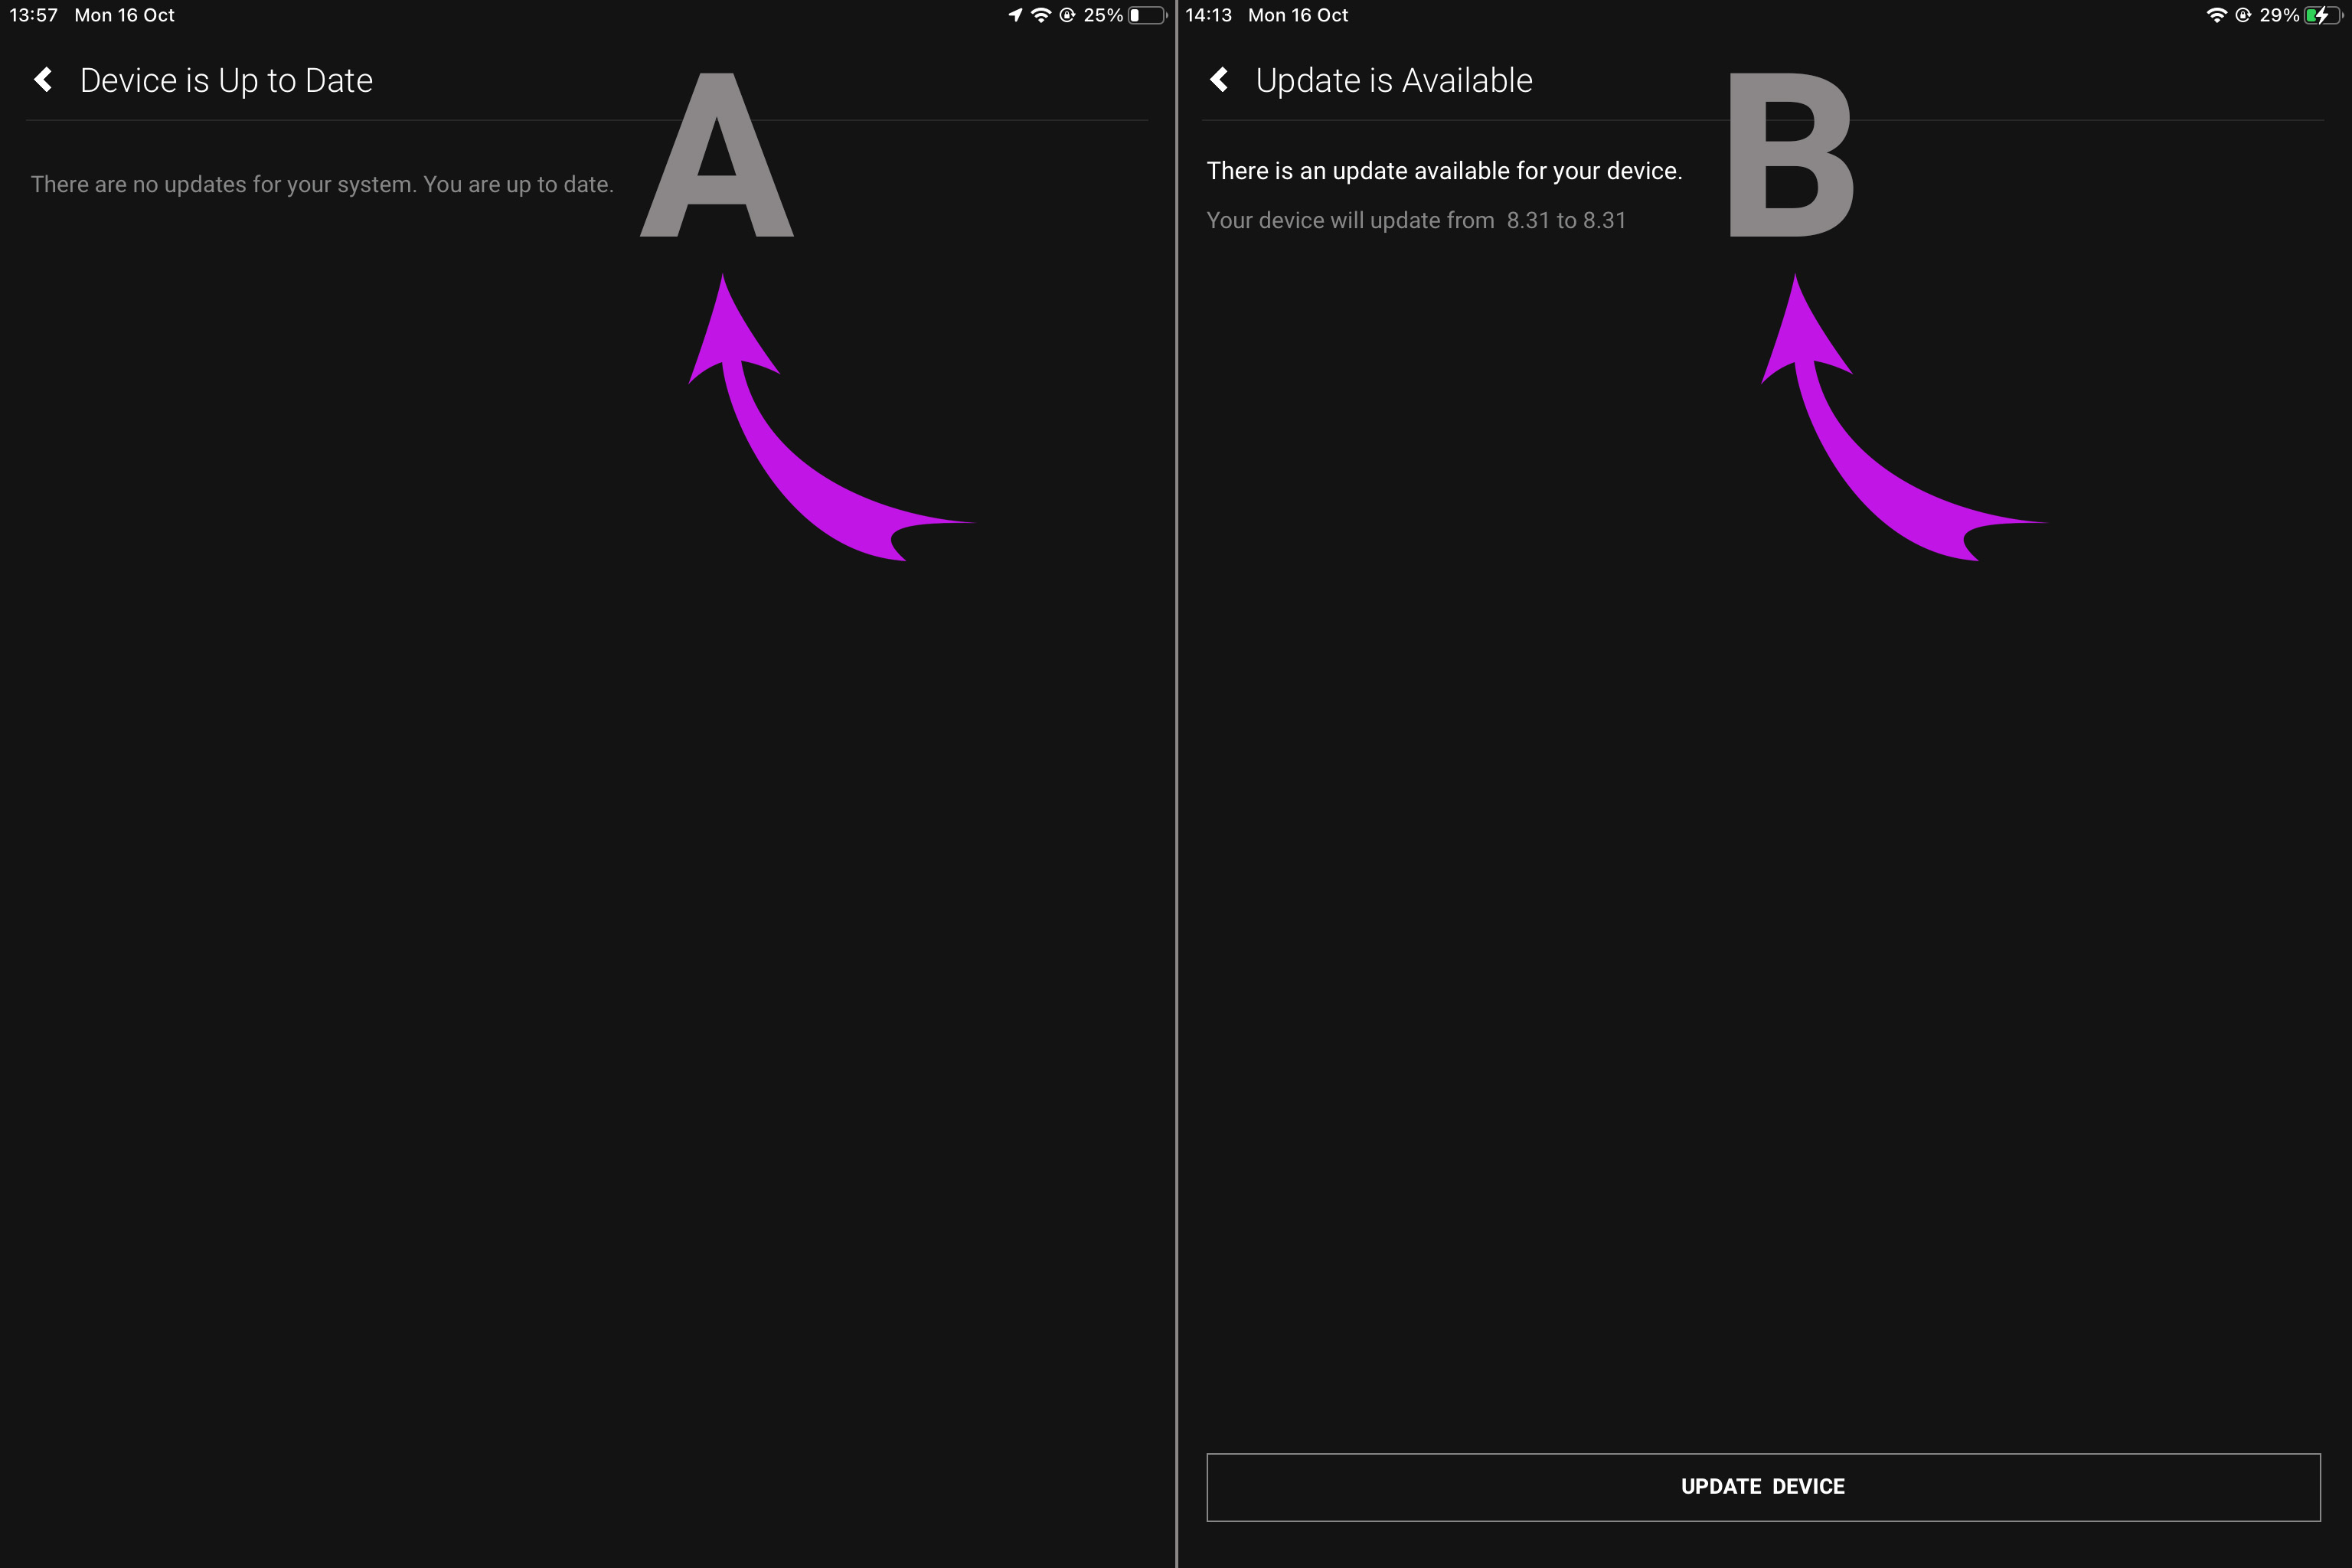
    4. Updating your device

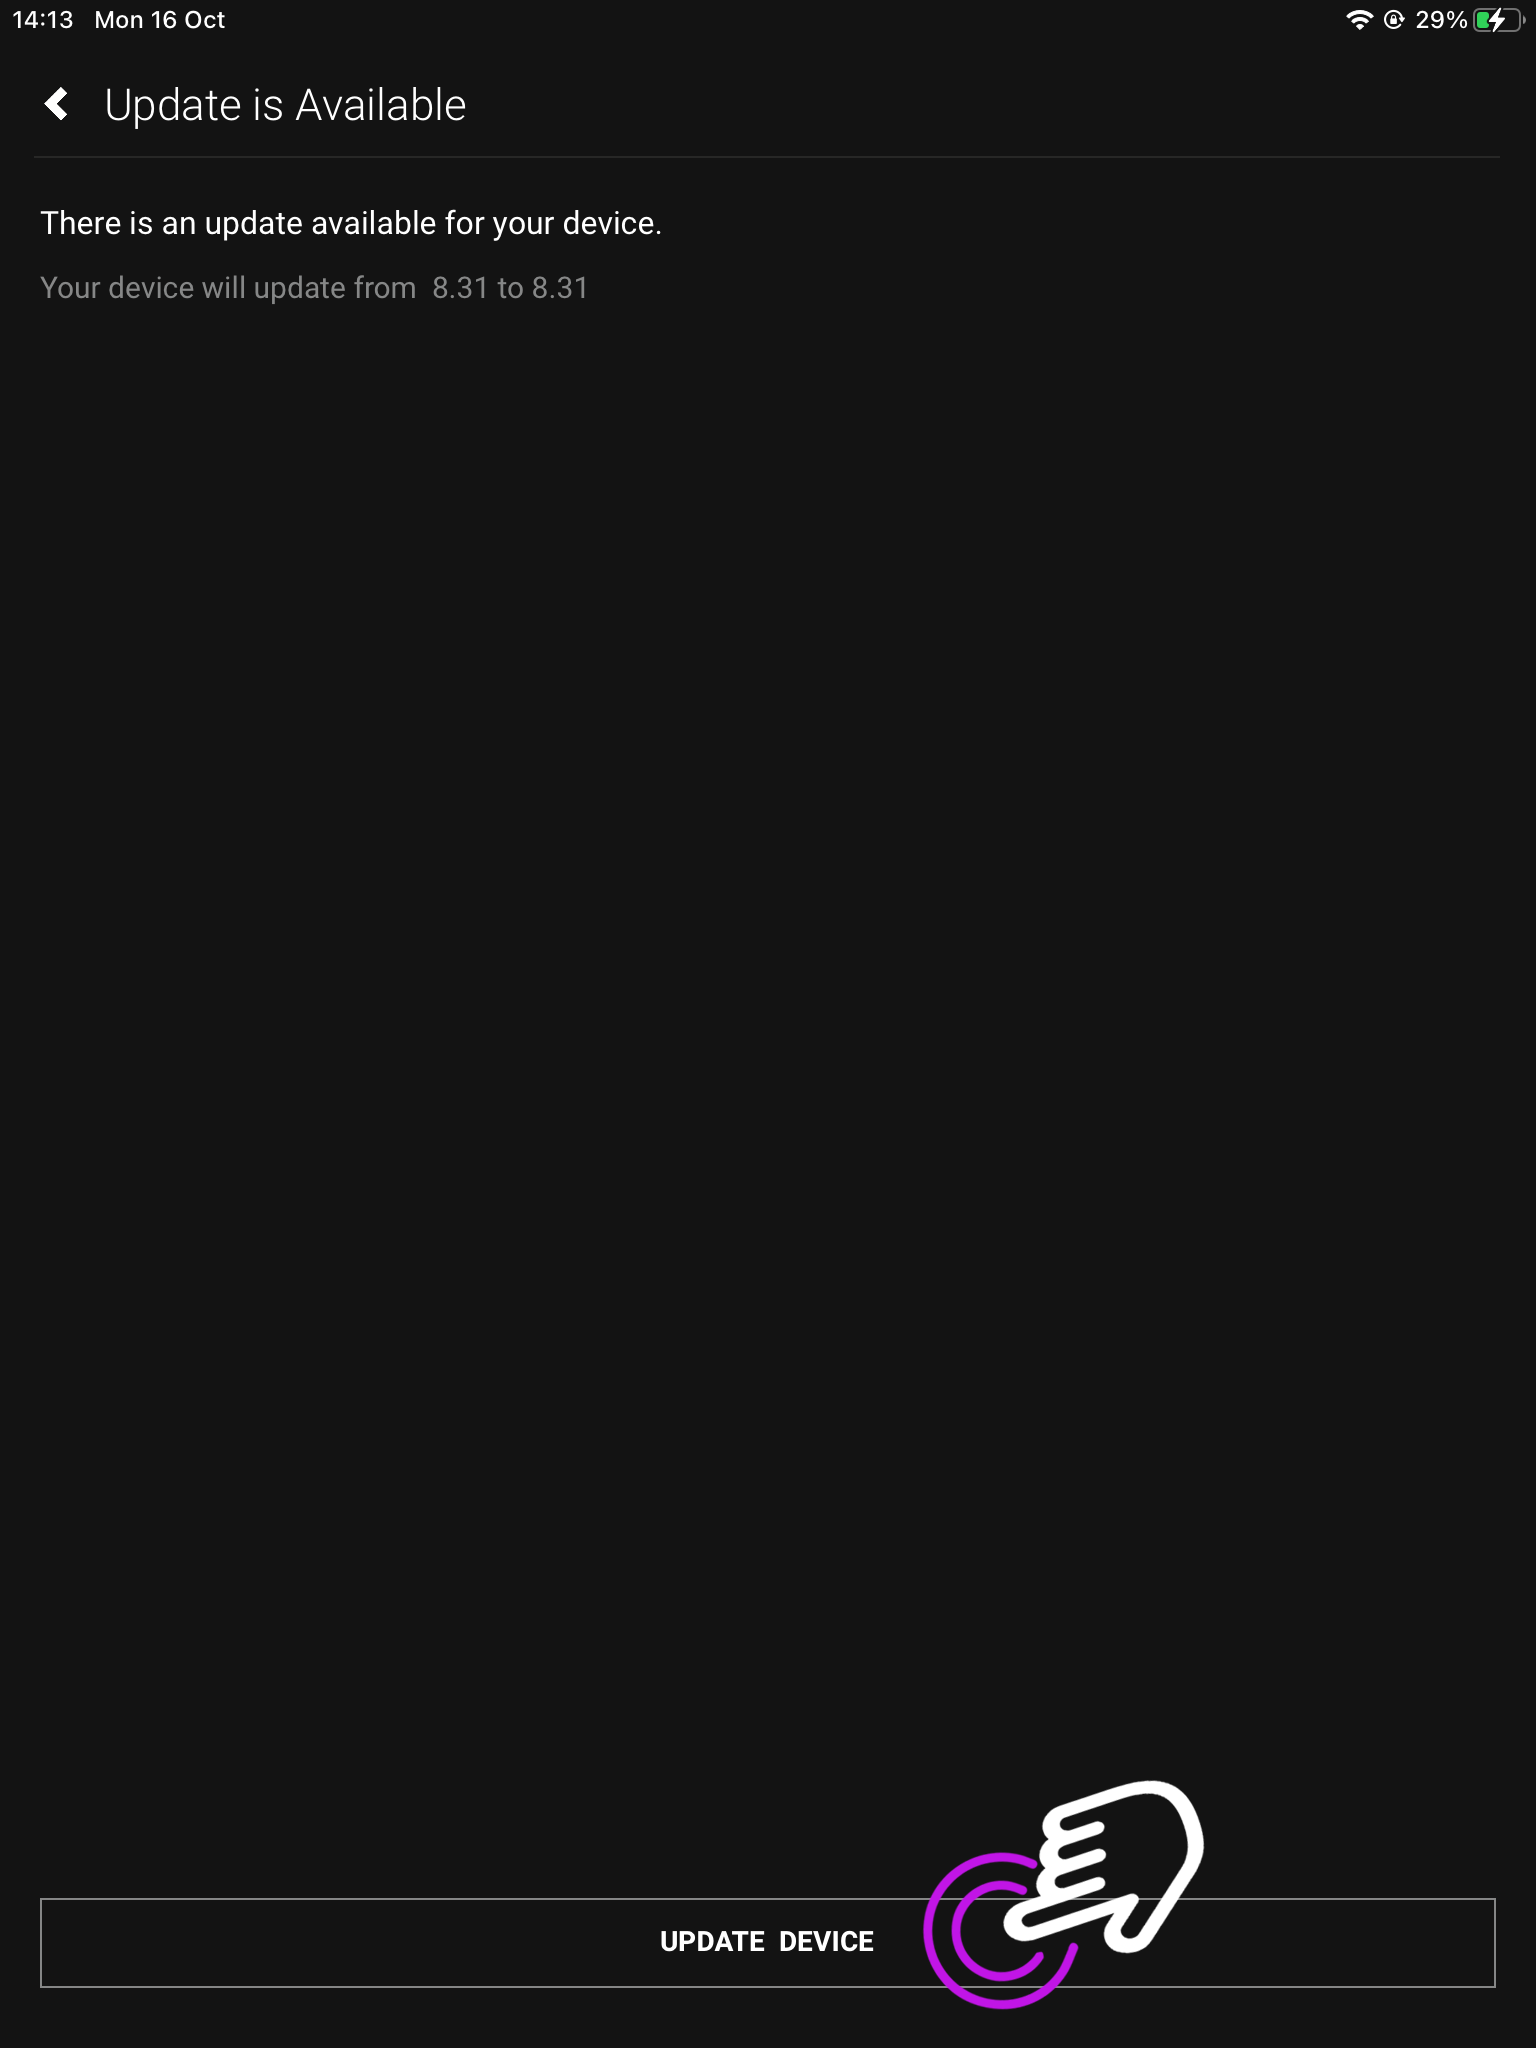
    A. If there is an available update press “Update Device”.
    B. If your device is already up to date, exit this page.

    If your HDA device has an issue that prompted you to update, but it is already up to date please contact support.

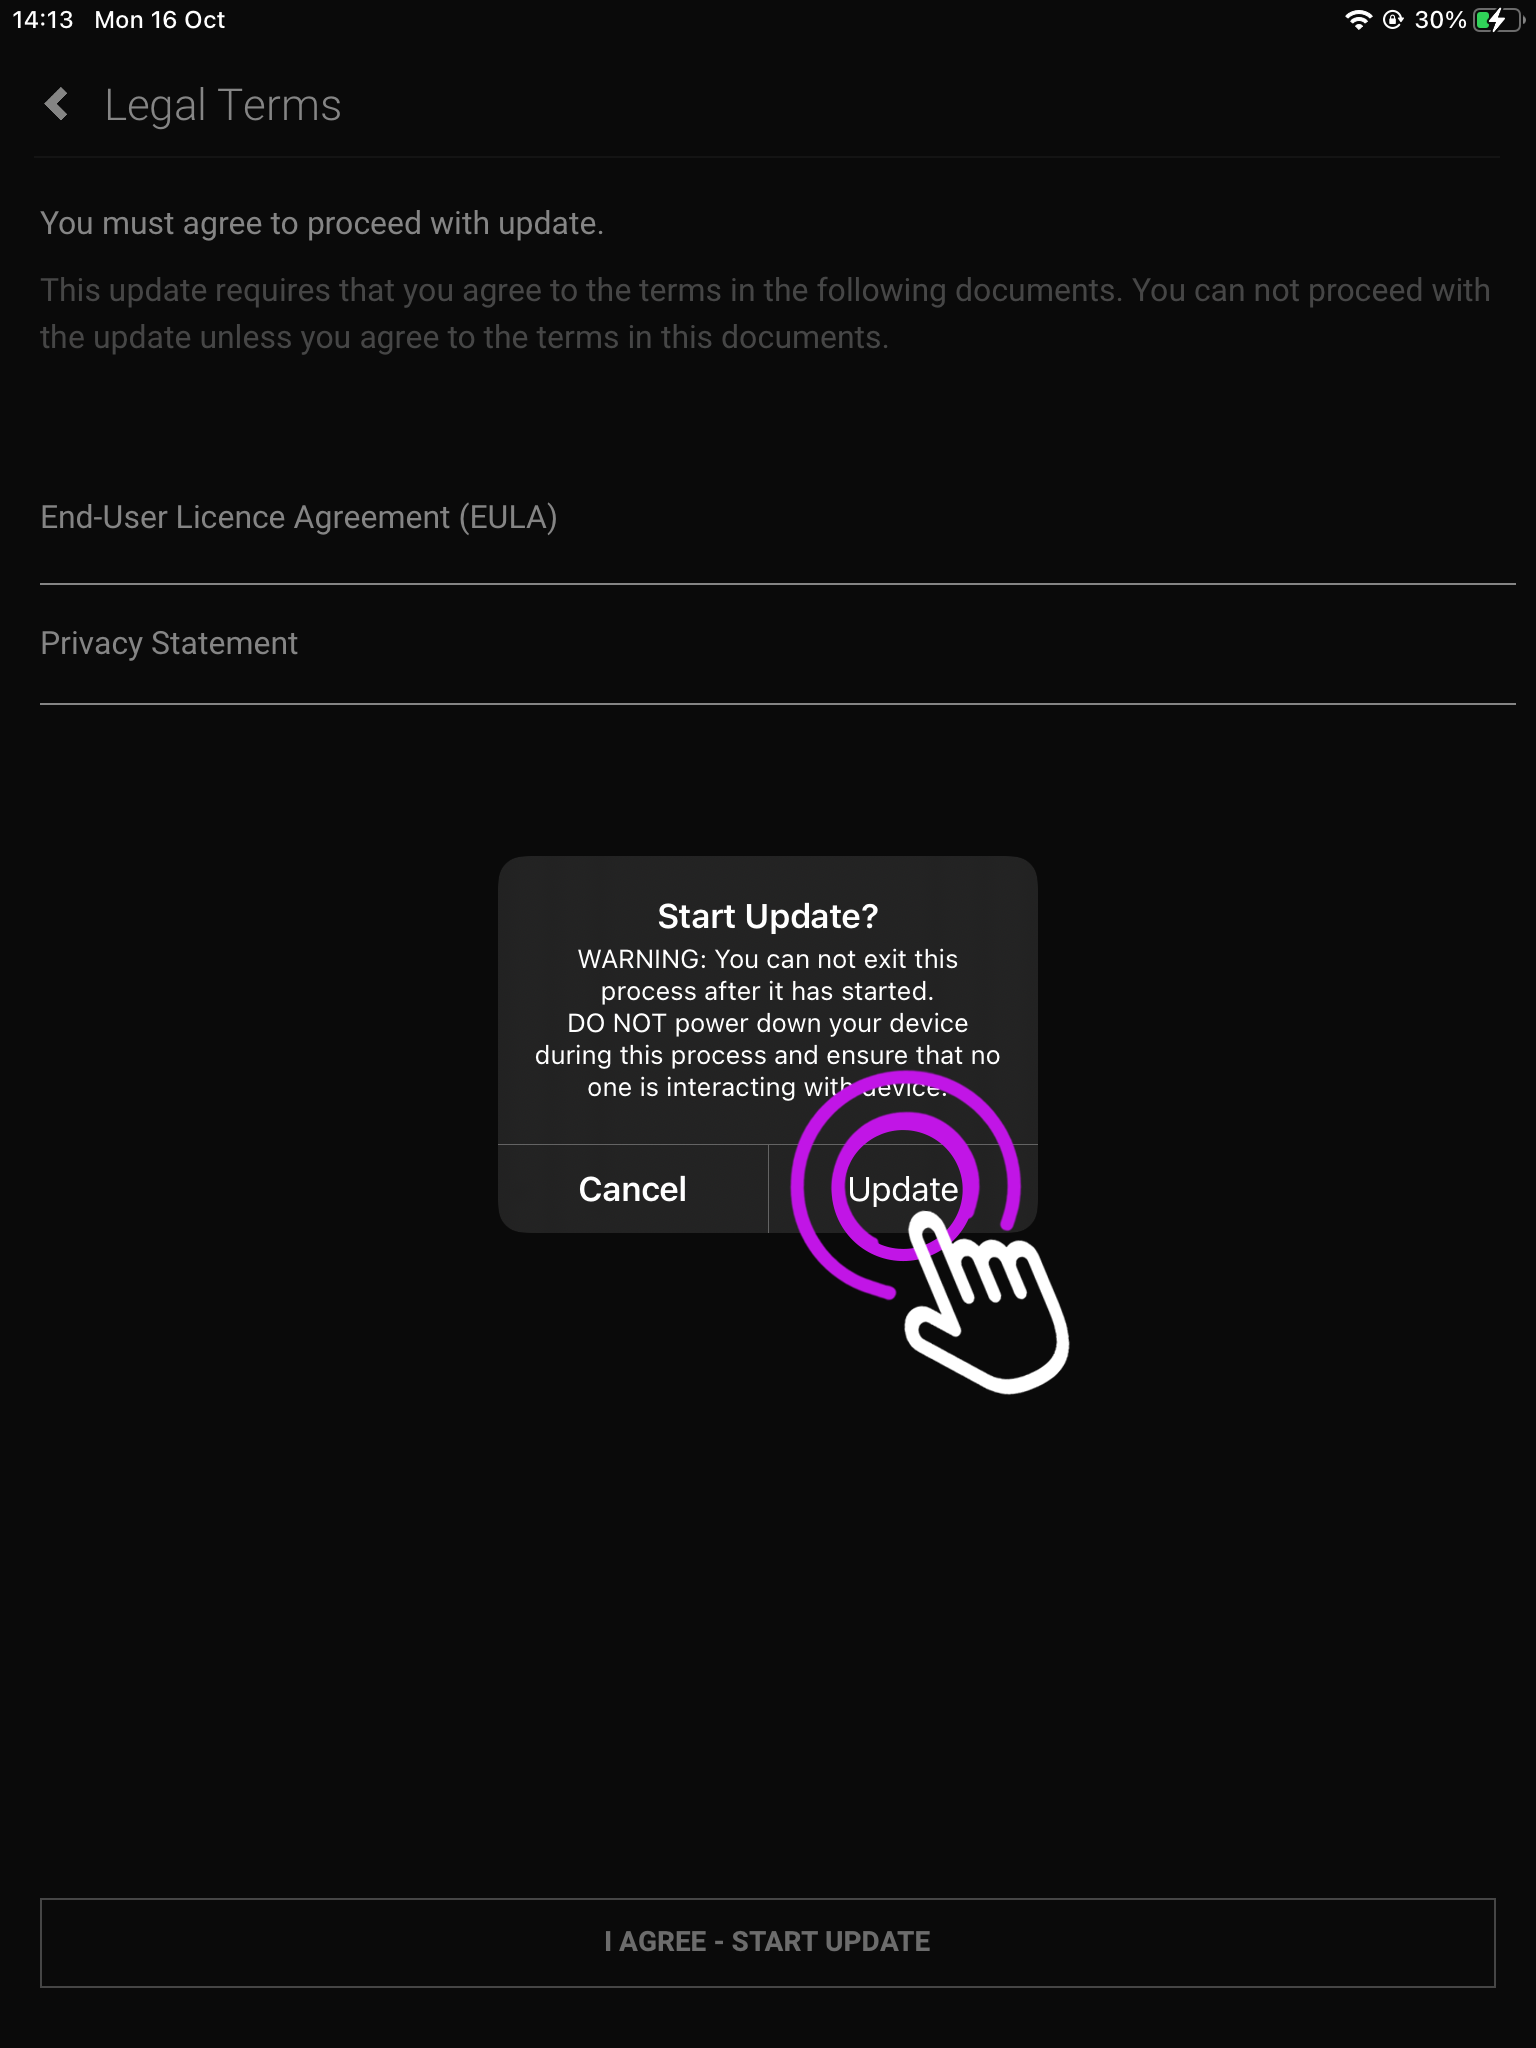
    5. Terms and Conditions

    To proceed accept the End User Licence Agreement (EULA) and Privacy Statement.

    For more information click on the terms.

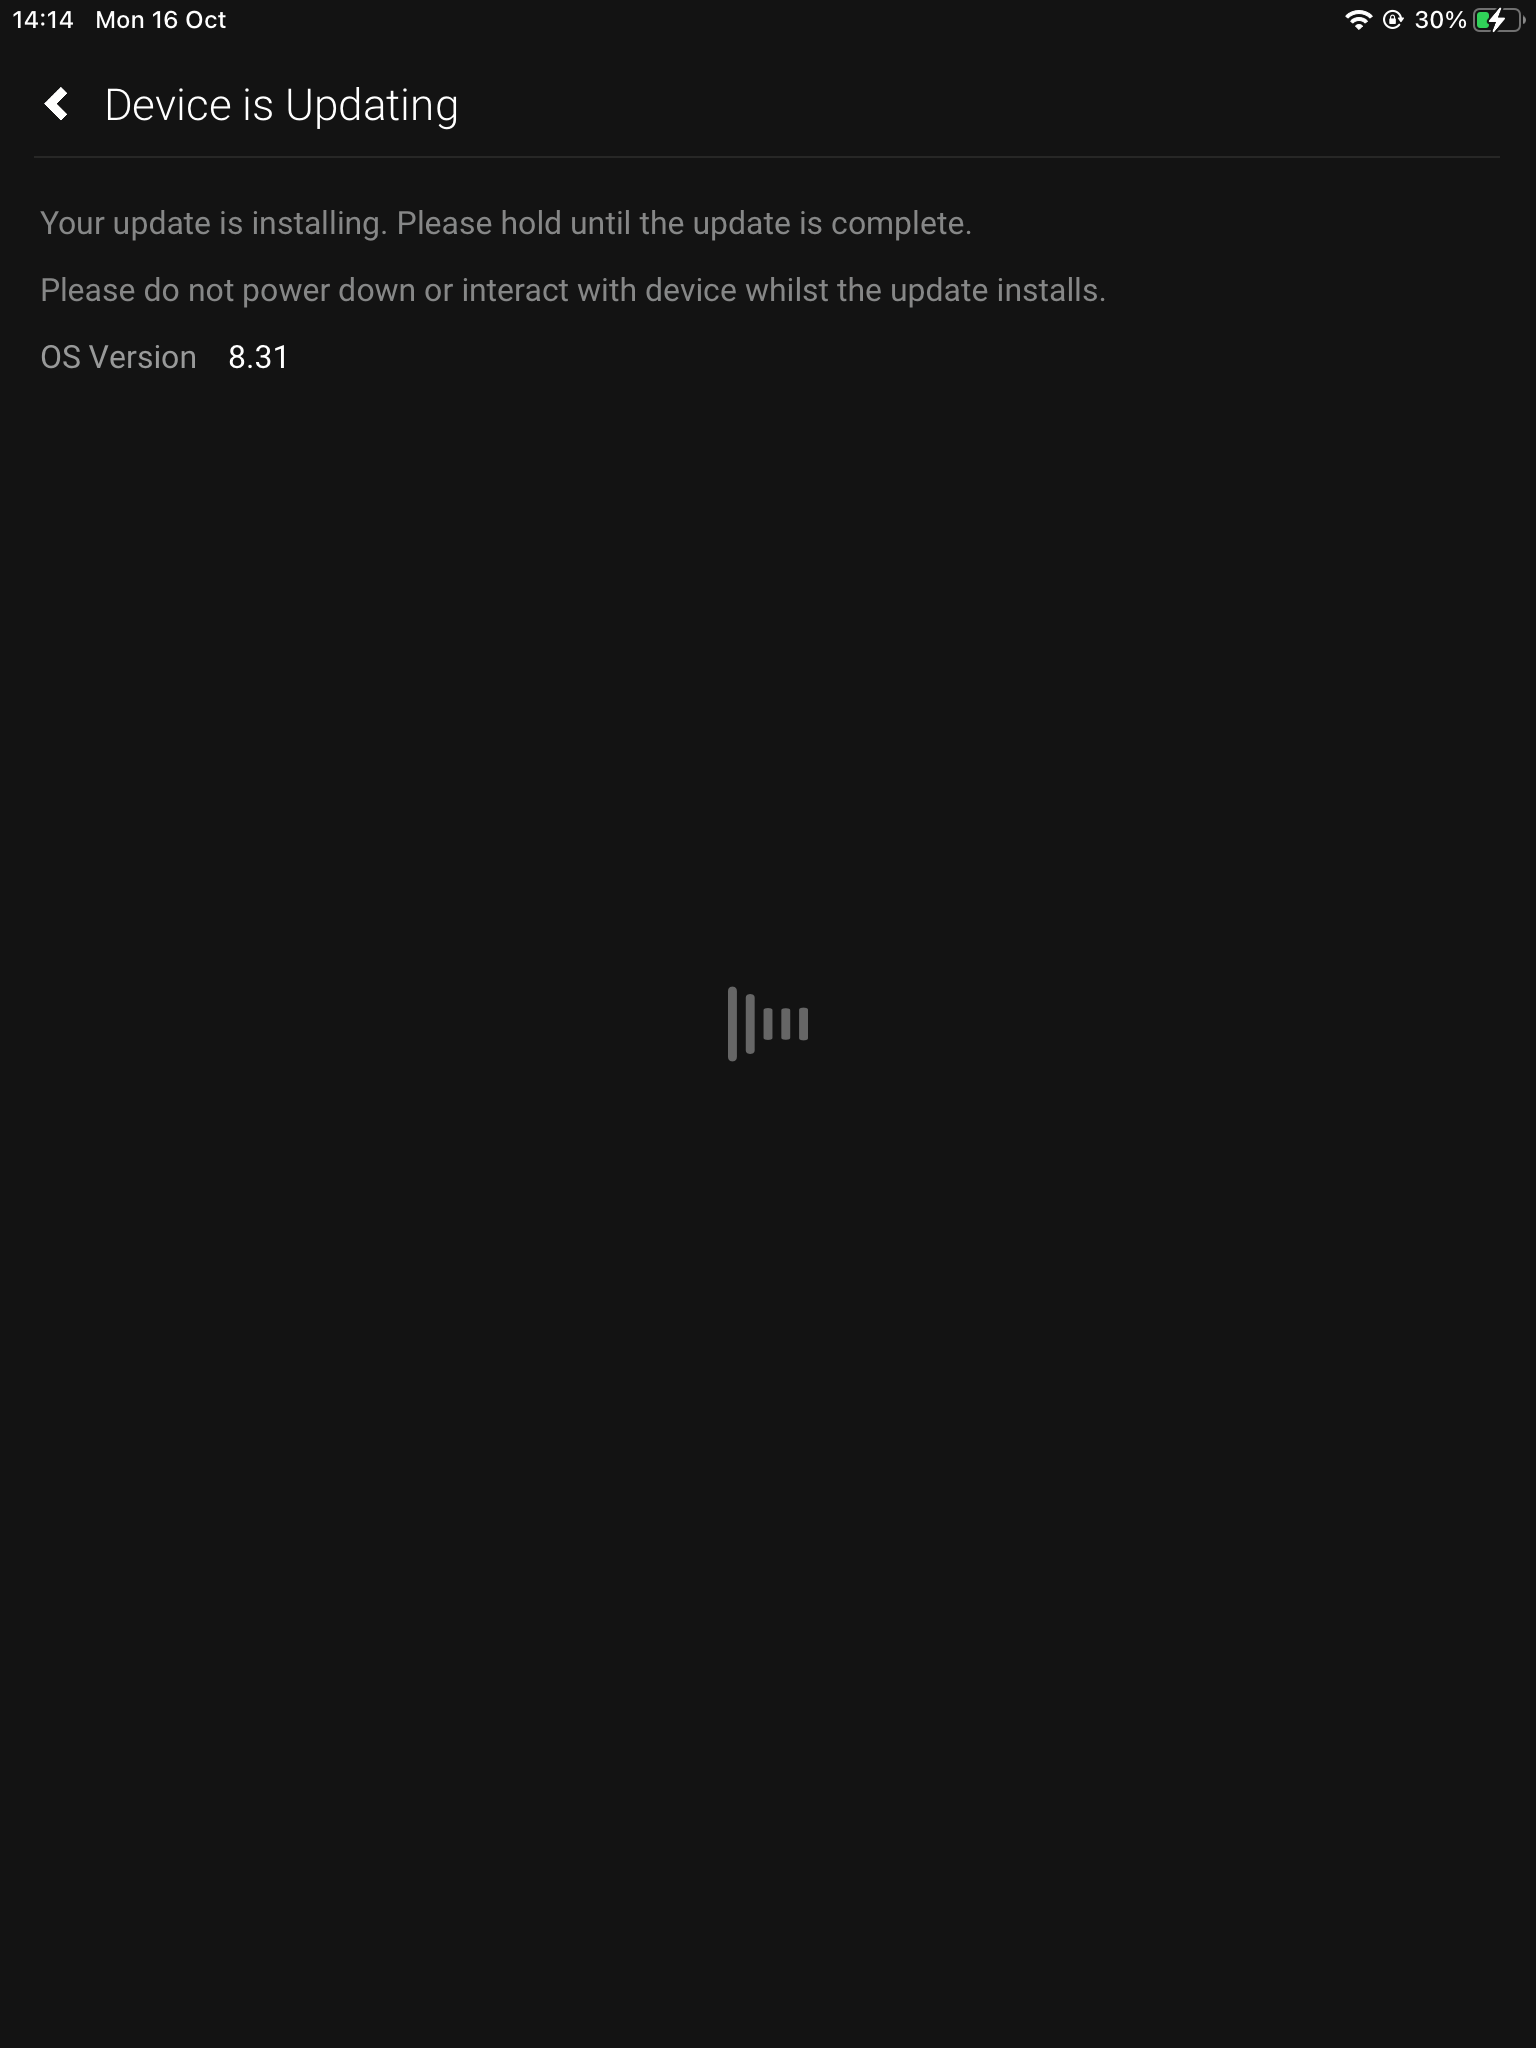
    6. Update begins

    This process can take up to 5 minutes, however, depending on your network it could be longer.

    Please do not switch off your HDA device whilst updating.

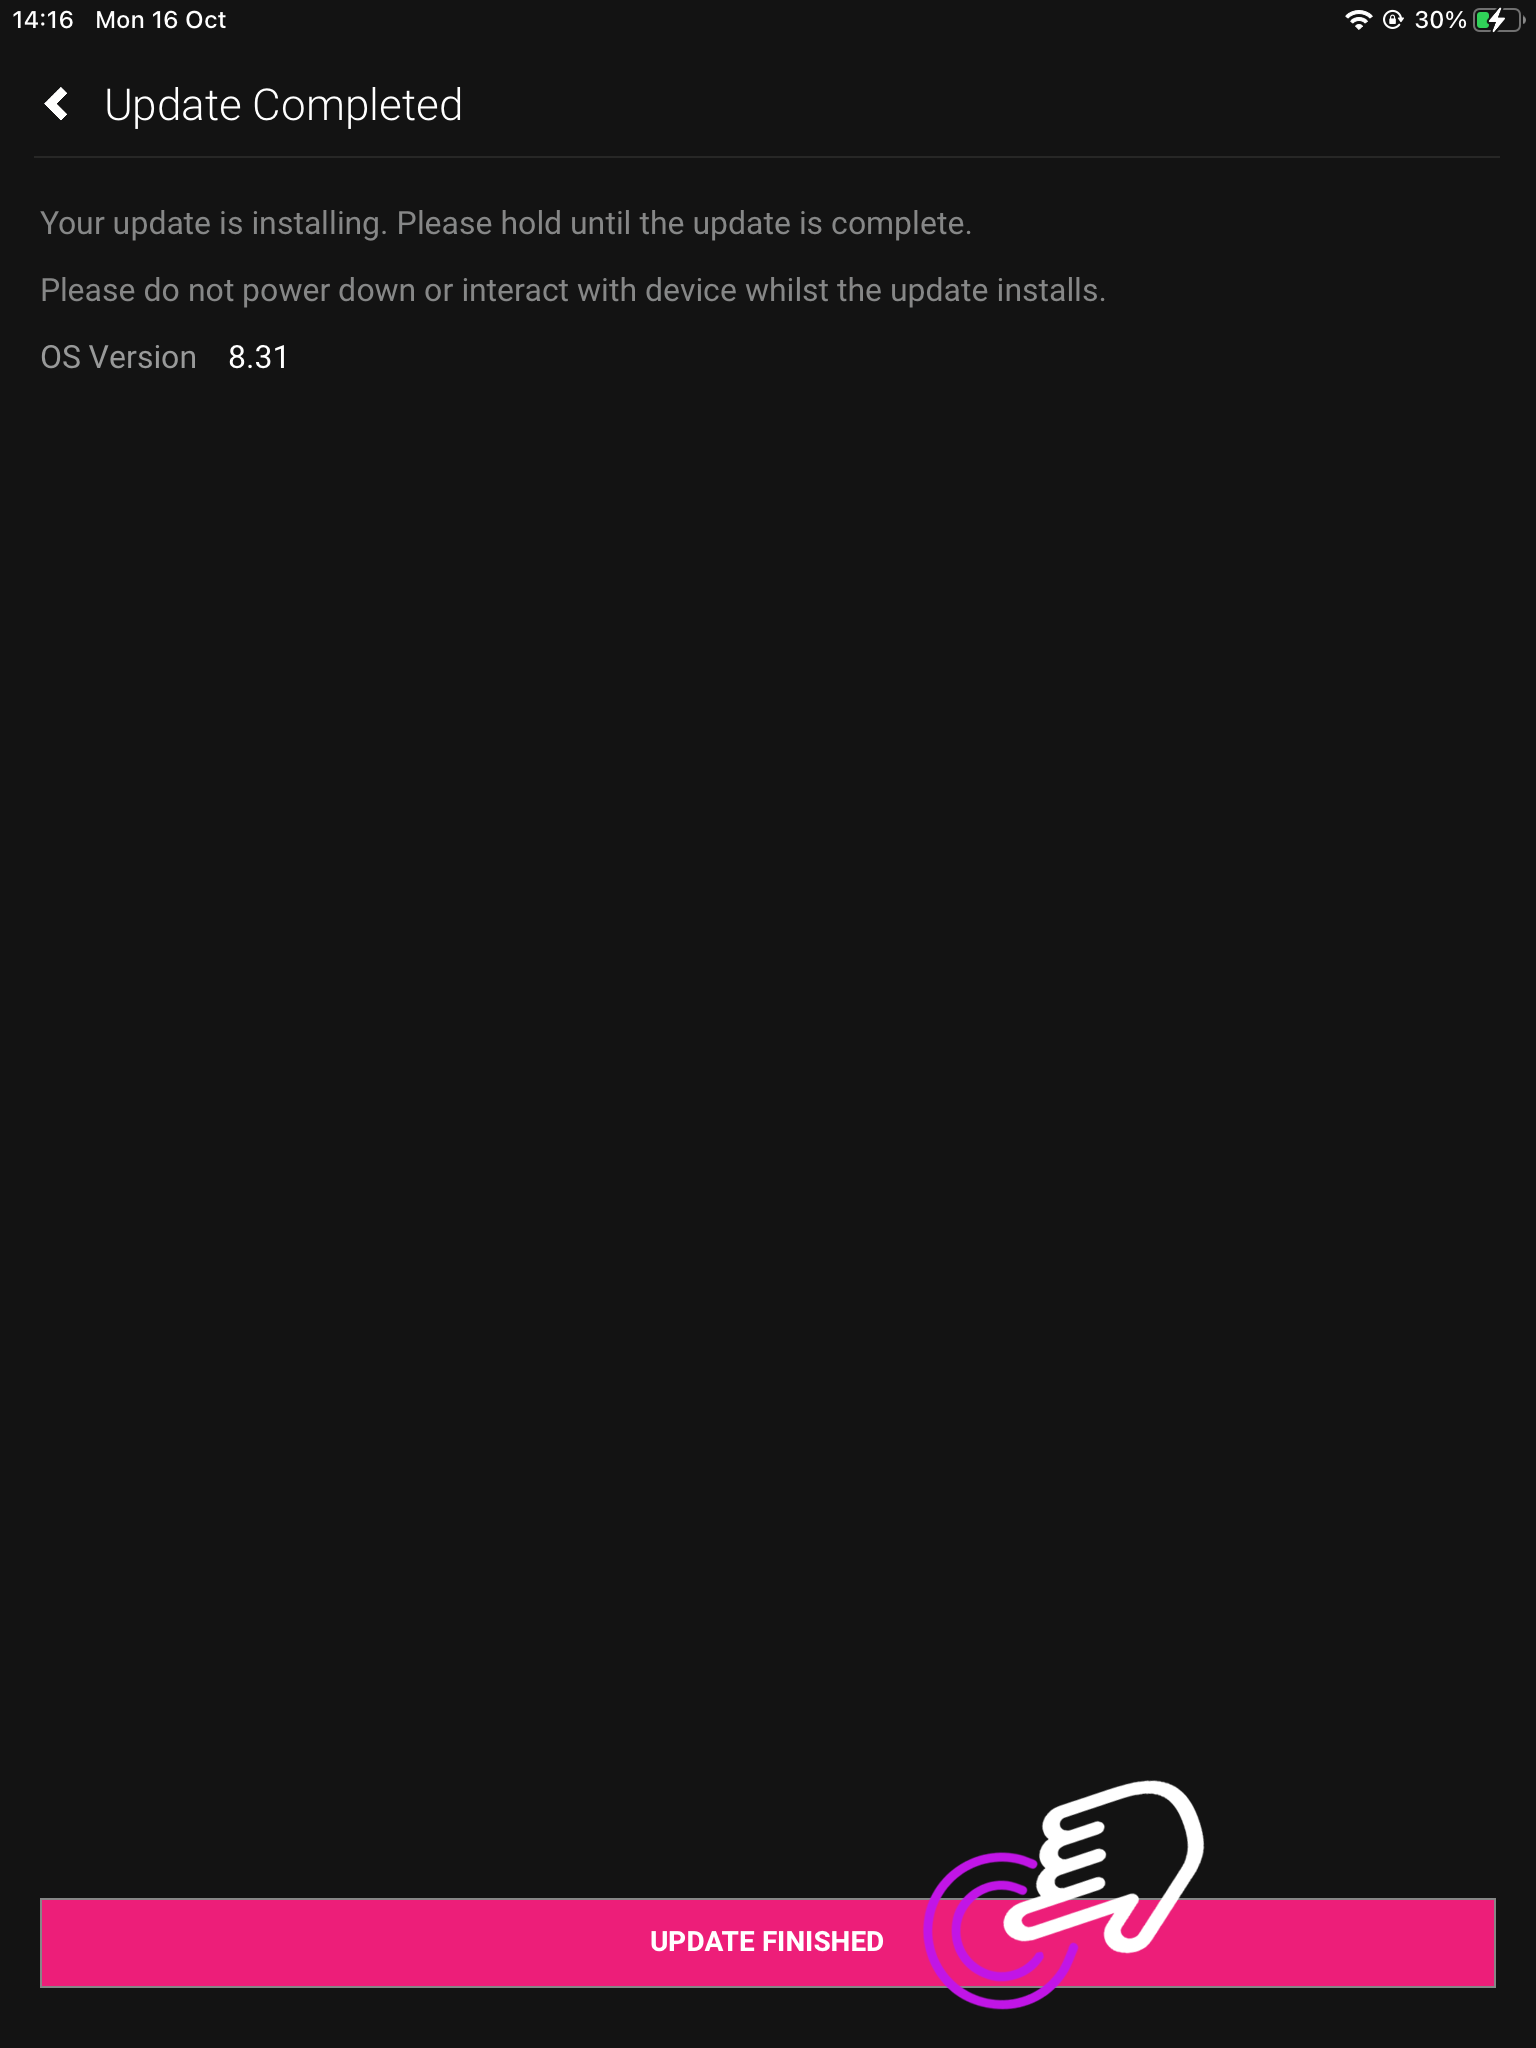
    7. Update completed

    uControl will display your OS Version.

    Press “Update Finished”.

    If you are connected to a device

    1. Open up uControl

    If you’re already connected to a system then you will need to access uControl’s settings. From the main screen you will see something similar to this (see below). From here, look for a menu icon (three horizontal lines) in the top left corner, press that to reveal the Zone selector and Zone control menu.

    What you see on the main screen may differ, however, the three lined menu bar will still be there.

    2. Navigate to your settings

    Look for the settings icon located in the bottom left corner.

    The icon may vary depending on your mobile devices size, however, it will still be in the bottom left corner.

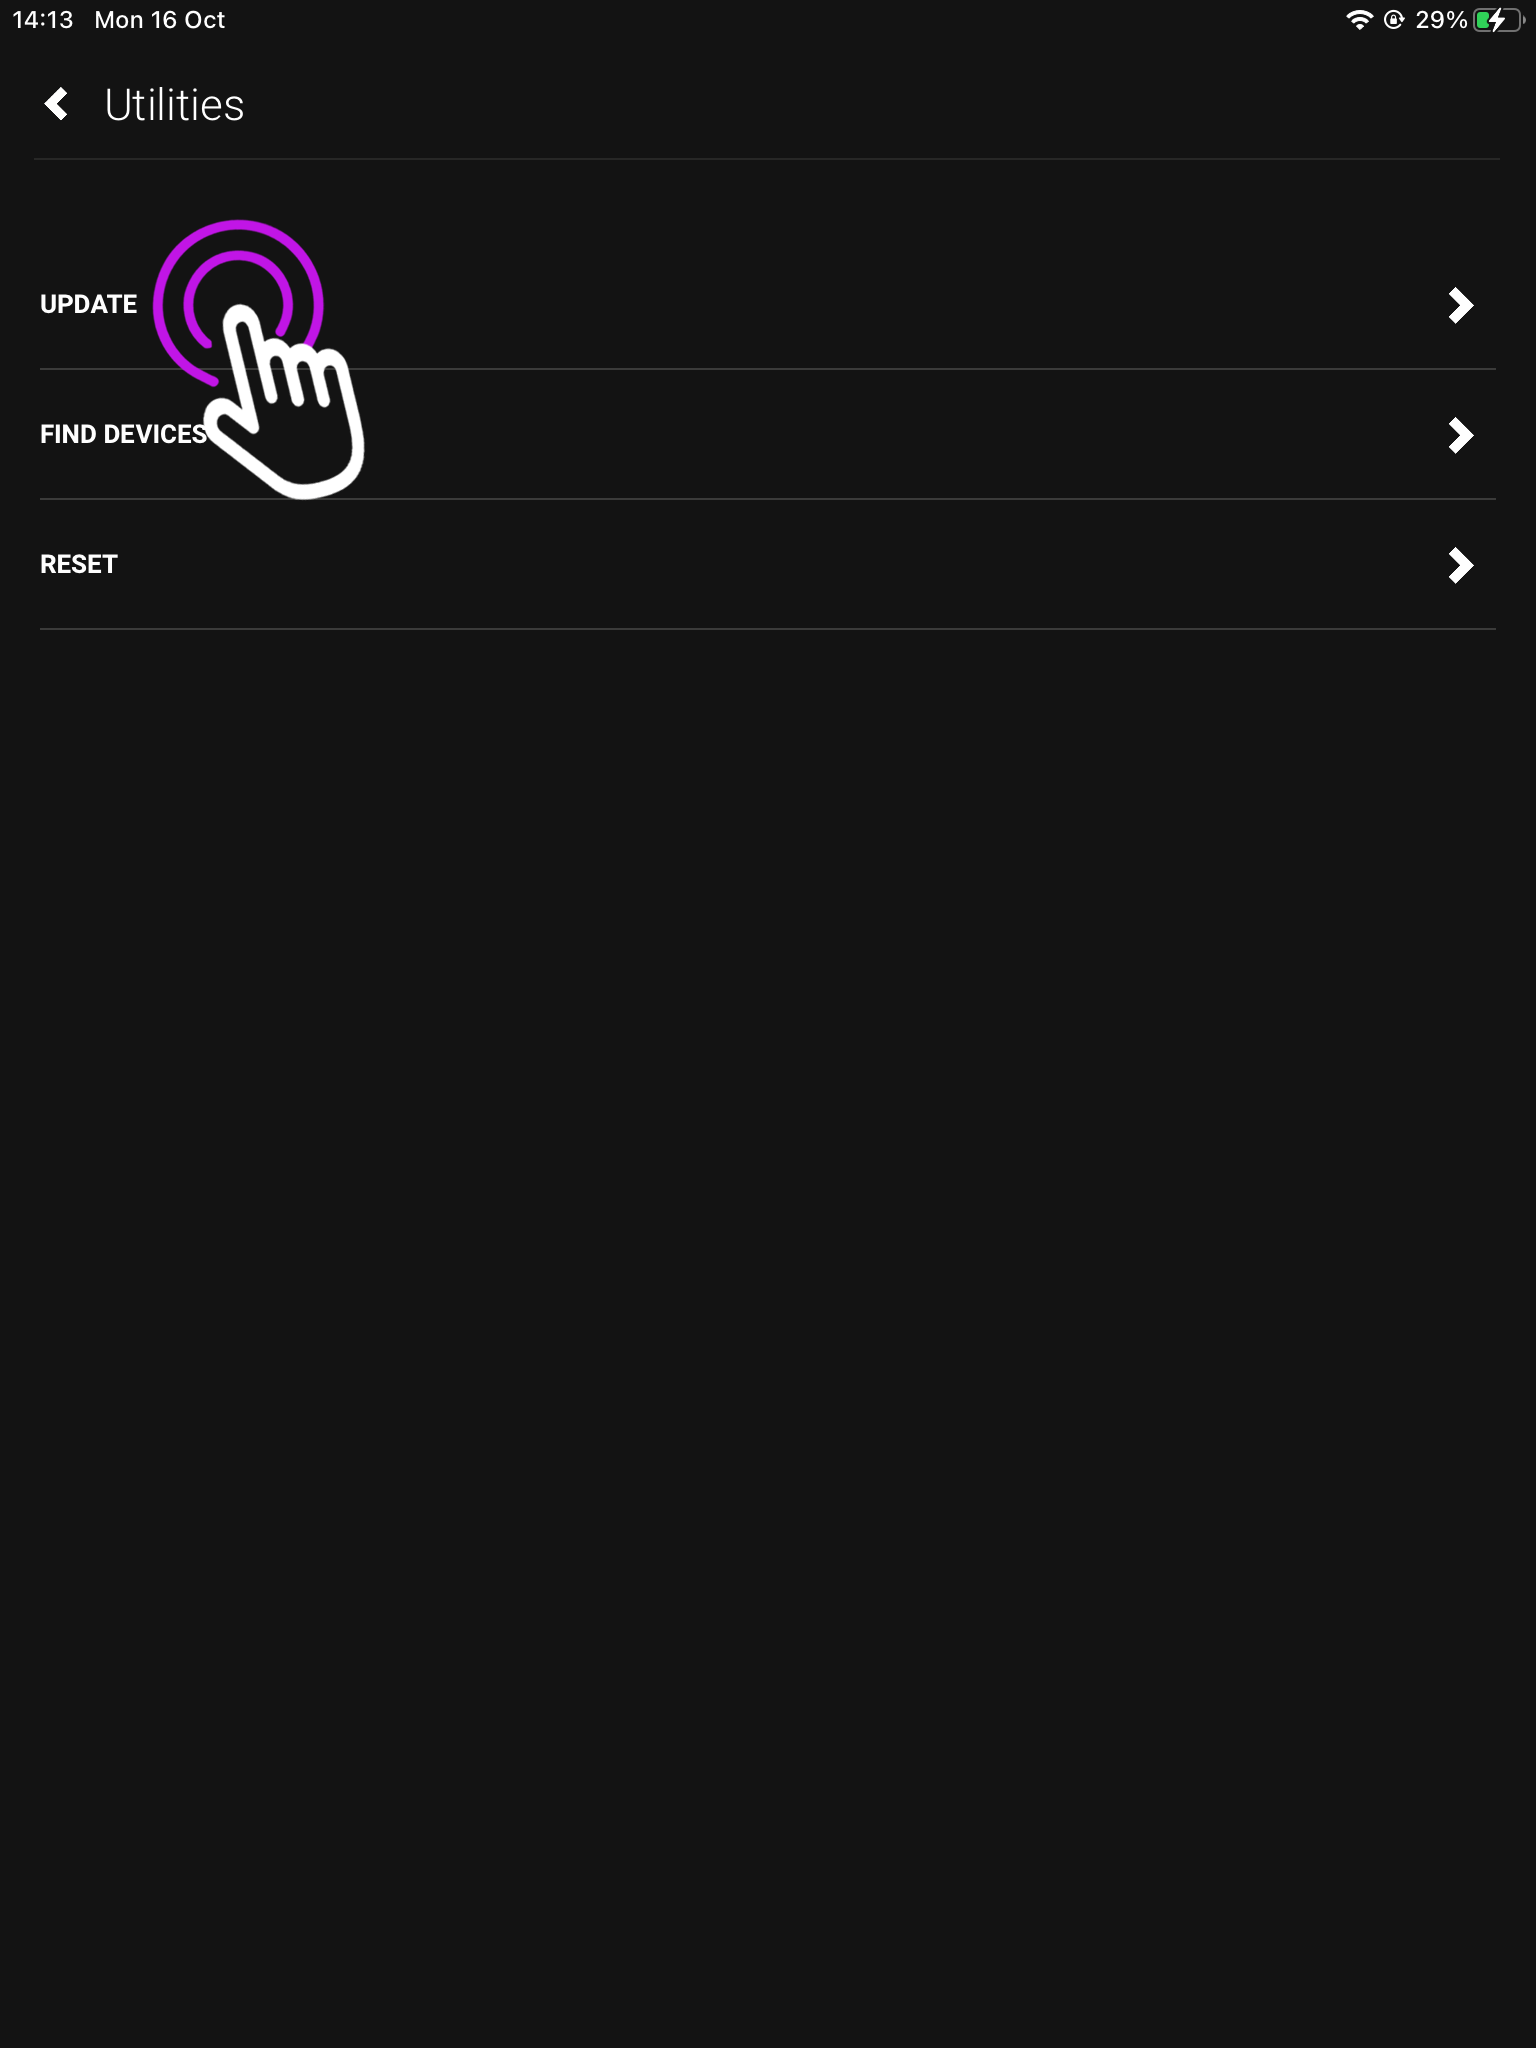
    3. Press “Utilities”

    This will take you to your devices service page.

    From here you can also see your connected devices IP address(s).

    4. Press “Update”

    From this page you can also find your devices, and reset one. To find out more check out our uOS Utilities page.

    The next page will show you your connected HDA devices.

    5.“Available Systems”

    If you have a stacked system, or multiple devices they will show here.

    Once an update is found you will be taken to the update screen.

    6. Begin update

    If your device is updateable it will start, and include which version you’re updating to.

    Press “Update Device”.

    7. Terms and Conditions

    To continue please acknowledge the legal terms.

    For more information on the legal terms, you can read the End-User Licence Agreement (EULA) and the Privacy Statement.

    8. Await download

    This process can take up to 5 minutes, however, depending on your network it could be longer.

    Please make sure not to power down your device whilst the update is downloading.

    9. Update completed

    uControl will now let you know the update is complete.

    Press “Update Finished”.