Category: mHub 4K

  • mHub 4K control system integration

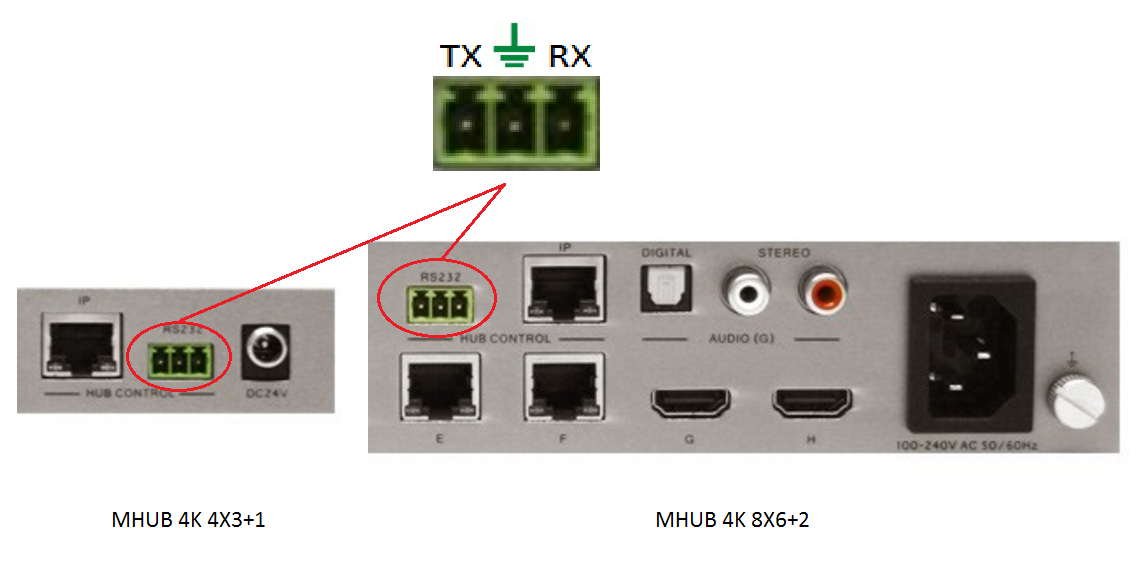
    The mHub 4K range has full support for most popular control systems via serial (RS232) or IP.

    All control strings and current available drivers are available in the mHub control pack, available here – Download
    IP control

    To control the mHub 4k unit via IP you will first need to discover it by using the mHub controller software available in the control pack above

    The mHub 4K will acquire an IP address via DHCP the first time it is connected to your home network, use the controller software to locate it on your network.

    mhub controller pic 1

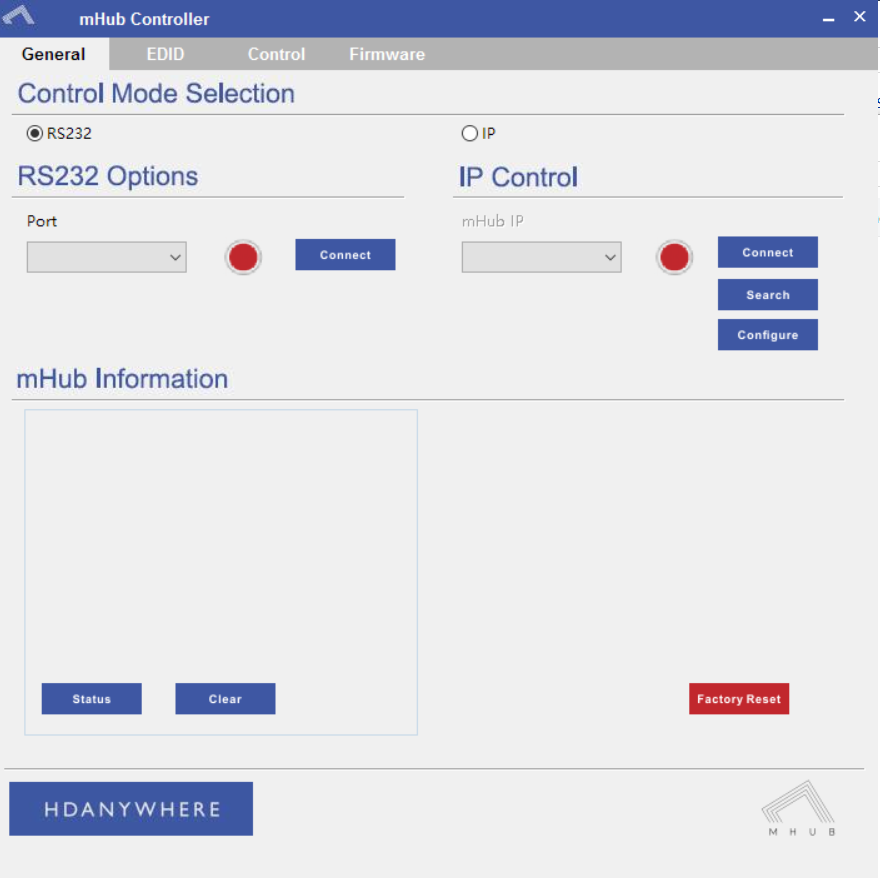
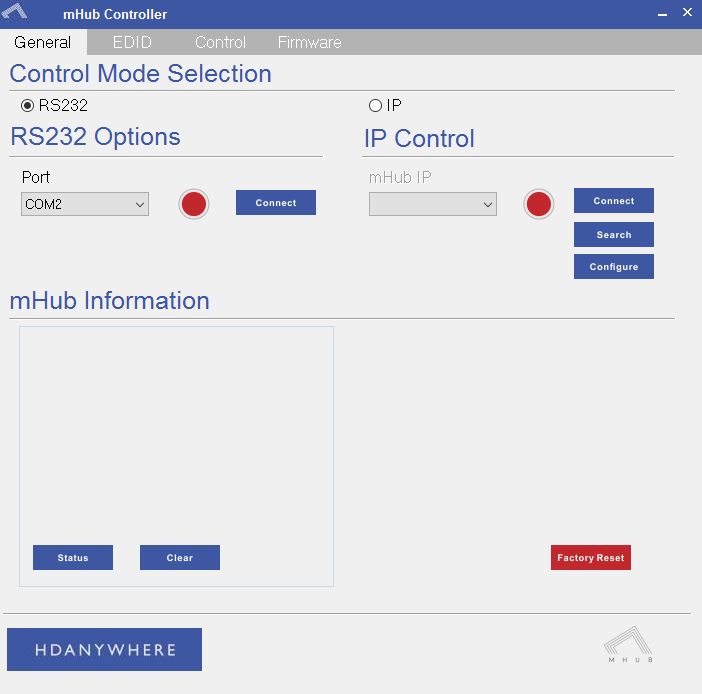
    In the mHub controller software select IP and then press the ‘search’ button, this should locate your mHub matrix. Press ‘connect’ the red button should turn green.

    Press the configure button

    mHub IP

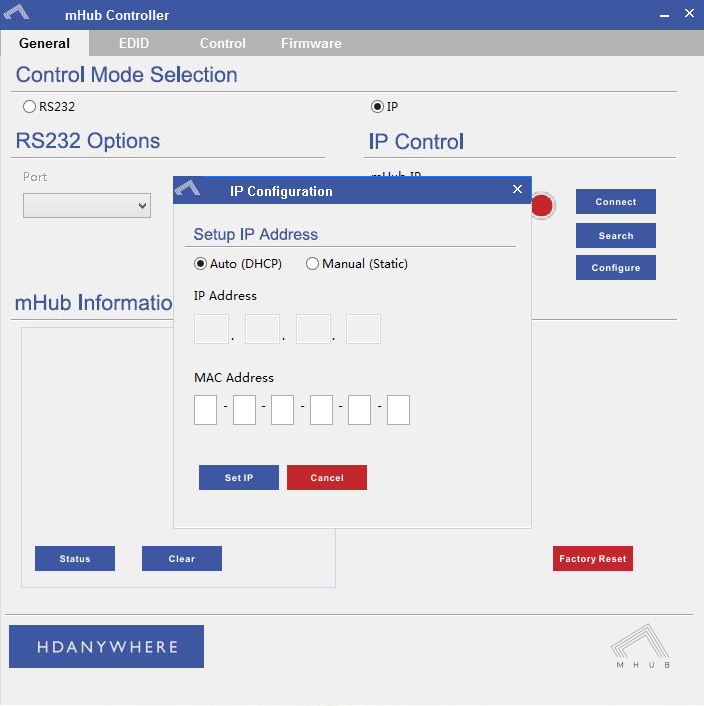
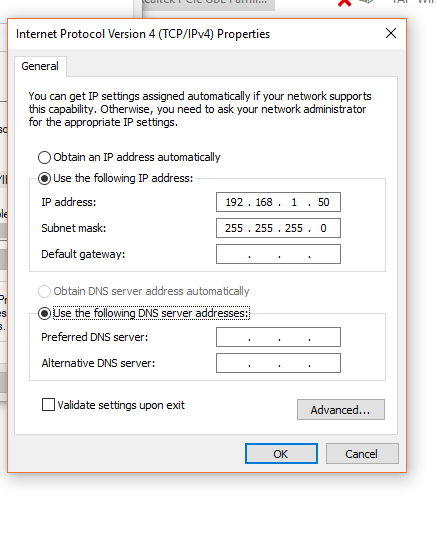
    From here you can set the matrix to a static IP if you wish (this is generally good practice)

    Your matrix is now on your home network and will be able to receive IP commands from whatever control system you are using.

    Looking for the mHub 2K information, go here – mHub 2K

  • How to disable the beep on mHub 2K and 4K (4×4 and 8×8)

    To disable the beep on the mHub 2k range of matrices please following the instructions below using either I.P or RS232 connection methods.

    To adjust the settings on the mHub range of products, you will need to download the controller software Download

     A) Connecting to the mHub Via I.P

    The mHub 2K’s IP address is pre-configured as 192.168.0.100, your computer will need to have it’s IPV4 range configured to be within the same range initially while you setup the matrix. (You don’t need to follow this step if you have a mHub 4K system)

    To configure your IPV4 settings you will need to navigate to the following menu

    ->Network and sharing center

    —>Ethernet
    —–>Properties
    ——->Internet Protocol Version 4 (TCP/IPv4)
    ———>Properties

    IPV4

    Once you have changed the IP settings on your PC, open the Mhub controller software.

    In the Control Mode Select Box choose ‘IP’, then click the ‘Search’ button. When the IP address shows in the mHub IP box, click connect.


    B)  Connecting to the mHub Via RS232

    To connect via RS232 use the supplied serial cable can connect between the mHub and your PC, then on the Controller software select ‘RS232’, then in the RS232 Options section select the Com port being used from the drop down menu then click connect

    Capture


    C) Disabling the Beep

    To disable the beep select the ‘Control’ tab and untick the box labeled ‘Enable Feedback Beep’.

    mHubbeepimage

    Once changed, you can verify the beep has been disabled by performing a source switch operation.

  • Software configuration tool for MHUB 2K and MHUB 4K (2014-2016)

    Windows configuration tool for MHUB 2K and MHUB 4K systems. Search for MHUB, configure EDID and network settings.

    Download the MHUB 2K and MHUB 4K configuration tool.

    The software configuration tool has been written for an older version of Windows. If you run the exe file on your laptop and you receive a C++ error message then please read this support article.

  • Error Message: ‘The application has failed to start because its side-by-side configuration is incorrect’

    Description

    When I try to install the software, I receive this warning:

    “The application has failed to start because its side-by-side configuration is incorrect. Please see the application event log for more detail.”

    This issue is typically caused by a conflict between the program and one or more of the files in the C++ runtime libraries. These libraries are part of the Windows operating system and are used, and potentially updated, by installing or updating several Microsoft or other third party products.

    If you are experiencing this error when launching or installing the program, and if the program repair option does not resolve the issue, the most effective method to correct this error is to uninstall and reinstall any Microsoft Visual C++ installations currently available on your computer before proceeding with the installation.

    To uninstall all current Microsoft Visual C++ installations

    Open the Control Panel and locate the list of programs.

    Windows 8/10
    From within the Start screen, type “Control Panel” and click on the Control Panel search result when it appears.
    Select Programs and Features.

    Windows 7/Vista
    Click Start> Control Panel
    If viewing categories, click Programs> Uninstall a Program
    If viewing icons, click Programs and Features

    Windows XP
    Select Start> Control Panel> Add or Remove Programs

    Scroll down to locate the Microsoft Visual C++ entries.

    Select each one, starting from the top entry, and choose Uninstall.

    Do this for each entry, until there are no more Microsoft Visual C++ entries listed.

    To reinstall new Microsoft Visual C++ packages follow the instructions on this page –

    Microsoft Vistual C++

    Once every package has been downloaded and installed, restart Windows.

    Finally, launch the program. If the error message persists after following all of these instructions, then please contact HDanywhere technical support on 01684 576348

  • MHUB 4K 4×3+1/8×6+2 RS232 Connection

    If you wish to control your MHUB 4K 4×3+1/8×6+2 from an external control system via a RS232 connection you will need to wire the included phoenix connector to the following specification.

    rs232

  • What is the difference between a HDA Cloud & a HDA Pro account?

    ^8225B169363E3009548C8F63CF73AC706CD60A0AA3F3C02D7A^pimgpsh_fullsize_distr

    1. HDA Cloud

    The HDA Cloud acts as our global data storage and service delivery platform offering an interface for MHUB owners, HDA Pro’s and 3rd party devices to talk to one another.

    There are two types of cloud account that can be associated with an MHUB system.
    account-types

    2. HDA Cloud Account

    The HDANYWHERE (HDA) Cloud account is the account that belongs to the Homeowner and/or End-User. The owner of the MHUB has to have a verified HDA Cloud account before any communication between MHUB systems and the HDA Cloud can take place.

    Registering the MHUB system provides numerous benefits including:

    • Extending the warranty period on the system by 1 year (must be registered within 30 days of purchase, Warranty is non-transferable)
    • Enables advanced functions for things like voice control, uControl, integration with other IoT devices and Sequences
    • Provide advanced troubleshooting information to your HDA Pro installer and HDA
    • Provide your HDA Pro installer permission to remotely manage your system, they can then modify your system for you without physically being there

    3. HDA Pro Account

    The HDA Pro account can not be added to a unit unless a HDA Cloud account (outlined above) is present first. This account authorises the installer to monitor the MHUB on their customer’s (the homeowner) behalf. This account sits alongside the Cloud account and gives a 3rd party access to the MHUB’s data and the ability to control it. HDA Pro’s can register Here

    The following Settings can be managed remotely:

    • Source Routing (and switching)
    • Edid management
    • uControl sequence configuration
    • uControl IR pack configuration
    • Power management
    • You can also monitor the following:

    • IP configuration
    • Temperature
    • Firmware (MHUB-OS, and MHUB)
    • IMPORTANT: a HDA Pro Account has to be created first Here and authorised by HDA staff before the installer can use their account details to enable monitoring on the MHUB.

    4. MHUB-OS

    MHUB’s operating system which acts as the bridge between using MHUB and managing it. From MHUB-OS it is possible to connect to HDA Cloud, integrate devices like Amazon Alexa, manage network settings and update software to add new features.

    5. uControl

    uControl is our remote control app for MHUB 4K PRO systems. It pulls all the information it needs to work directly from MHUB-OS and requires no setup or configuration. Just download it and let it find your MHUB and you’re ready to go.

  • Voice control with Amazon Echo using the “MHUB 4K PRO Control / MHUB 4K PRO Smarthome” Skill

    Setting up the MHUB 4K PRO Control / MHUB 4K PRO Smarthome Skill on the Alexa app

    HDANYWHERE (HDA) Amazon Alexa App Skill

    We are assuming that you have already downloaded the Amazon Alexa app and have a functioning Amazon account.

    Skill types:
    There are two types of skill which you can enable on the Alexa app.

    • Custom Skill
      With a Custom Skill we have full control over the voice interaction (a voice interaction is the communication you have with an ECHO device when speaking a command and also includes the response given by the ECHO) between you and your Echo device, this allows for a greater range of voice commands including playhead, change channel, switch sources, increase/decrease volume.Click here to view a the full range of voice commands.
    • Smarthome Skill
      The Smarthome skill differs from the custom skill in a couple of ways. Firstly, invoking a smarthome skill is fixed and defined by Amazon, this also applies to the voice interaction. We currently support on/off commands, allowing you to perform actions quickly by uttering “Alexa, turn on TV” or a custom label like “Alexa, turn on movies”.
    • You can of course, use both. They are FREE!

    What you need to get your MHUB to respond to voice commands:

    1. You have completed the first-boot procedure within MHUB-OS
    2. You have MHUB-OS version 7.0 or higher installed on your MHUB
    3. You have an active HDA Cloud account
    4. You have downloaded uControl packs for all displays and source devices you want to control
    5. You have an active Amazon account
    6. You have an Amazon Alexa enabled device, such as Amazon Dot/Echo/Show

    Linking the custom skill “MHUB 4K PRO Control”

    1. Go to the Skills section on the Alexa app and search for “MHUB 4K PRO Control”
    2. Click on the skill and select “Enable”
    3. Click “Link Account” – when you do this, you will be redirected to HDA Cloud’s secure login page. Enter your username and password in to the fields.

    To enable the MHUB 4K PRO Control Skill you will need to add the skill first by pressing the "Enable" button in your Amazon Alexa app. Once enabled you will be forwarded to HDA Cloud to link your account with Amazon Alexa. Enter your HDA Cloud username and password and your MHUB will be connected to Alexa!

    Linking the smarthome skill “MHUB 4K PRO Smarthome”

    1. Go to the Skills section on the Alexa app and search for “MHUB 4K PRO Control”
    2. Click on the skill and select “Enable”
    3. Click “Link Account” – when you do this, you will be redirected to HDA Cloud’s secure login page. Enter your username and password into the fields.
    4. After the account has been linked, visit the “Smart Home” screen then navigate to the ‘Manage devices in Smart Home’ then Devices. Next click ‘Discover’.
    5. This action will communicate with MHUB and pull any devices making them ready to use.

    Configure voice commands to do exactly what you want

    Let’s take the command “Alexa, tell my TV to watch football” as an example.

    It might appear like a very simple command but there are a number of things that need to happen in order to watch football! First the TV might need to turn on, but in which room? The volume might need to be set to a desired limit. The correct source input might need to be selected on MHUB and finally that source will need to navigate to the channel hosting the football.

    You can configure all those actions in what we call a “Sequence”.

    Taking the example above:
    Alexa (this wakes up your Amazon Dot/Echo/Show)
    tell my TV to… (this invokes HDA’s custom skill)
    watch (this is a special function which tells MHUB to start a Sequence)
    football (this is your custom name for the Sequence, it can be anything you want)

    Inside MHUB-OS we can configure exactly what “football” does.

    • You can select if you want MHUB to turn your TV on and adjust the volume
    • You can tell MHUB to switch to the source device with has the football on it
    • You can instruct MHUB to change the channel on that source device

    Read more about Sequences and Scheduling.

    Here’s a table of all the commands you can tell your MHUB to do…

    Now you’re ready to go. Take a look at a full list of commands that you can say to your Echo.

  • Creating a stacked MHUB system using uControl

    When an MHUB video device is paired with an MHUB AUDIO device we call that a Stack. Stacks can contain up to 4 MHUB products with 1 Master device and 3 slave devices. Master devices can be either VIDEO or AUDIO, slaves are AUDIO only.

    Below are a few examples of stacked systems.

    • Master : MHUBPRO4440, Slaves : 3x MHUBAUDIO64
    • Master : MHUBAUDIO64, Slaves : 3x MHUBAUDIO64
    • Master : MHUB4K44PRO, Slaves : 2x MHUBAUDIO64

    To create a stacked system you will need to download uControl (available on iOS and Android app stores), and your MHUB hardware will need to be powered on and connected to your network.

    Open the uControl app and select ‘Connect to MHUB System‘. The following screens will be displayed. uControl will search your network for all MHUB devices. To create a stack select ‘Video + Audio
    CS1
    uControl will now ask you to select first a master device, then upto 3 slave devices. (The order in which you select the slave devices will be their order in the stack. this is indicated by a numeric value on the left side of the device button. If you are unsure which MHUB AUDIO device is which you can simply click on the Identify button at the side of each device which will start the HDA and AUDIO logo flashing.)
    CS2

    Once this is done you will be taken to MHUB-OS where the first boot Process will be run.

    MHUB FIRST BOOT PROCESS(link)