Category: mHub 4K

  • Troubleshooting: “No picture on one of the TVs connected to my matrix”

    In order to effectively troubleshoot this problem, we need to deduce whether or not the matrix, the HDMI cables, extender set, or other connectivity accessories such as wallplates, repeaters or cable joiners are at fault.

    Troubleshooting Step 1

    Swap the outputs over on the matrix to see whether the problem follows the cable run, or stays associated with the HDMI port. This will help us decide whether it is the cable run or the matrix at fault.

    Outcome 1: Problem follows the cable.

    You have isolated the issue to be associated with that particular cable run and TV. If possible, try an alternative HDMI cable (such as the one connected to another TV on the matrix) to deduce whether a known to be working cable solves the issue. If it does, there is a good chance that the original HDMI cable is at fault and requires replacing.

    Outcome 2: Problem stays with the port on the matrix.

    You have isolated the issue to be associated with that particular HDMI port on the matrix. This issue could be hardware or software related.

    Firstly, to rule out whether it is a software issue, follow the hard reset procedure (described in manual) to reset the matrix software. If this does not revive the troublesome HDMI port, it is likely that there is a hardware fault with the matrix.

    In this case, Contact Customer Services. for a replacement unit.

  • HDBaseT Wiring Guidance

    HDanywhere video distribution systems require a single network cable to be run from each HDTV location, back to a central point. Some single wire systems use HDBaseT technology to transmit over 1 x Cat5e/6/7 cable up to a 100 / 328 ft metre distance.

    This article is designed to give you a good overview of the standard of wiring needed for a HDBaseT system. For a detailed, official set of guidelines issued by HDBaseT click here.

    (more…)

  • Troubleshooting: Green screen

    Important:
    In most cases, if you are experiencing green screen on your display then this is often down to the HDMI cable in between. A quick way to test to see if this is the case is to replace your existing HDMI cable with our range of 4K or 8K HDMI cables. If that doesn’t work, move your HDMI source to another display in your property (use a different HDMI cable), connect it up and observe to see if the same behaviour follows the box. This will help you determine if the issue is the cable or the HDMI source.

    The article below describes how to troubleshoot a green screen when using a HDANYWHERE product, if you are having green screen issues and you do not own a HDA product then we recommend you buy our 4K or 8K HDMI cables and give that a go first – they come with free shipping!

    Symptom:

    There is no picture or maybe a green screen following standby or when switching between source devices via a matrix. Most often this problem occurs once the TV goes to standby, and when brought out of standby to an ‘on’ state, it will not handshake properly and green screen instead of video appears.

    Green screen flashes generally indicate a HDCP (Digital Content Protection) handshaking issue, or a HDMI hot plug detect issue between that particular source device and display.

    (more…)

  • An introduction to two-Way IR

    What is two-way IR?

    With one way IR, the IR travels “backwards” from the TV location to the location of your source device or central matrix. The addition of a “forward” IR path means that IR can be sent 2 ways along the transmission cable, known as “two way IR”.

    The “forward” IR path takes IR from the central location to the location of the receiver part of the product you are using. Normally this will be the location of a display or projector.

    (more…)

  • HDBaseT Product Distance Capability Notes

    HDBaseT Product Distance Capability Notes

    Products based on HDBaseT are based on one of two groups of electronic chips. The HDBaseT-Pro and HDBaseT-Lite groups. Each has different distances over which it can extend HDMI and this also depends on the type of cable used.

    (more…)

  • Using a multi-channel 5.1 / 7.1 amplifier receiver AVR with a matrix

    Using multichannel 5.1 / 7.1 amps AVR with matrix systems

    Essential Knowledge
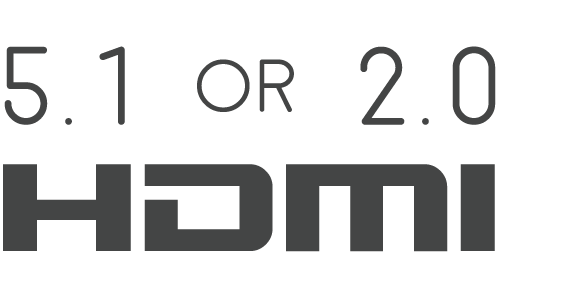
    To understand how multichannel (5.1 / 7.1 etc) audio/sound is routed via a HDMI or HDBaseT matrix system, it is important to firstly acknowledge that all HDMI source devices (Blu-ray players, set-top-boxes, media servers, PCs etc) can only output a single audio format type at any one time. This is a limitation of HDMI itself.

    For example, the HDMI port on a Blu-Ray player cannot simultaneously output HDMI with 2.0ch stereo as well as HDMI with 7.1 DTS Master audio. It is always one or the other.

    arctical

    With only displays connected to the matrix
    When a matrix has only displays connected, with no AMPS/AVR in your set up, routing audio is relatively easy. This is because displays generally only have two speakers, and so a single HDMI format of HDMI+2.0ch can be routed to all displays. This gives you video and audio at every display.

    Adding an AVR/AMP the matrix
    When adding an AMP/AVR to the connected device mix, you are adding a component that can accept a multichannel audio format, such as 5.1 or 7.1.

    You now have a situation whereby some connected devices (displays) can only accept HDMI with 2.0ch stereo and some (the AVR/Amp) can accept HDMI with multichannel audio.

    What to expect in a mixed display / AVR setup
    Video matrixes operate on a “lowest common denominator” rule. This means that the matrix will exchange information with your displays and AVRs to decide on the format of audio to get from the source device; choosing the format that will ensure audio is output in all of your locations.

    One of two things can happen: If the AVR is turned on first and the matrix set to send a source capable of multi-channel audio to the AVR, the source will deliver multi-channel audio to the AVR. If a stereo TV is then turned on and the matrix then set to send the same source going to the AVR to the TV, the TV will be unable to play back the multi-channel audio. The result would be no sound from the TV.

    In the reverse, if a TV is turned on first and the matrix is set to send one of the connected sources, the source will deliver stereo audio to the TV via the matrix. If the AVR is then switched on and the matrix set to deliver the same source going to the TV, the AVR will only receive stereo audio.

    It is important to re-iterate, this is not a product limitation of HDanywhere matrixes. This is a limitation of HDMI technology itself and its specification.

    A solution is therefore required whereby the source device always sends multichannel audio to the AMP/AVR and 2.0ch stereo audio to the displays.

    Solution options
    There are many ways to solve this problem. Some complicated, some easier. Things will depend on the location of your equipment and the number of AVRs. We are always happy to help you build a specific solution that meets your setup. Here we can only cover some of the more common setup examples and a single solution to those.

    I have a single AVR located beside / local to my source devices and the matrix e.g. in a cupboard / AV rack.
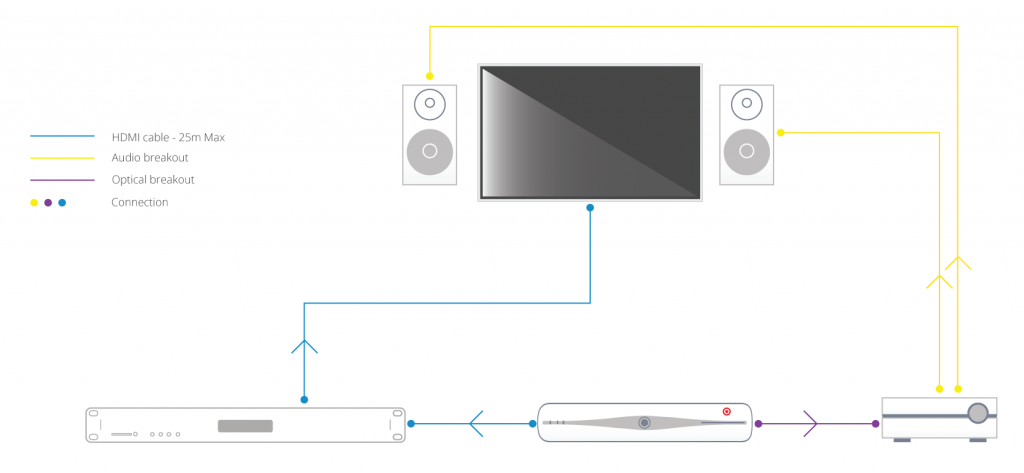
    In this type of setup, where the AVR for the multi-channel room is located with the sources and matrix itself, one solution is to deliver the audio to your AVR via alternative connectors to the HDMI where possible. For example, Sky HD boxes and Blu-Ray players usually have a digital audio output that can be connected to the AVR** via optical cabling. This can deliver multi-channel audio to the AVR over the optical cable, whilst the HDMI output from the source device can deliver 2.0 ch stereo audio to your matrix and therefore your other TV (stereo) locations in your setup. If this setup is located away from the room with multi-channel speakers fitted, say an under-stairs cupboard, there are solutions to keep IR control of your AVR that we can help with.

    arctical

    AVRs located in the room with the displays
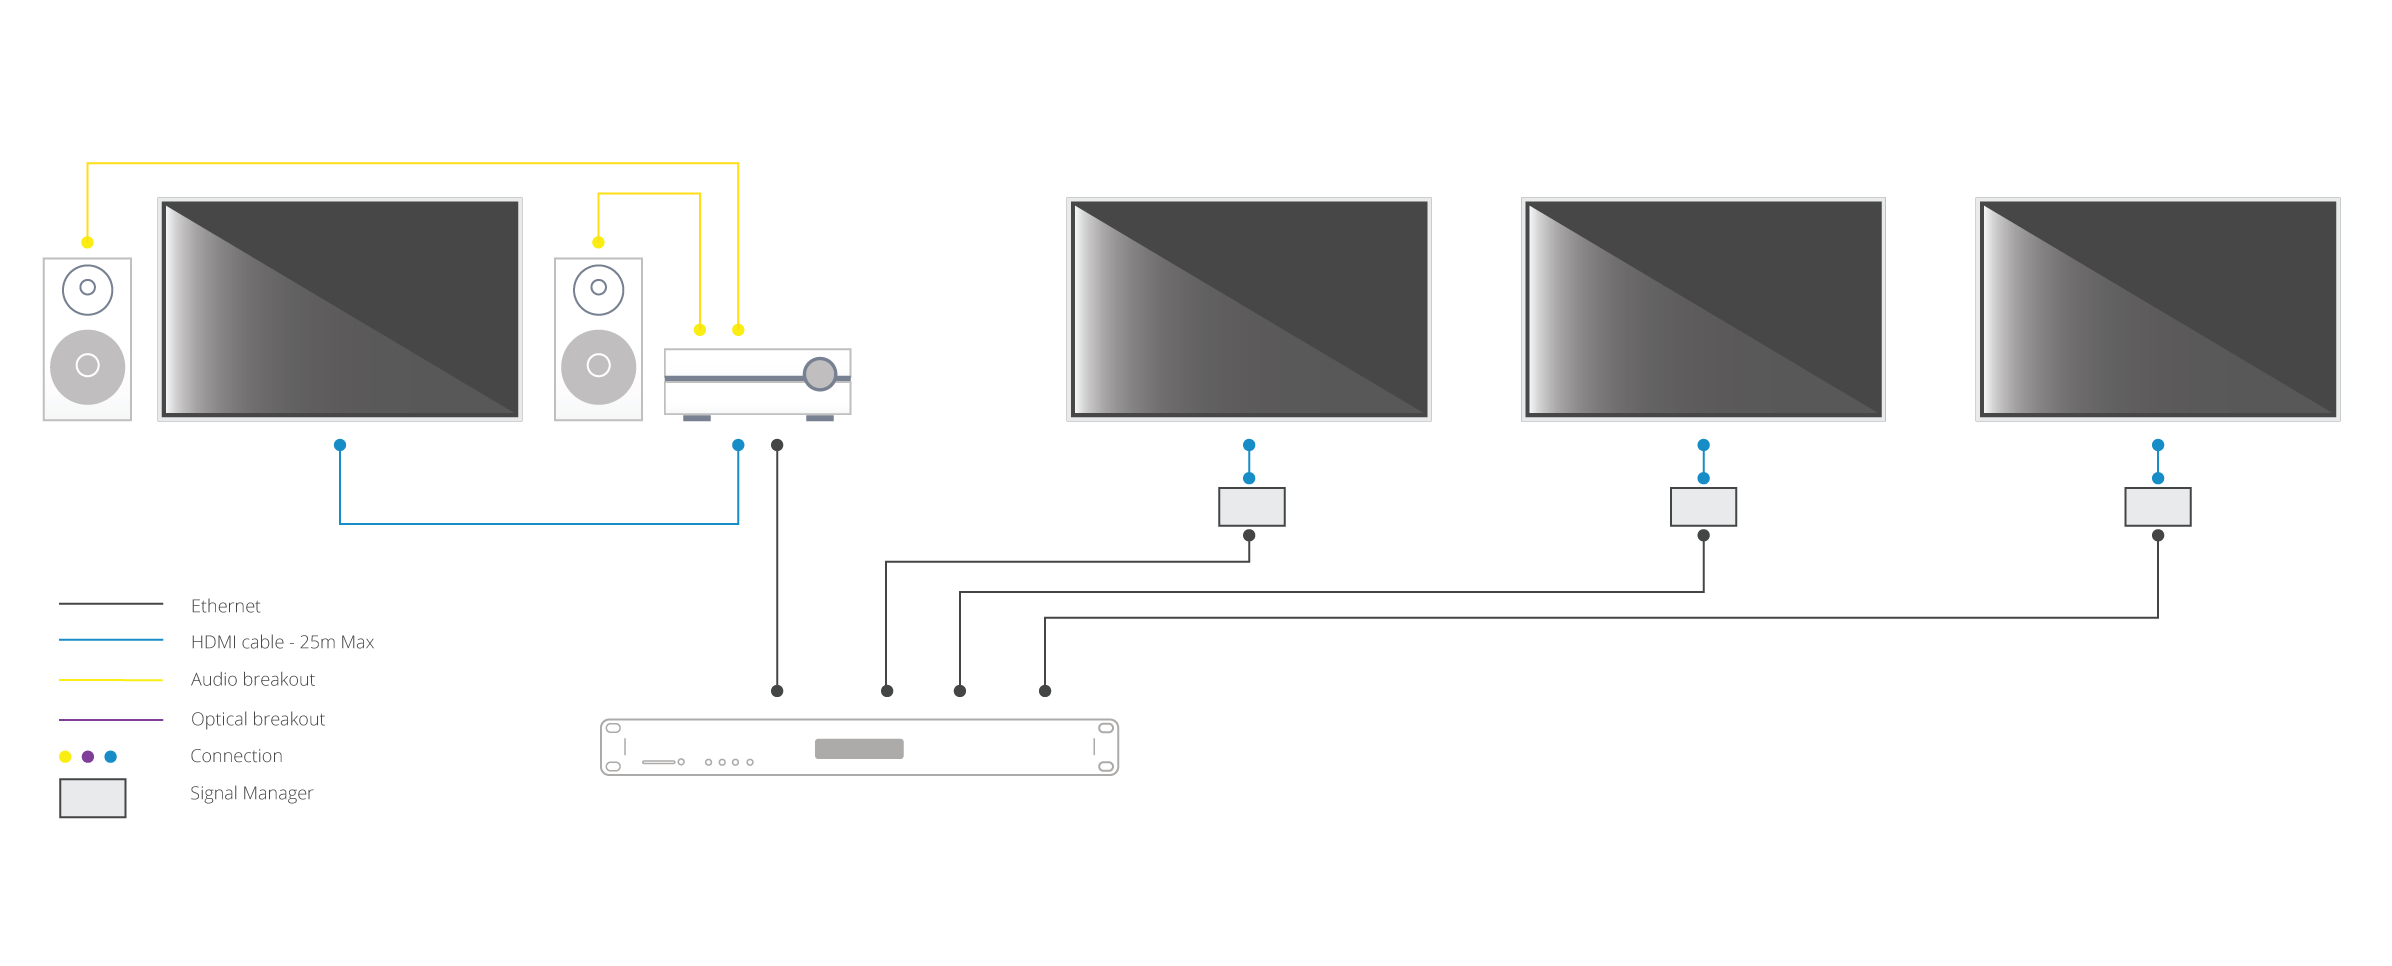
    In this type of setup, where AVR(s) are located in the rooms local to the displays, make sure the HDMI device is set to output 5.1 / 7.1 channel audio. This audio format will be sent over the Cat cable to each display location. In order to get audio out of your HDTVs (in say three rooms) and the AVR (connected to HDTV in a fourth room), some additional hardware is needed. HDanywhere sell a signal manager. Place 1 x signal manager at each TV that needs 2.0 channel audio aka. each TV that does not have an AVR.  Use a HDMI cable to connect the HDMI output port of the matrix’s display receiver to the HDMI input port of the Signal manager. Then use another HDMI cable to connect the HDMI output port of the Signal Manager to the HDMI port on the HDTV. So, the Signal Manager sits in between the display receiver and the HDTV.

    arctical2

    The Signal Manager has a box labelled “Audio”. The little switch on this audio section needs toggled to number 2: LPCM 2.0 before you connect up and turn on all your HDMI source devices and displays. Do not switch toggle the switch from no. 1 to no. 2 whilst displays and HDMI sourced devices are on. If you do so, you will need to power down the re-power all source devices and displays.

    Once the signal manager is set up and in place it will take 5.1 and output it as 2.0, ready to be accepted and then output by the HDTV. This should hopefully resolve your issue and deliver 5.1 to your AVR and 2.0 to your HDTV.

    Buy HDanywhere Signal Manager 

    Notes:
    *Multichannel audio via HDMI includes the following formats: LPCMDolby DigitalDTSDVD-AudioSuper Audio CDDolby Digital PlusDolby TrueHD,DTS-HD High Resolution AudioDTS-HD Master Audio, MPCM, DSDDST

    **When using alternative audio connectors other than HDMI, support for DTS-HD Master Audio and Dolby True HD is lost.

  • Software configuration tool for MHUB 2K and MHUB 4K (2014-2016)

    Windows configuration tool for MHUB 2K and MHUB 4K systems. Search for MHUB, configure EDID and network settings.

    Download the MHUB 2K and MHUB 4K configuration tool.

    The software configuration tool has been written for an older version of Windows. If you run the exe file on your laptop and you receive a C++ error message then please read this support article.

  • Error Message: ‘The application has failed to start because its side-by-side configuration is incorrect’

    Description

    When I try to install the software, I receive this warning:

    “The application has failed to start because its side-by-side configuration is incorrect. Please see the application event log for more detail.”

    This issue is typically caused by a conflict between the program and one or more of the files in the C++ runtime libraries. These libraries are part of the Windows operating system and are used, and potentially updated, by installing or updating several Microsoft or other third party products.

    If you are experiencing this error when launching or installing the program, and if the program repair option does not resolve the issue, the most effective method to correct this error is to uninstall and reinstall any Microsoft Visual C++ installations currently available on your computer before proceeding with the installation.

    To uninstall all current Microsoft Visual C++ installations

    Open the Control Panel and locate the list of programs.

    Windows 8/10
    From within the Start screen, type “Control Panel” and click on the Control Panel search result when it appears.
    Select Programs and Features.

    Windows 7/Vista
    Click Start> Control Panel
    If viewing categories, click Programs> Uninstall a Program
    If viewing icons, click Programs and Features

    Windows XP
    Select Start> Control Panel> Add or Remove Programs

    Scroll down to locate the Microsoft Visual C++ entries.

    Select each one, starting from the top entry, and choose Uninstall.

    Do this for each entry, until there are no more Microsoft Visual C++ entries listed.

    To reinstall new Microsoft Visual C++ packages follow the instructions on this page –

    Microsoft Vistual C++

    Once every package has been downloaded and installed, restart Windows.

    Finally, launch the program. If the error message persists after following all of these instructions, then please contact HDanywhere technical support on 01684 576348

  • MHUB 4K 4×3+1/8×6+2 RS232 Connection

    If you wish to control your MHUB 4K 4×3+1/8×6+2 from an external control system via a RS232 connection you will need to wire the included phoenix connector to the following specification.

    rs232

  • What is the difference between a HDA Cloud & a HDA Pro account?

    ^8225B169363E3009548C8F63CF73AC706CD60A0AA3F3C02D7A^pimgpsh_fullsize_distr

    1. HDA Cloud

    The HDA Cloud acts as our global data storage and service delivery platform offering an interface for MHUB owners, HDA Pro’s and 3rd party devices to talk to one another.

    There are two types of cloud account that can be associated with an MHUB system.
    account-types

    2. HDA Cloud Account

    The HDANYWHERE (HDA) Cloud account is the account that belongs to the Homeowner and/or End-User. The owner of the MHUB has to have a verified HDA Cloud account before any communication between MHUB systems and the HDA Cloud can take place.

    Registering the MHUB system provides numerous benefits including:

    • Extending the warranty period on the system by 1 year (must be registered within 30 days of purchase, Warranty is non-transferable)
    • Enables advanced functions for things like voice control, uControl, integration with other IoT devices and Sequences
    • Provide advanced troubleshooting information to your HDA Pro installer and HDA
    • Provide your HDA Pro installer permission to remotely manage your system, they can then modify your system for you without physically being there

    3. HDA Pro Account

    The HDA Pro account can not be added to a unit unless a HDA Cloud account (outlined above) is present first. This account authorises the installer to monitor the MHUB on their customer’s (the homeowner) behalf. This account sits alongside the Cloud account and gives a 3rd party access to the MHUB’s data and the ability to control it. HDA Pro’s can register Here

    The following Settings can be managed remotely:

    • Source Routing (and switching)
    • Edid management
    • uControl sequence configuration
    • uControl IR pack configuration
    • Power management
    • You can also monitor the following:

    • IP configuration
    • Temperature
    • Firmware (MHUB-OS, and MHUB)
    • IMPORTANT: a HDA Pro Account has to be created first Here and authorised by HDA staff before the installer can use their account details to enable monitoring on the MHUB.

    4. MHUB-OS

    MHUB’s operating system which acts as the bridge between using MHUB and managing it. From MHUB-OS it is possible to connect to HDA Cloud, integrate devices like Amazon Alexa, manage network settings and update software to add new features.

    5. uControl

    uControl is our remote control app for MHUB 4K PRO systems. It pulls all the information it needs to work directly from MHUB-OS and requires no setup or configuration. Just download it and let it find your MHUB and you’re ready to go.