Author: HDA Support Team

  • Updating OS through uControl

    Your HDA device will be supplied with the latest stable software version already installed. To access the latest features or maintain your system, it is recommended that you perform periodic updates to the OS. This process must be done manually as we do not push updates to systems automatically. Ensure that your system has access to a good internet connection and that power to your HDA device is stable during the process.


    In this support article:


    If you are not connected to a device

    1. Open uControl app

    Launch uControl and you will see the home page.
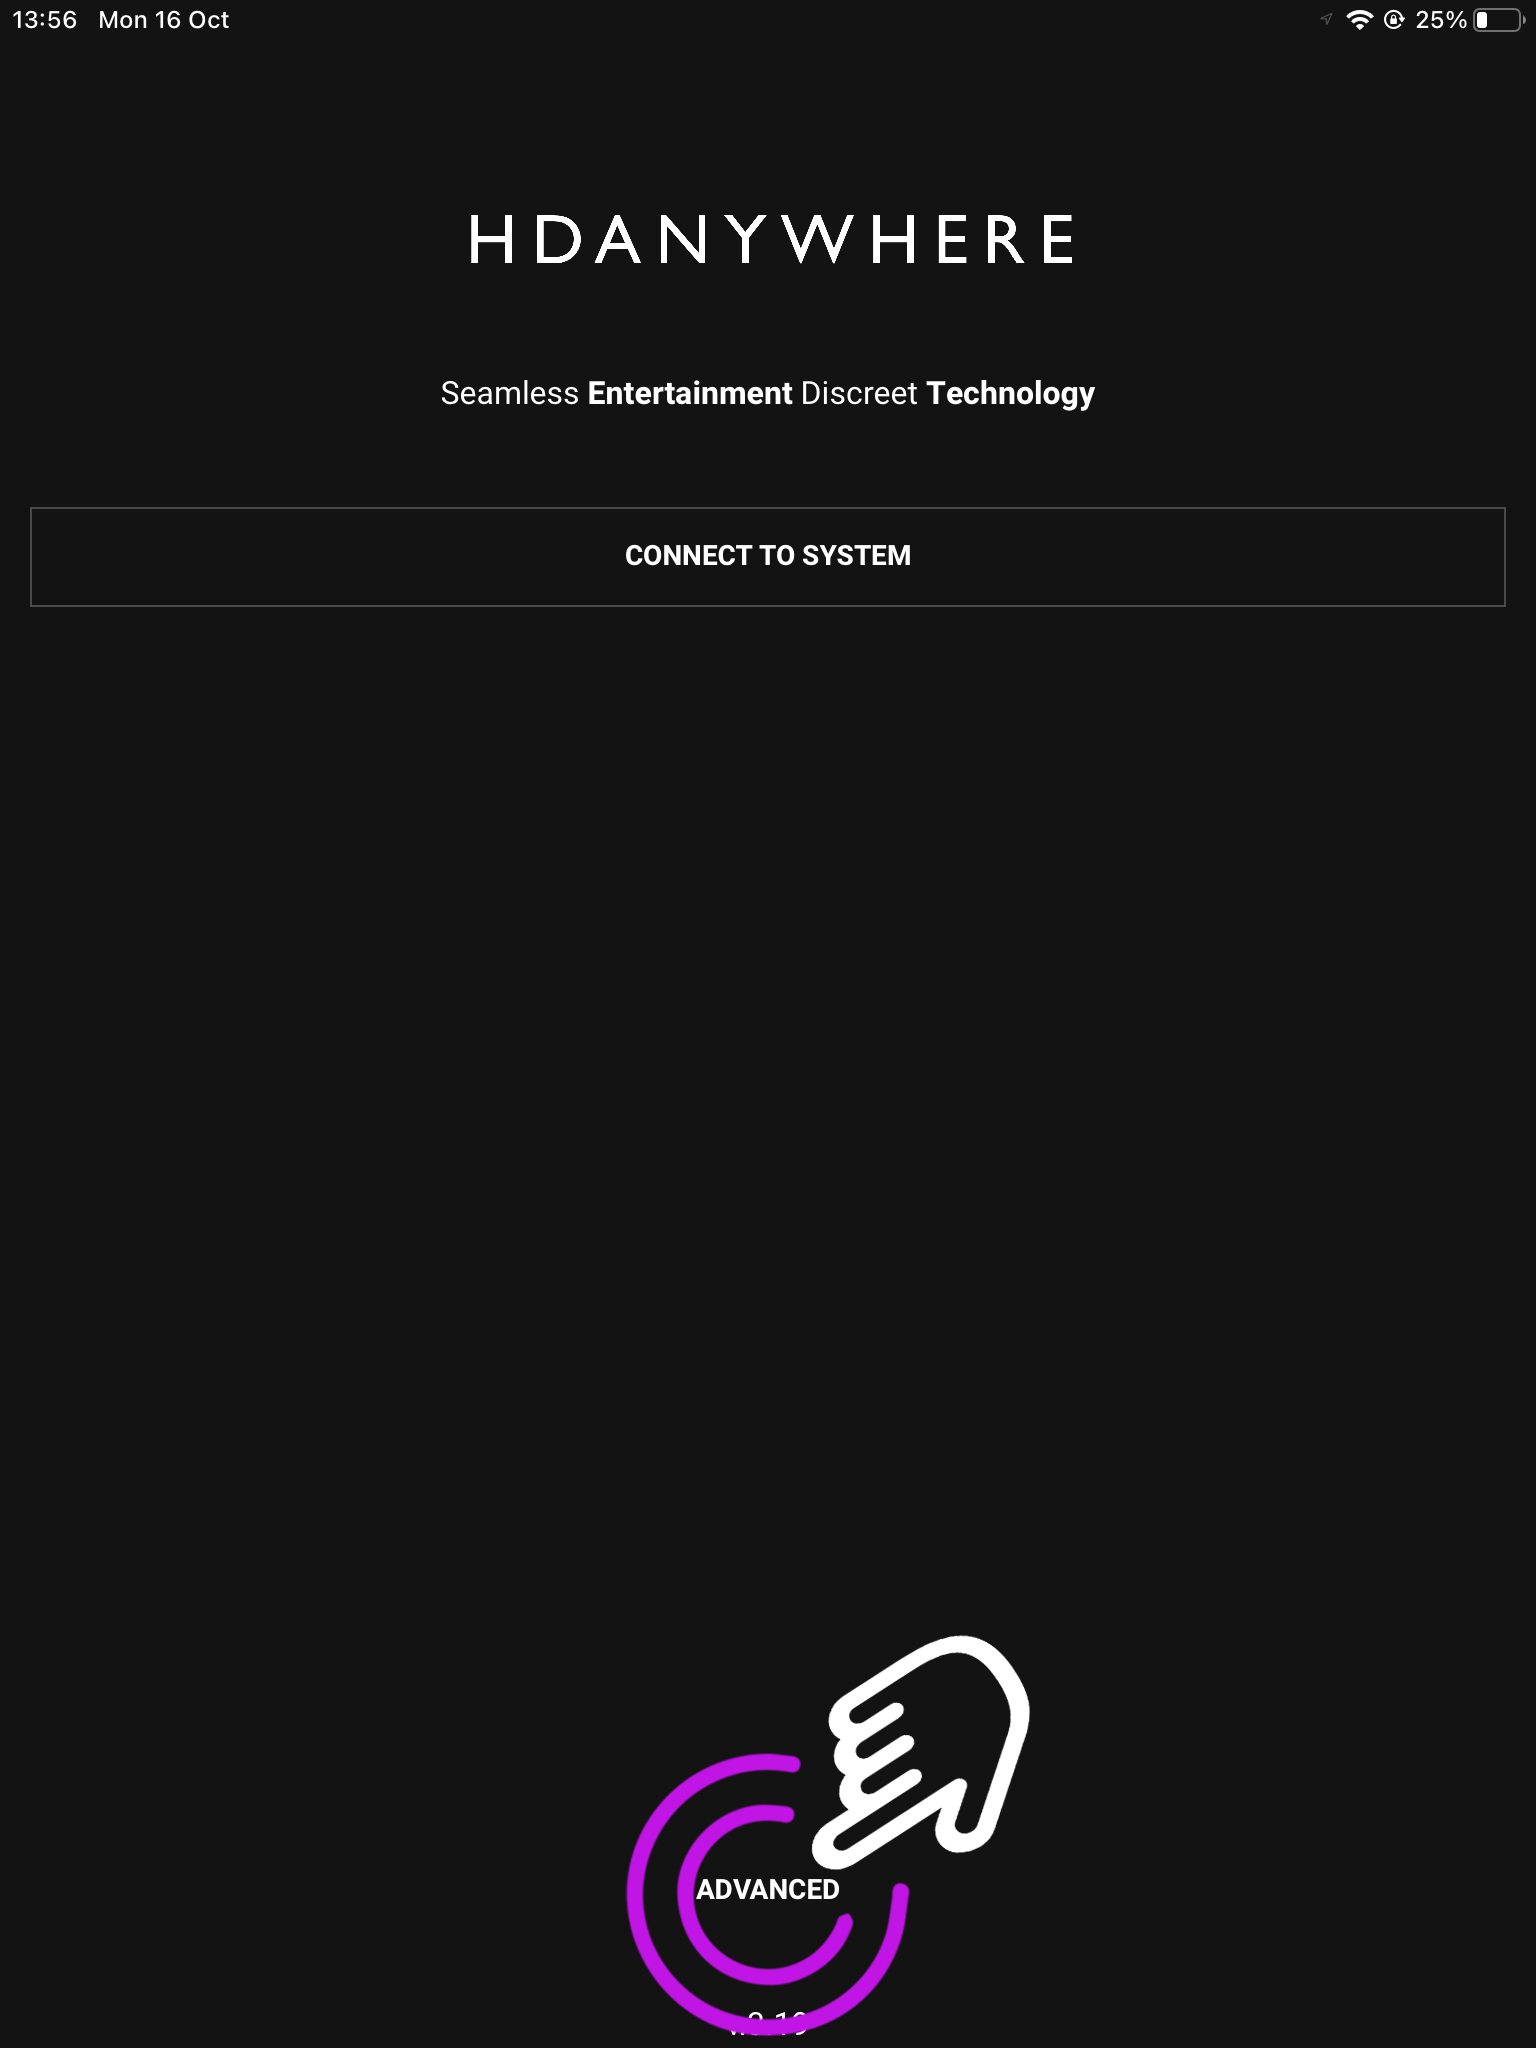
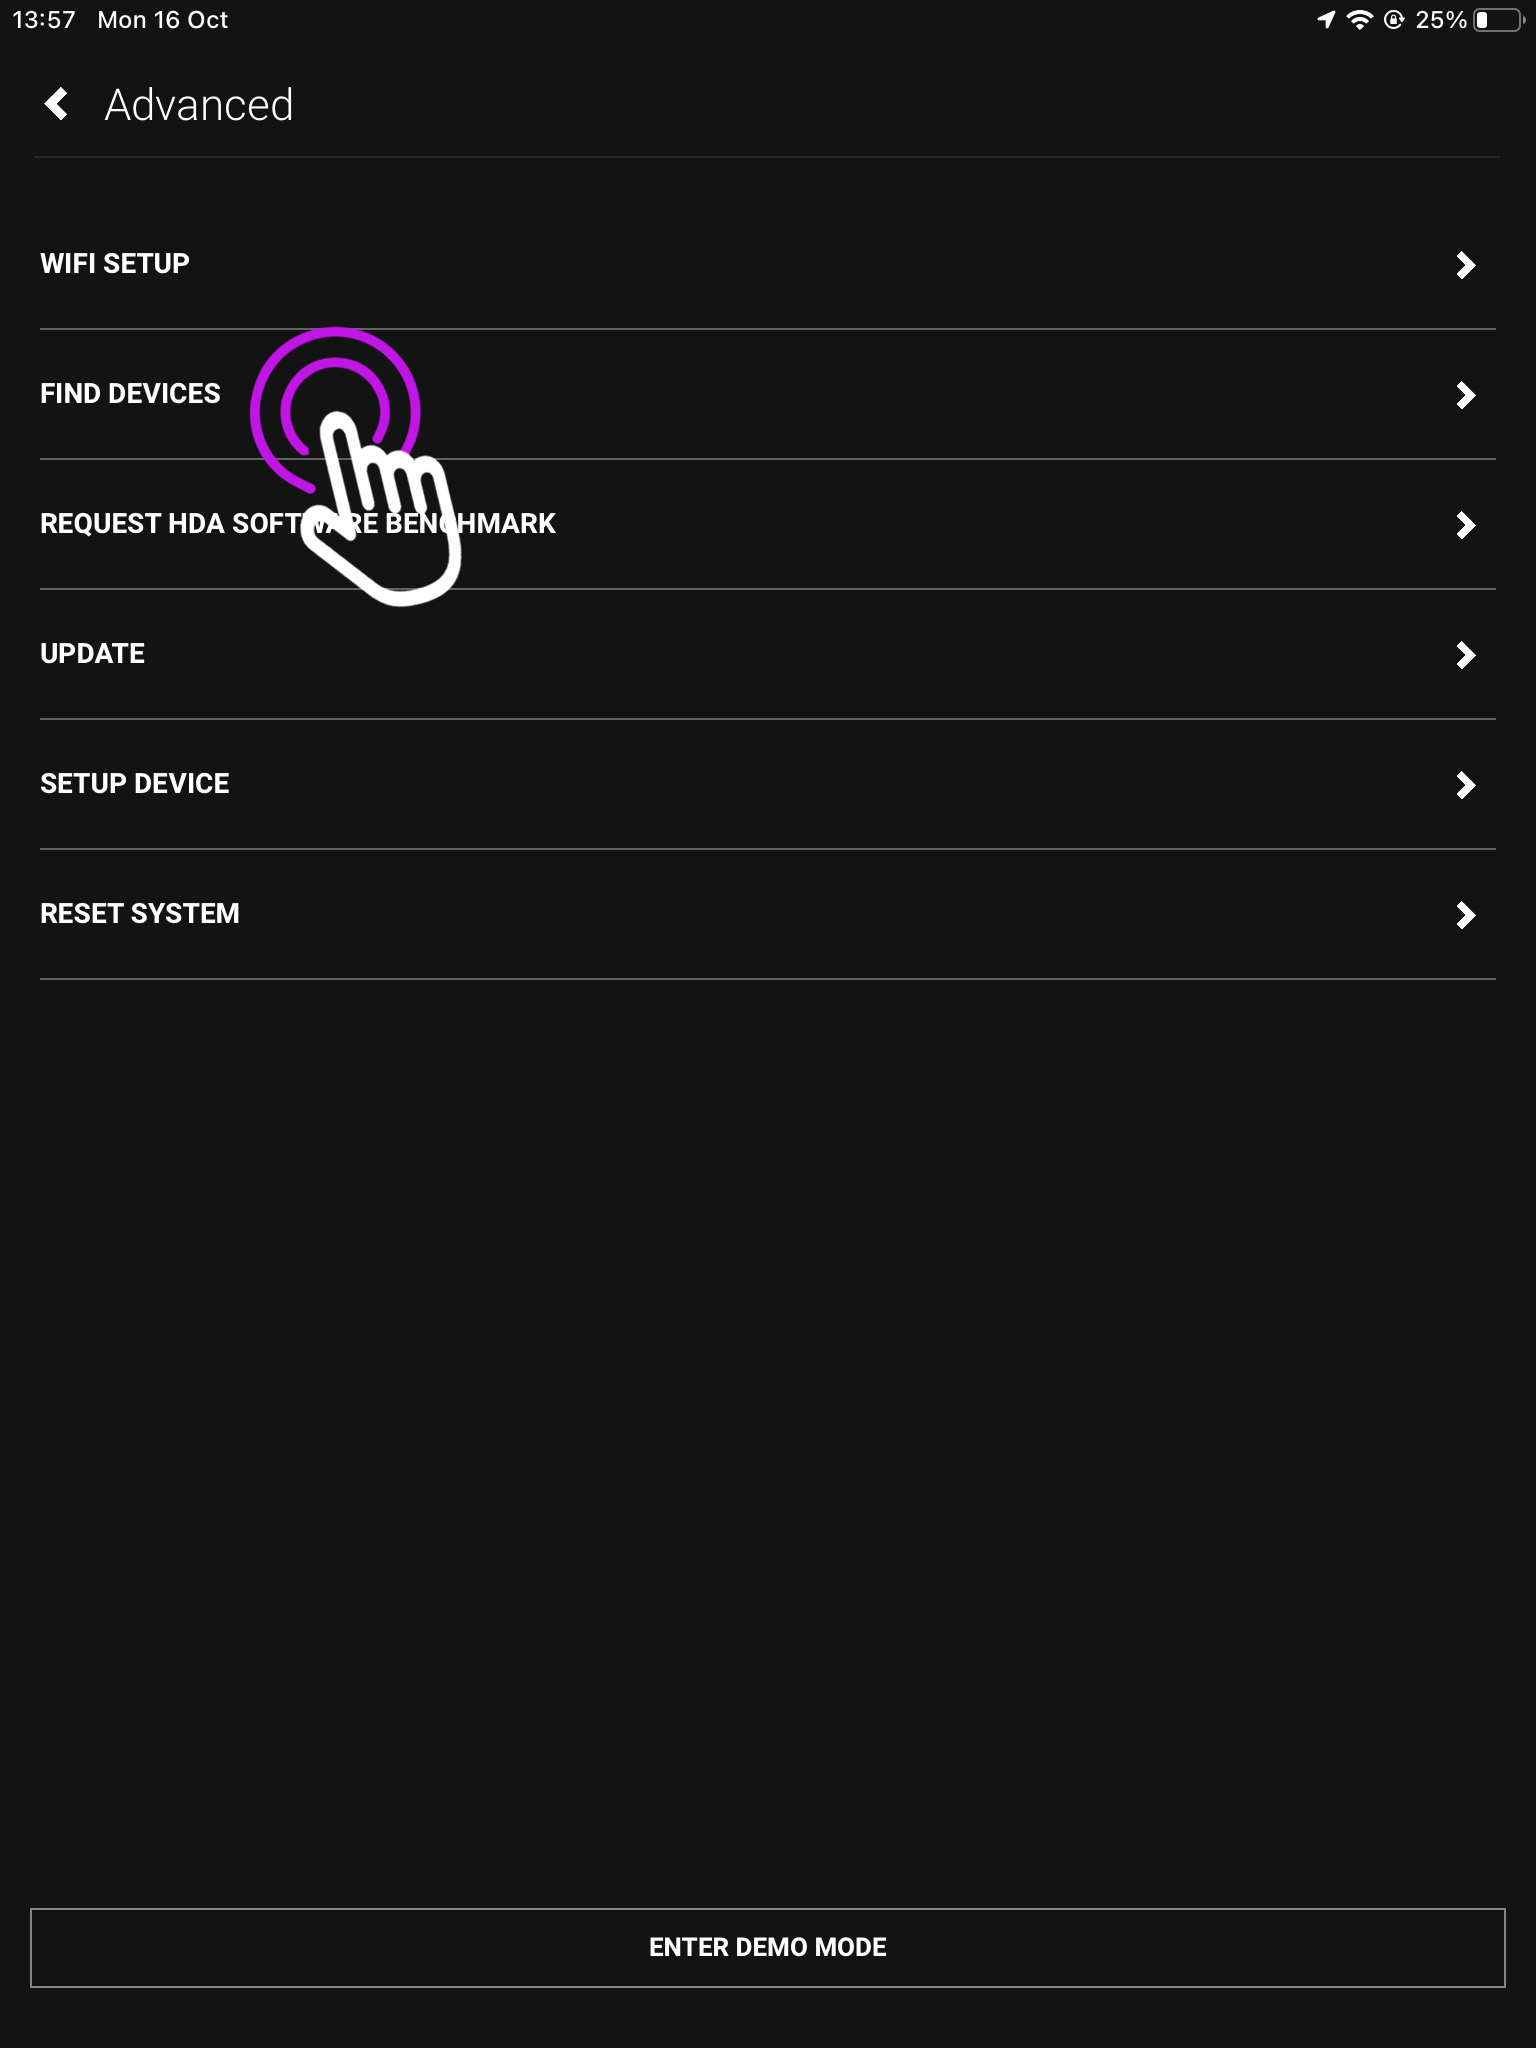
    You now need to press advanced.

    2. Press “Update”

    This is the advanced screen where you can find your devices, connect over WiFi, reset your system and more.
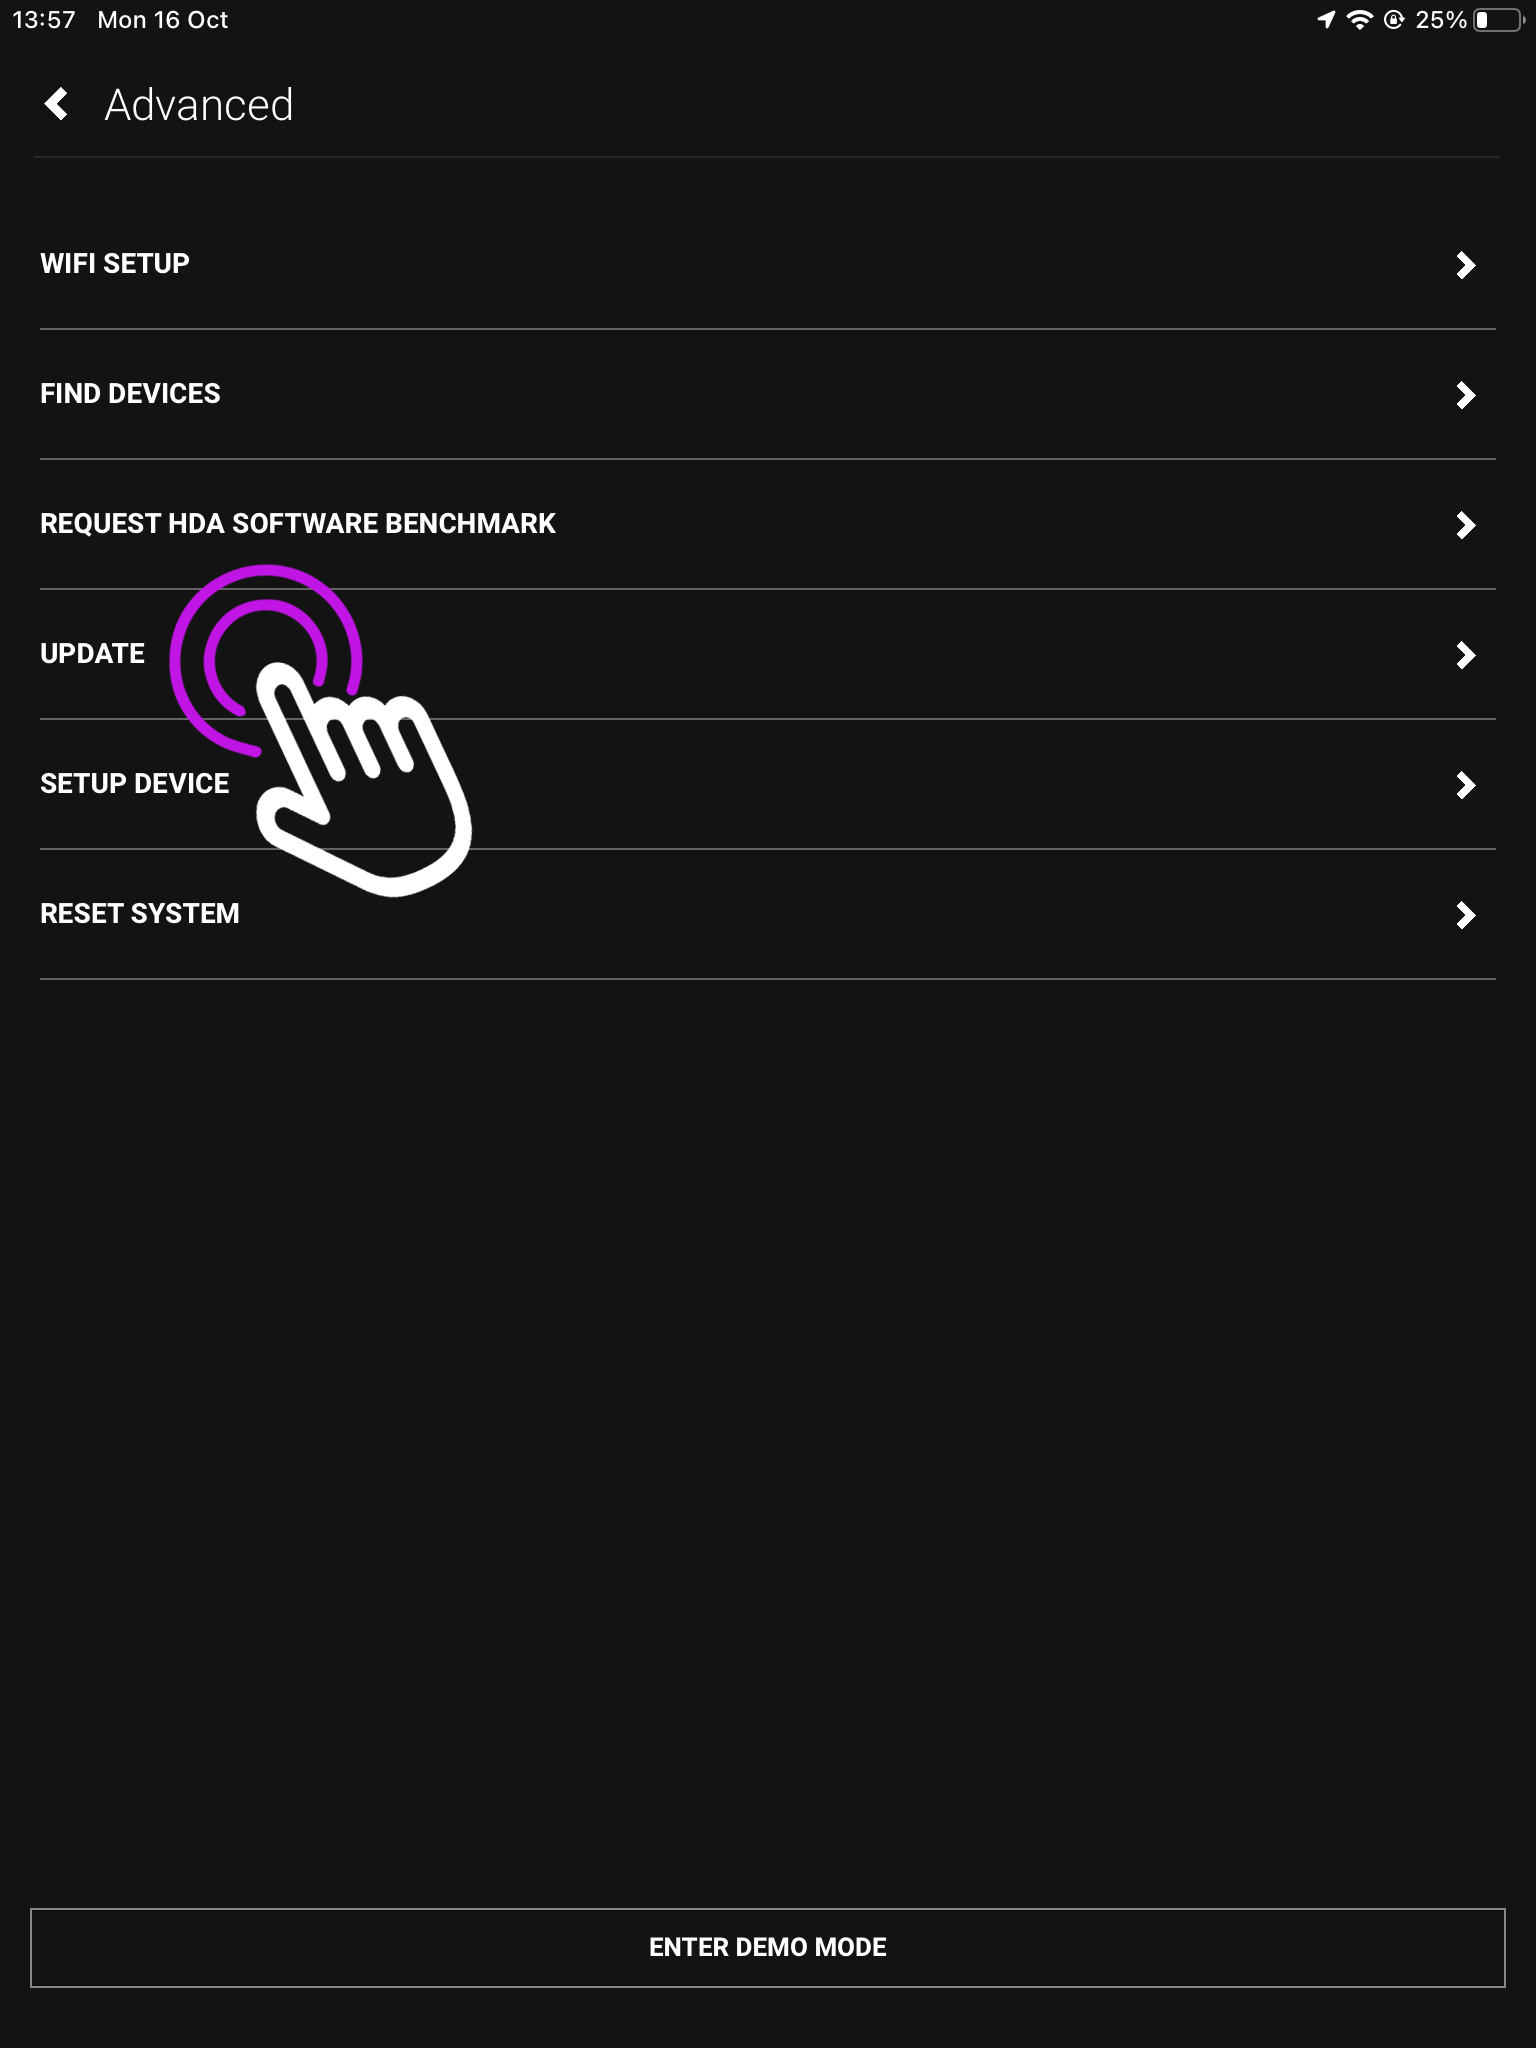
    Your IP address will be needed here so uControl knows which device is looking for an update.

    3. Enter the devices IP address

    If you don’t have this you can get it by finding the IP address of your device.
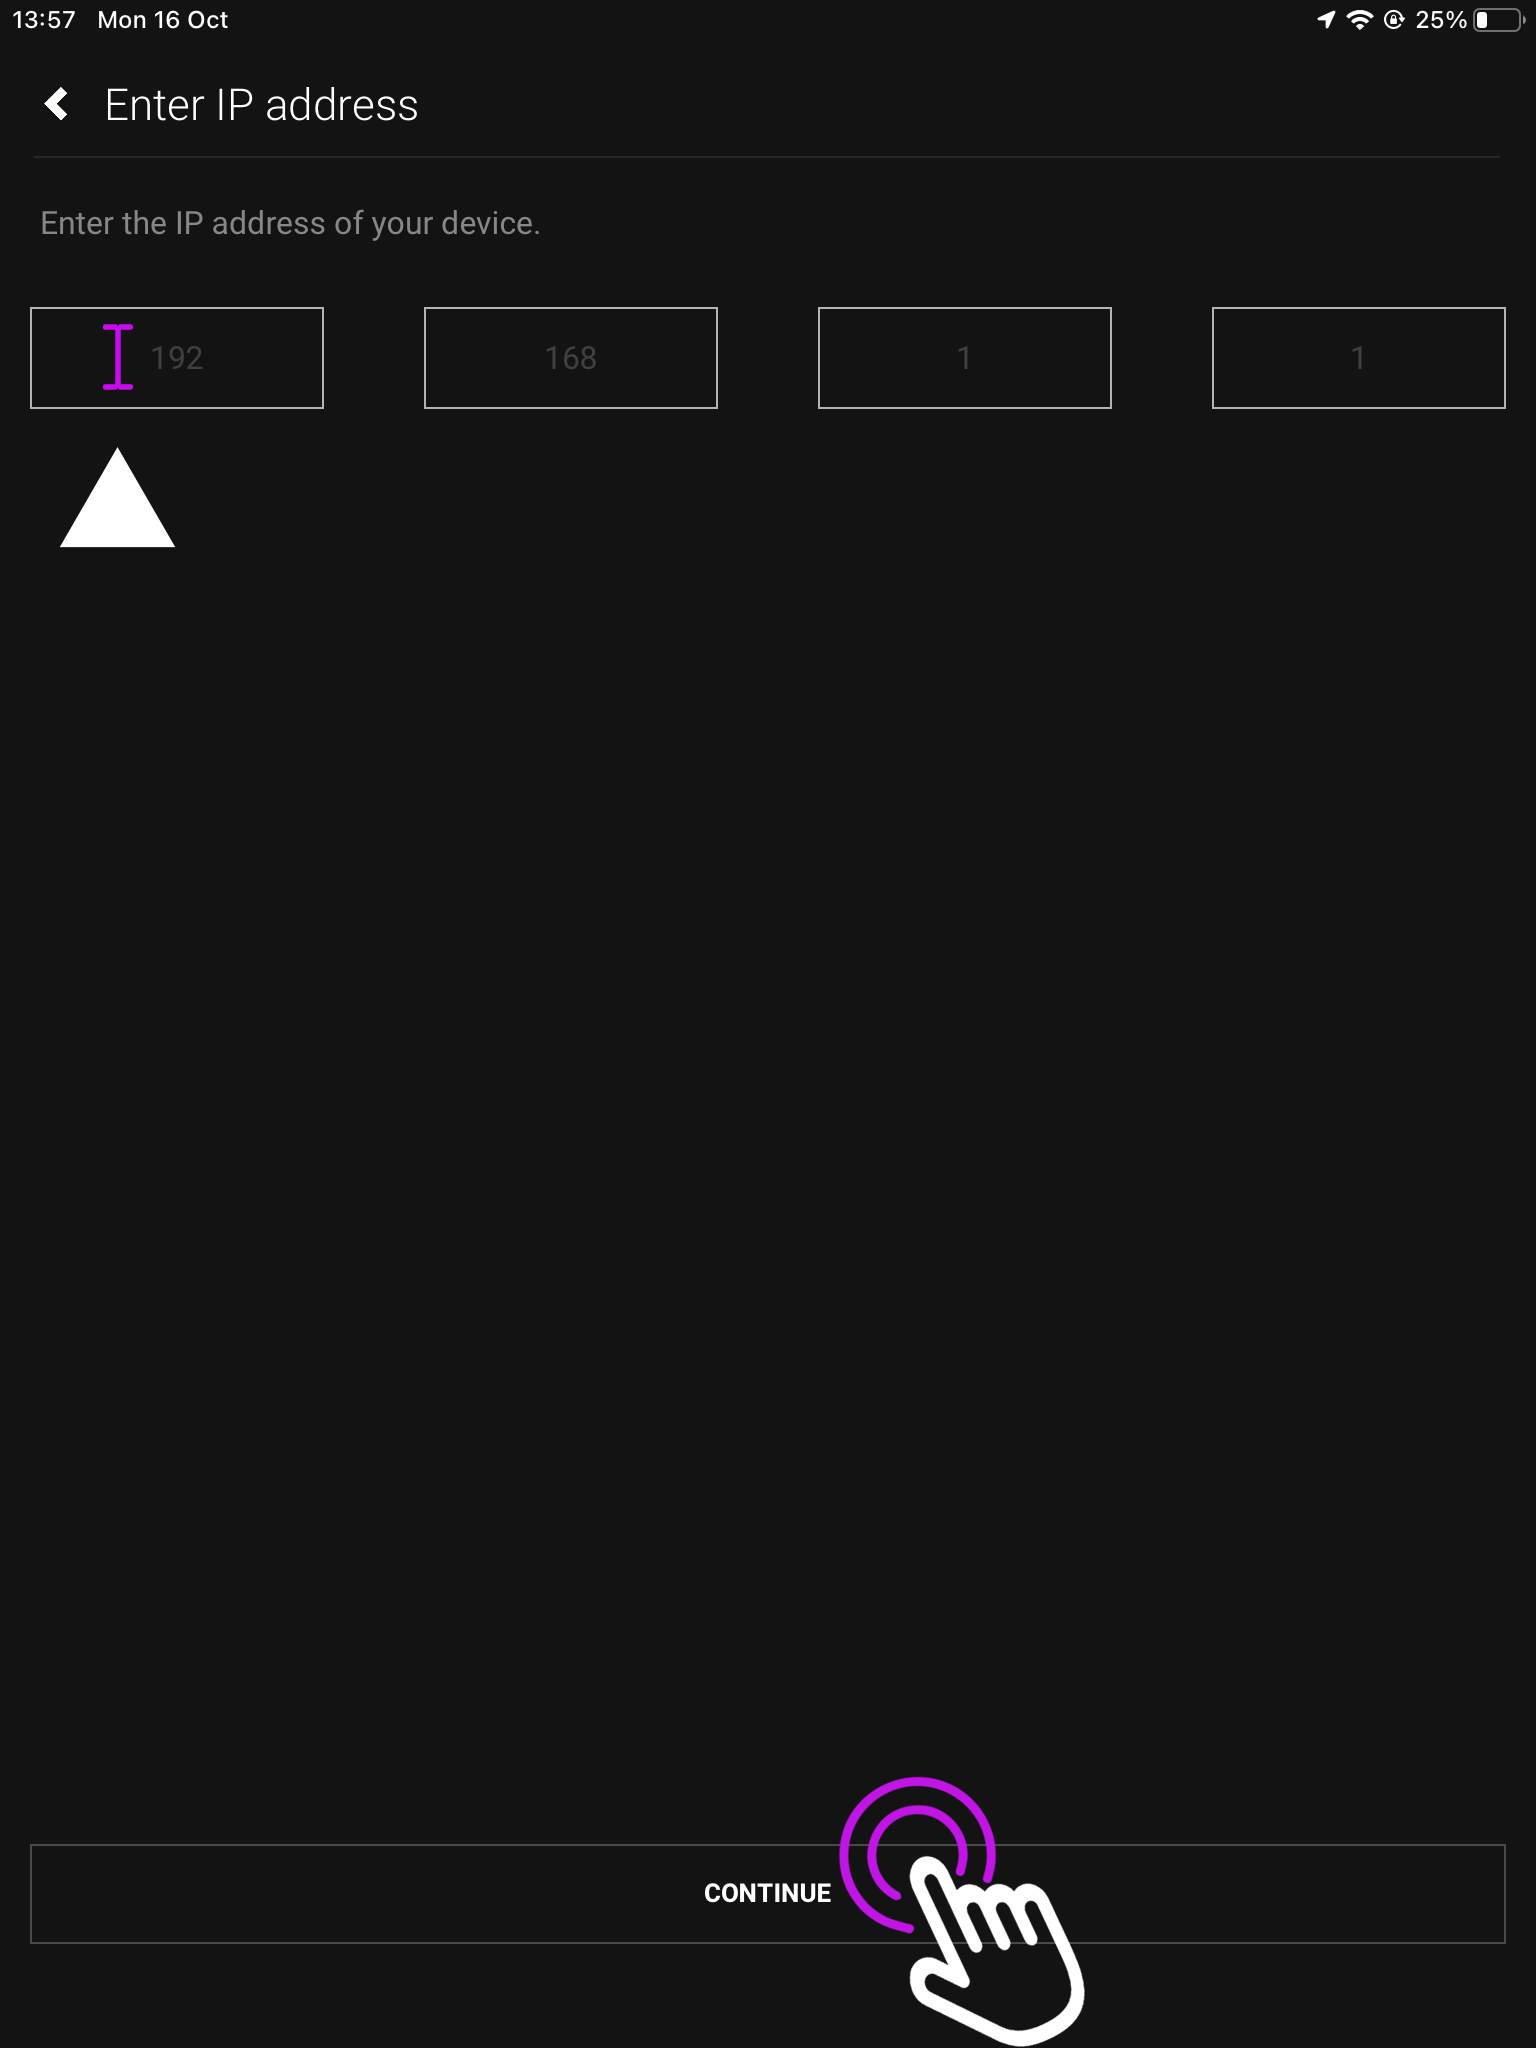
    Once you have typed in your IP address, press “Continue”.

    4. Updating your device

    A. If there is an available update press “Update Device”.
    B. If your device is already up to date, exit this page.
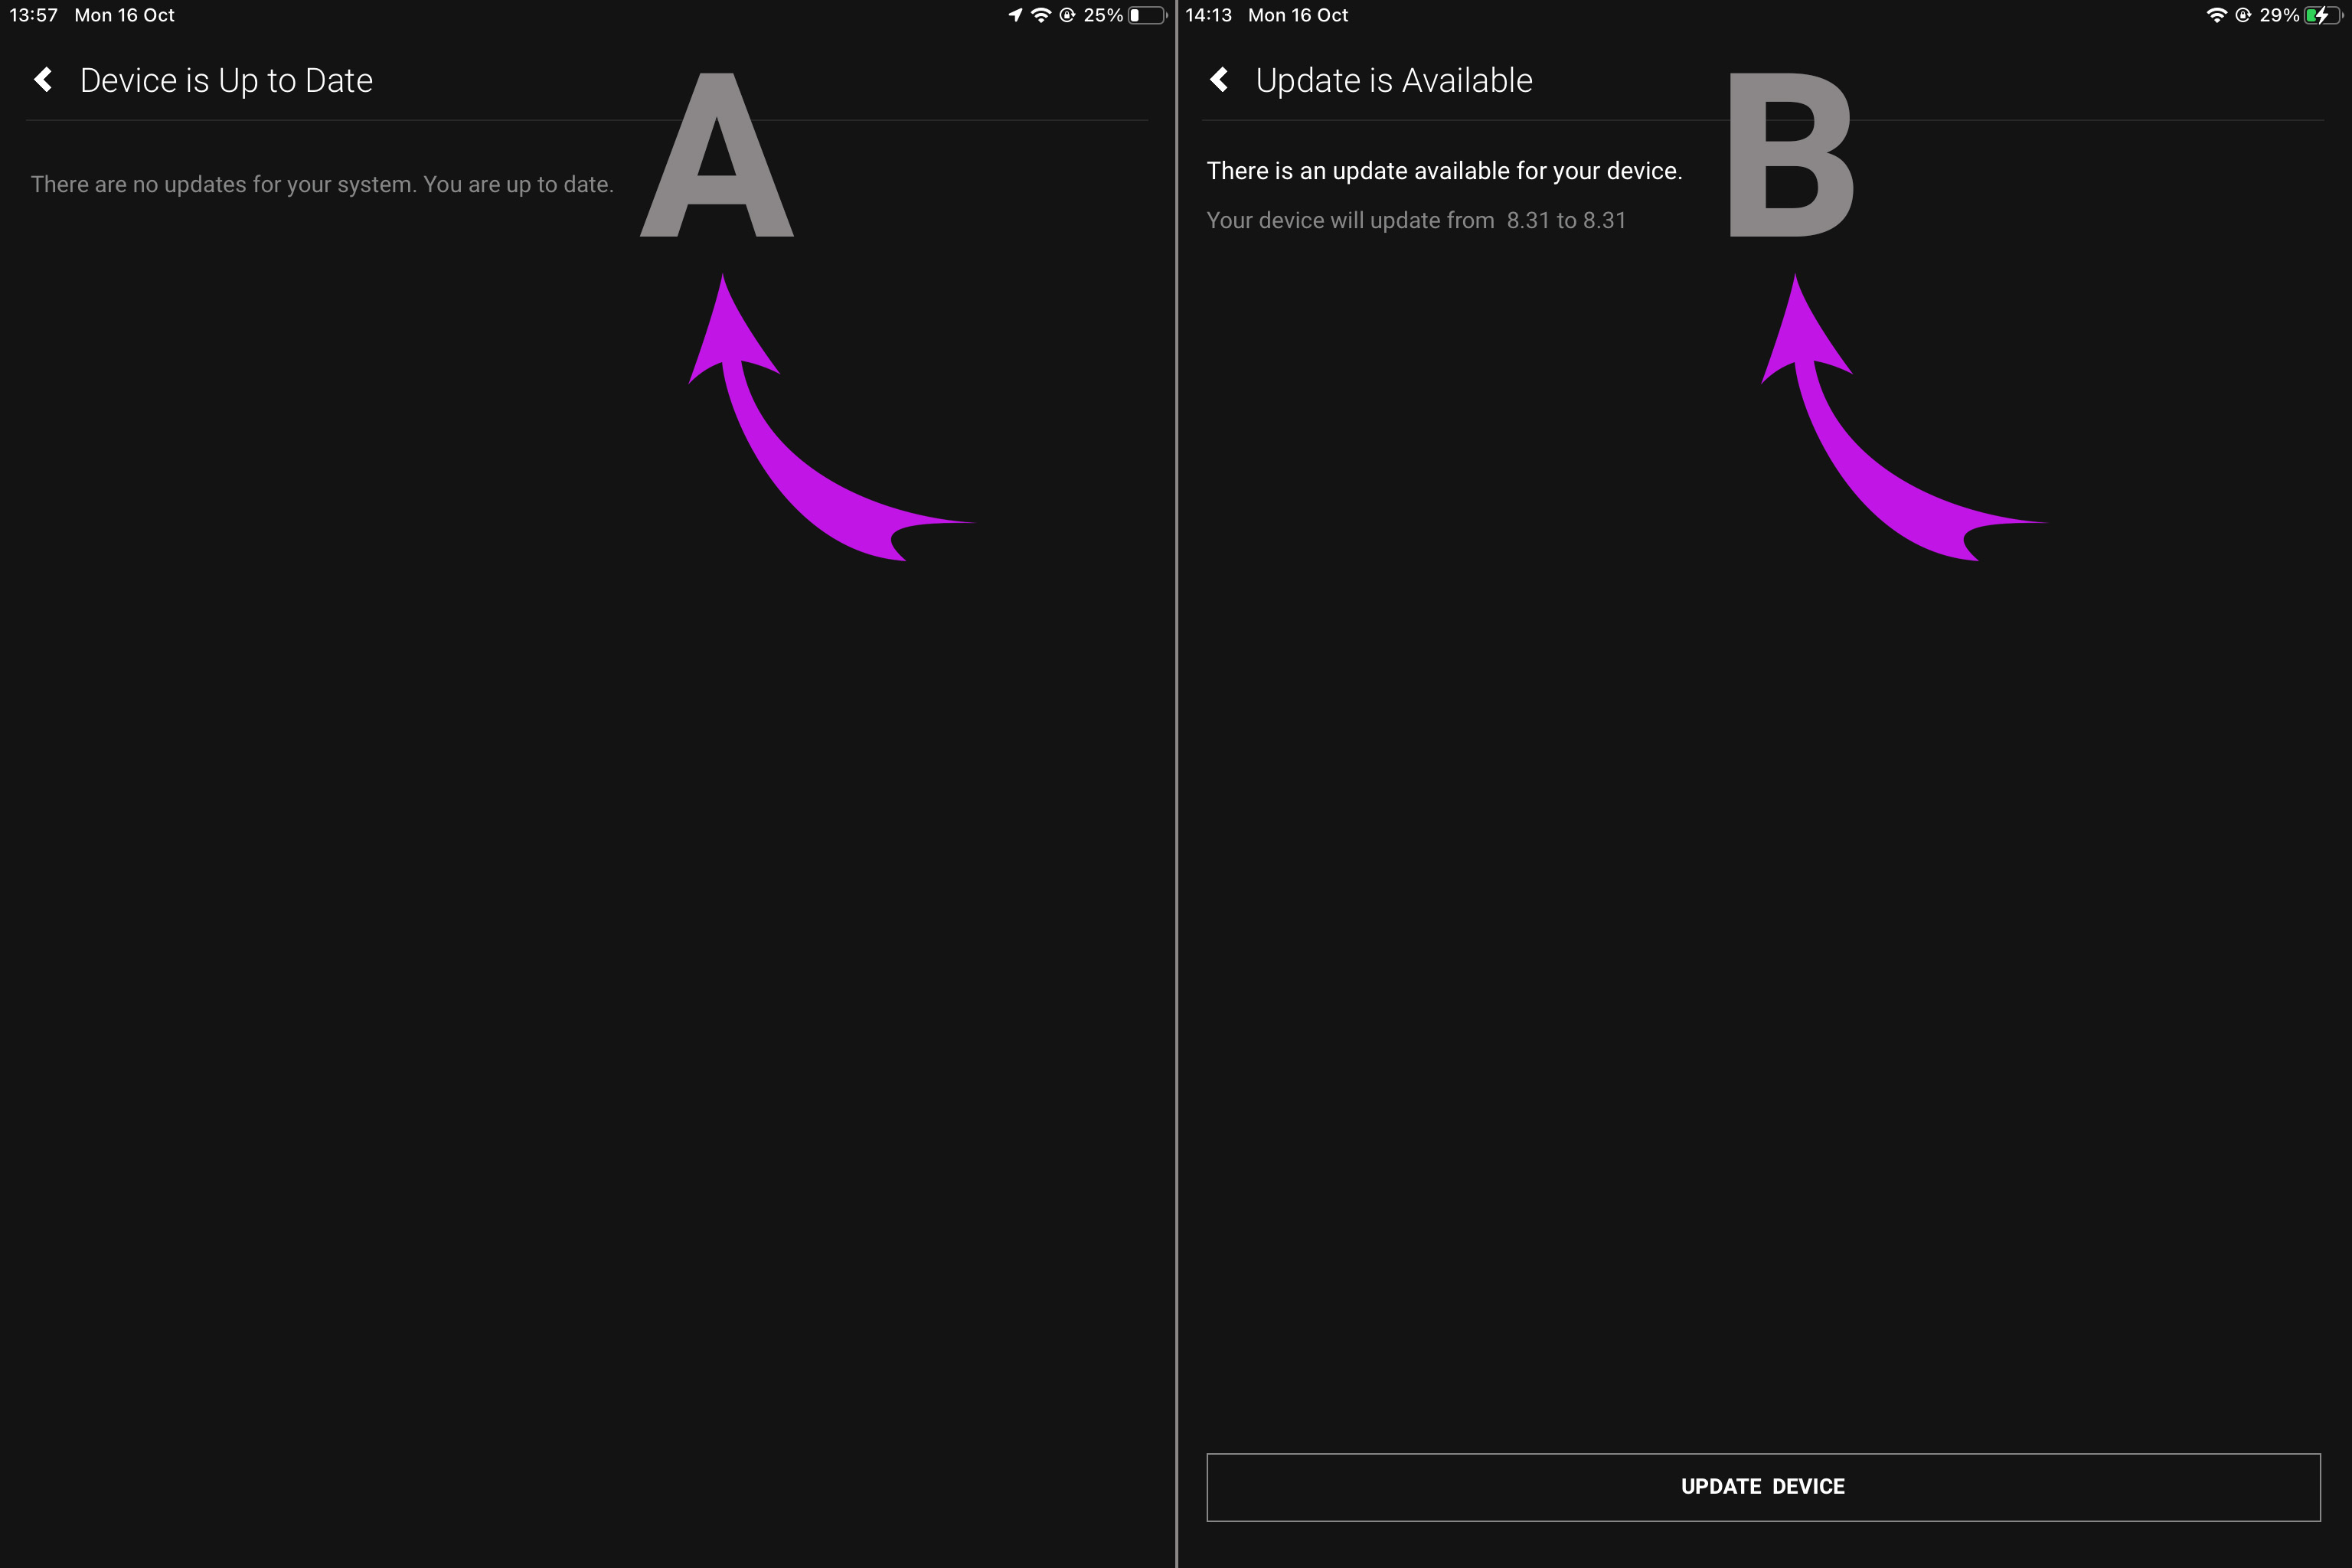
    If your HDA device has an issue that prompted you to update, but it is already up to date please contact support.

    5. Terms and Conditions

    To proceed accept the End User Licence Agreement (EULA) and Privacy Statement.
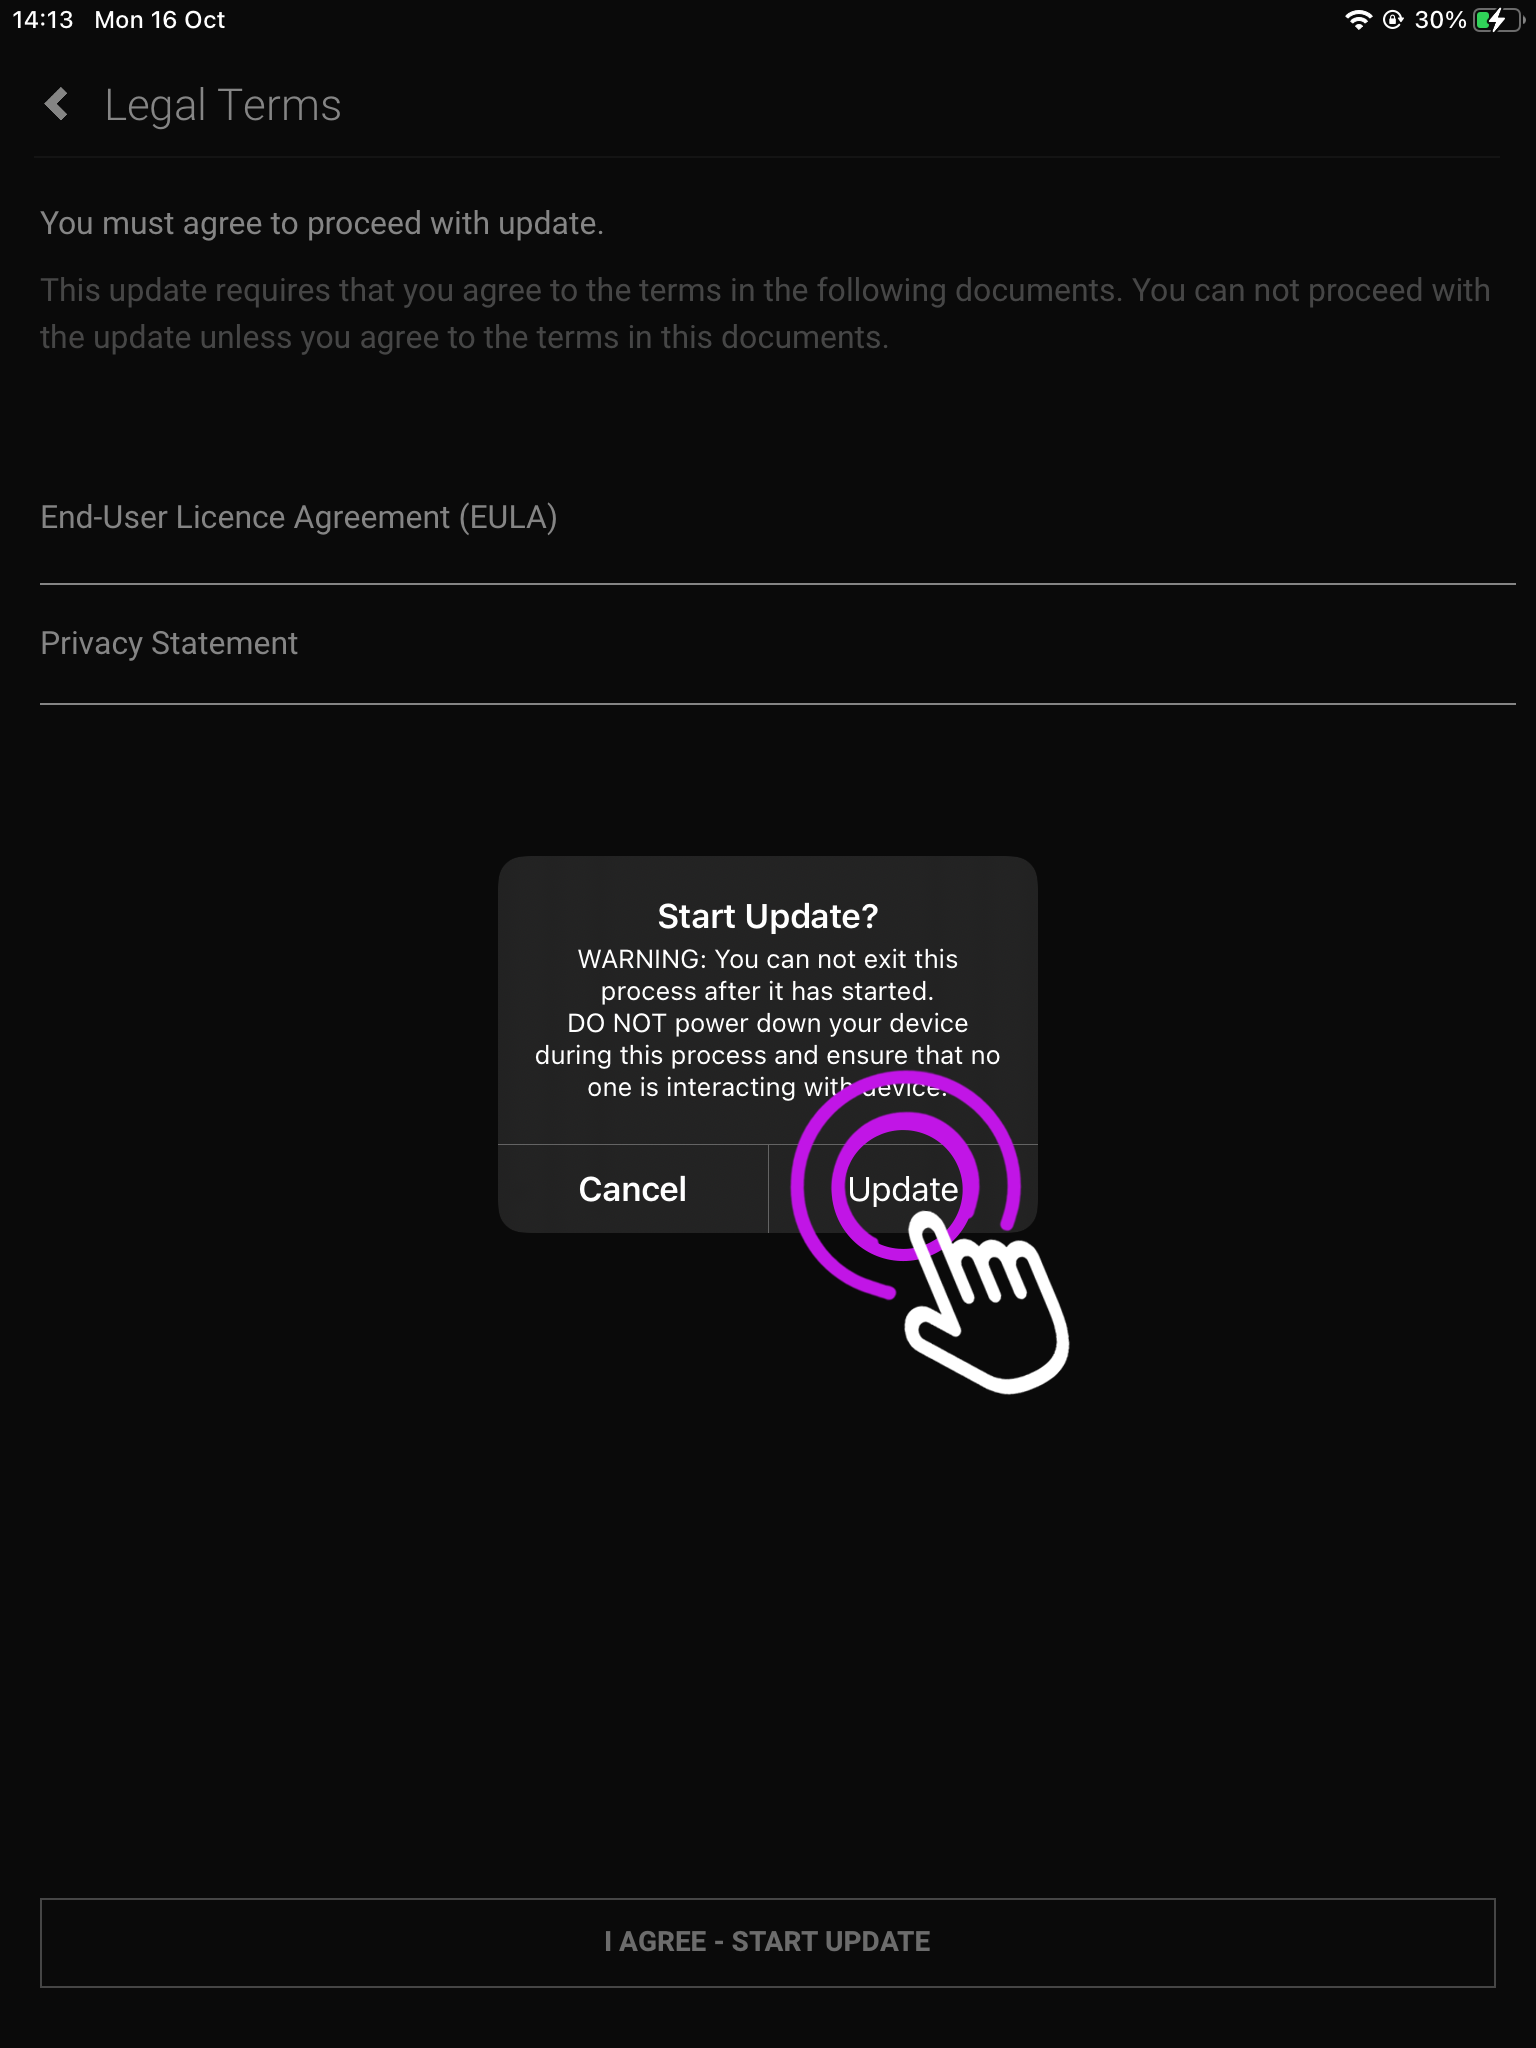
    For more information click on the terms.

    6. Update begins

    This process can take up to 5 minutes, however, depending on your network it could be longer.
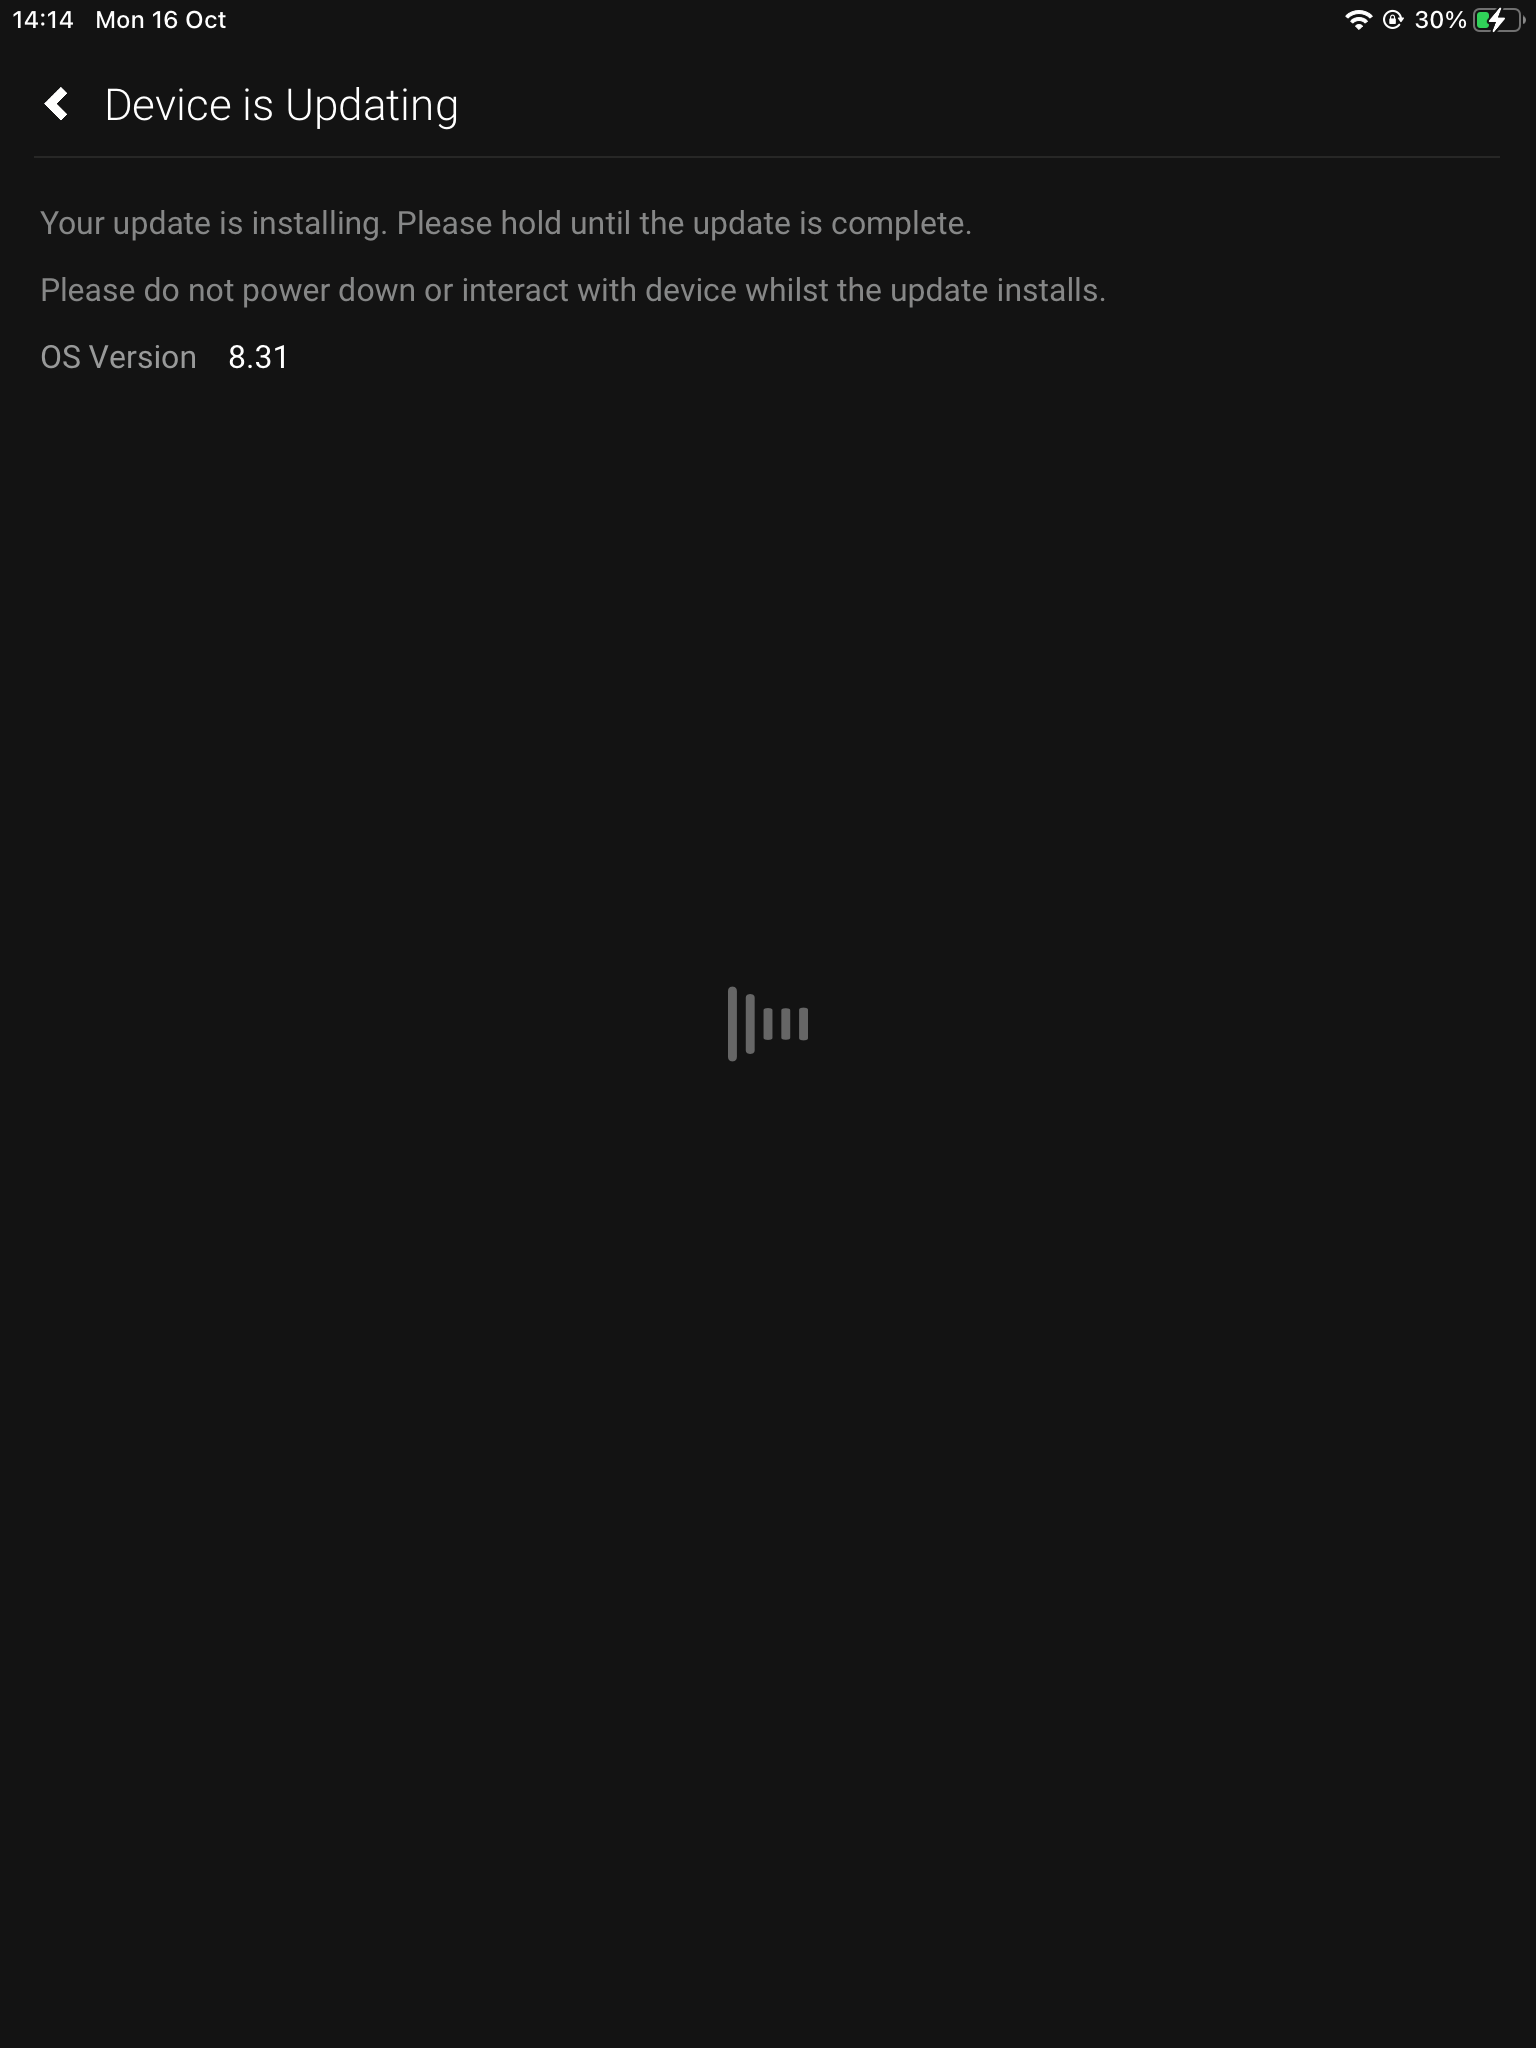
    Please do not switch off your HDA device whilst updating.

    7. Update completed

    uControl will display your OS Version.
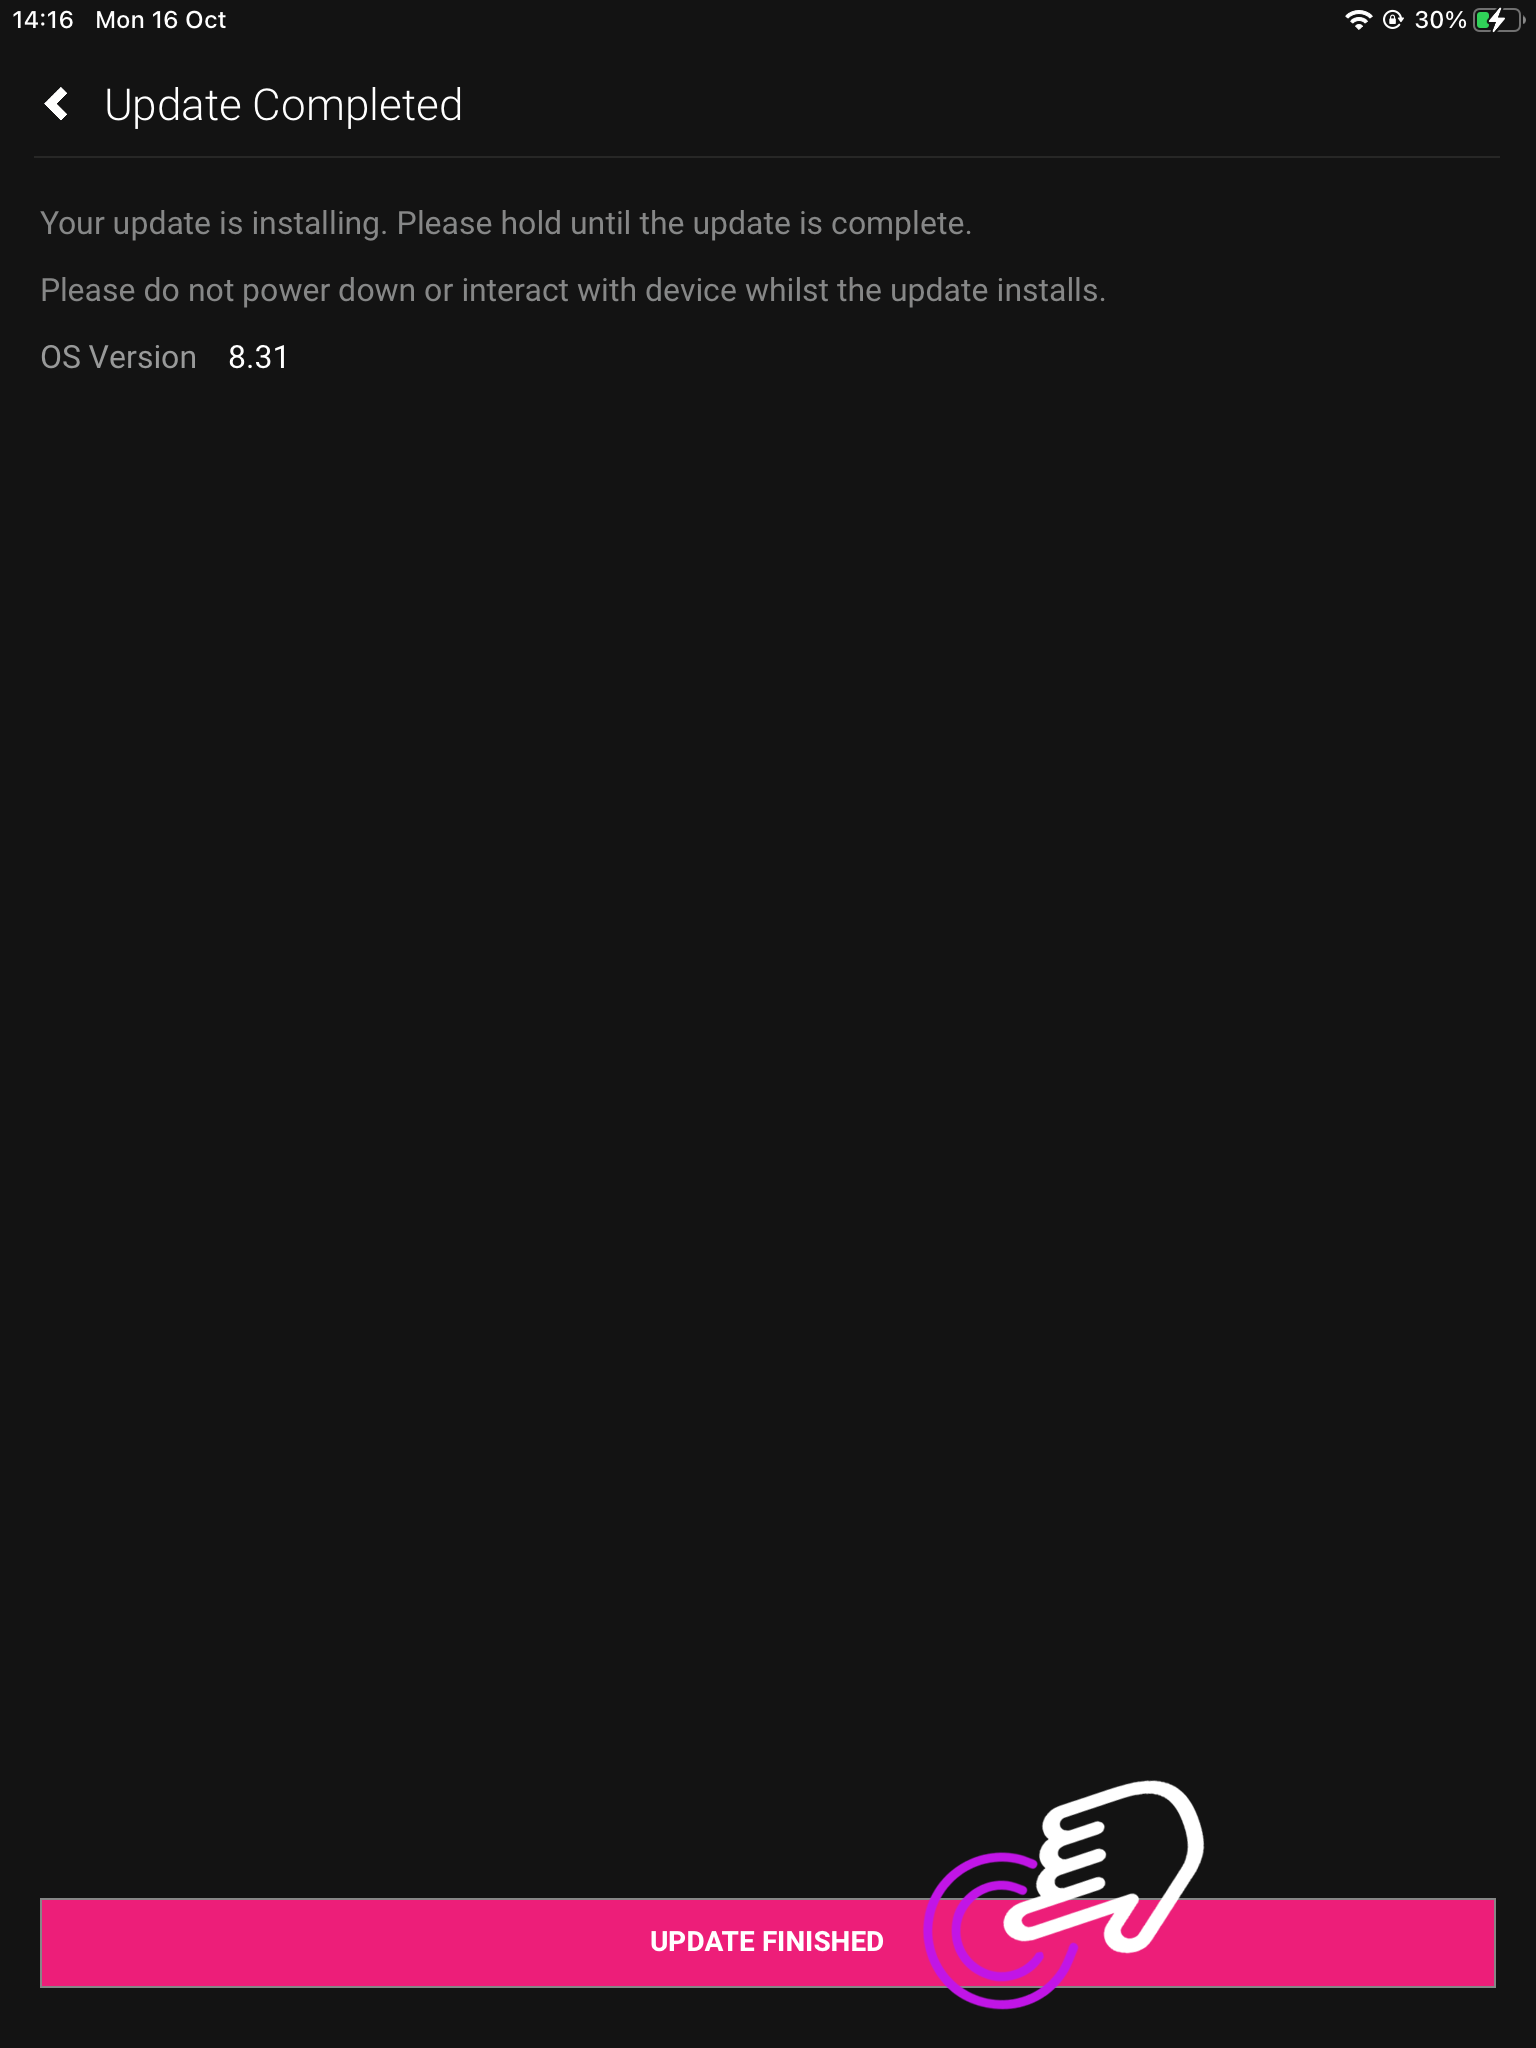
    Press “Update Finished”.

    If you are connected to a device

    1. Open up uControl

    If you’re already connected to a system then you will need to access uControl’s settings. From the main screen you will see something similar to this (see below). From here, look for a menu icon (three horizontal lines) in the top left corner, press that to reveal the Zone selector and Zone control menu.
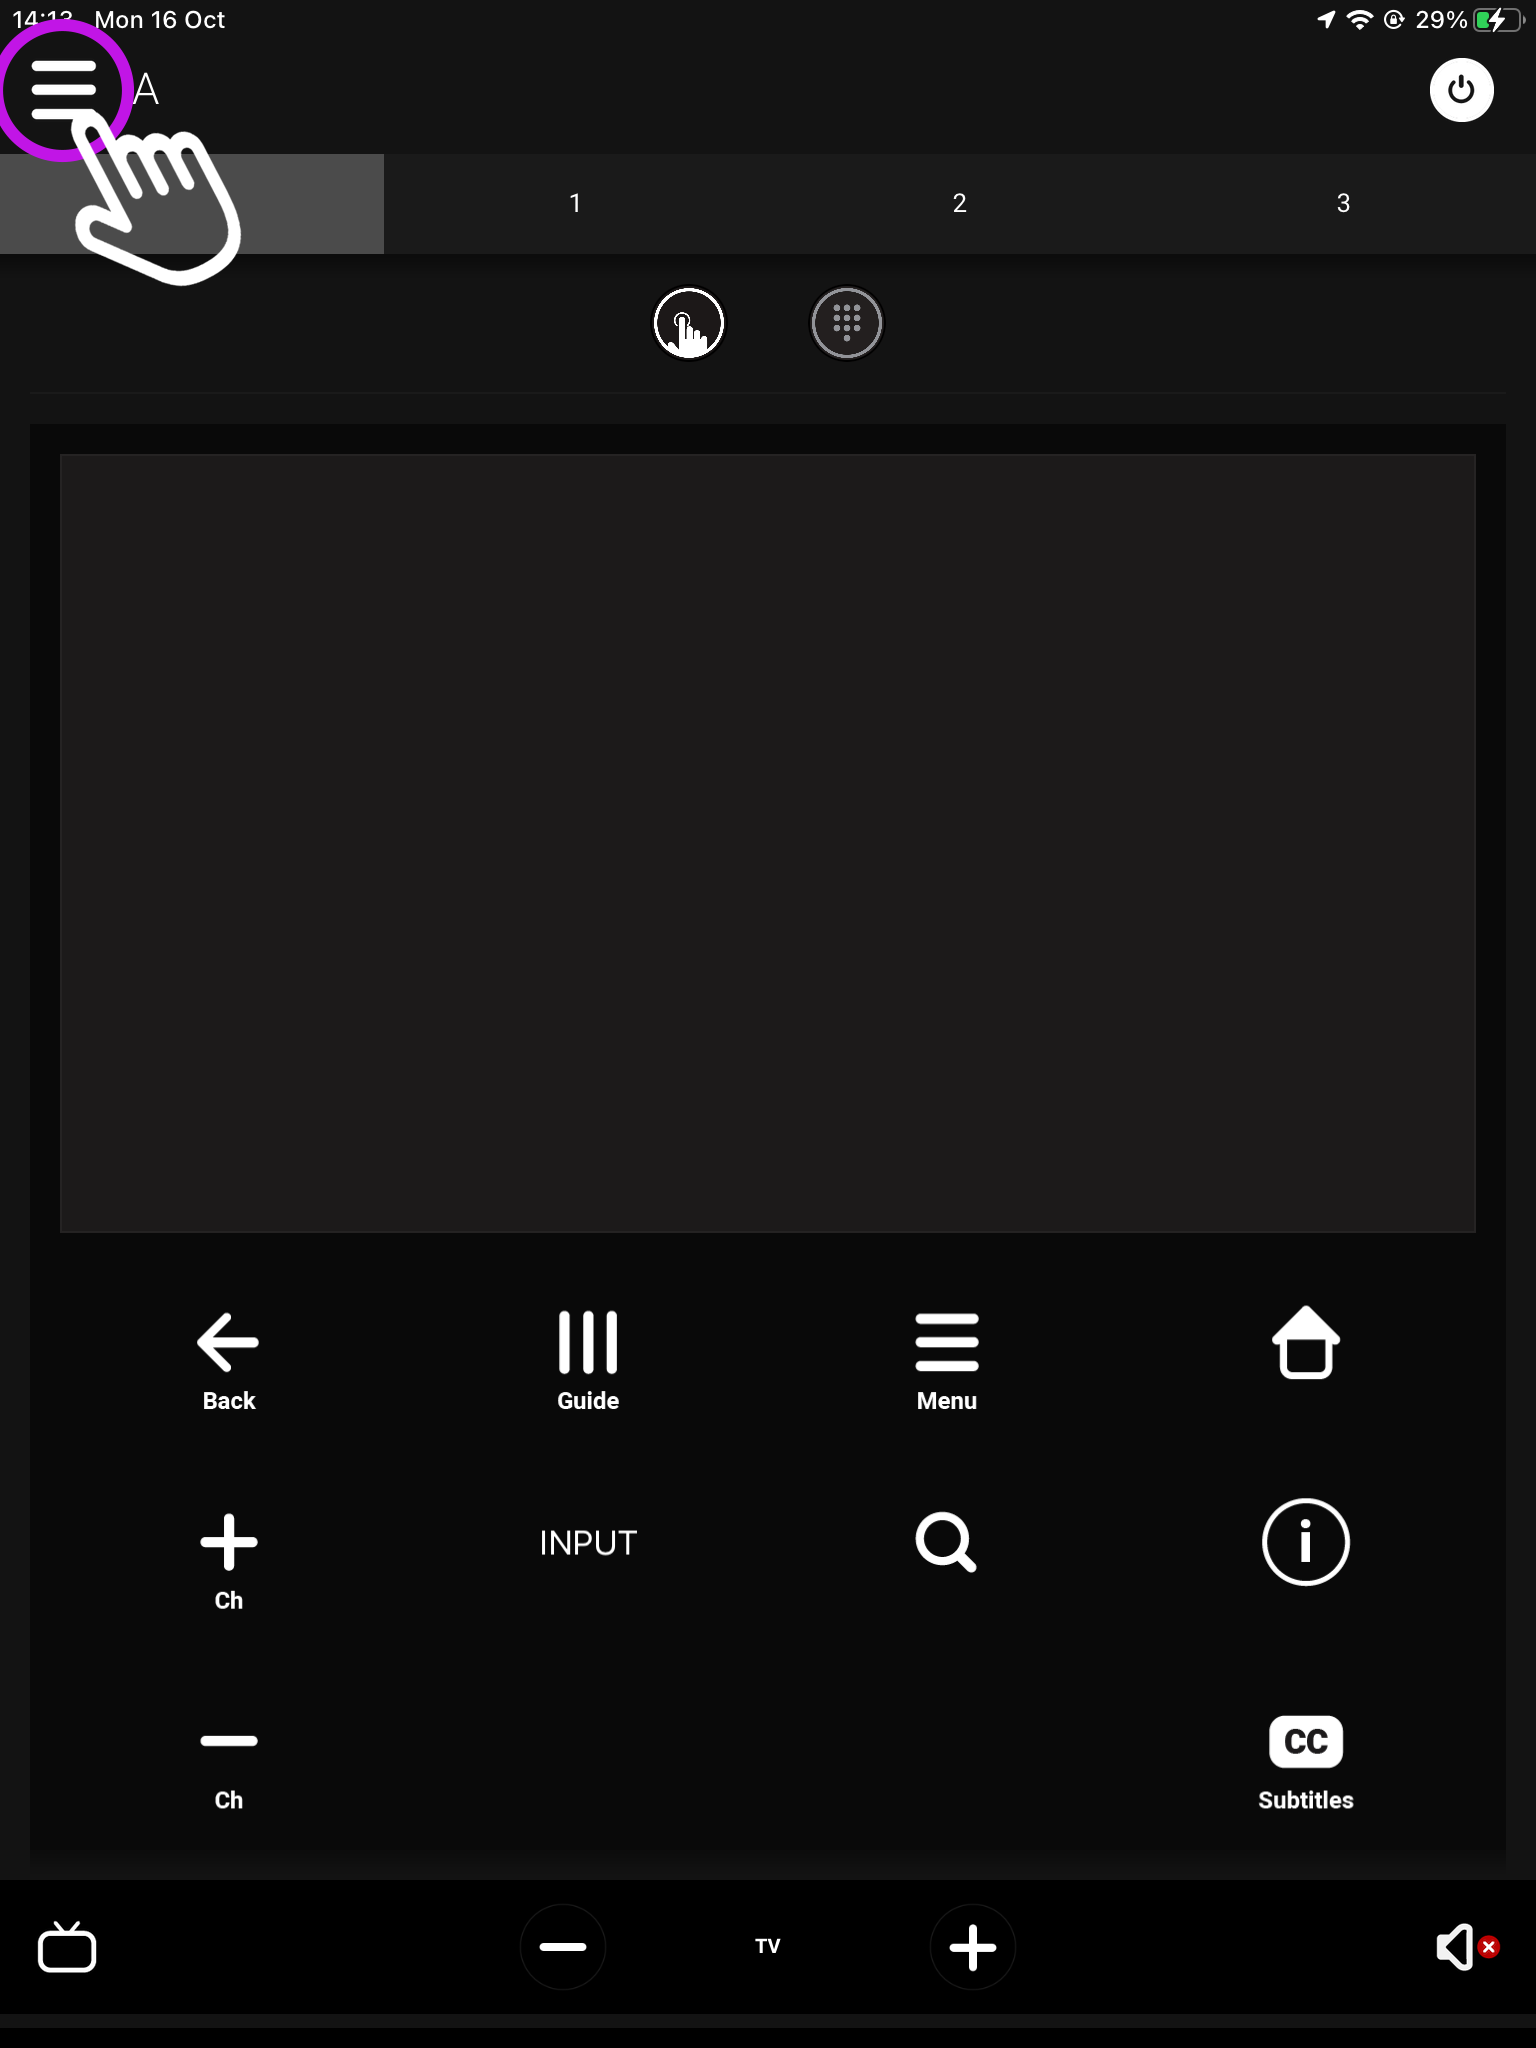
    What you see on the main screen may differ, however, the three lined menu bar will still be there.

    2. Navigate to your settings

    Look for the settings icon located in the bottom left corner.
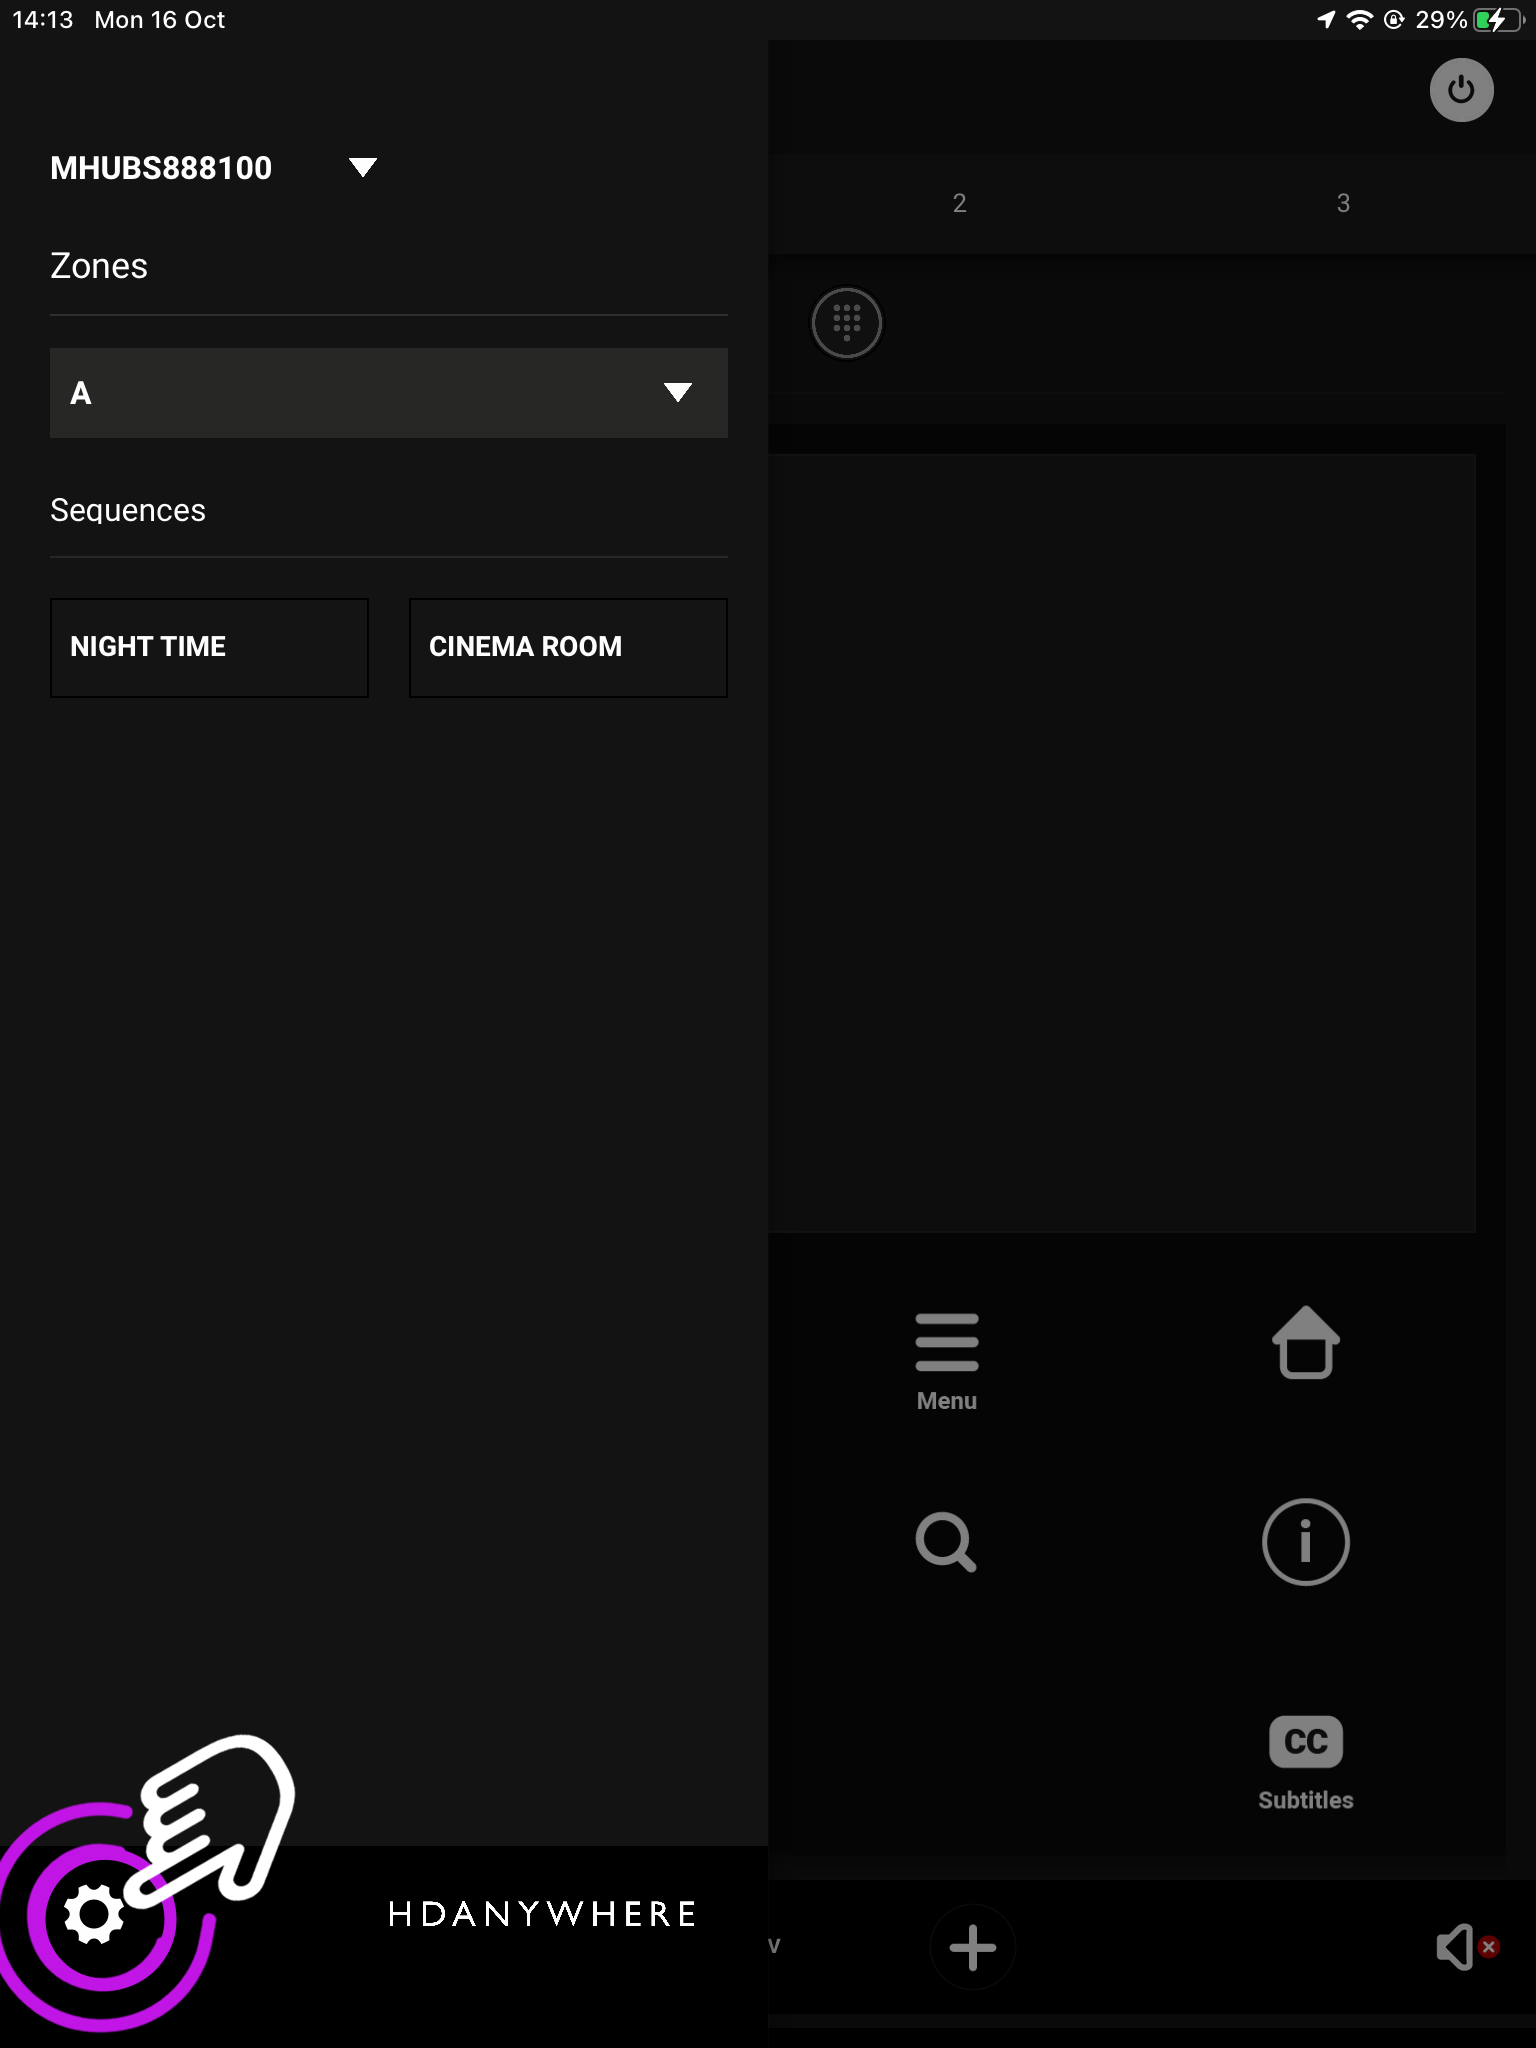
    The icon may vary depending on your mobile devices size, however, it will still be in the bottom left corner.

    3. Press “Utilities”

    This will take you to your devices service page.
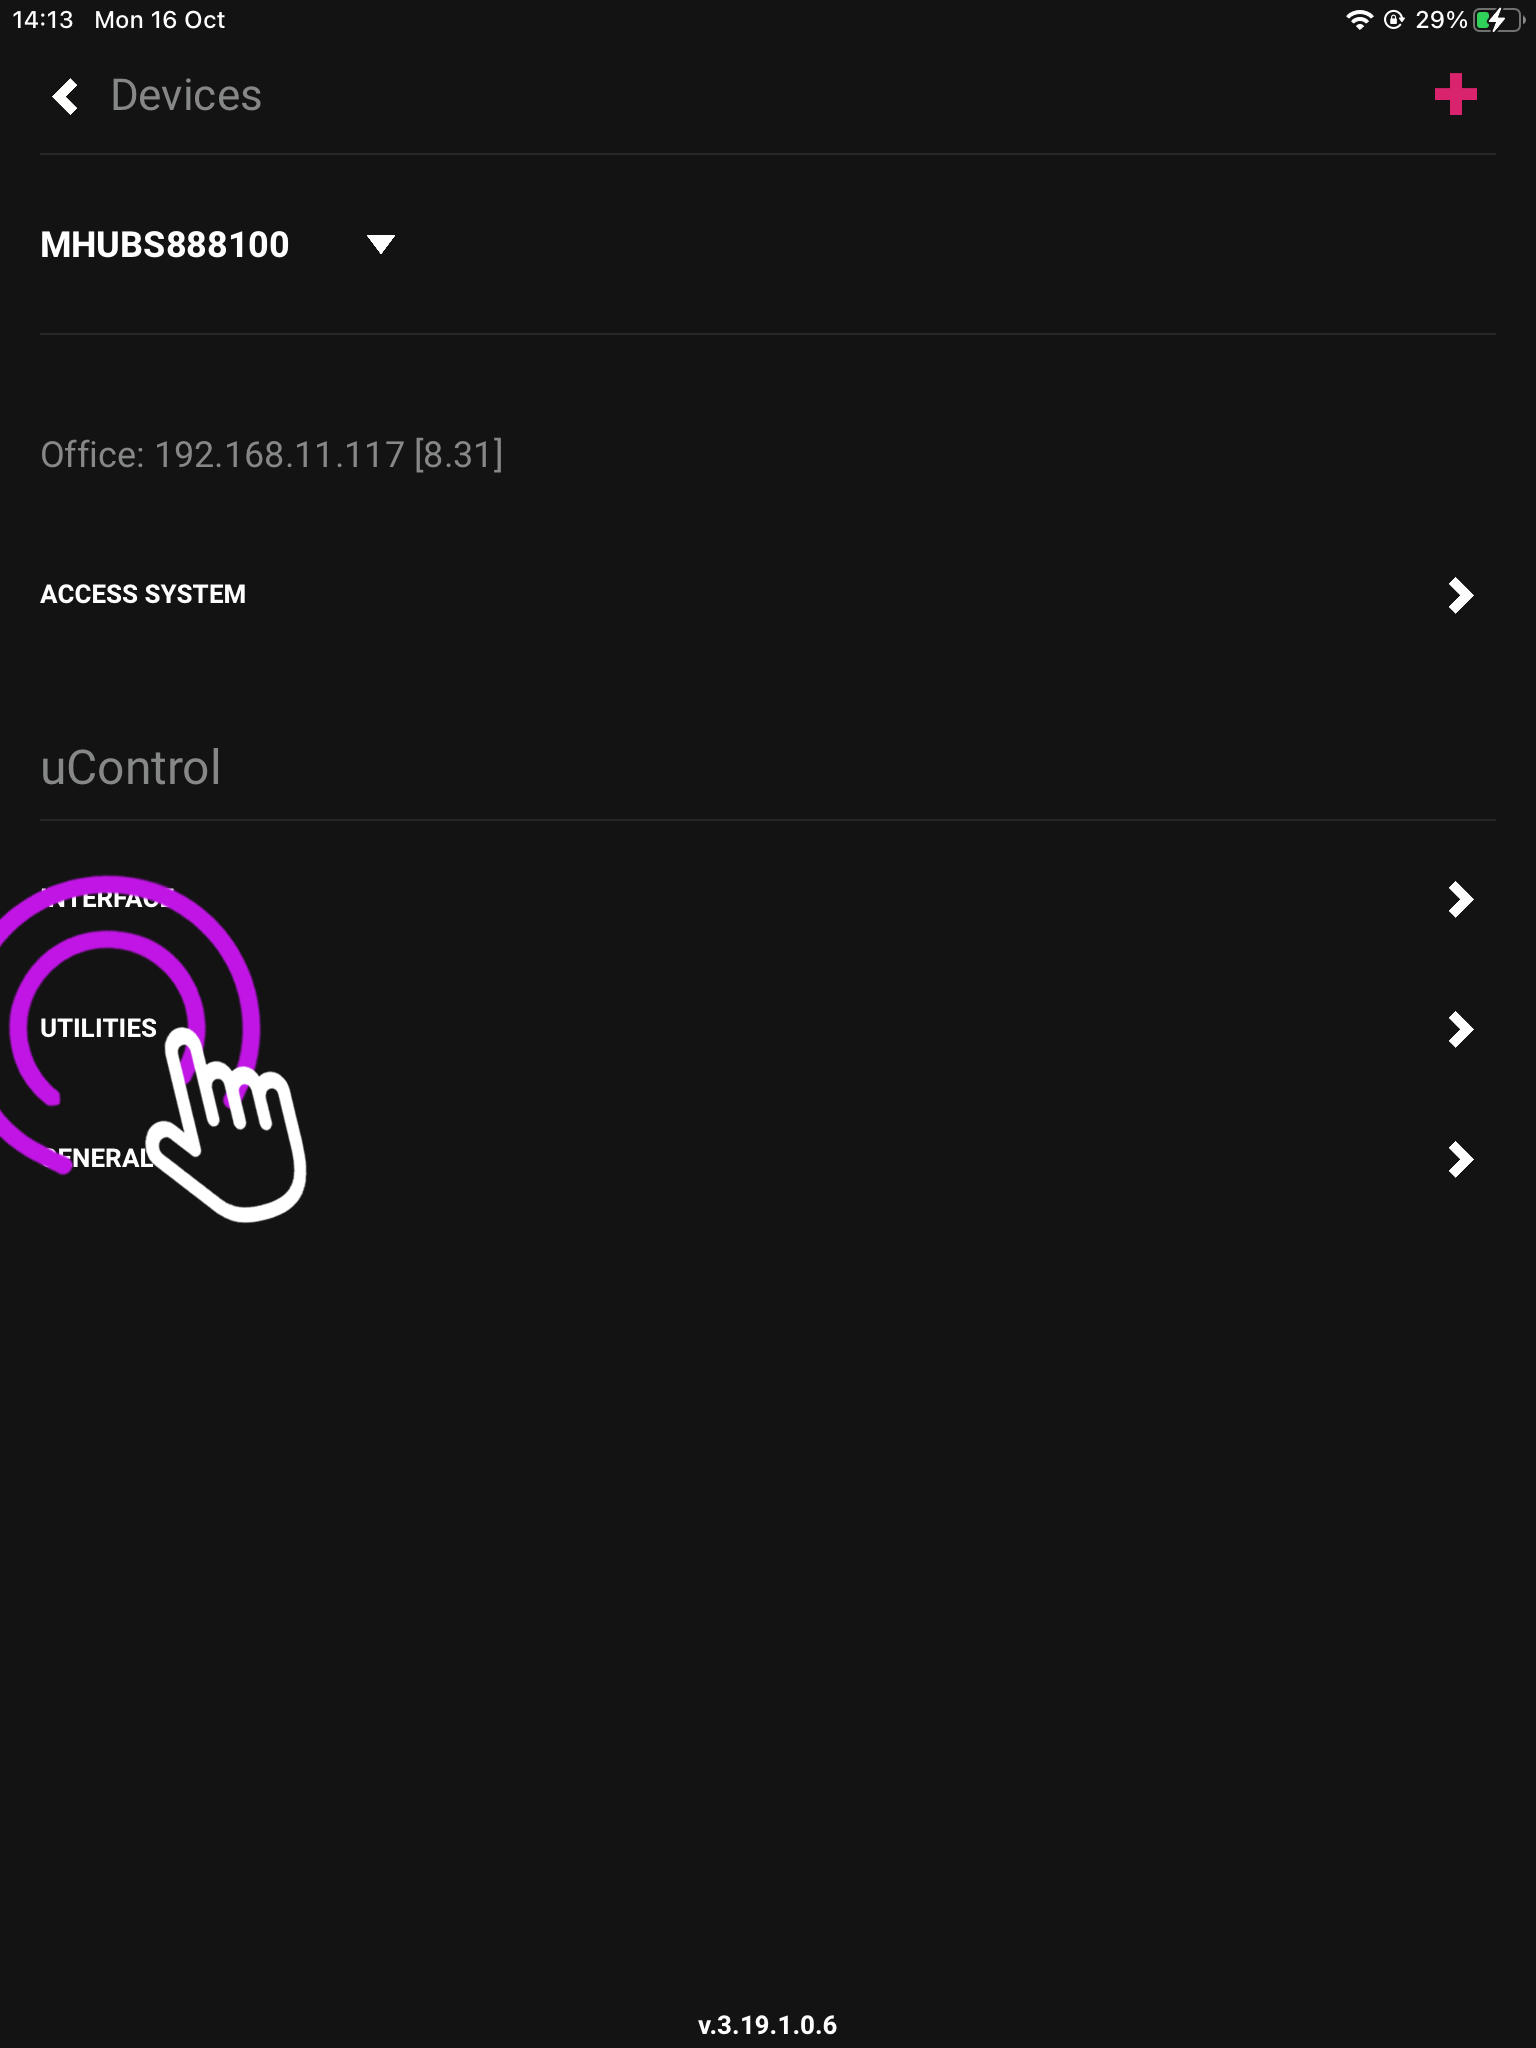
    From here you can also see your connected devices IP address(s).

    4. Press “Update”

    From this page you can also find your devices, and reset one. To find out more check out our uOS Utilities page.
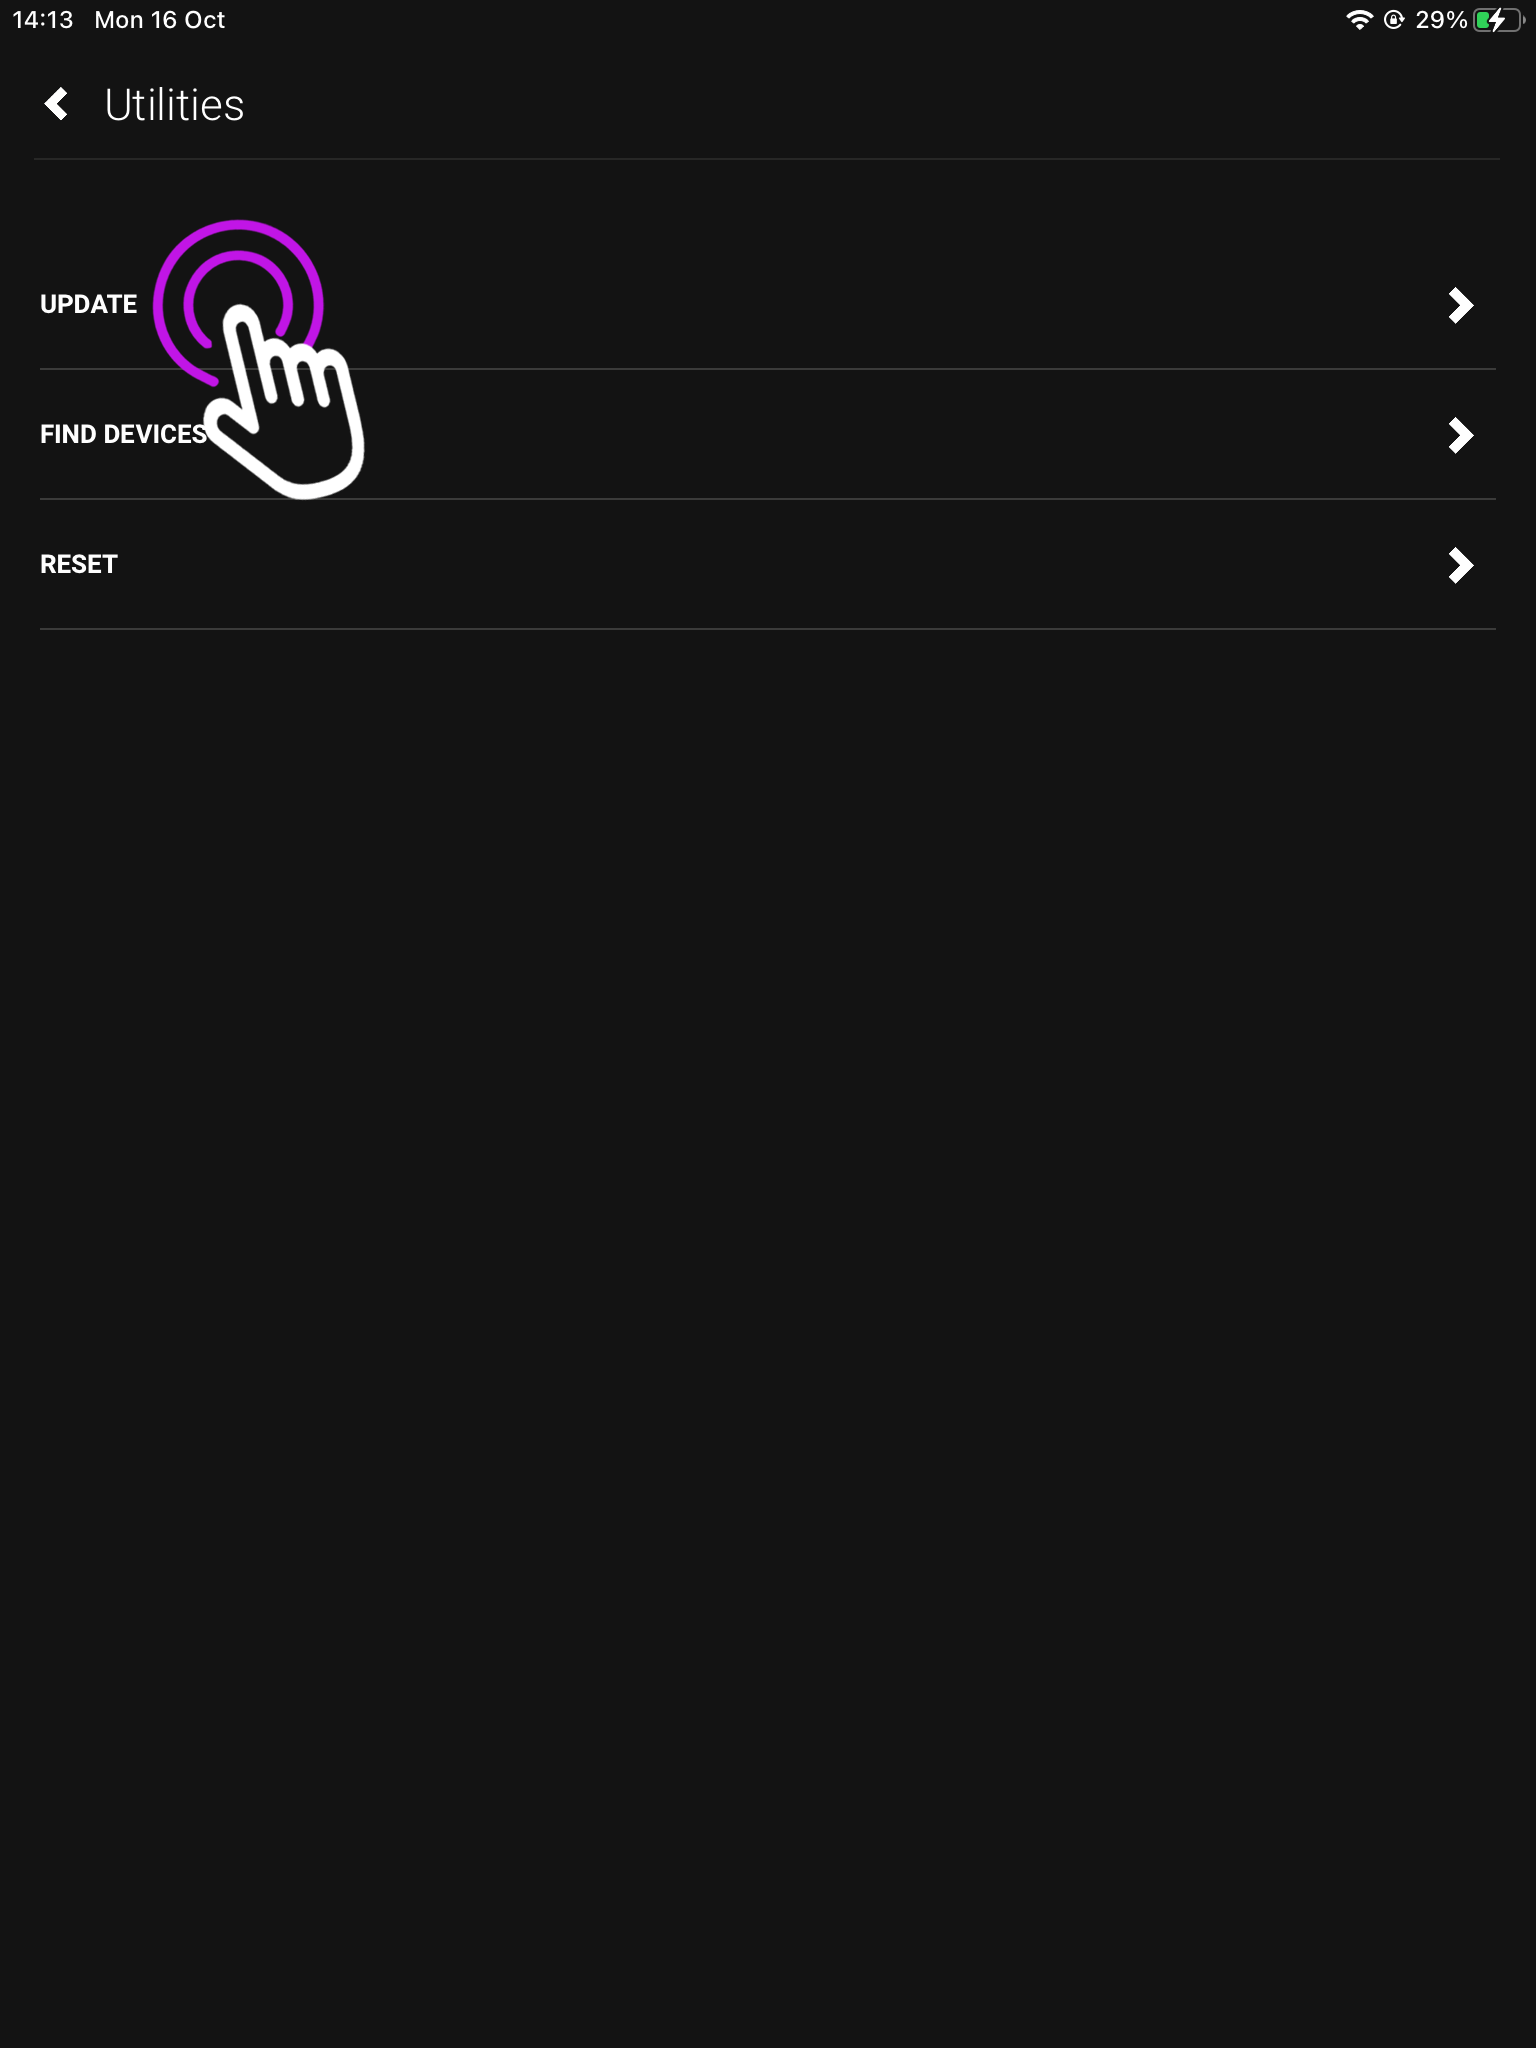
    The next page will show you your connected HDA devices.

    5.“Available Systems”

    If you have a stacked system, or multiple devices they will show here.
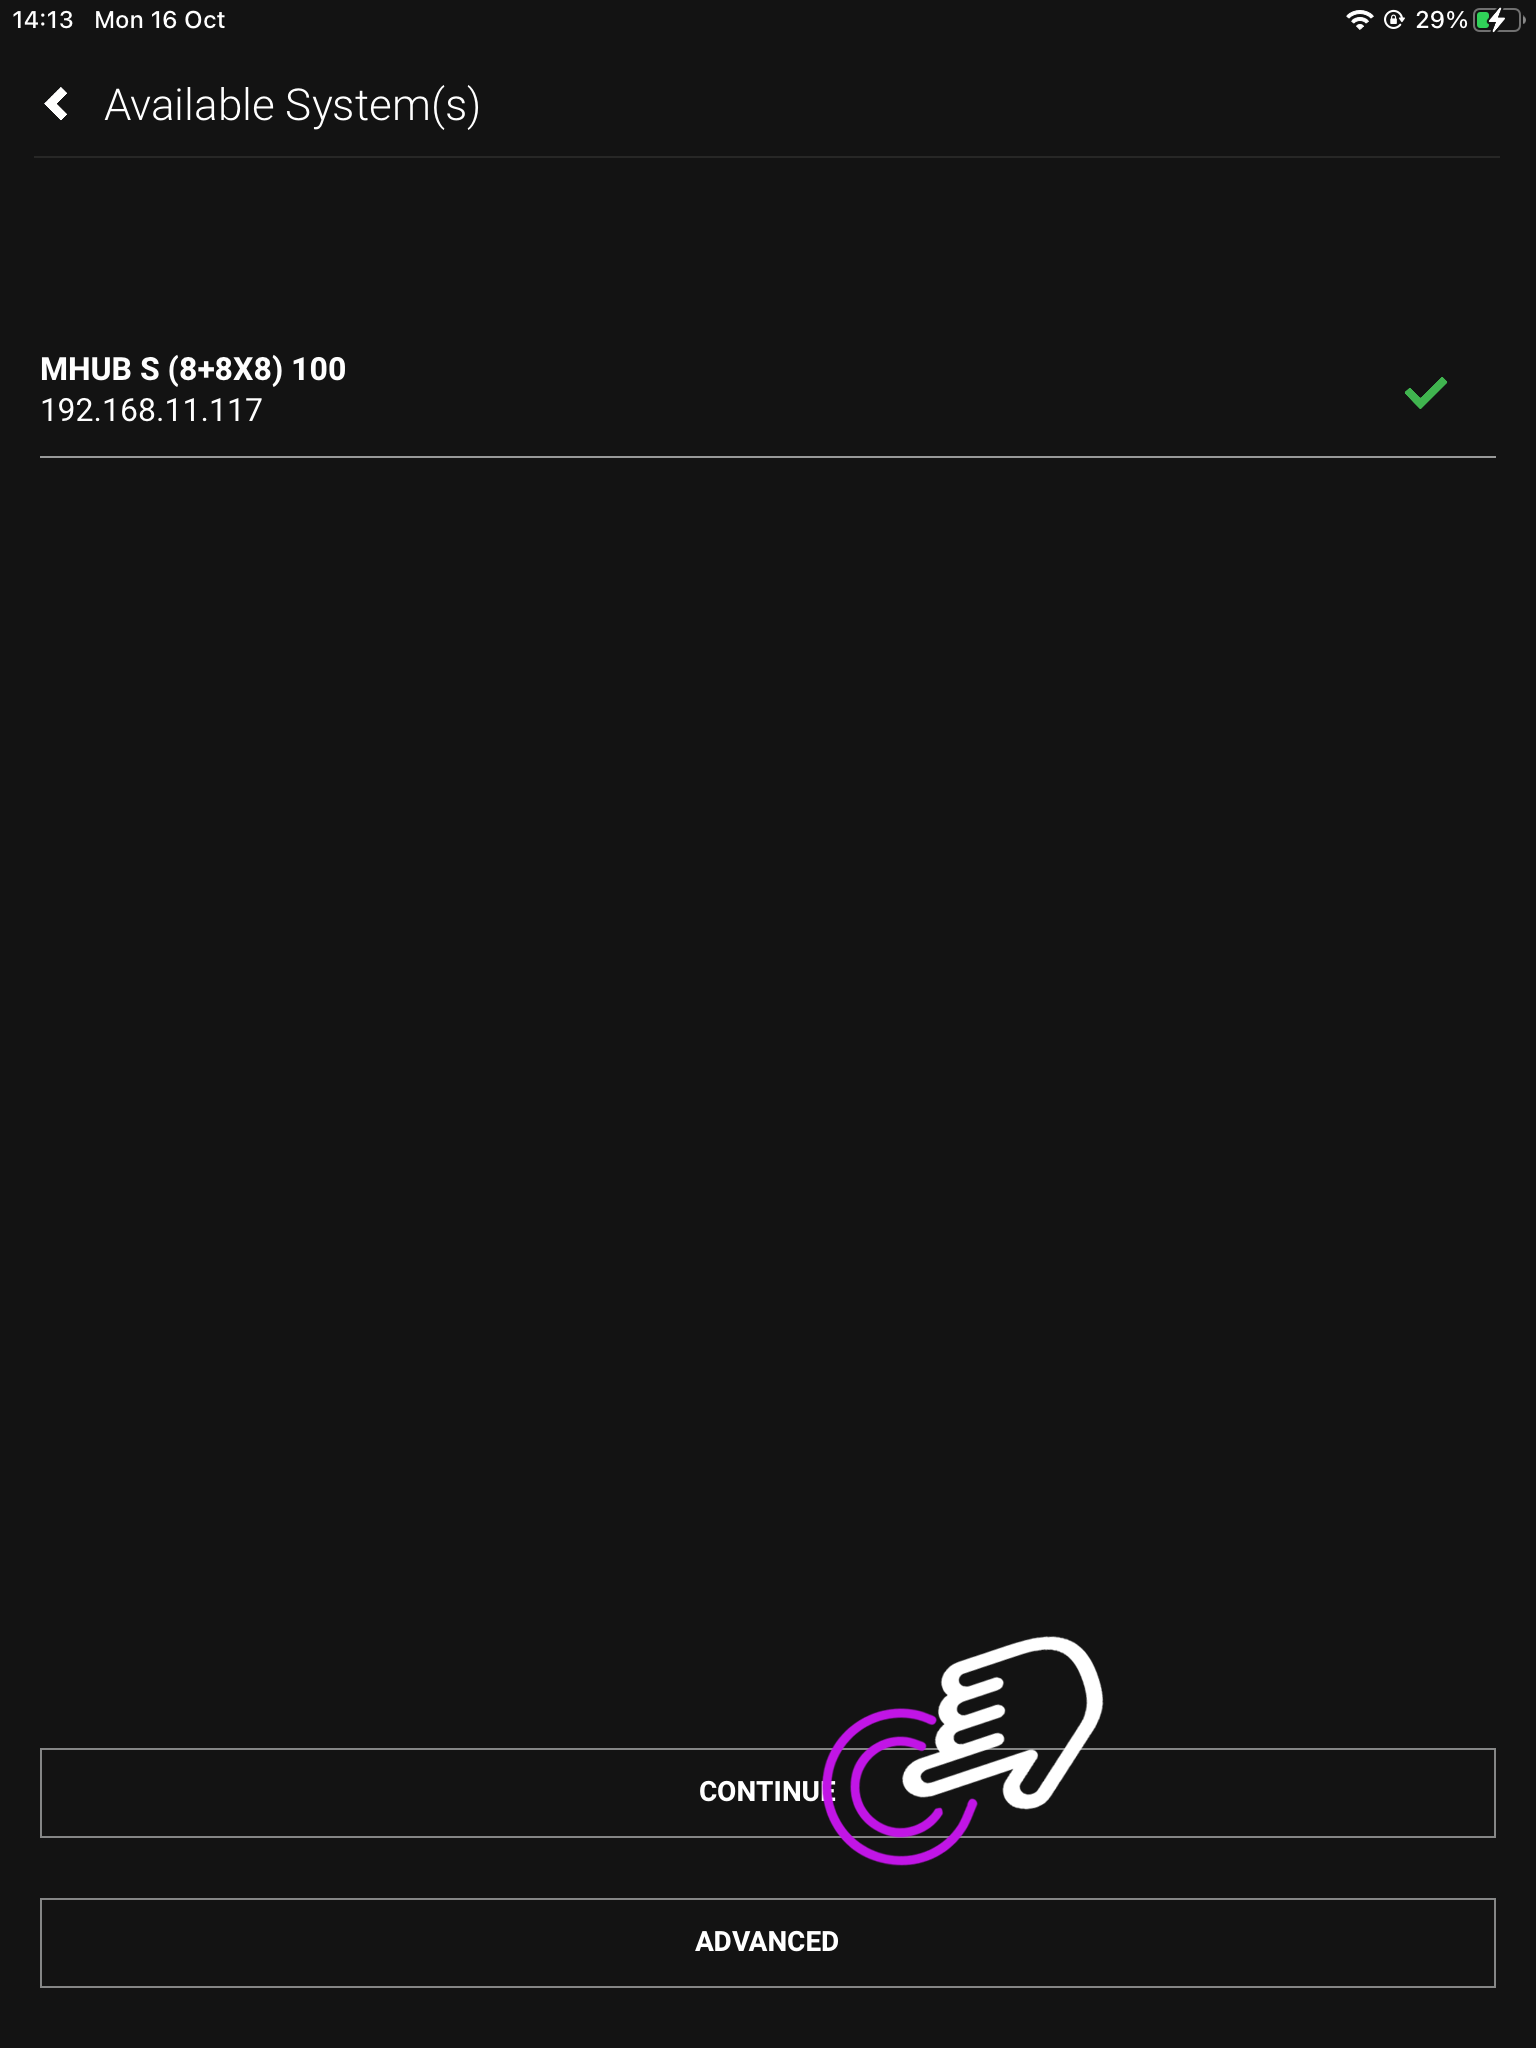
    Once an update is found you will be taken to the update screen.

    6. Begin update

    If your device is updateable it will start, and include which version you’re updating to.
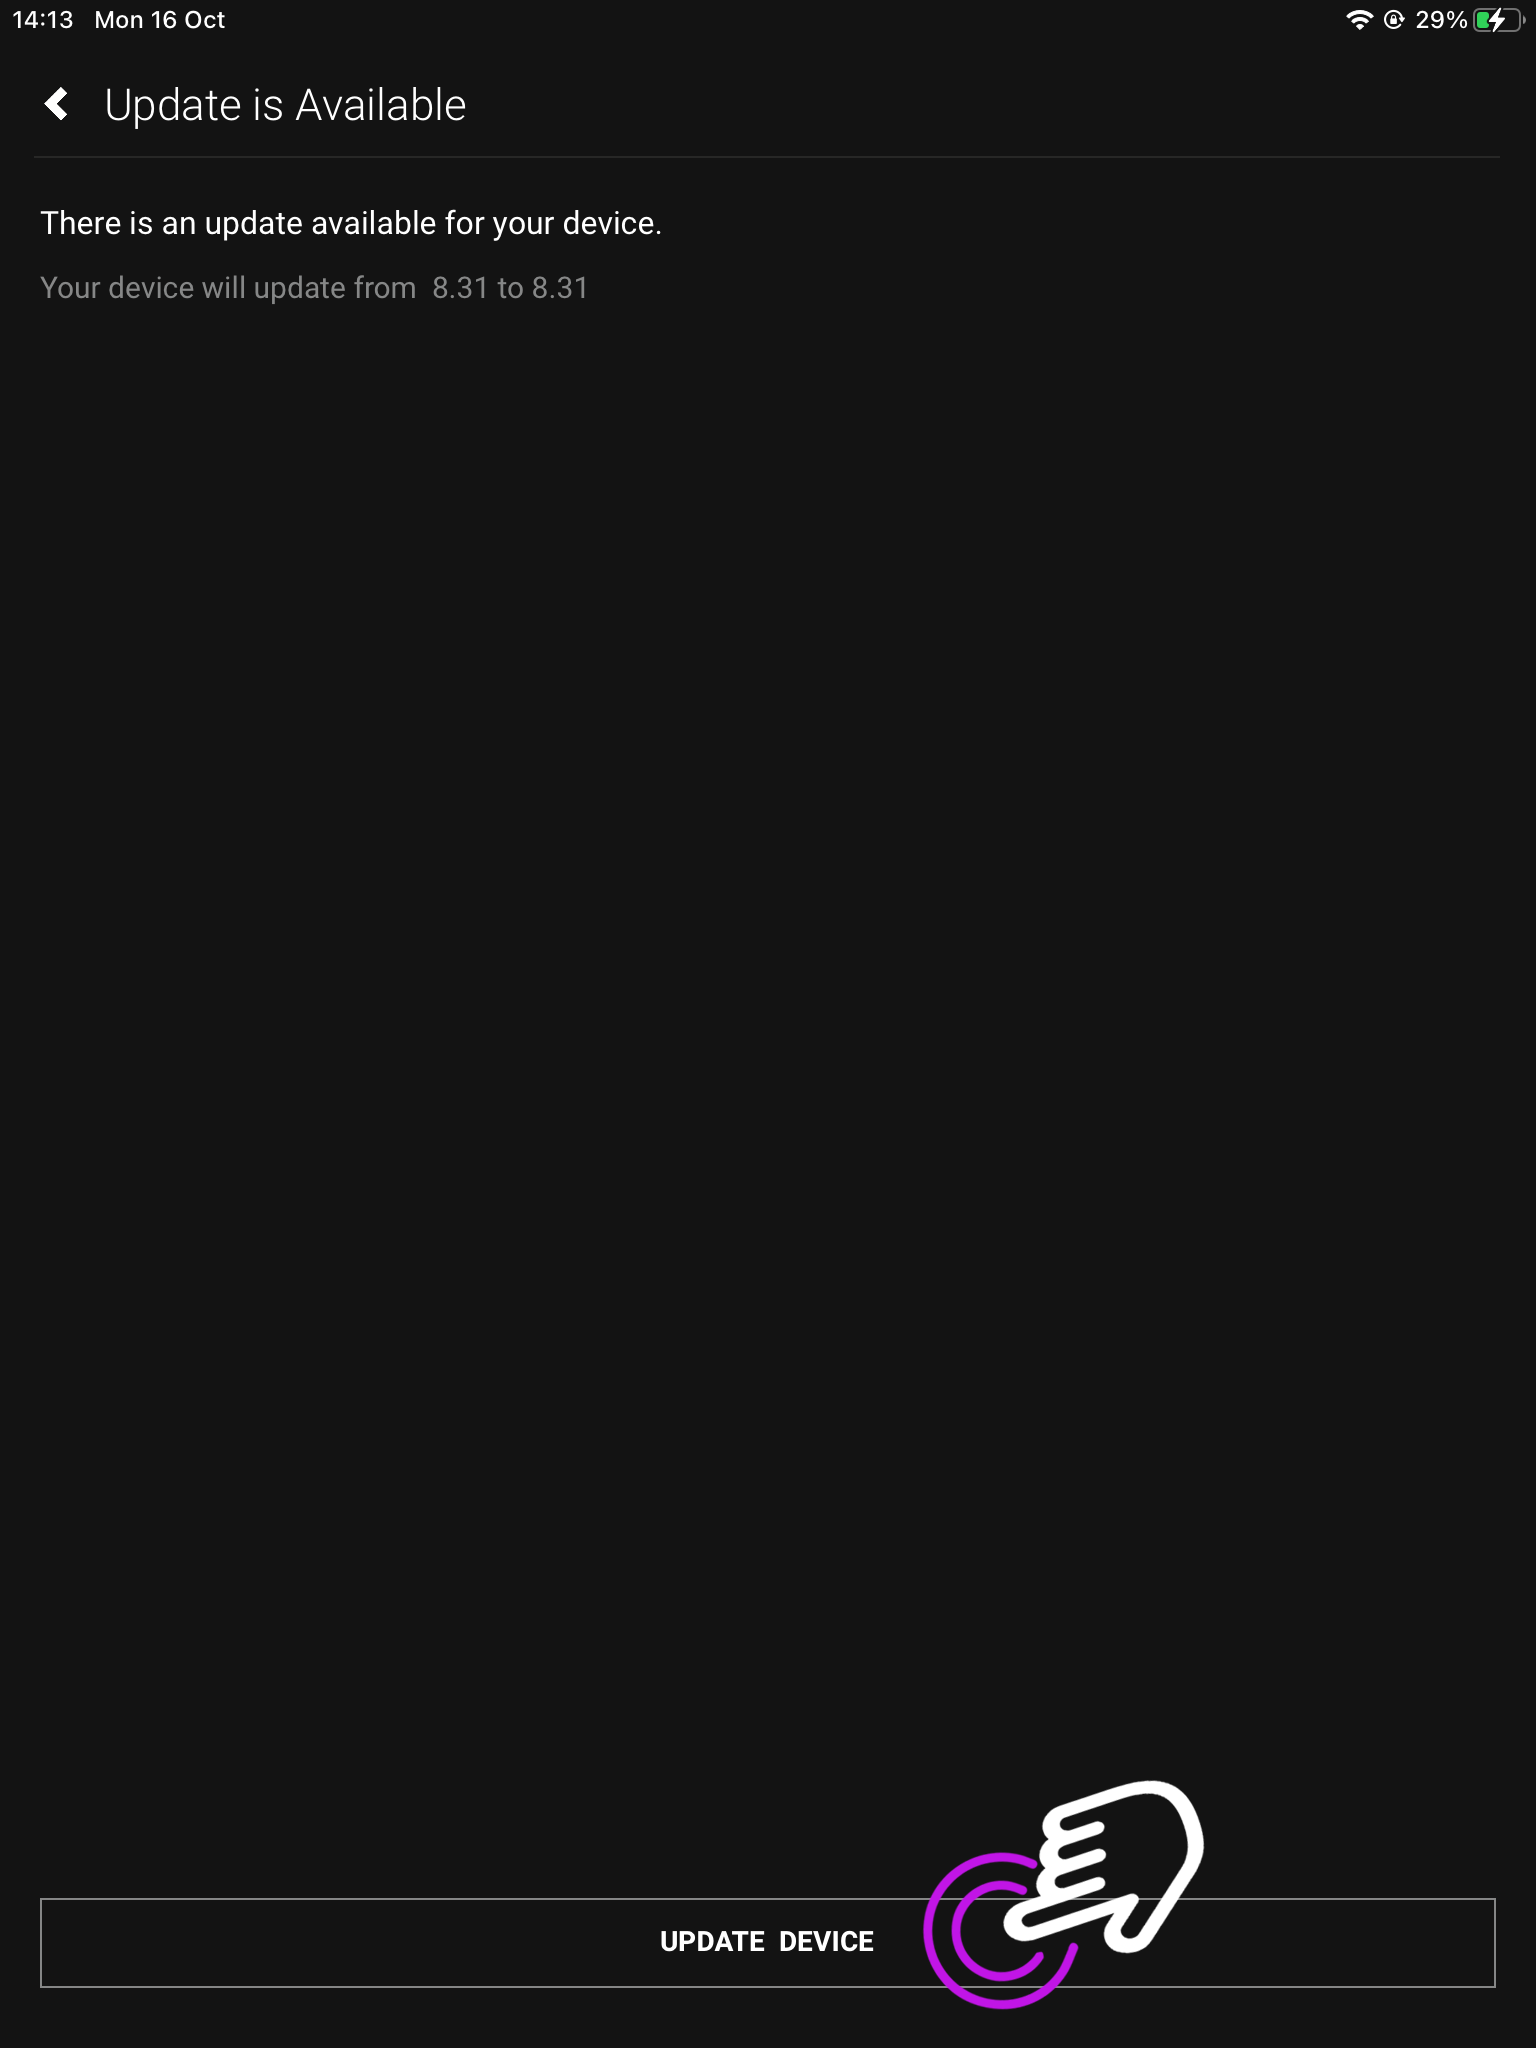
    Press “Update Device”.

    7. Terms and Conditions

    To continue please acknowledge the legal terms.

    For more information on the legal terms, you can read the End-User Licence Agreement (EULA) and the Privacy Statement.

    8. Await download

    This process can take up to 5 minutes, however, depending on your network it could be longer.

    Please make sure not to power down your device whilst the update is downloading.

    9. Update completed

    uControl will now let you know the update is complete.
    Press “Update Finished”.
  • How to find available systems through uControl

    Your HDA device will be displayed as an available system when connected to uControl. You may have more than one device connected, or be operating a stack and need to see which devices are connected.


    In this support article:


    When you’re not connected in uControl

    1. Open uControl app

    Launch uControl and you will see the home page.

    You now need to press advanced.

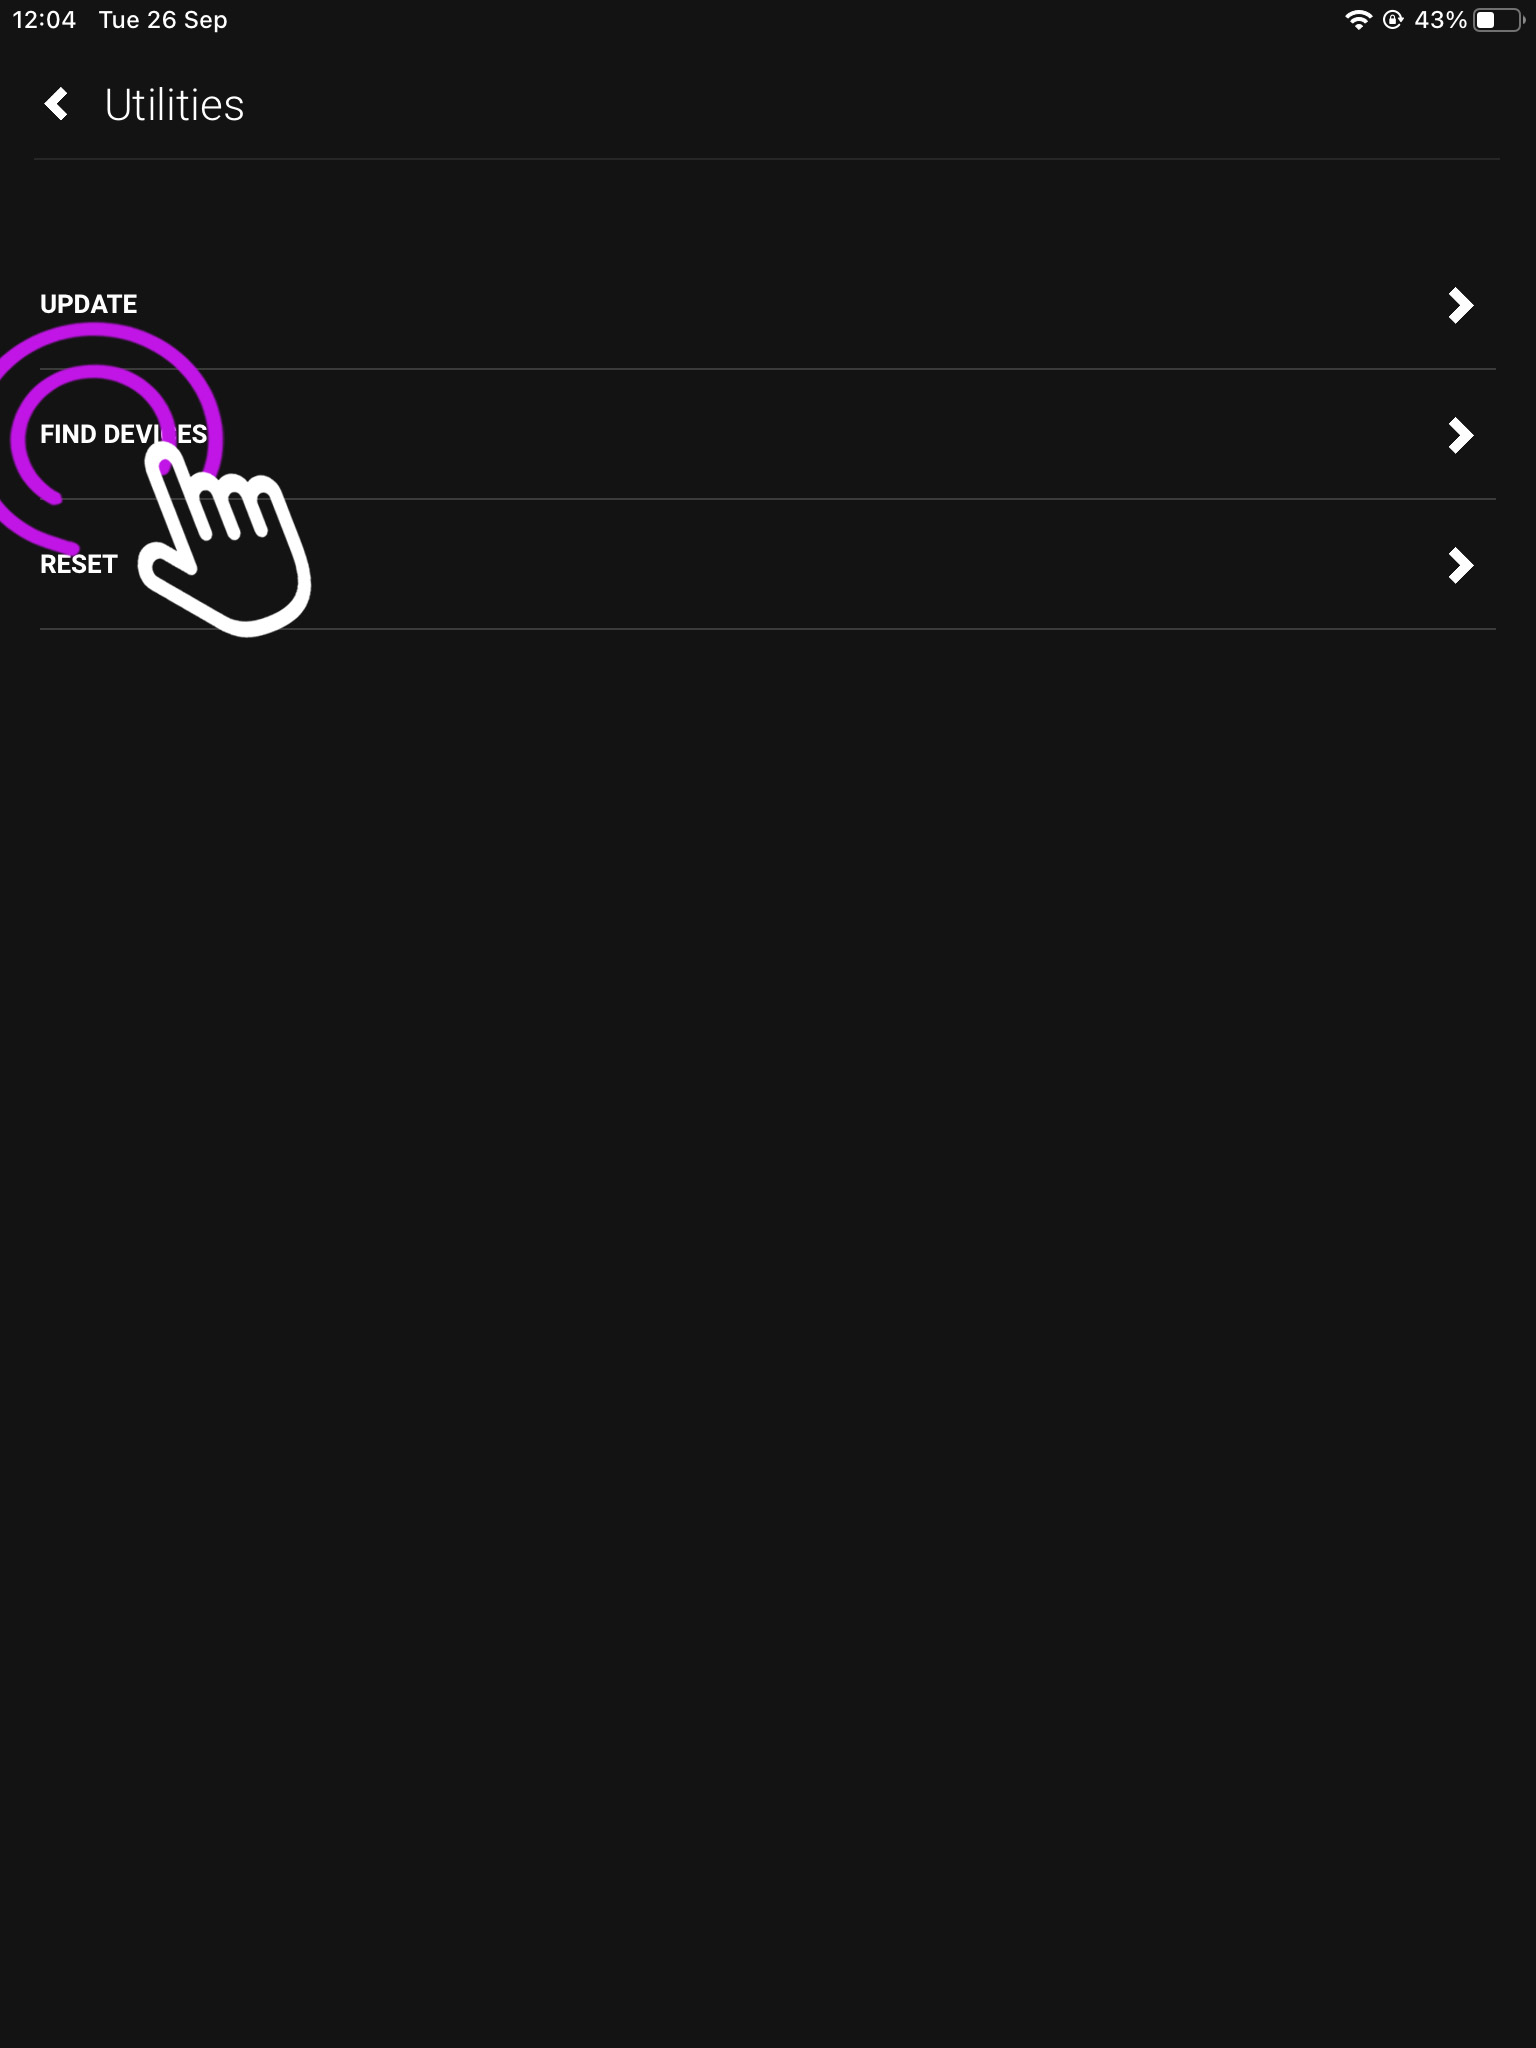
    2. Press “Find Devices”

    This is the advanced screen where you can find your devices, connect over WiFi, reset your system and more.

    It is the main navigation page for your devices options.

    3. Available Systems(s)

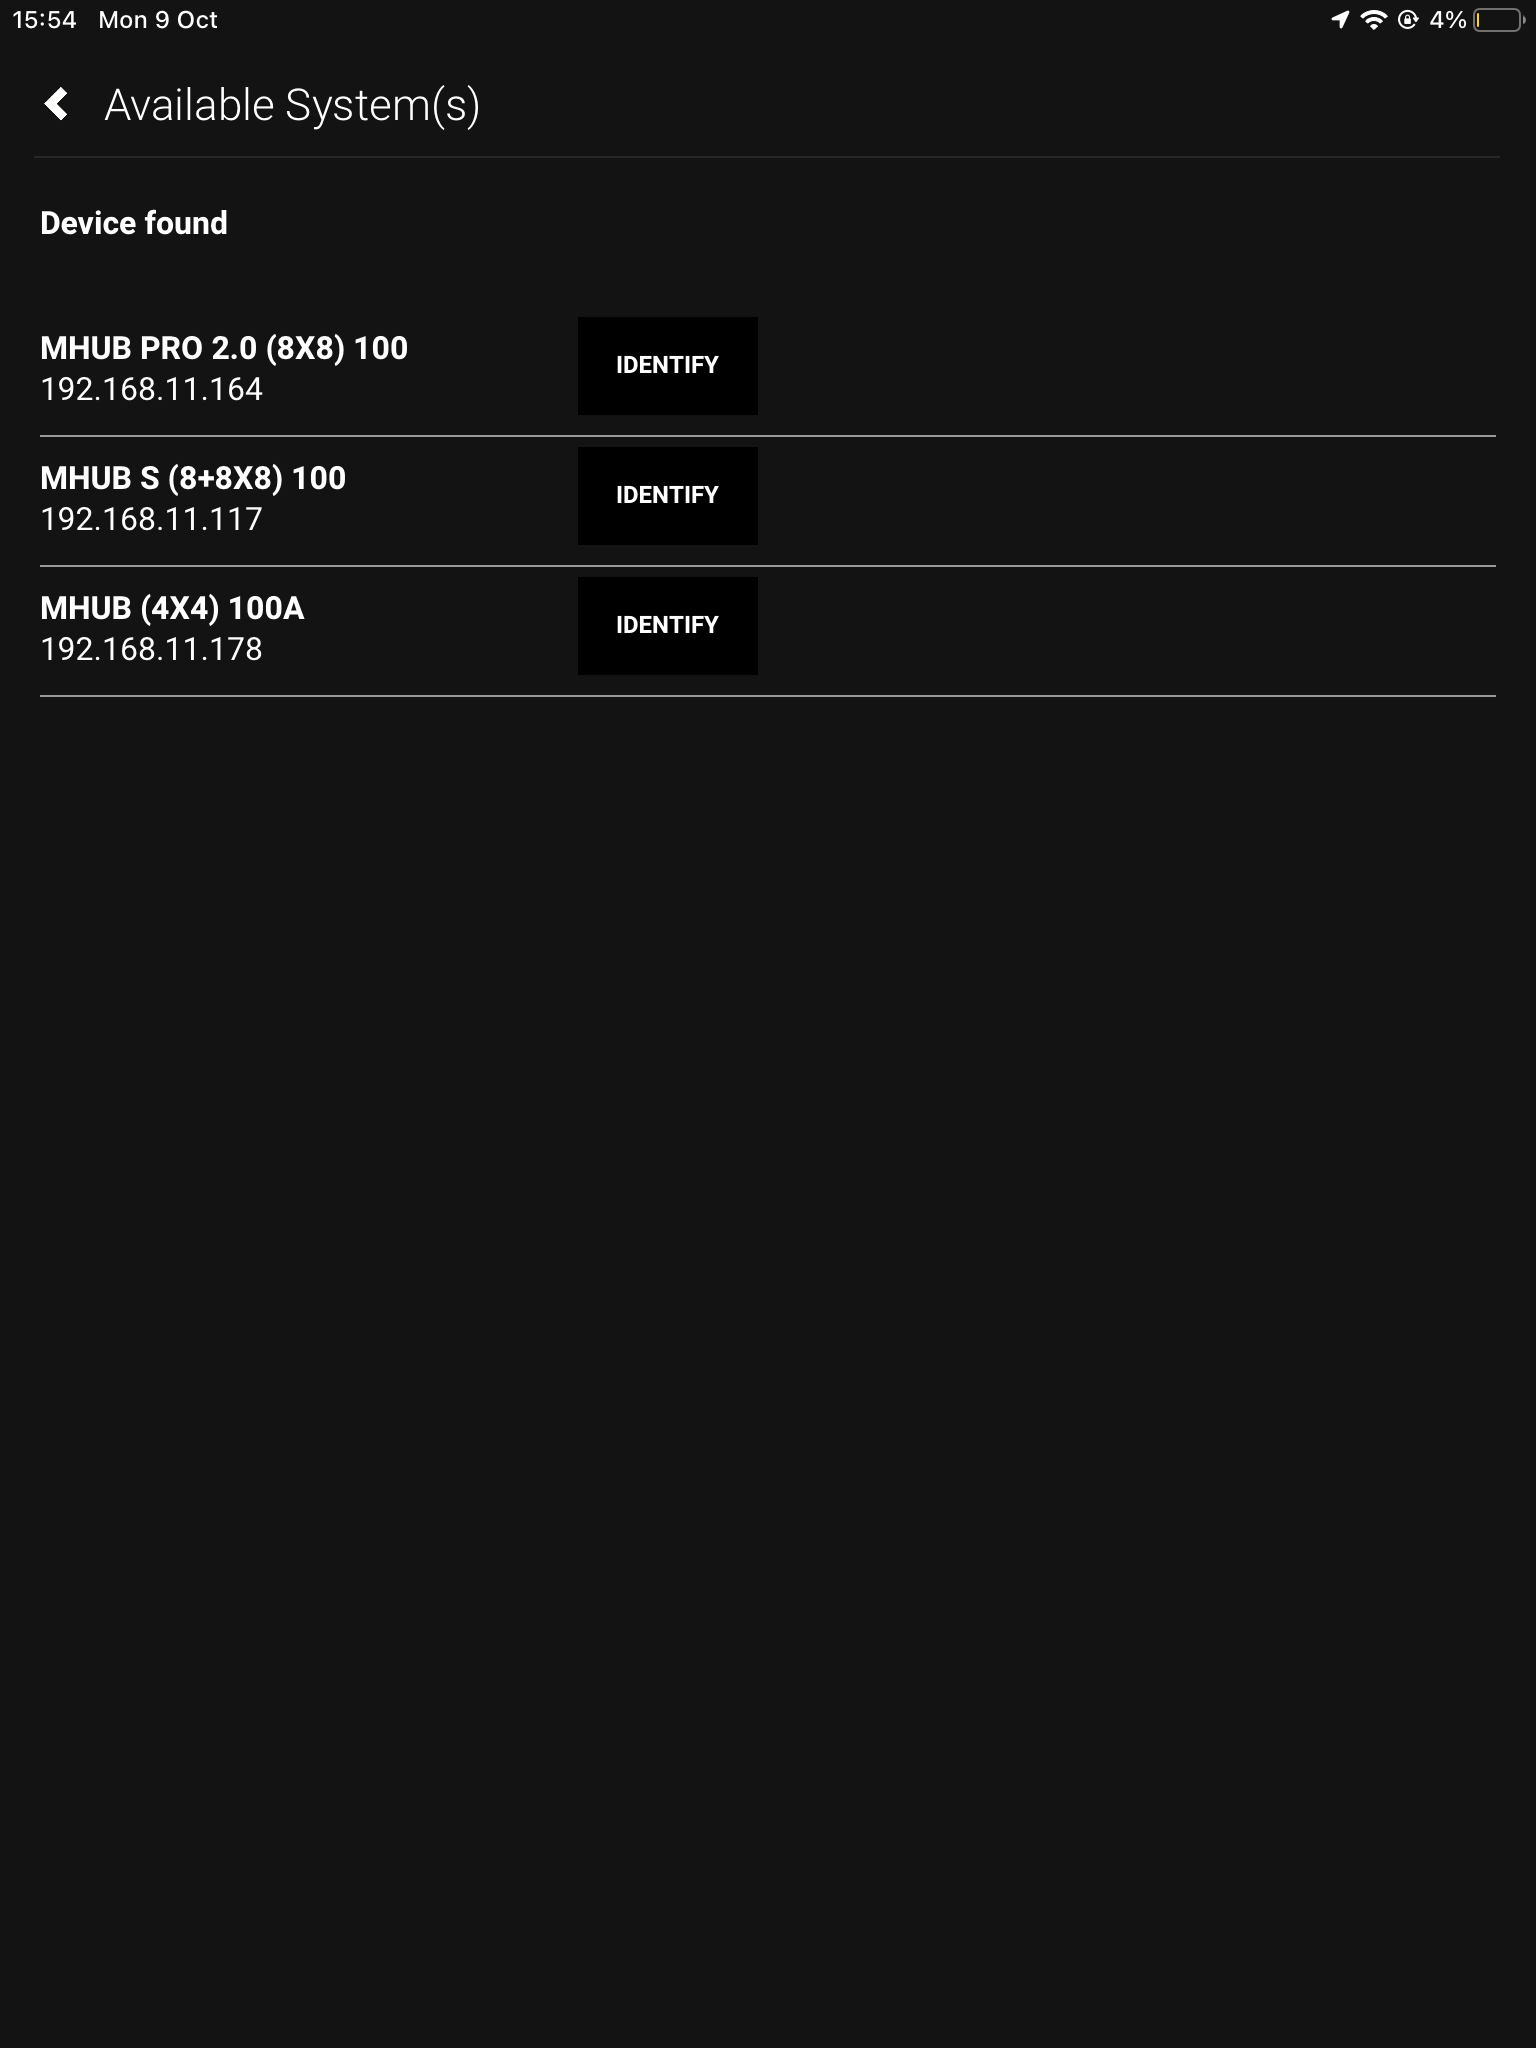
    This is where your connected devices will show.

    If you have more than one connected device, you can click “identify” to make the power LED of that unit flash.

    When you’re connected in uControl

    1. Open up uControl

    If you’re already connected to a system then you will need to access uControl’s settings. From the main screen you will see something similar to this (see below). From here, look for a menu icon (three horizontal lines) in the top left corner, press that to reveal the Zone selector and Zone control menu.

    What you see on the main screen may differ, however, the three lined menu bar will still be there.

    2. Navigate to your settings

    Look for the settings icon located in the bottom left corner.

    The icon may vary depending on your mobile devices size, however, it will still be in the bottom left corner.

    3. Press “Utilities”

    This will take you to your devices service page.

    From here you can also see the IP address of the device you’re currently controlling.

    4. Press “Find Devices”

    From this page you can also update, and reset your HDA device. To find out more check out our uOS Utilities page.

    The next page will show you your connected HDA devices.

    5. Available Systems(s)

    If you have a stacked system, or multiple devices they will show here.

    If you have more than one connected device, you can click “identify” to make the power LED of that unit flash.

  • Finding the IP address of your device

    Your HDA device broadcasts its IP address using a protocol called mDNS over your Local Area Network (LAN). The easiest way to find your IP address is to use our app, uControl.


    In this support article:


    Finding your device on a (new/reset) system


    1. Open uControl app

    Launch uControl and you will see the Home Page.

    You now need to press advanced.

    2. Press “Find Devices”

    This is your Advanced Page where you can find the HDA systems connected to your network.

    From here you can find your devices, connect over WiFi, reset your system and more.

    3. “Available System(s)”

    Your connected devices will show here along with their IP address.

    If you have more than one device you can use the identify button to make the power LED blink.

    Finding your device if you’re already connected to a system

    1. Open up uControl

    If you’re already connected to a system then you will need to access uControl’s settings. From the main screen you will see something similar to this (see below). From here, look for a menu icon (three horizontal lines) in the top left corner, press that to reveal the Zone selector and Zone control menu.

    What you see on the main screen may differ, however, the three lined menu bar will still be there.

    2. Navigate to your settings

    Look for the settings icon located in the bottom left corner.

    The icon may vary depending on your mobile devices size, however, it will still be in the bottom left corner.

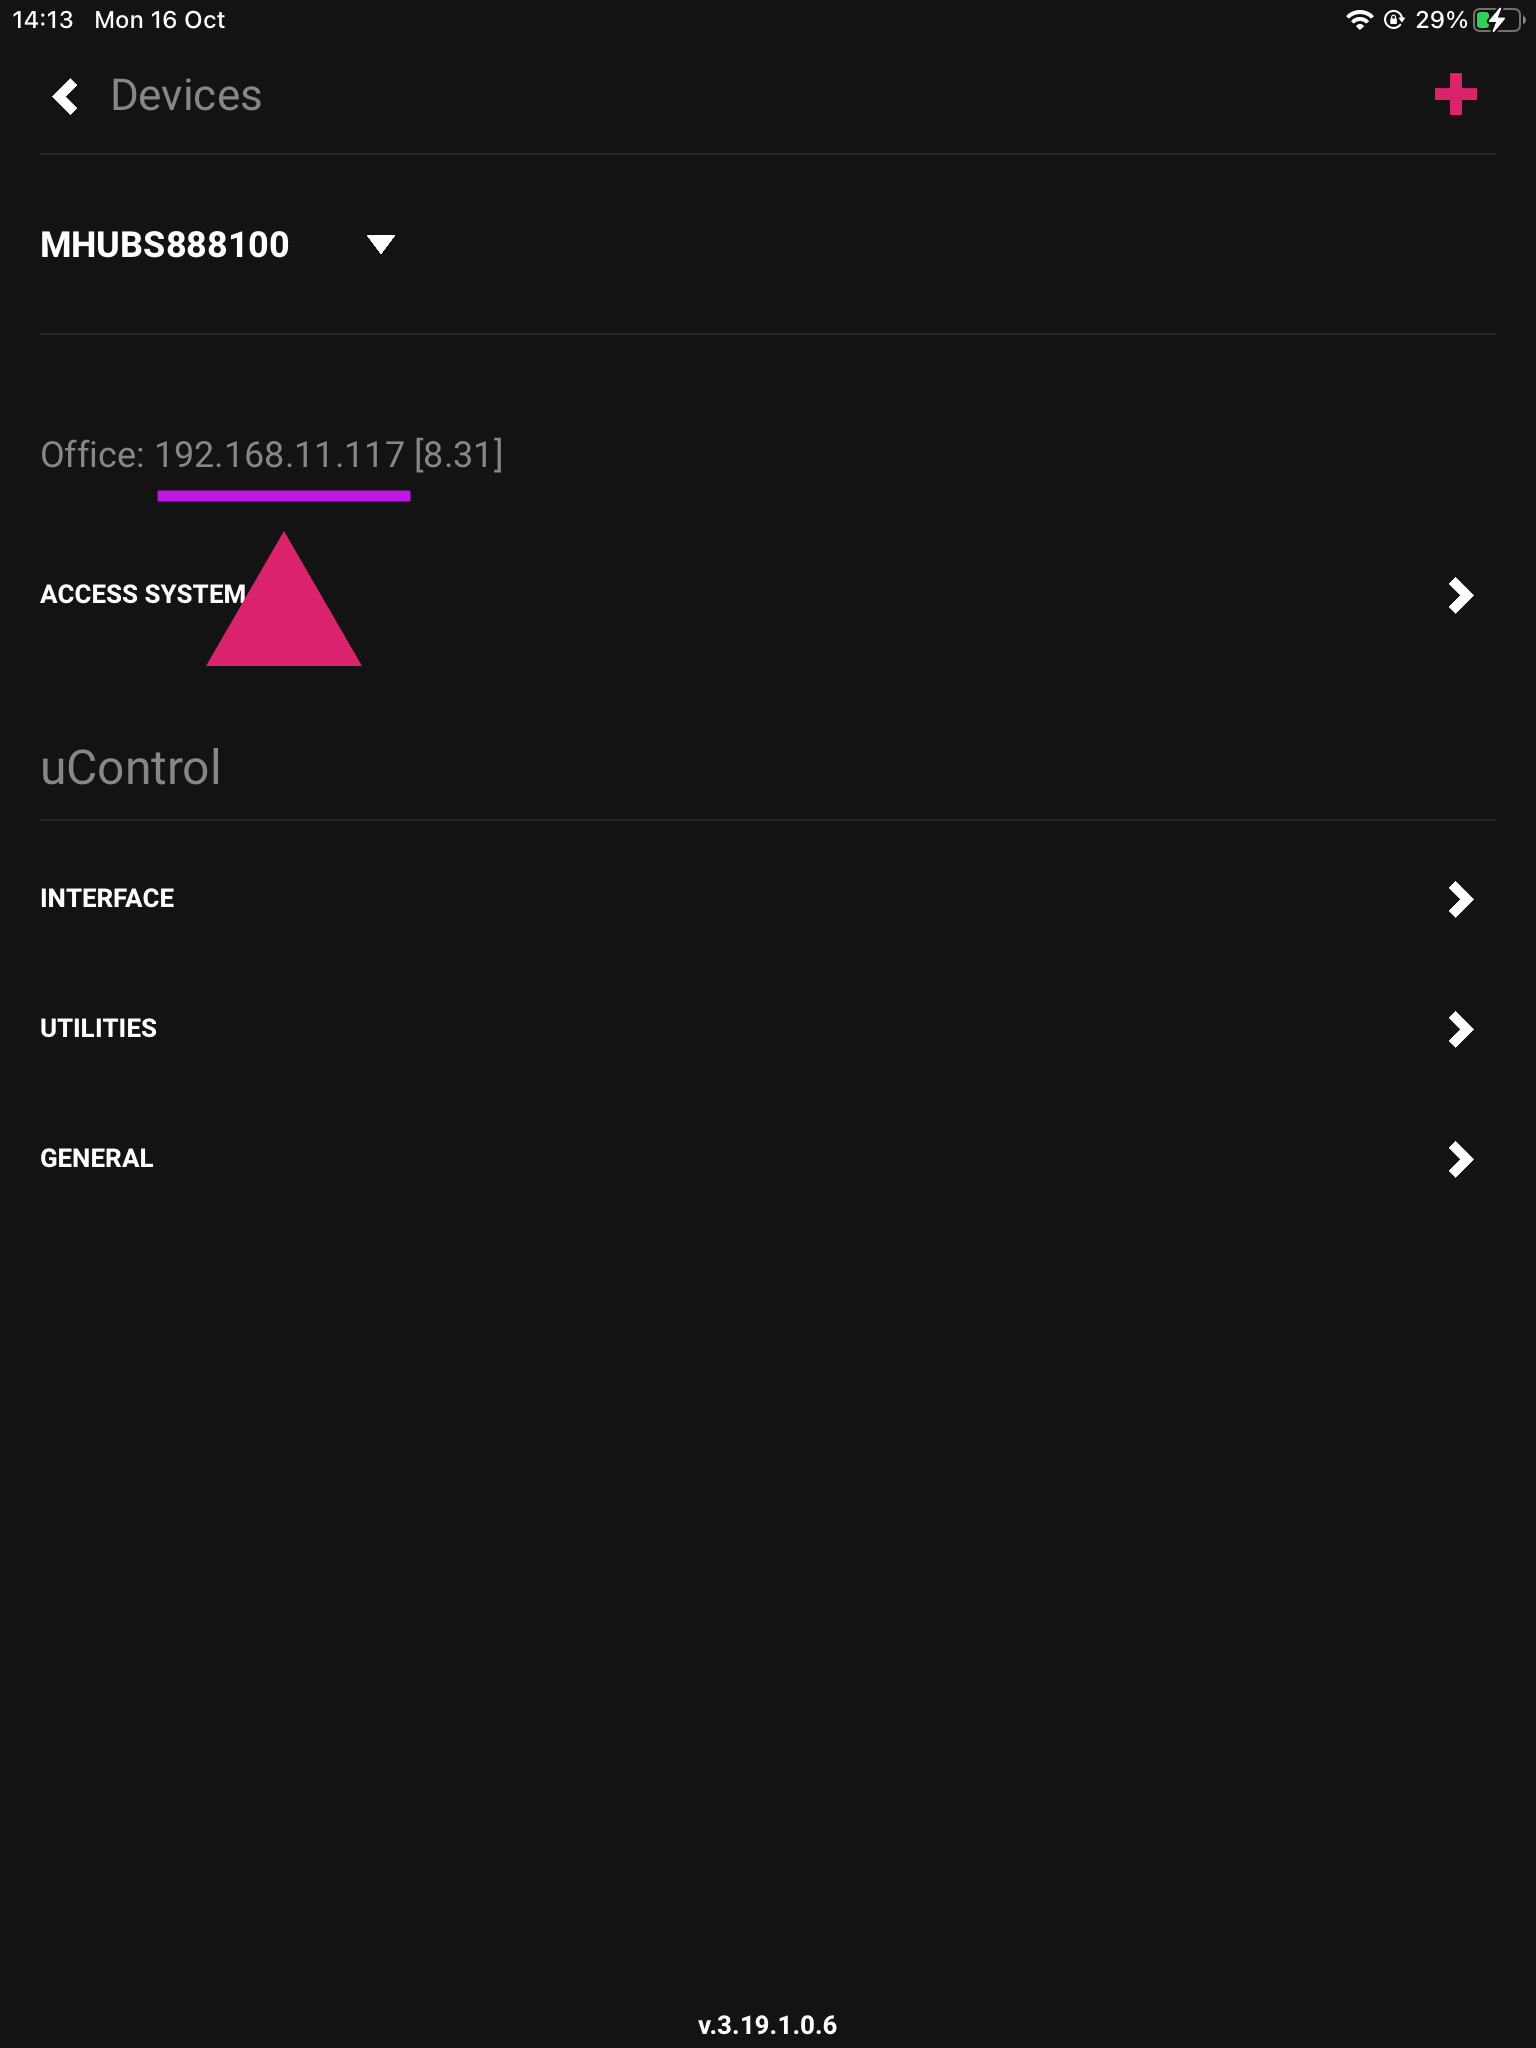
    3. Utilities

    This is your device page which displays your model and IP address, if you want a list of all connected devices go to utilities.

    From here you can also add another device to your setup using the plus sign in the top right.

    4. Find Devices

    This page is where you can update, reset or find your available connected systems.

    To reset your system as you can see below, you will need to press it 10 times.

    5. Available Systems

    Here you will see all your connected devices, and their IP addresses.

    If you have multiple devices connected, you can distinguish between them by pressing the identify button which will make the power LED flash.

  • How to update your MHUB through uControl

    This guide will show you how to update you device in uControl.

    From slide 2 if your system is already connected in uControl.

    From slide 9 if you have just installed uControl and are not connected to a device.


  • What is “uControl inside” on MHUB or Zone Processors

    horizontal_uC_inside_colour_lightBG@3x

    If you see a HDANYWHERE or third party device marked with “uControl inside” then it contains our control system inside it. You can find out what it can do by visiting uControl’s website here.

    Comparing AV and Full versions of uControl inside

    Some devices are marked “AV” where others are “Full”. This is determined by the operating system found on the device. The “full” implementation of uControl can be found in devices which have uControl OS (uOS) inside. “AV” means that the system is running MHUB-OS (MOS) and control capability is restricted to AV only or the devices that are directly connected to the MHUB system.

    Full

    • Control over sources, AVRs, displays and projectors (IR)
    • Control over sources, AVRs, displays and projectors (IP/CEC)
    • IP control over lighting, blinds, shades, PDUs, relays and more See all here
    • uControl app, Alexa, Watch support
    • uControl Remote
    • Super Sequences, Functions and Scheduling

    AV

    • Control over sources, AVRs, displays and projectors (IR)
    • uControl app, Alexa, Watch support
    • uControl Remote*
    • Sequences and Scheduling

    Upgrading an older MHUB to support Full uControl

    It may be possible to update your MHUB’s control capabilities by adding a uControl Zone Processor to manage your system instead. Not all models are supported so we recommend contacting us to confirm the level of support first.

    *Requires a Zone Processor to be added to the system to upgrade to Full uControl capabilities.

  • Controlling Lutron from uOS

    This guide explains how to use Lutrons API protocol to control QS Standalone, RadioRA2, Quantum, Athena, HomeWorks QS, myRoom plus from Lutrons devices.

    Lutron in uOS

    What this guide will cover:

    1. How to control Lutron lights in your home.
    2. How to add that API into uOS.
    3. QS Standalone, RadioRA2, Quantum, Athena, HomeWorks QS, myRoom plus.

    Important: you must have the IP addresses first

    For the purposes of this guide we are going to assume that your Lutron gateway is on IP address 192.168.1.15 and your uOS device (MHUB, MZMA or Zone Processor) is on 192.168.1.196. We will use this to illustrate all examples moving forward.

    Important: This guide assumes that you are familiar with Lutron and know how to use their lighting infrastructure and that your Lutron system is operational before integrating into uOS.

    What a Telnet Lutron command looks like

    See “Testing your API’s” for more information on Telnet.

    #OUTPUT,2,1,75,00:30

    Understanding what the variables above mean:

    #OUTPUT
    This is the operation character for executing an action. For more information on these see the slideshow below.

    ,2
    The first number in the string is the ID for the device.

    ,1
    The second number in the string is the action number, which in this instance is enable.

    ,75
    This number sets the level of the dimmer, so in this case 75%.

    ,00:30
    This is the fade time of the dimmer.

    Testing your APIs

    We recommend that you test every API before you enter them into uOS. All IP based APIs have different requirements when it comes to testing, Lutron’s method is a little different as it needs to be done over Telnet in command prompt.

    To test your commands, open up command prompt on your laptop or PC and enter telnet 192.168.1.15 23

    Remember, your IP address will be different, you must use the Lutron gateway IP address for this, the port is 23.

    You now need to wait for it to connect which may take a few minutes, then you will be asked to login. The username is lutron, and the password is integration. You will now be able to test your commands in the terminal. Observe the device you are trying to control, and see if your commands changes the outcome.

    Using a MAC?

    If you are using a MAC you can use Netcat to test your API command. To do so open your terminal and enter nc 192.168.1.15 23

    Wait for it to connect and then you will be prompted to login. The username is lutron and the password is integration.

    If it doesn’t work then try the following:

    • Make sure the IP address is correct.
    • Make sure that you do not have any typos.
    • Ensure that your IDs are correct and that you’re observing a light in the correct room and location.
    • Make sure that the structure of the API matches our example no spaces, no special characters, data is in the correct case (often lowercase).

    How to add your APIs into uControl

    Need more help with the API? Get in touch.

    All HDA staff are able to help with any API questions you might have including any advanced features. Get in touch for help or assistance.

  • Controlling SilentGliss from uOS

    This guide explains how to pull data from the SilentGliss API so you can control it directly from uOS.

    Shelly in uOS

    What this guide will cover:

    1. How to control SilentGliss window coverings in your home.
    2. How to add that API into uOS.

    Important: you must have the IP addresses first

    You can get the IP address of your SilentGliss gateway device:

    1. Use a network discovery app like Fing to find the SilentGliss gateway on your network.

    What a typical SilentGliss API command looks like

    192.168.1.15/sgbms/v1/device/7/command

    This command only shows the structure and does not include the actual action of the command which needs to be included in the body. This will be explained further through the guide.

    192.168.1.15/
    This is the IP addresss of the gateway, a forward slash (/) needs to be added between each unique variable.

    sgbms/v1
    This is the URL version of the gateway.

    device/7
    This specifies we are affecting a device and what its ID is.

    command
    Command must go at the end as we are performing a POST execution method which is atempting to perform an action.

    Testing your APIs

    We recommend testing your API command before entering it into uOS to ensure it works. To do this we recommend installing an application called Postman.

    If it doesn’t work then try the following:

    • Make sure the IP address is correct.
    • Make sure that you do not have any typos.
    • Ensure that your IDs are correct and that you’re observing a light in the correct room and location.
    • Make sure that the structure of the API matches our example no spaces, no special characters, data is in the correct case (often lowercase).

    How to add your APIs into uControl

    Need more help with the API? Get in touch.

    All HDA staff are able to help with any API questions you might have including any advanced features. Get in touch for help or assistance.

  • Controlling KNX from uOS

    This guide explains how to pull data from KNX’s protocol so you can control it directly from uOS.

    KNX in uOS

    Please note: this guide assumes you have access and knowledge of ETS6, and your own KNX/Weinzierl gateway. In this guide we are using a BAOS 774 gateway, but you may have a different one, so refer to this site for more Weinzierl product knowledge.

    What this guide will cover:

    1. How to control KNX devices in your home.
    2. How to add that API into uOS.

    Important: you must have the gateway IP address first

    You can get the IP address of your gateway by:

    • Use a network scanner application like Fing on your mobile phone to scan your network.
    • You can also get the IP address from the properties tab of the device in KNX’s ETS.

    For the purposes of this guide we are going to pretend that your Weinzierl gateway is on IP address 192.168.1.15 and your uOS device (MHUB, MZMA or Zone Processor) is on 192.168.1.196. We will use this to illustrate all examples moving forward.

    What a typical BAOS API command looks like

    http://192.168.1.15/baos/SetDatapointValue?Datapoint=2&Format=DPT1&Length=1&Value=false

    The above command will trigger our BAOS gateway to send a telegram to datapoint 2, which will switch off our light.

    Understanding what the variables in the API above mean:

    http://192.168.1.15
    The command starts with http:// as it can be sent over a URL, followed by the IP address of your KNX/Weinzierl gateway.

    /baos/
    This is the device type of a Weinzierl device.

    SetDatapointValue?Datapoint=2
    Here we are setting this command to send to our KNX data point to two.

    &Format=DPT1
    This is the sub data point, and sets the rules of which values are allowed.

    &Length=1&Value=false
    This is the length of the data point type, and the value is boolean therefore setting it on or off.

    Testing your APIs

    We recommend that you test every API before you enter them into uOS. All IP based APIs all have different requirements when it comes to testing but the KNX API is great because it can be tested on your browser.

    To test your API, open a web browser and enter the full API (including http://192.168.1.15) in the URL window and hit enter.

    If the KNX device responds as you expected then your API is working and you can proceed adding it into uOS.

    If it doesn’t work then try the following:

    • Make sure the IP address is correct.
    • Make sure that you do not have any typos.
    • Ensure that your IDs are correct and that you’re observing the correct device.
    • Make sure that the structure of the API matches our example no spaces, no special characters, data is in the correct case (often lowercase).

    How to add your APIs into uControl

    Need more help with the API? Get in touch.

    All HDA staff are able to help with any API questions you might have including any advanced features. Get in touch for help or assistance.

  • Controlling AudioFlow from uOS

    This guide explains how to pull data from the Audioflow API so you can control it directly from uOS, uControl App and uControl Remote.


    Before you begin, you will need:

    Important: You must have the IP address for AudioFlow first

    You can get the IP address of your AudioFlow switch by:

    • Using a network scanner application like Fing on your mobile phone to scan your network.
    • Download the AudioFlow app and connect it to your network. From here go to settings, and you will see its IP address.

    Step 1 – Getting Data


    Step 2 – Build Function

    Need more help with the API? Get in touch.

    All HDA staff are able to help with any API questions you might have including any advanced features. Get in touch for help or assistance.

  • Controlling Gen 1 Shelly devices from uOS

    This guide explains how to pull data from Shelly’s API so you can control it directly from uOS.

    Shelly in uOS

    Please note: this guide covers how to execute a command for a Shelly light, if you are using a different device the same logic applies, you only need to change the parameters. Please find the link to Shelly’s API document below for commands relating to different devices.

    What this guide will cover:

    1. How to control Shelly lighting in your home.
    2. How to add that API into uOS.

    Important: you must have the IP addresses first

    There are a few ways you can get the IP address if your Shelly device:

    1. Use a network scanner app like Fing to find Shelly on your network.
    2. Log into your wireless router and look for Shelly in the DHCP table.

    What a typical Shelly command looks like

    /color/0?turn=on&red=0&blue=0&green=255

    This only shows the logic of a Shelly command, you may be controlling a relay and therefore need to use different parameters. There will be a link at the bottom which will take you to Shelly’s API documentation where you can find all their codes.

    /color/0?
    This is the mode of the device and declares it is an RGBW2 controller. If you were writing a command for an automated blind it would be /relay/0?.

    turn=on
    This affects the state of the device.

    red=0&blue=0&green=255

    Testing your APIs

    You can test your Shelly command in the URL to see if it works. Make sure to include http:// for it to work properly.

    If it doesn’t work then try the following:

    • Make sure the IP address is correct.
    • Make sure that you do not have any typos.
    • Ensure that your IDs are correct and that you’re observing a light in the correct room and location.
    • Make sure that the structure of the API matches our example no spaces, no special characters, data is in the correct case (often lowercase).

    How to add your APIs into uControl

    Need more help with the API? Get in touch.

    All HDA staff are able to help with any API questions you might have including any advanced features. Get in touch for help or assistance.