Author: HDA Support Team

  • Setting up Apple Hey Siri

    Siri Shortcuts & HDANYWHERE.

    With any Apple device along with an MHUB or Zone Prossesor you can use Apple “Hey Siri” and our API to send commands to uControl/uOS to control virtually any display, source inputs plus lighting control.

    Below you will find a step by step how-to guide.


  • Unable to get HDR through MHUB or XTND to TV / Projector

    If your MHUB is marked with “TPC” then it is capable of passing a HDR picture to your display. There are a number of reasons why HDR may not be fed through your HDA device. This support post aims to troubleshoot the most common reasons and how to resolve them.

    Important: there are different versions of HDR, make sure your display supports the format your source is outputting!
    There are multiple variants of HDR such as HLG, HDR10+ and Dolby Vision, please ensure your display supports the relevant HDR technology.

    When connecting your HDR enabled source and display to a HDA system you may need to adjust some settings to get it to work.

    1. First, disconnect the source and connect it directly to your display. Do you get HDR?
    2. Ensure you are using High Speed HDMI Cables, this is important as long HDMI cables (over 5m) unless Active or Fibre will not work.
    3. Was you HDA device manufactured before 2019? Does it have TPC markings or 18G/18Gbps on it anywhere? If it doesn’t then there is a good chance that your HDA device does not support HDR as it was made before the specification was finalised.
    4. Does your HDA device support scaling? If so please ensure it is set to bypass.
    5. Copy or set a custom EDID directly from your display. This post explains how to copy EDID directly from your display.
  • Using Siri Shortcuts with HDA systems

    How to setup Siri Shortcuts


  • What is HDMI 2.1 and should you need to worry about it?

    HDMI Specification 2.1 or HDMI 2.1 is the most recent update of the HDMI specification (June 2021). The headline is that any source, display and everything in between must support HDMI 2.1 in order to take advantage of the higher video resolution support (8K up to 10K!) and faster refresh rates (4K up to 120fps and 8K at 60fps). If you have an older HDMI cable then it is unlikely that it will be able to handle the bandwidth that’s required for HDMI 2.1.

    Do I need a 2.1 HDMI cable?

    Answer

    What do all those new HDMI acronyms mean?

    • eARC: Enhanced Audio Return Channel
      An update to standard ARC support. eARC allows audio to be ‘pulled’ from a display and carried down the HDMI cable to an audio device like a Sonos soundbar or an AVR. The biggest difference between ARC and eARC is that eARC is capable of pulling uncompressed audio formats like 5.1, 7.1 and high bitrate, object based audio such as Dolby Atmos and DTS:X.
    • VRR: Variable Refresh Rate
      VRR enables a gaming source such as a console or computer to deliver video frames as fast as it can, which in many cases is slower than the normal static refresh rate.
    • ALLM: Auto Low Latency Mode
      This is a new HDMI feature that allows a source (e.g. an gaming console such as the XBox One S or XBox One X) to direct all compatible components in the HDMI chain (things like AVRs and displays) to enter its a low-latency mode automatically. This allows the picture to be displayed with the lowest possible delay which is important in gaming.
    • QMS: Quick Media Switching
      Reduces the black screen you see when you change source. This works when resolutions are the same between HDMI connections.
    • QFT: Quick Frame Transport
      Another measure to transport data from the source to the display as fast as possible.
  • Enabling DHCP on MHUB if you have lost it on your network

    If your MHUB has been configured with a fixed IP address and you changed your network infrastructure then your MHUB may become unreachable by your new router.

    With MHUB PRO models you can enable DHCP from the MENU button on the front panel by holding it down for 3 seconds. For MHUB 100A & MHUB U (4×1+1) 40 models you need to follow Guide 1, for MHUB U (4×3+1) 40 & (8×6+2) 40 models follow Guide 2 and for older MHUB U (micro USB on front) models use Guide 3.


    MHUB 100A & MHUB U (4×1+1) 40

    To reset DHCP on an MHUB (4×4, 6×6, 8+8×8) 100A you can either use the Hercules method which is included below, or you can hold down Output A on the front panel of the matrix for 10 seconds.

    To reset an MHUB S (16+16×16) 100A press and hold button 1 for 10 seconds.

    To reset to DHCP on an MHUB U (4×1+1) 40 you can press and hold the 2 front panel buttons for 10 seconds.

    Items needed

    Steps

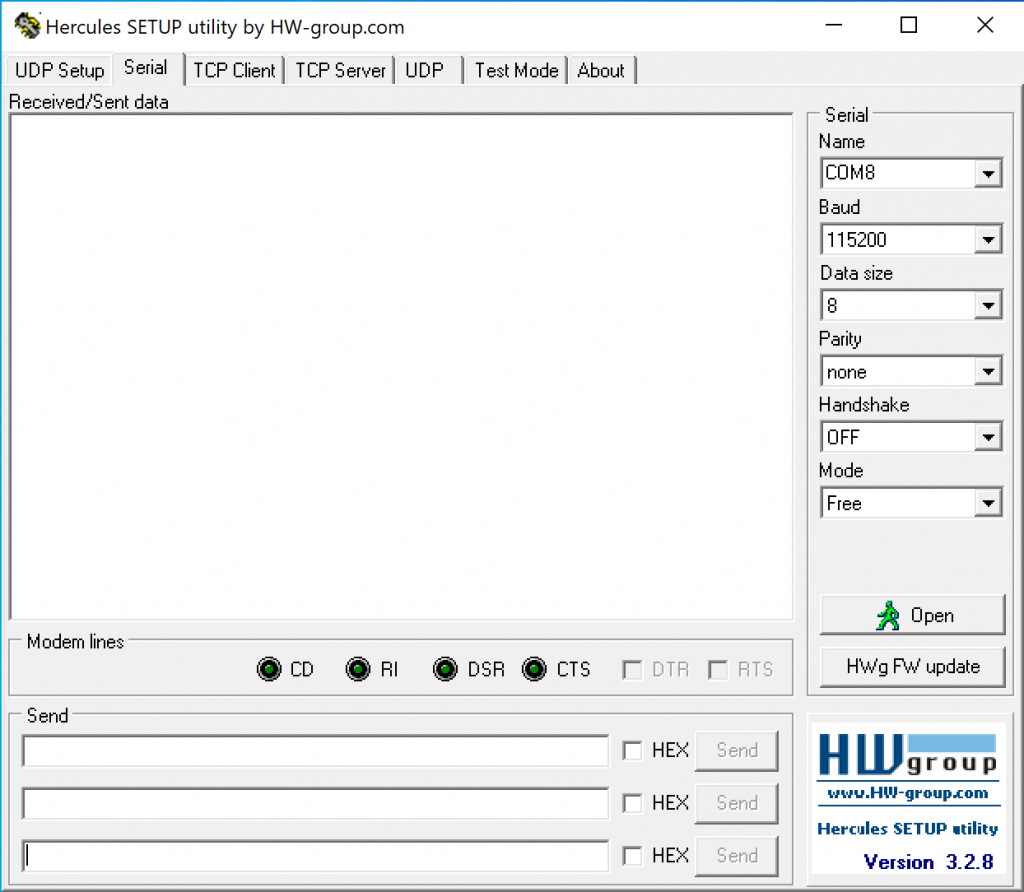
    1. Install Hercules and open the software on your PC or laptop
    2. Hercules interface

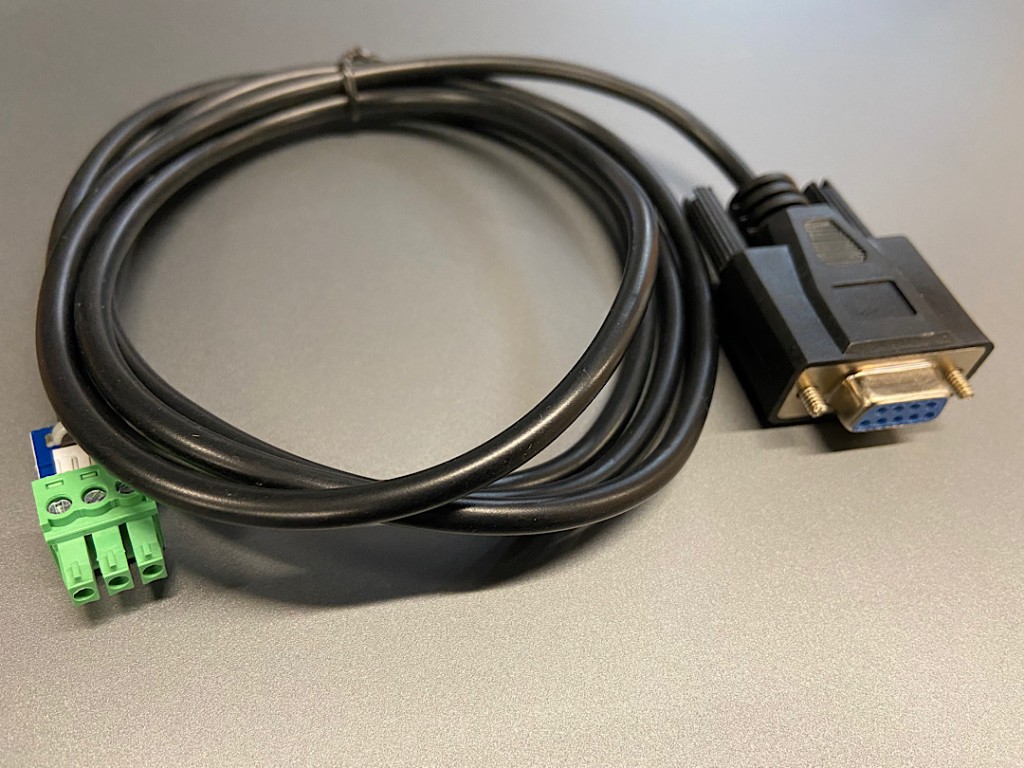
    3. Connect the serial to phoenix cable to the MHUB, and then your serial to USB adaptor into a laptop or PC.
    4. Go back to Hercules, ensure that the Baud is 115200, the Data Size is 8, the parity is None, the Handshake is OFF and finally, the Mode is Free.
    5. Click on the “Open” button. Your PC will now connect directly to the MHUB.
    6. Type DHCPON! in the box labelled “Send” and click “Send”. Make sure that “Hex” remains unticked.
    7. You will receive a response in the “Received/Sent Data” box. This will confirm that the MHUB has been reset to DHCP.
    8. Hard reboot your MHUB by pulling the power out from the back of the system.
    9. Reconnect MHUB to your router as normal and power up the system. Your MHUB should now be discoverable.

    MHUB U

    Items needed

    Steps

    1. Install Hercules and open the software on your PC or laptop
    2. Hercules interface

    3. Connect the serial to phoenix cable to the MHUB, and then your serial to USB adaptor into a laptop or PC.
    4. Go back to Hercules, ensure that the Baud is 115200, the Data Size is 8, the parity is None, the Handshake is OFF and finally, the Mode is Free.
    5. Click on the “Open” button. Your PC will now connect directly to the MHUB.
    6. Type DHCPON! in the box labelled “Send” and click “Send”. Make sure that “Hex” remains unticked.
    7. You will receive a response in the “Received/Sent Data” box. This will confirm that the MHUB has been reset to DHCP.
    8. Hard reboot your MHUB by pulling the power out from the back of the system.
    9. Reconnect MHUB to your router as normal and power up the system. Your MHUB should now be discoverable.

    Serial to phoenix Cable

    IMG_10May2021at131731


    MHUB 4K (with micro USB on front panel)

    If your MHUB U has a micro USB port on the right hand side of the front panel then please follow these steps to reset your system. Using Hercules from the steps above, send the following command:

    • Baud Rate 9600
    • Data Size 8
    • No parity
    • Restore Command: %0911. (include the full stop “.”)
    • Query IP Command: %9964.

  • How to deal with Picture loss/dropout on your display(s) when using MHUB

    ​Your MHUB is similar to a central heating system in that there are many components that all need to come together to deliver a working system. An intermittent or full loss in picture on one or more displays can be down to a number of things.

    • HDMI cables going into MHUB and from the display receivers to the displays
    • Your network cabling infrastructure, the termination quality, the distance of the cable run and the number of times that cable runs through patch panels or wall plates.
    • The physical output port on the MHUB
    • The display receivers
    • The actual source devices (more common than you think!) and the AV they are outputting (4K, 1080p, surround sound, HDCP format etc)

    Unfortunately, there is no fast way to determine this. To do this test correctly you will need to test for several days to ensure the results are accurate and your system is stable.

    If dropout occurs on one display in your property…

    The first thing to do is disconnect all sources and outputs from MHUB so you are left with 1 source (preferably the source you notice picture loss on) and 1 output (preferably the display you notice picture loss most frequently on).

    Grab a piece of paper and log the following outcomes when you test the following:

    1. If picture loss is happening only in one location in your property then take a display receiver (and the HDMI cable going into the display) from a known working location and swap it in the area you’re noticing picture loss.
    2. If you still experience picture loss then run freshly terminated Cat 6 cable from the MHUB to the display receiver point-to-point (no breaks in cable) and check again.
    3. If you are still having a problem then connect your new Cat 6 cable to another output port on MHUB.
    4. If #3 doesn’t resolve the problem then disconnect your source from MHUB (and the HDMI cable) and plug it directly into your test display using the same HDMI cable.
    5. If the picture is stable then take the source and the HDMI cable back to MHUB and plug it into another HDMI input and test for picture loss on your display.
    6. Finally, drop the resolution on your HDMI source to something you know the display will accept easily (something like 1080p Stereo)

    If dropout occurs on all displays in your property…

    Start by disconnecting your source from MHUB (and the HDMI cable) and plug it directly into a test display using the same HDMI cable.

    Grab a piece of paper and log the following outcomes when you test the following:

    1. If the picture is stable then take the source and the HDMI cable back to MHUB and plug it into another HDMI input and test for picture loss on your display.
    2. If you still experience loss in picture then drop the resolution on your HDMI source to something you know the displays will accept easily (something like 1080p Stereo)
    3. Remove all outputs from MHUB until you’re left with only one output connected, it could be any port but we recommend starting with A. Check for a stable picture and repeat for each output port individually.
    4. If all ports passed the test in #4 then start connecting additional outputs back to MHUB starting B (so you should have A + B now), if the picture is stable add output C and so on.

    If you log any problems or positives with each test then let us know and we can assist you further.

  • Sending TV audio from MHUB to in-wall or ceiling speakers using MHUB PRO 2.0 and MHUB AUDIO

    Extracting video audio from MHUB and sending it to speakers

    Today’s TVs are very thin with the latest models able to be rolled away into a box! A thinner TV is lighter, easier to install and generally more pleasing to the eye as these new advancements can radically change how your traditional TV looks or is installed into your property.

    These advancements have reduced the space inside the TV to an absolute minimum and often a causality of this is the internal TV speaker. Speakers are either located on the rear of the panel (leading to muffled audio) or underneath and in many cases can not provide the type of audio amplification to match the large screen sizes found in the marketplace today.

    Soundbars have plugged the gap, but they aren’t the solution.

    Soundbars have plugged this gap as customers try to achieve audio reproduction that matches their picture quality. Whilst a soundbar is a simple solution to the problem it fair to say that it doesn’t present itself as the most elegant in that it’s additional (visible) hardware that you need to add to your AV setup. The soundbar is also tied to the function of the TV; so it’s not very easy to listen to music on the same device, for example.

    De-embed the audio and manage it separately.

    Using MHUB it’s possible to extract the audio that would be sent to your TV – or even the audio generated from your TV apps like Disney+ or Netflix and send that to speakers in your room. Additionally, when the TV is off you can listen to music on the same speakers. If your speakers are embedded in your walls or are in the ceiling then you won’t even notice them, but you’ll hear the difference.

    Watch the setup video instead.

    MHUB PRO 2.0 + MHUB AUDIO: how does it work

    To achieve this you will need to use MHUB PRO 2.0 and MHUB AUDIO operating together as one system which we call V&A (video & audio).

    Download the MHUB (V&A) guide.

    The MHUB PRO 2.0 can de-embed the audio from any video stream or TV app (using ARC) and downmix it into 2 channel stereo. This audio is then fed into the inputs on MHUB AUDIO which manages amplification of that audio. If you have inputs that require amplification then you can stack another MHUB AUDIO (up to three times using uControl) or as many as you want if you’re using a control system.

    We are here to help. Let us know if you have any questions…

    .

    Contacting us is super easy and we respond fast. Let us know if you have any questions about setting up a V&A system.

  • Handling Dolby Audio (Atmos) and DTS-HD audio with MHUB

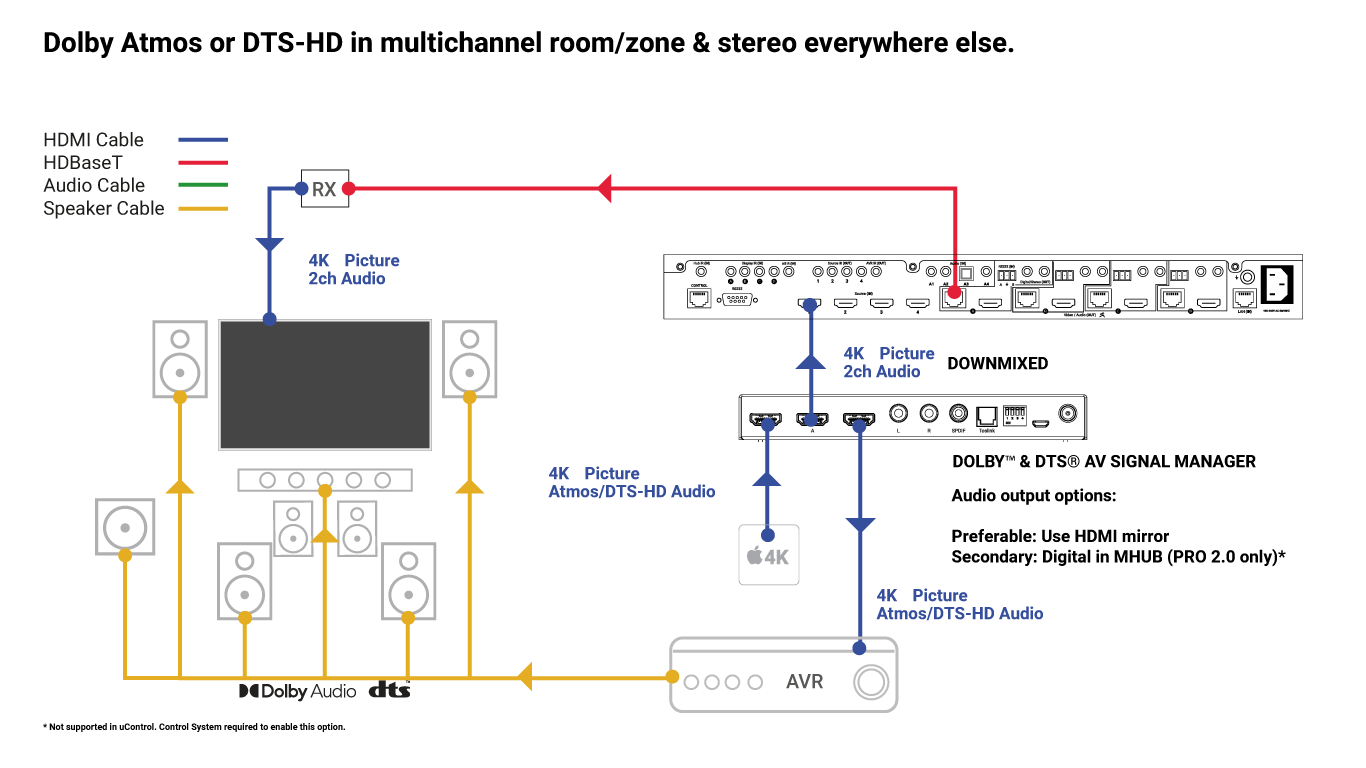
    Using a matrix and providing Dolby Atmos or DTS-HD audio.

    atmos-mhub

    If you are planning a cinema or media room supplied by MHUB that requires a multichannel audio signal like Dolby Atmos or DTS-HD then you will need additional hardware to achieve this result.

    Why do I need additional hardware and what does it do?

    In order to enjoy Dolby or DTS audio in a cinema or media room you will need to instruct your source device (AppleTV / Bluray / Set top box etc) to output its audio in Dolby Atmos or DTS-HD only.

    If all the zones in your property can accept a multichannel Dolby or DTS signal then you will have no problem but the chances are that the rest of the rooms in the property will just have a standard TV with a left and right speaker only – think of a kitchen TV display or a TV in a kids room.

    You therefore need a device that sits in-line (between) your HDMI video source and the MHUB that does the following important things:

    1. Sends an untouched signal from your HDMI source to your AVR (as if they were connected directly to one another) to provide it with Atmos or DTS-HD audio and…
    2. Split the signal and ‘downmix’ it so all those channels of audio are mixed into a left and right only for all other displays that the MHUB serves.

    What is it called?

    The device that you need is called the Dolby™ & DTS® AV Signal Manager.

    What devices does it work with?

    It will work with MHUBs and XTND hardware which feature HDMI mirrored outputs.

  • Extracting ARC from your TV to a nearby AVR or (Sonos) Amp

    Many displays sold from 2015 come with apps to watch TV directly from the Internet (Netflix, Disney+, YouTube etc). If you want to extract that audio to nearby speakers you have two options: 1) extract the audio using a technology within the HDMI cable called Audio Return Channel (ARC) back to an amplifier that also has ARC or 2) extract the audio from the TV using its stereo or optical connection and run additional cabling back to the amplifier.

    If the TV is wall mounted, is at a distance, or you are unable to run any additional cable to the amplification equipment then your only choice is to rely on ARC – if supported by your display – to achieve this result.

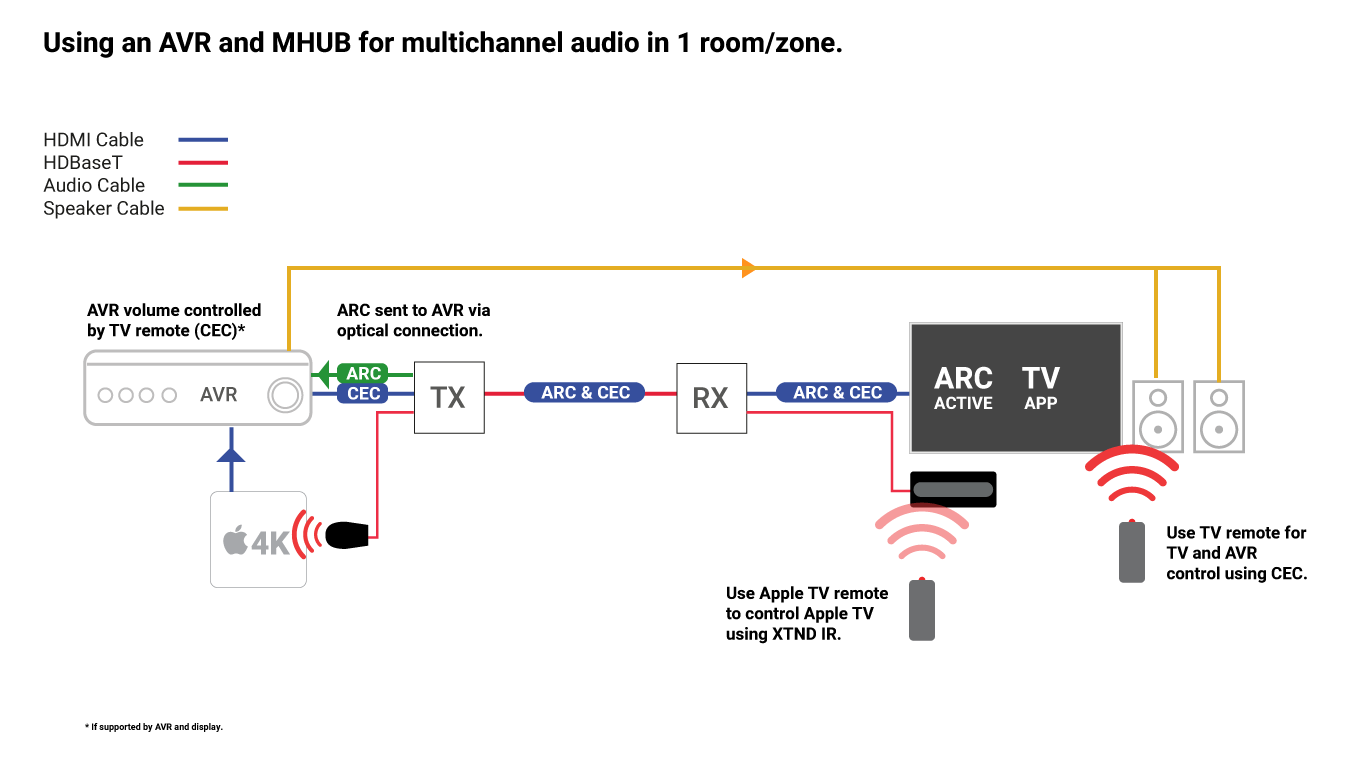
    Both MHUB and XTND support ARC (check model spec) BUT there are some important points you should understand before purchasing your system. This article describes ARC extraction and control via CEC for XTND models.

    xtnd-audio

    Do they support eARC?

    No. eARC is not supported currently. ARC support includes 2 channel audio (stereo) and multichannel audio upto 5.1 (if supported by your display).

    Our extenders do not mimic a long HDMI cable…

    Your MHUB or XTND device does not act like a long HDMI cable and should not be thought of as one. Our devices can handle HDMI features like HDCP, EDID, CEC and ARC but it doesn’t ‘pass it through’ like a standard copper HDMI cable does point-to-point.

    With ARC on our XTND models for example, it doesn’t pass through to the HDMI cable on the source side. Instead our extenders extract the audio to an optical or analogue output which can then be fed in to an AVR or Amp.

    This is done because the XTND is not an ARC extender. It is primarily a HDMI video extender that supports the ARC featureset.

    …meaning you can’t use ARC + CEC together.

    So for scenarios where you want to use Sonos Amp you might have a problem because you can not use the TVs remote control to control the Sonos Amp but you have an alternative options because you can use IR passback to control the Sonos Amp instead.

  • Using HDA MHUB and XTND with soundbars

    Soundbars

    As TVs have become thinner, the space required for housing speakers within them have diminished, often leaving TV audio weak, lacking in depth and richness. Soundbars are an effective solution to that problem and HDANYWHERE works with them absolutely fine.

    Picking the right soundbar.

    There are generally three types of soundbar available.

    1. Stereo soundbars
    2. Multichannel 5.1 soundbars
    3. Multichannel (Spacial) soundbars that support Dolby Atmos and DTS-HD

    1. Stereo soundbars

    If you have #1 (stereo soundbars) then you’re good to go. This will work all over your property as the speaker arrangement and capability is just a better version of what your TV already supports.

    2. Multichannel soundbars

    If you intend on fitting #2 then you will need to consider what capability your other rooms/zones can handle around your property. If your soundbar supports 5.1, then we suggest reading the guidance here.

    What the guidance above says (briefly).

    If you want your soundbar to output 5.1 then you will need to make sure your source is also set to output 5.1. When you do this all displays connected to MHUB will receive a 5.1 audio signal and if that display can’t decode 5.1 audio and downmix it into stereo then you will have an audio problem.

    3. Multichannel (Immersive) soundbars

    If you intend on installing a soundbar with this capability and require the source to be distributed then you will need additional hardware to manage the signal. We would recommend that you read Using MHUB and providing Dolby Audio (Atmos) and DTS (DTS-HD) audio.

    Confused? Help is available, drop us an email for a fast response.