Basic IR Setup (dos and don’ts)


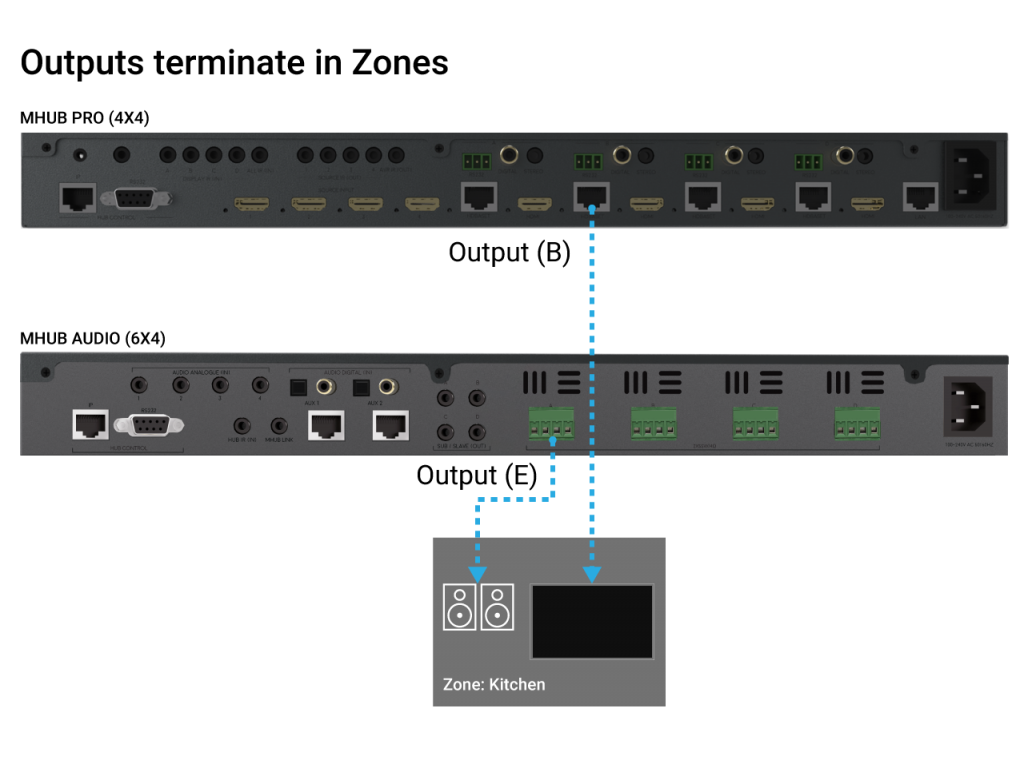
Zones define a physical space in a property where outputs from MHUB terminate.
A Zone can include a maximum of 1 video output and a maximum of 4 audio outputs. For example, you can create a zone called “Kitchen” and assign 1 video and 1 audio output to it to provide you with viewable TV and sound. A Zone must contain at least 1 output from an MHUB for it to be addressable for control. Note: outputs can not be shared or split to more than 1 Zone.
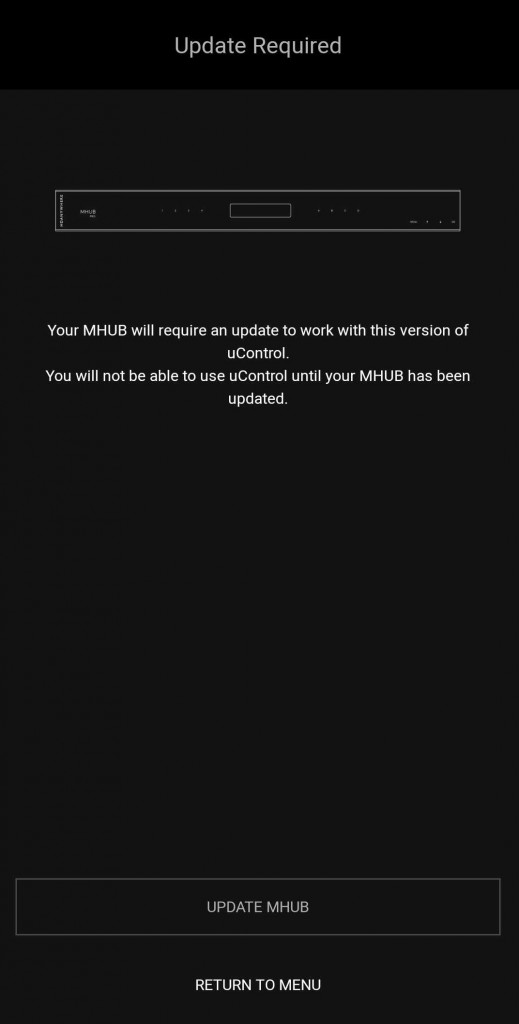
If you have received a notification in uControl or by email that an update is available for your MHUB-OS then follow these steps to update your system. All updates are now handled by uControl. Please ensure you have installed the latest version.
If you have not connected to your MHUB before, please follow this guide first – Connecting to a MHUB
If you have received a notification in uControl or by email that an update is available for your MHUB then chose the correct option below:
The majority of MHUB customers will be on MHUB-OS 7 and their systems will contain user data which needs updating to the latest version. If this is you then follow these steps.
This is likely to happen if you have recently bought MHUB and it was shipped to you on older software. You will run through the following steps:
If your version of uControl updates to version 2.0 or above automatically, any previous connection to your MHUB will be reset. This is normal and part of the update process. Follow the process as described in ‘Updating a New System’ and uControl will update your system as part of the connection process.
Having trouble updating your MHUB, check here –Update Troubleshooting
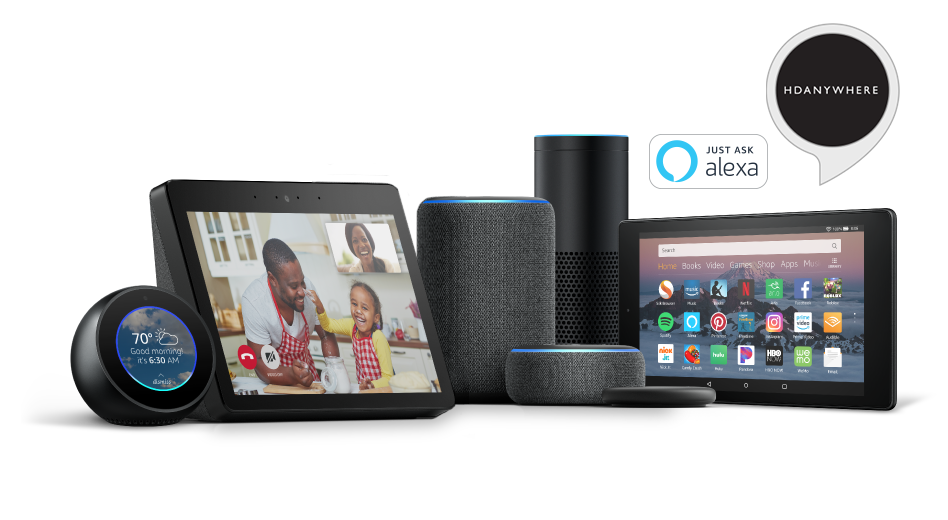
*Before you activate the Alexa Voice Service with your MHUB, make sure Amazon support your territory and version. We cannot guarantee voice services or offer support to those territories not officially supported by Amazon. Check here: https://www.amazon.co.uk/gp/help/customer/display.html?nodeId=202207000
Let’s take the command “Alexa, Turn on football” as an example.
It might appear like a very simple command but there are a number of things that need to happen in order to watch football! First the TV might need to turn on, but in which room? The volume might need to be set to a desired limit. The correct source input might need to be selected on MHUB and finally that source will need to navigate to the channel hosting the football.
You can configure all those actions in what we call a “Sequence”.
Taking the example above:
Alexa (this wakes up your Amazon Dot/Echo/Show)
Turn on… (this invokes the smarthome skill)
football (this is your custom name for the Sequence, it can be anything you want)
Inside MHUB-OS we can configure exactly what “football” does.
Read more about Sequences and Scheduling.
Now you’re ready to go. Take a look at a full list of commands that you can say to your Echo.
The table below details the PSU DC rating, the system power draw in watts and BTU(British thermal unit) heat output of each device.
| Product Code | Release | PSU Rating (DC) | Power Draw (watts) | BTU | |||||
|---|---|---|---|---|---|---|---|---|---|
XTND |
|||||||||
| XTND2K30 | 2017 | 5V 1A | 2.5 | 9 | |||||
| XTND4K40ARC | 2018 | 24V 1A | 20 | 68 | |||||
| XTND4K100TPC | 2018 | 24V 1A | 12 | 41 | |||||
MHUB |
|||||||||
| MHUBAUDIO64 | 2018 | 24V 13.4A | 520 | 1774 | |||||
| MHUBMAX44 | 2018 | 24V 2.71A | 19.2 | 66 | |||||
| MHUB431U | 2018 | 24V 2.71A | 36 | 123 | |||||
| MHUB862U | 2018 | 24V 2.71A | 28 | 198 | |||||
| MHUBPRO4440 | 2018 | 24V 2.71A | 40 | 136 | |||||
| MHUBPRO8870 | 2018 | 24V 6.3A | 98 | 334 | |||||
| MHUB4K44PRO | 2016 | 24V 2.71A | 42.72 | 146 | |||||
| MHUB4K88PRO | 2016 | 24V 6.3A | 100 | 341 | |||||
| MHUBPRO24440 | 2019 | 24V 5A | 68 | 232 | |||||
| MHUBPRO288100 | 2019 | 24V 6.3A | 130 | 444 | |||||
SPLITTERS AND SCALERS |
|||||||||
| SPLITTERMAX12 | 2019 | 5V 1A | 2 | 7 | |||||
| SPLITTERMAX14 | 2019 | 5V 1A | 2 | 7 | |||||
| SIGNALMANAGER | 2018 | 5V 1A | 1.65 | 6 | |||||
If your MHUB is marked with “TPC” then it is capable of passing a HDR picture to your display. There are a number of reasons why HDR may not be fed through your HDA device. This support post aims to troubleshoot the most common reasons and how to resolve them.
Important: there are different versions of HDR, make sure your display supports the format your source is outputting!
There are multiple variants of HDR such as HLG, HDR10+ and Dolby Vision, please ensure your display supports the relevant HDR technology.
When connecting your HDR enabled source and display to a HDA system you may need to adjust some settings to get it to work.
On Monday 18th of May we rolled out a firmware release to all live Modular 8×8 units. Whilst the update was being delivered to the units we suffered an ISP issue causing the update file to be corrupted in some instances. Most units will repair themselves automatically. If your unit is displaying a ‘1021 cant reach gateway’ error or stuck in a boot loop please follow the instructions below
1. Remove and re-insert the SDCard from the slot on the front by pressing it once to pop it out and press again to pop it back in. This should resolve things in most cases. (This may need to be repeated if the first attempt fails)
2. In more rare cases, it may be that removing all of the cat5 cables from any HDBaseT outputs and then removing and replacing the SDCard is required.
3. In extreme instances, a manual software update is required. To perform this, the SDCard needs to be fully removed from the unit and placed in a Windows based PC. Open The SD Card and remove all files except the ‘SETTINGS.INI’ File. Then file below needs to be downloaded, extracted, then the three files within need to be placed on the root of the 8×8 SDCard. Once there, the card can be inserted back into the 8×8, it should reboot and apply the correct software. Normal operation of the 8×8 will then resume.
If none of the above works, or you require further assistance please contact the technical team via phone or email on 01684576348 & support@hdanywhere.com
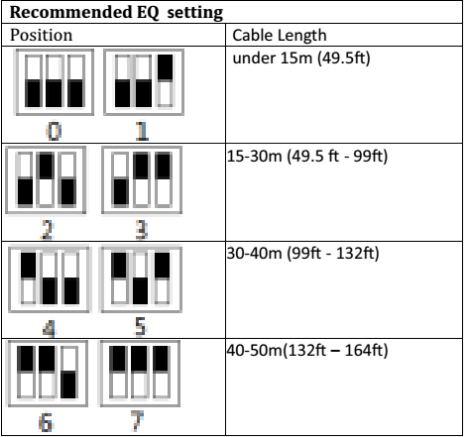
If you find that you have no picture or poor picture quality, you may need to adjust the EQ settings on your XTND 2K30 based on the approximate distance of your cable run. If you have any patch points add an additional 10% onto your effective distance. The below diagram shows the correct switch settings for various lengths of cable run. We suggest working from the maximum distance and working down if you are unsure of the length of your cable run.
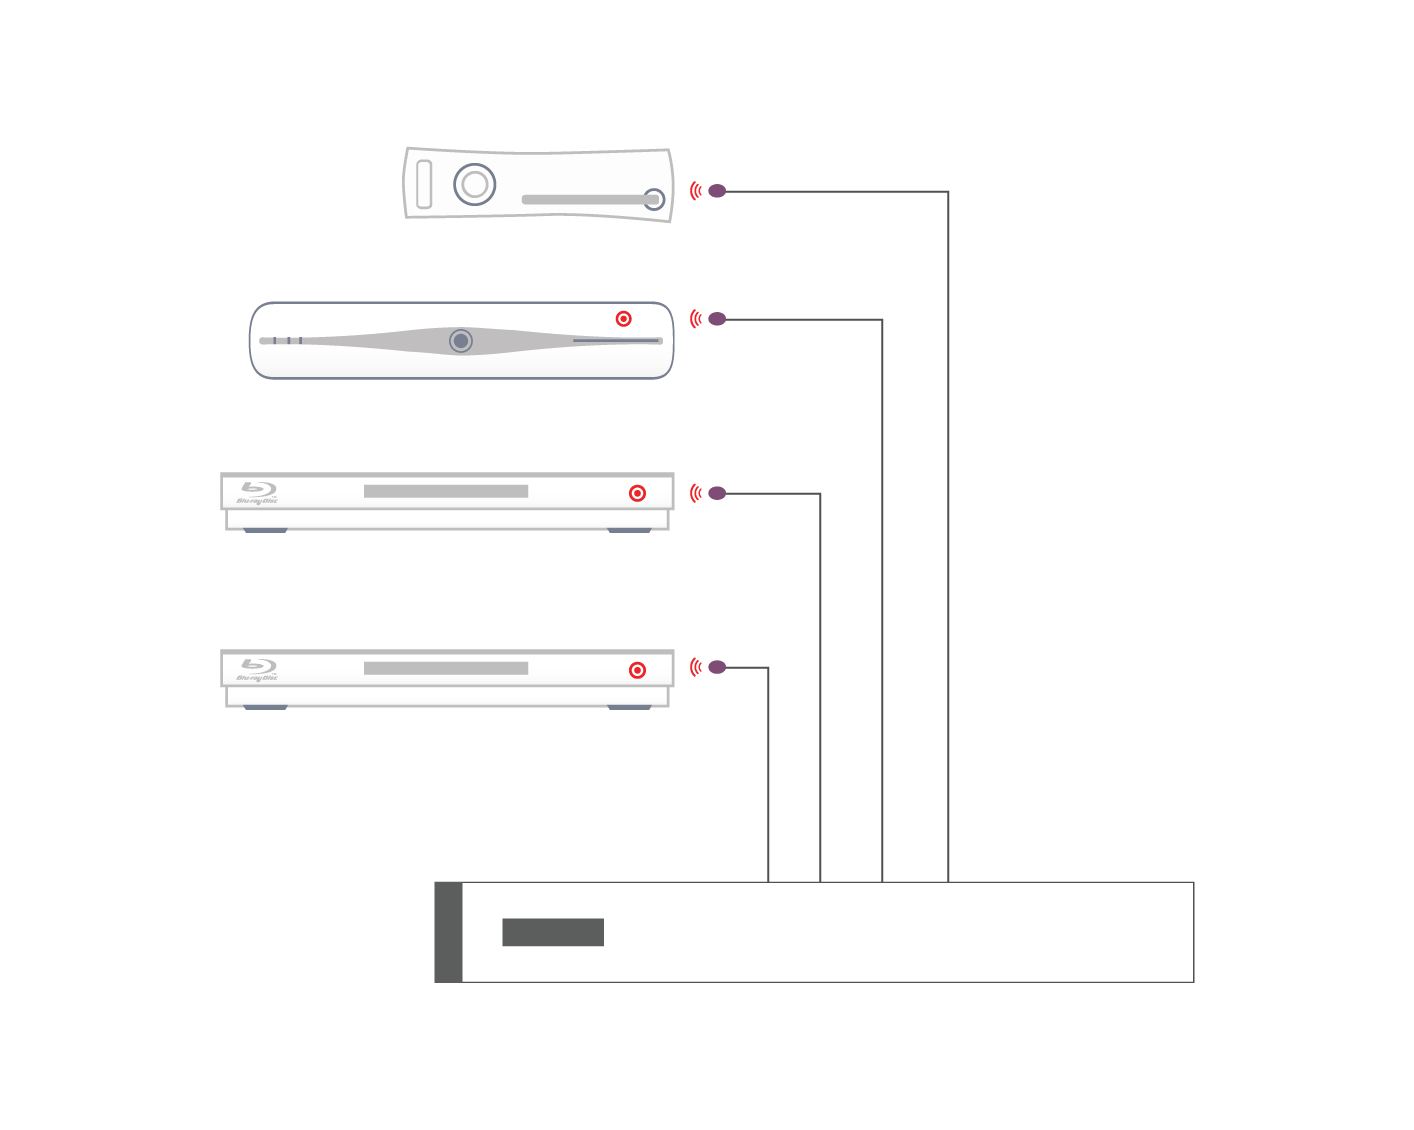
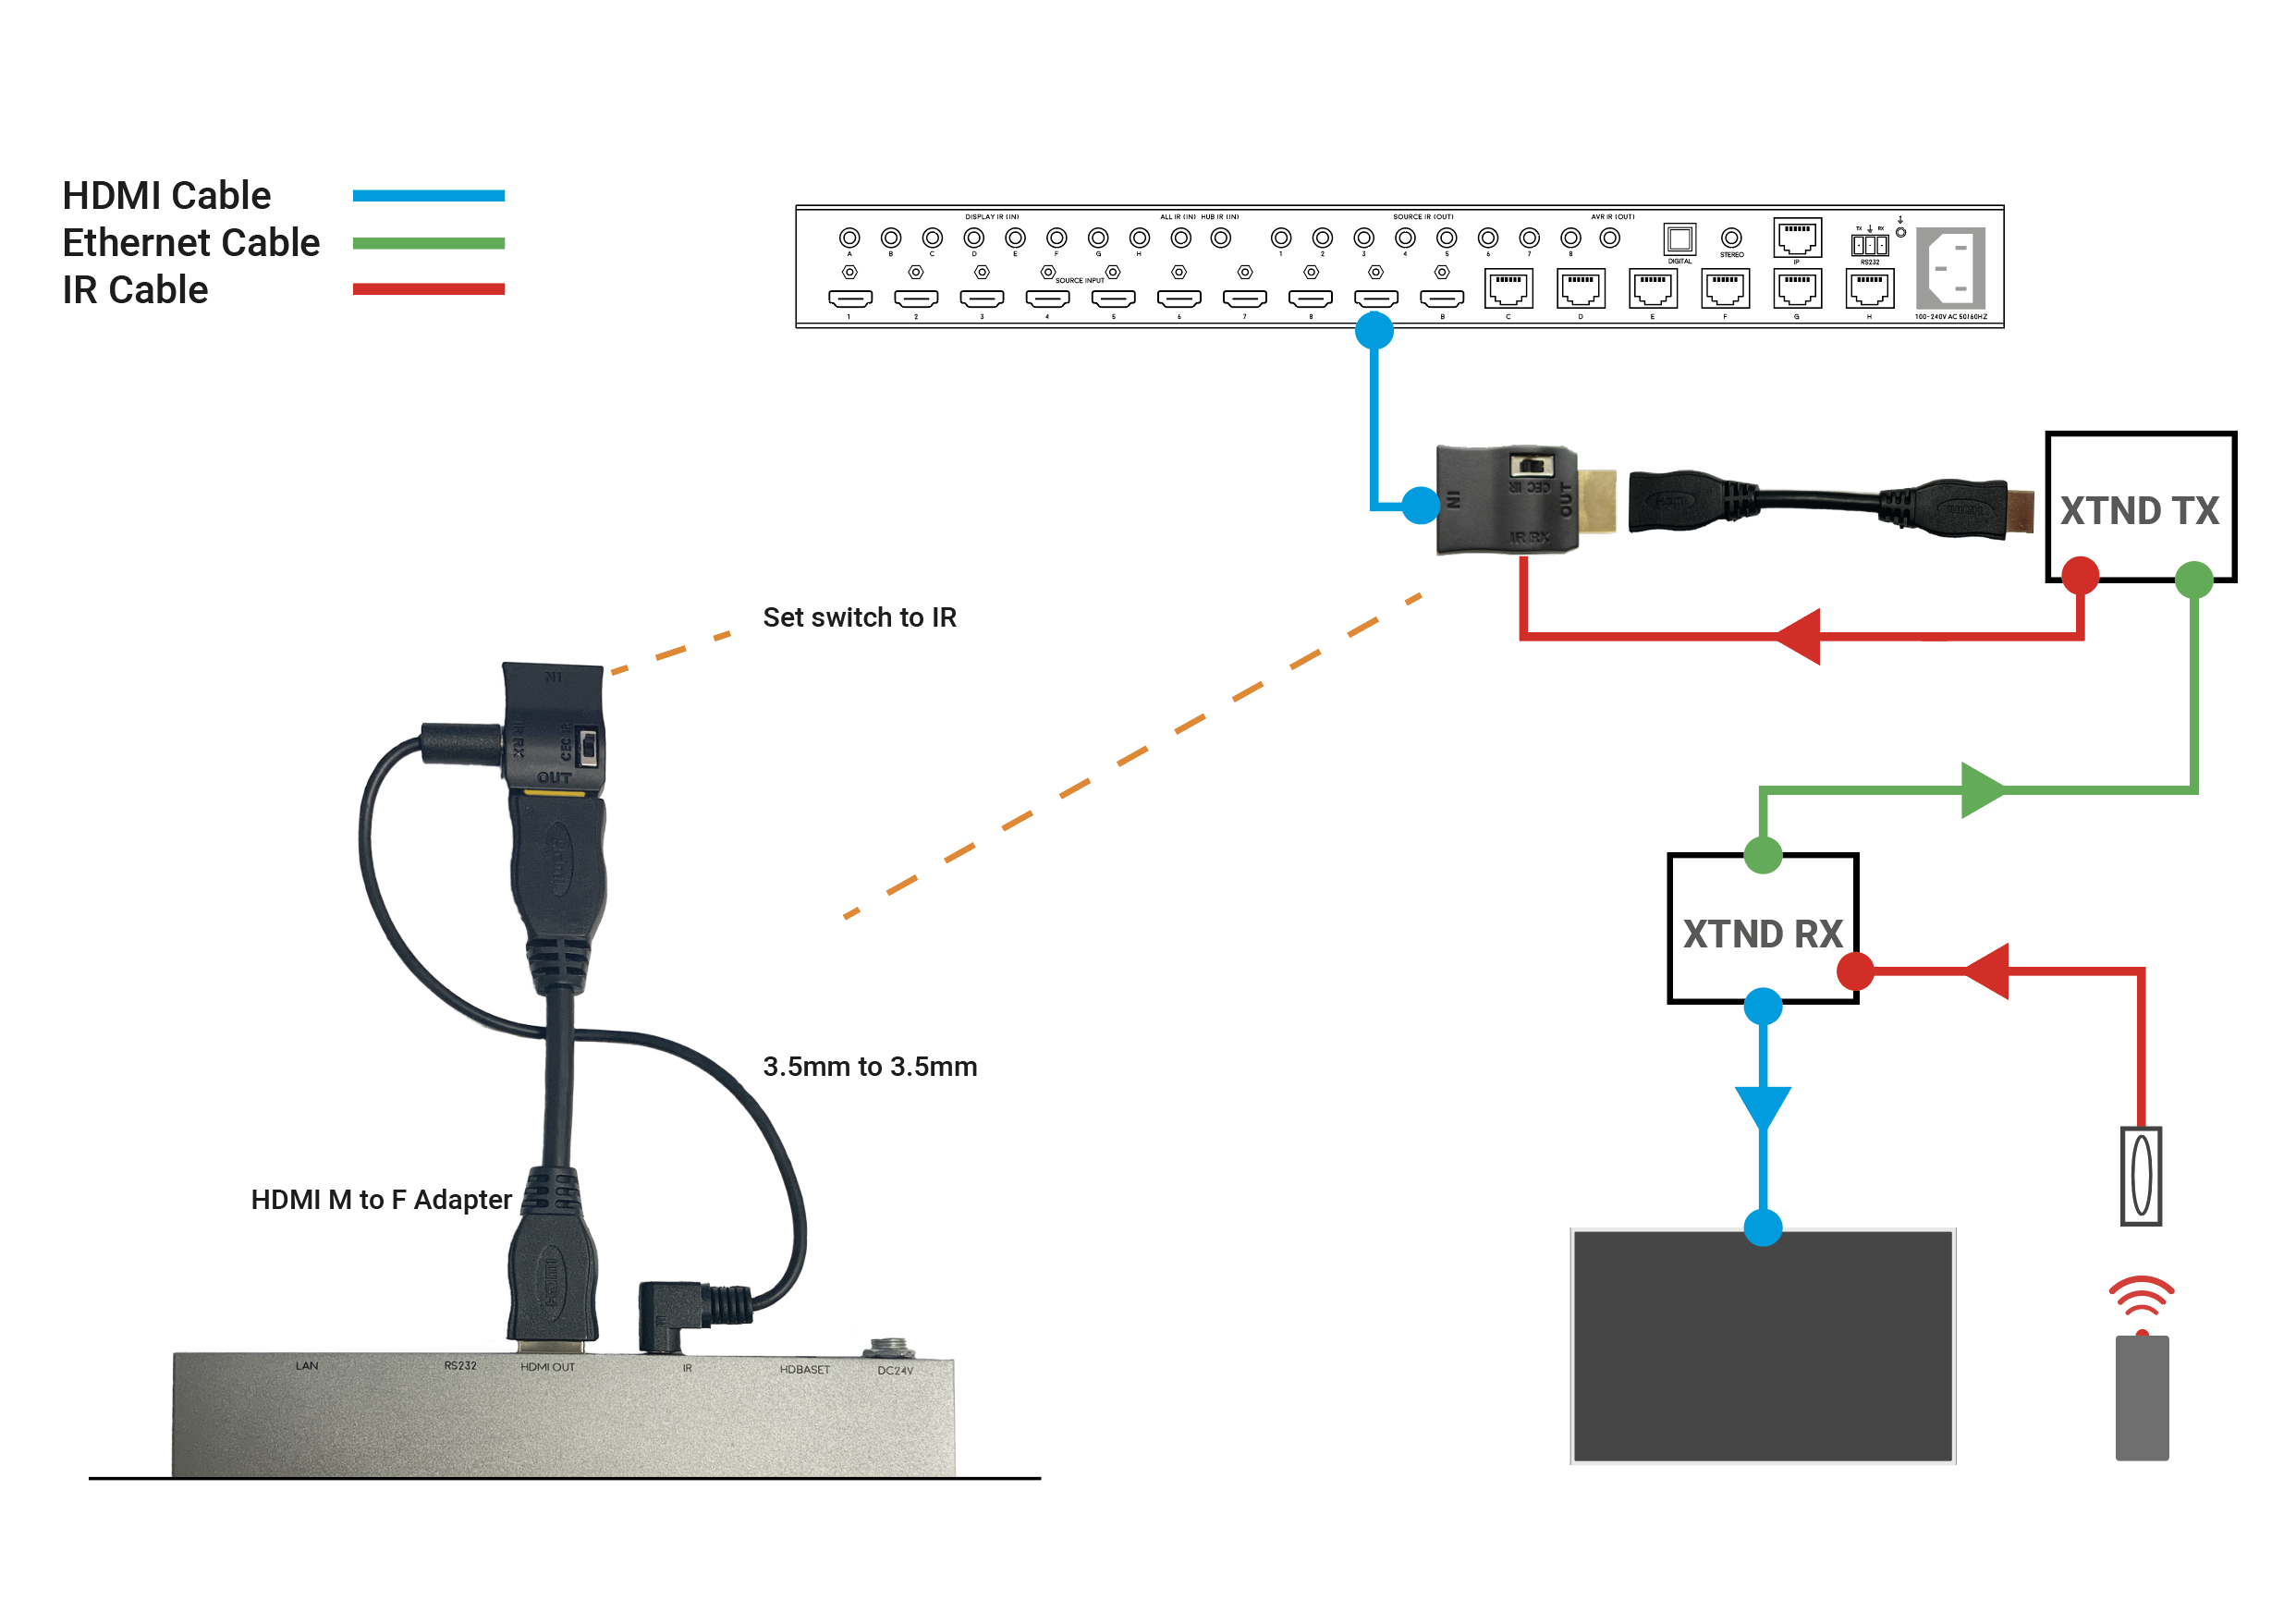
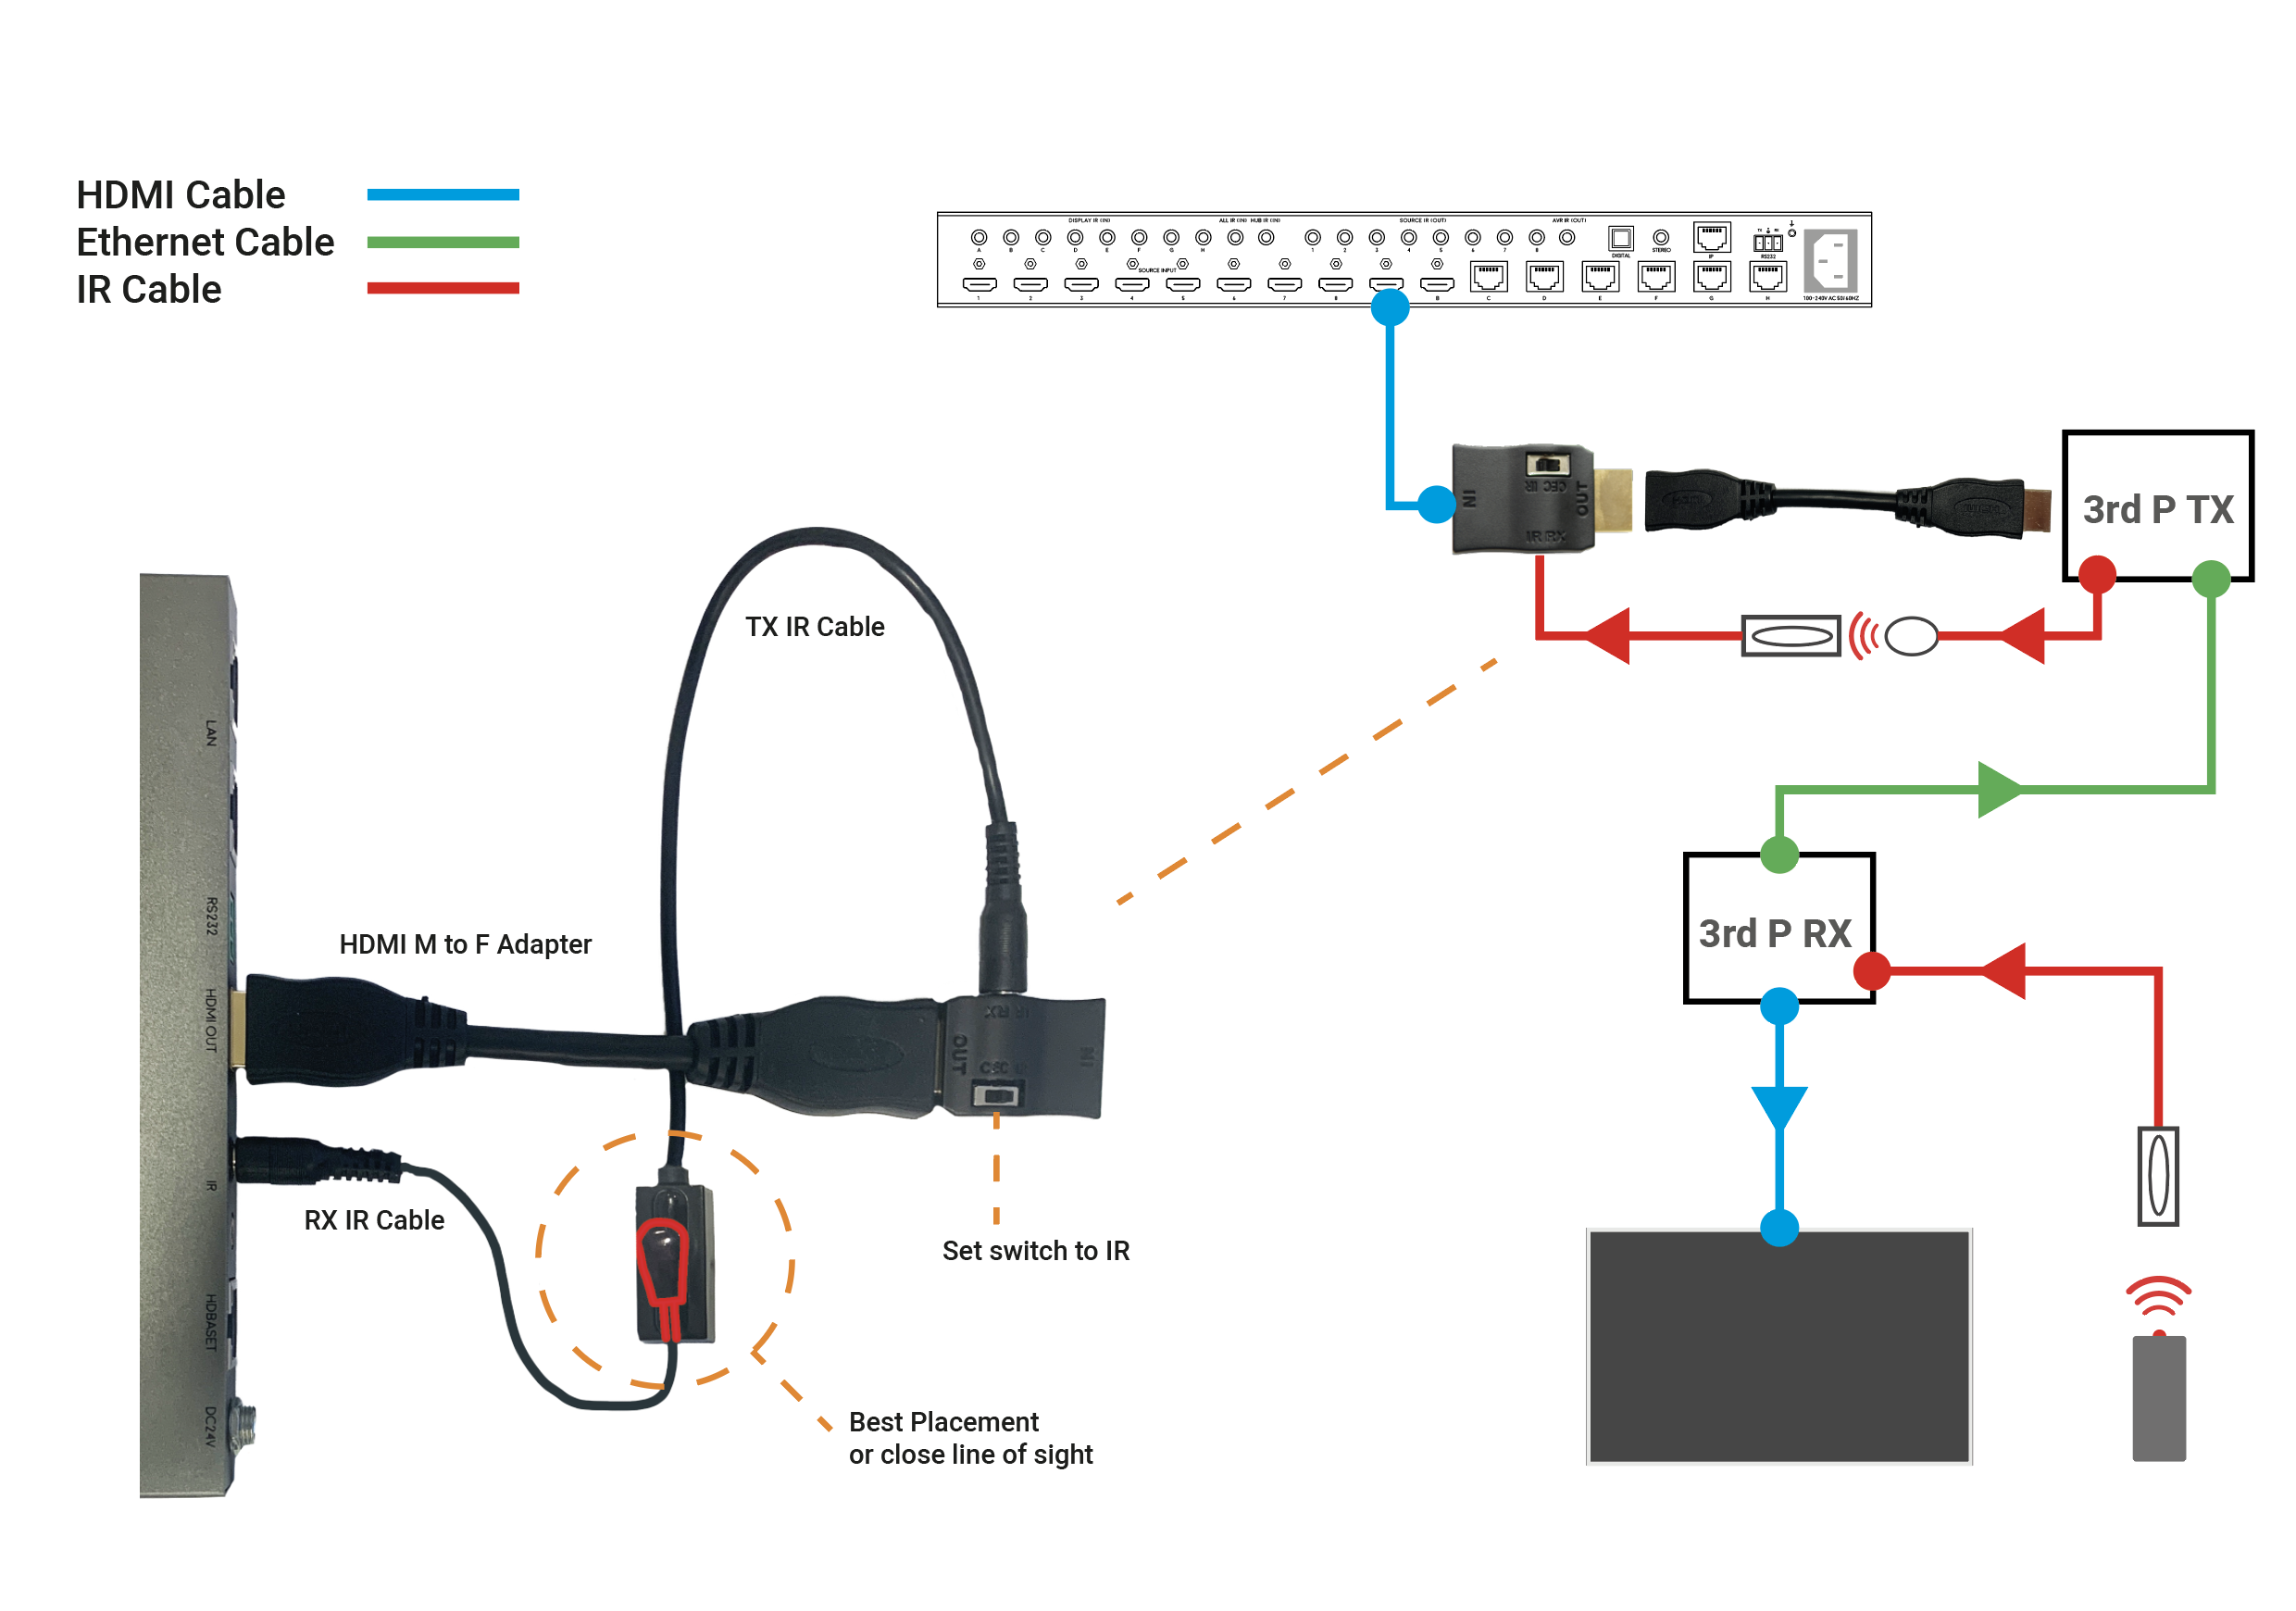
Daisy chaining IR can allow you to connect the IR systems of 2 devices. This allows IR to pass from one device to another
This does not work for HDMI Mirrored ports.
a) The diagram below shows how you can link two HDA devices, such as an MHUBU86240 and an XTND4K40TPC using a MHUB + XTND Integration Kit
b) This second diagram shows how you would connect a HDA system to a 3RD PARTY extender or device such as a Harmony Remote by Daisy-chaining the IR transmitter from the 3RD party device and the IR receiver included with the MHUB system.
c)