If you wish to control your MHUB 4K 4×3+1/8×6+2 from an external control system via a RS232 connection you will need to wire the included phoenix connector to the following specification.
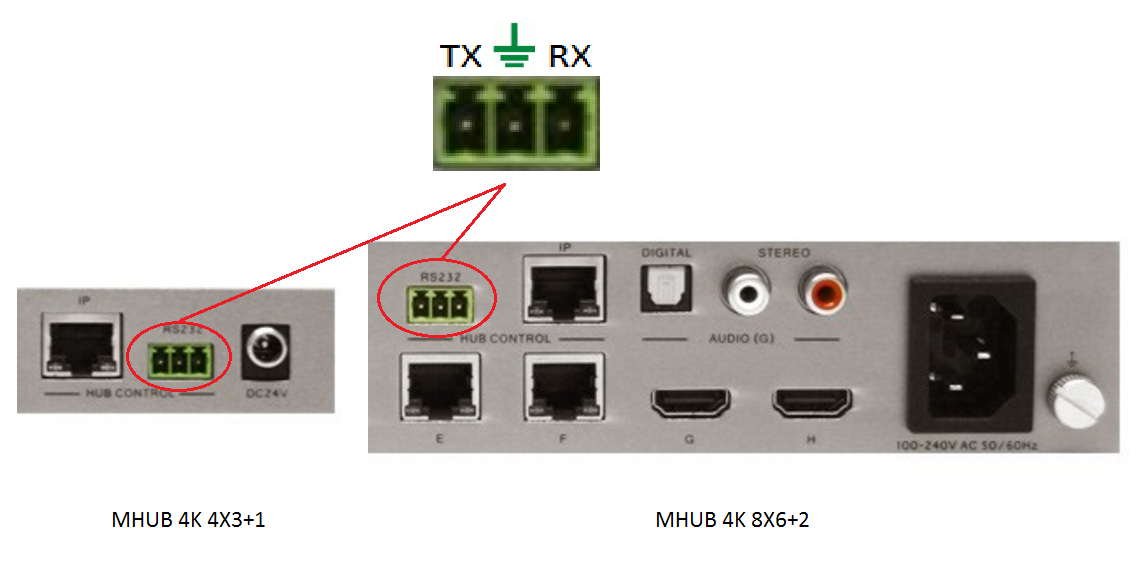
If you wish to control your MHUB 4K 4×3+1/8×6+2 from an external control system via a RS232 connection you will need to wire the included phoenix connector to the following specification.
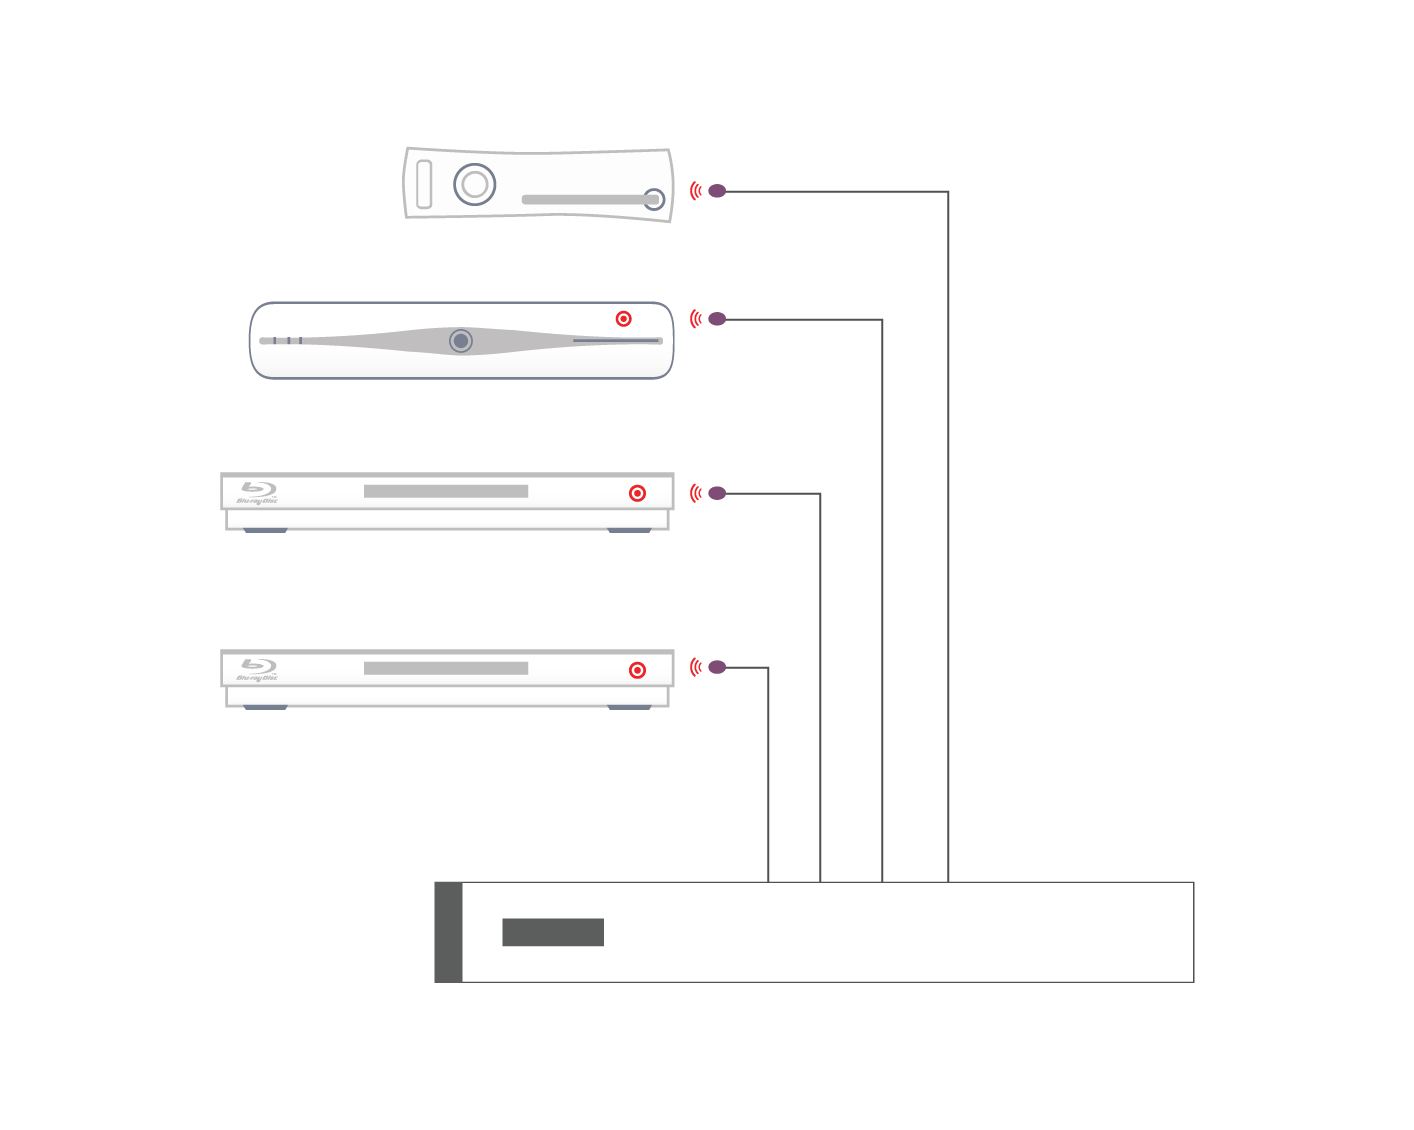
Daisy chaining IR can allow you to connect the IR systems of 2 devices. This allows IR to pass from one device to another
This does not work for HDMI Mirrored ports.
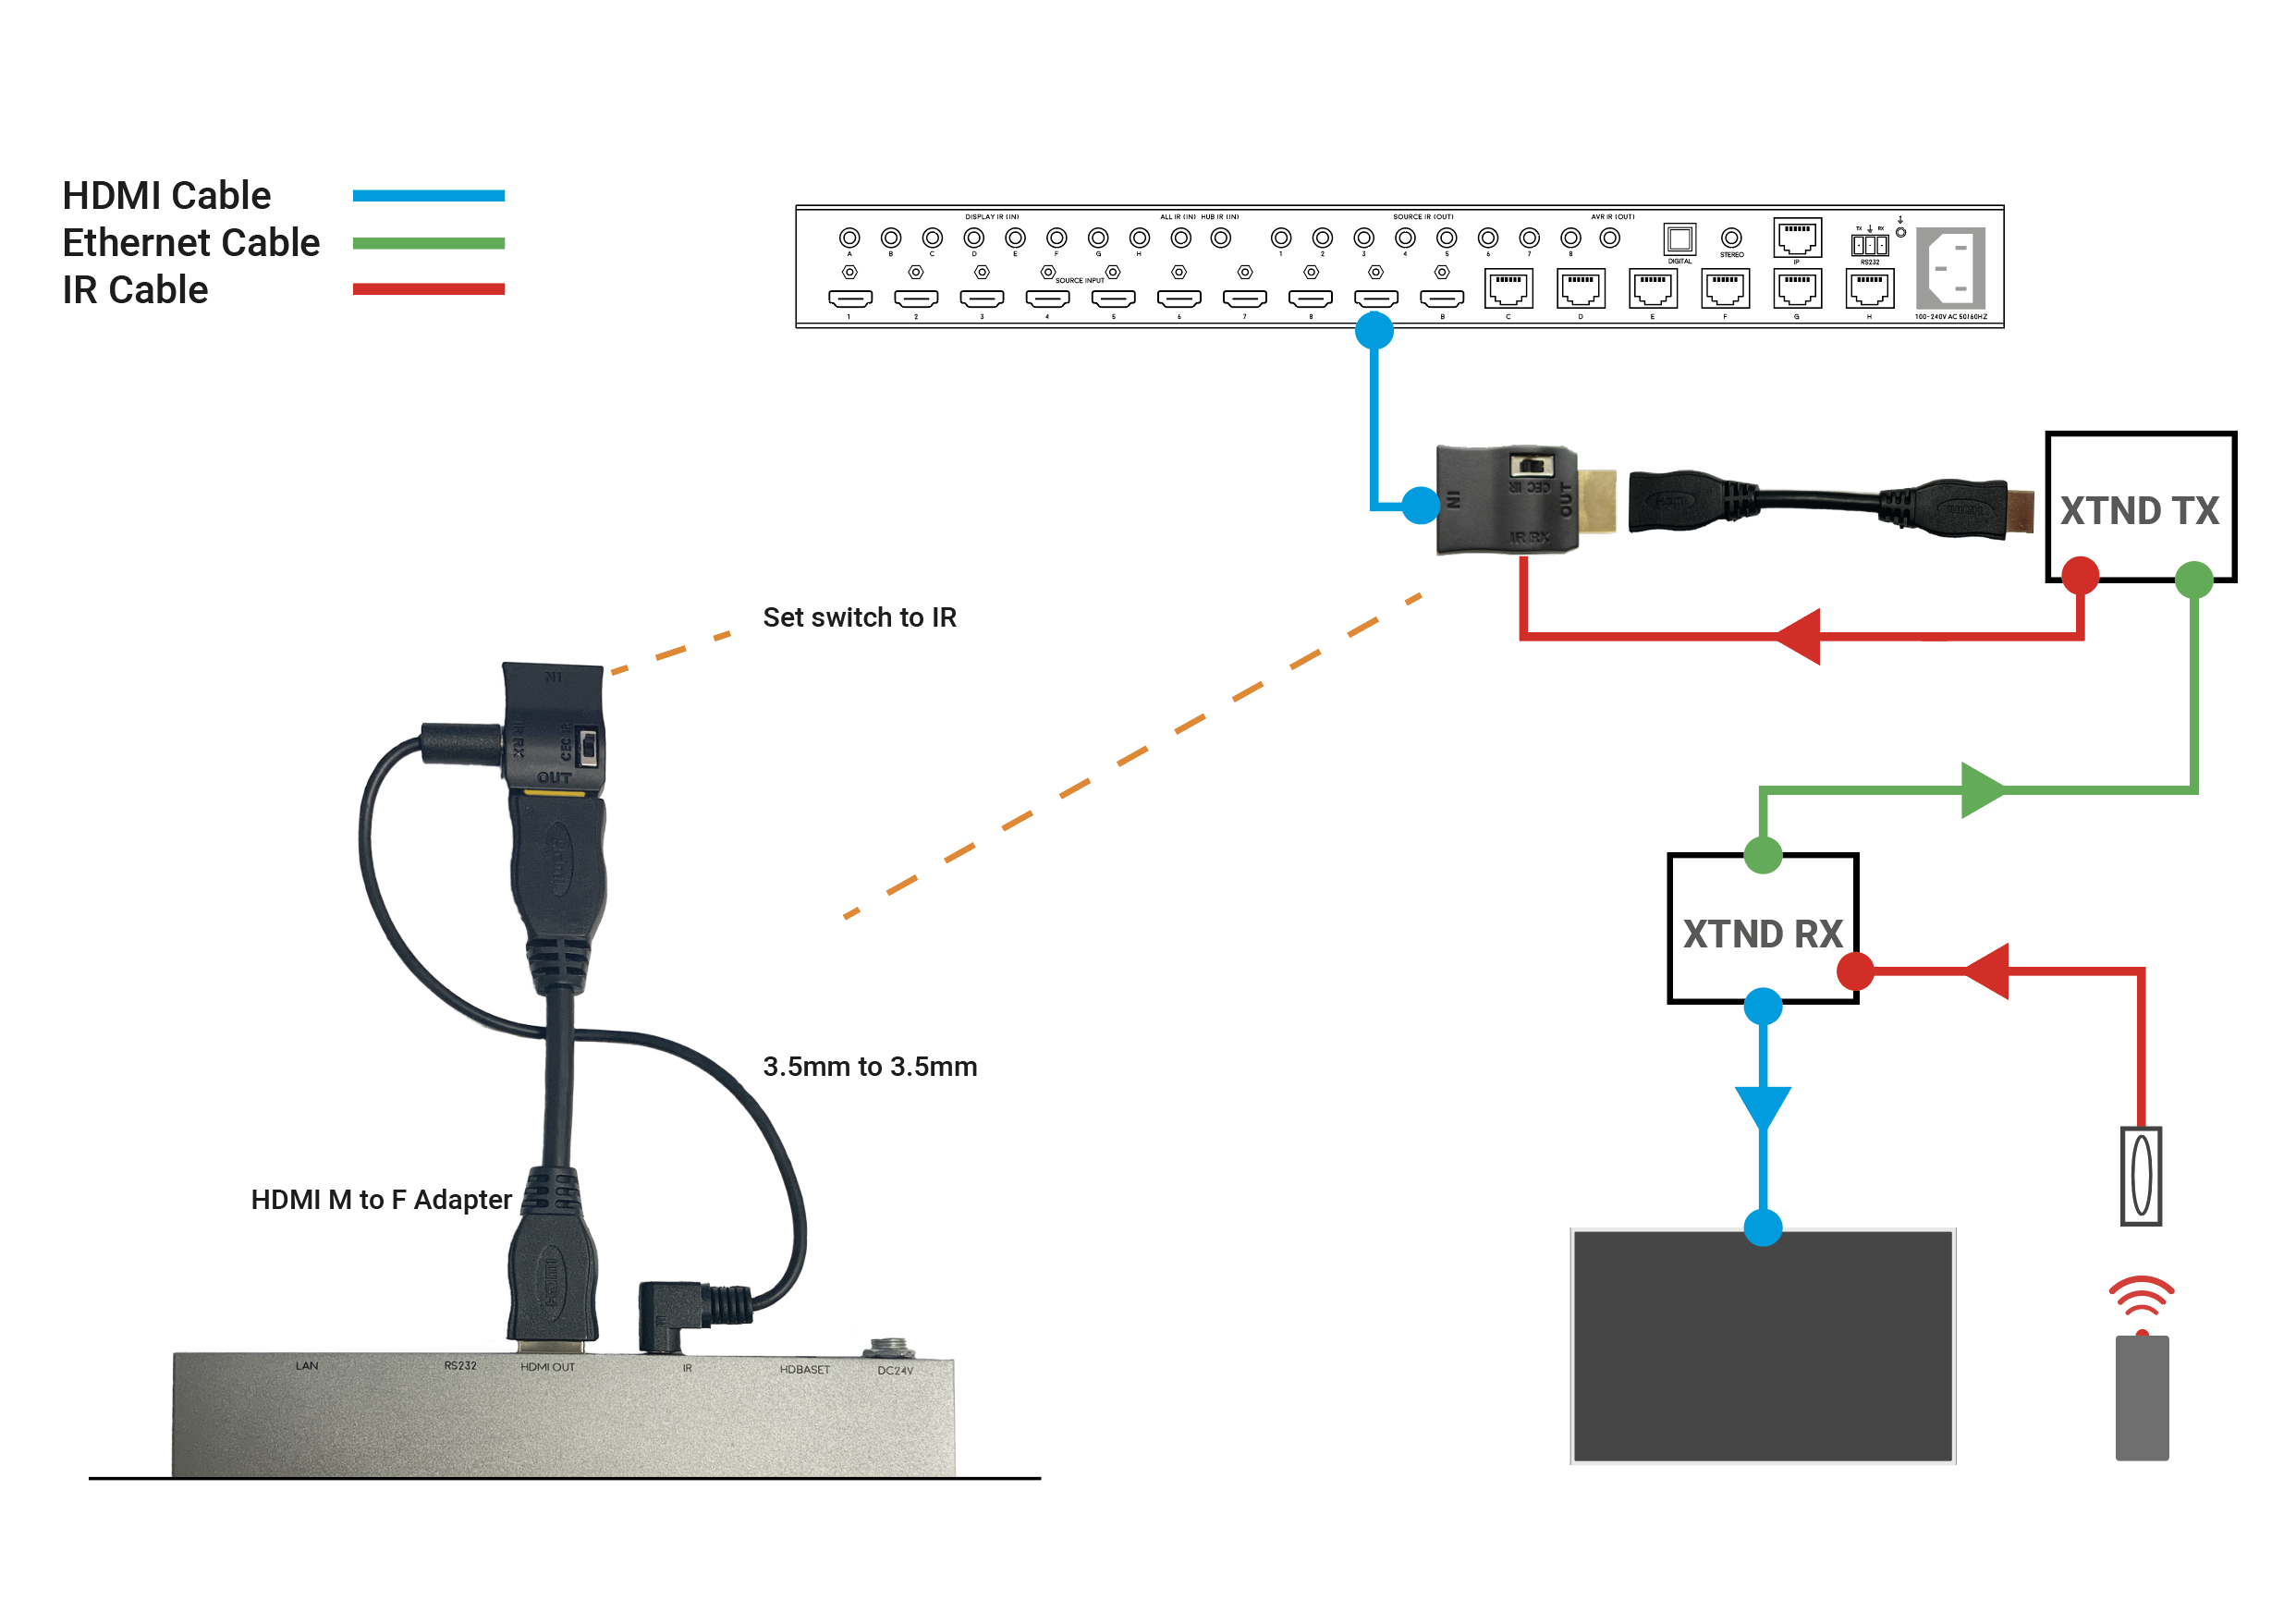
a) The diagram below shows how you can link two HDA devices, such as an MHUBU86240 and an XTND4K40TPC using a MHUB + XTND Integration Kit
b) This second diagram shows how you would connect a HDA system to a 3RD PARTY extender or device such as a Harmony Remote by Daisy-chaining the IR transmitter from the 3RD party device and the IR receiver included with the MHUB system.
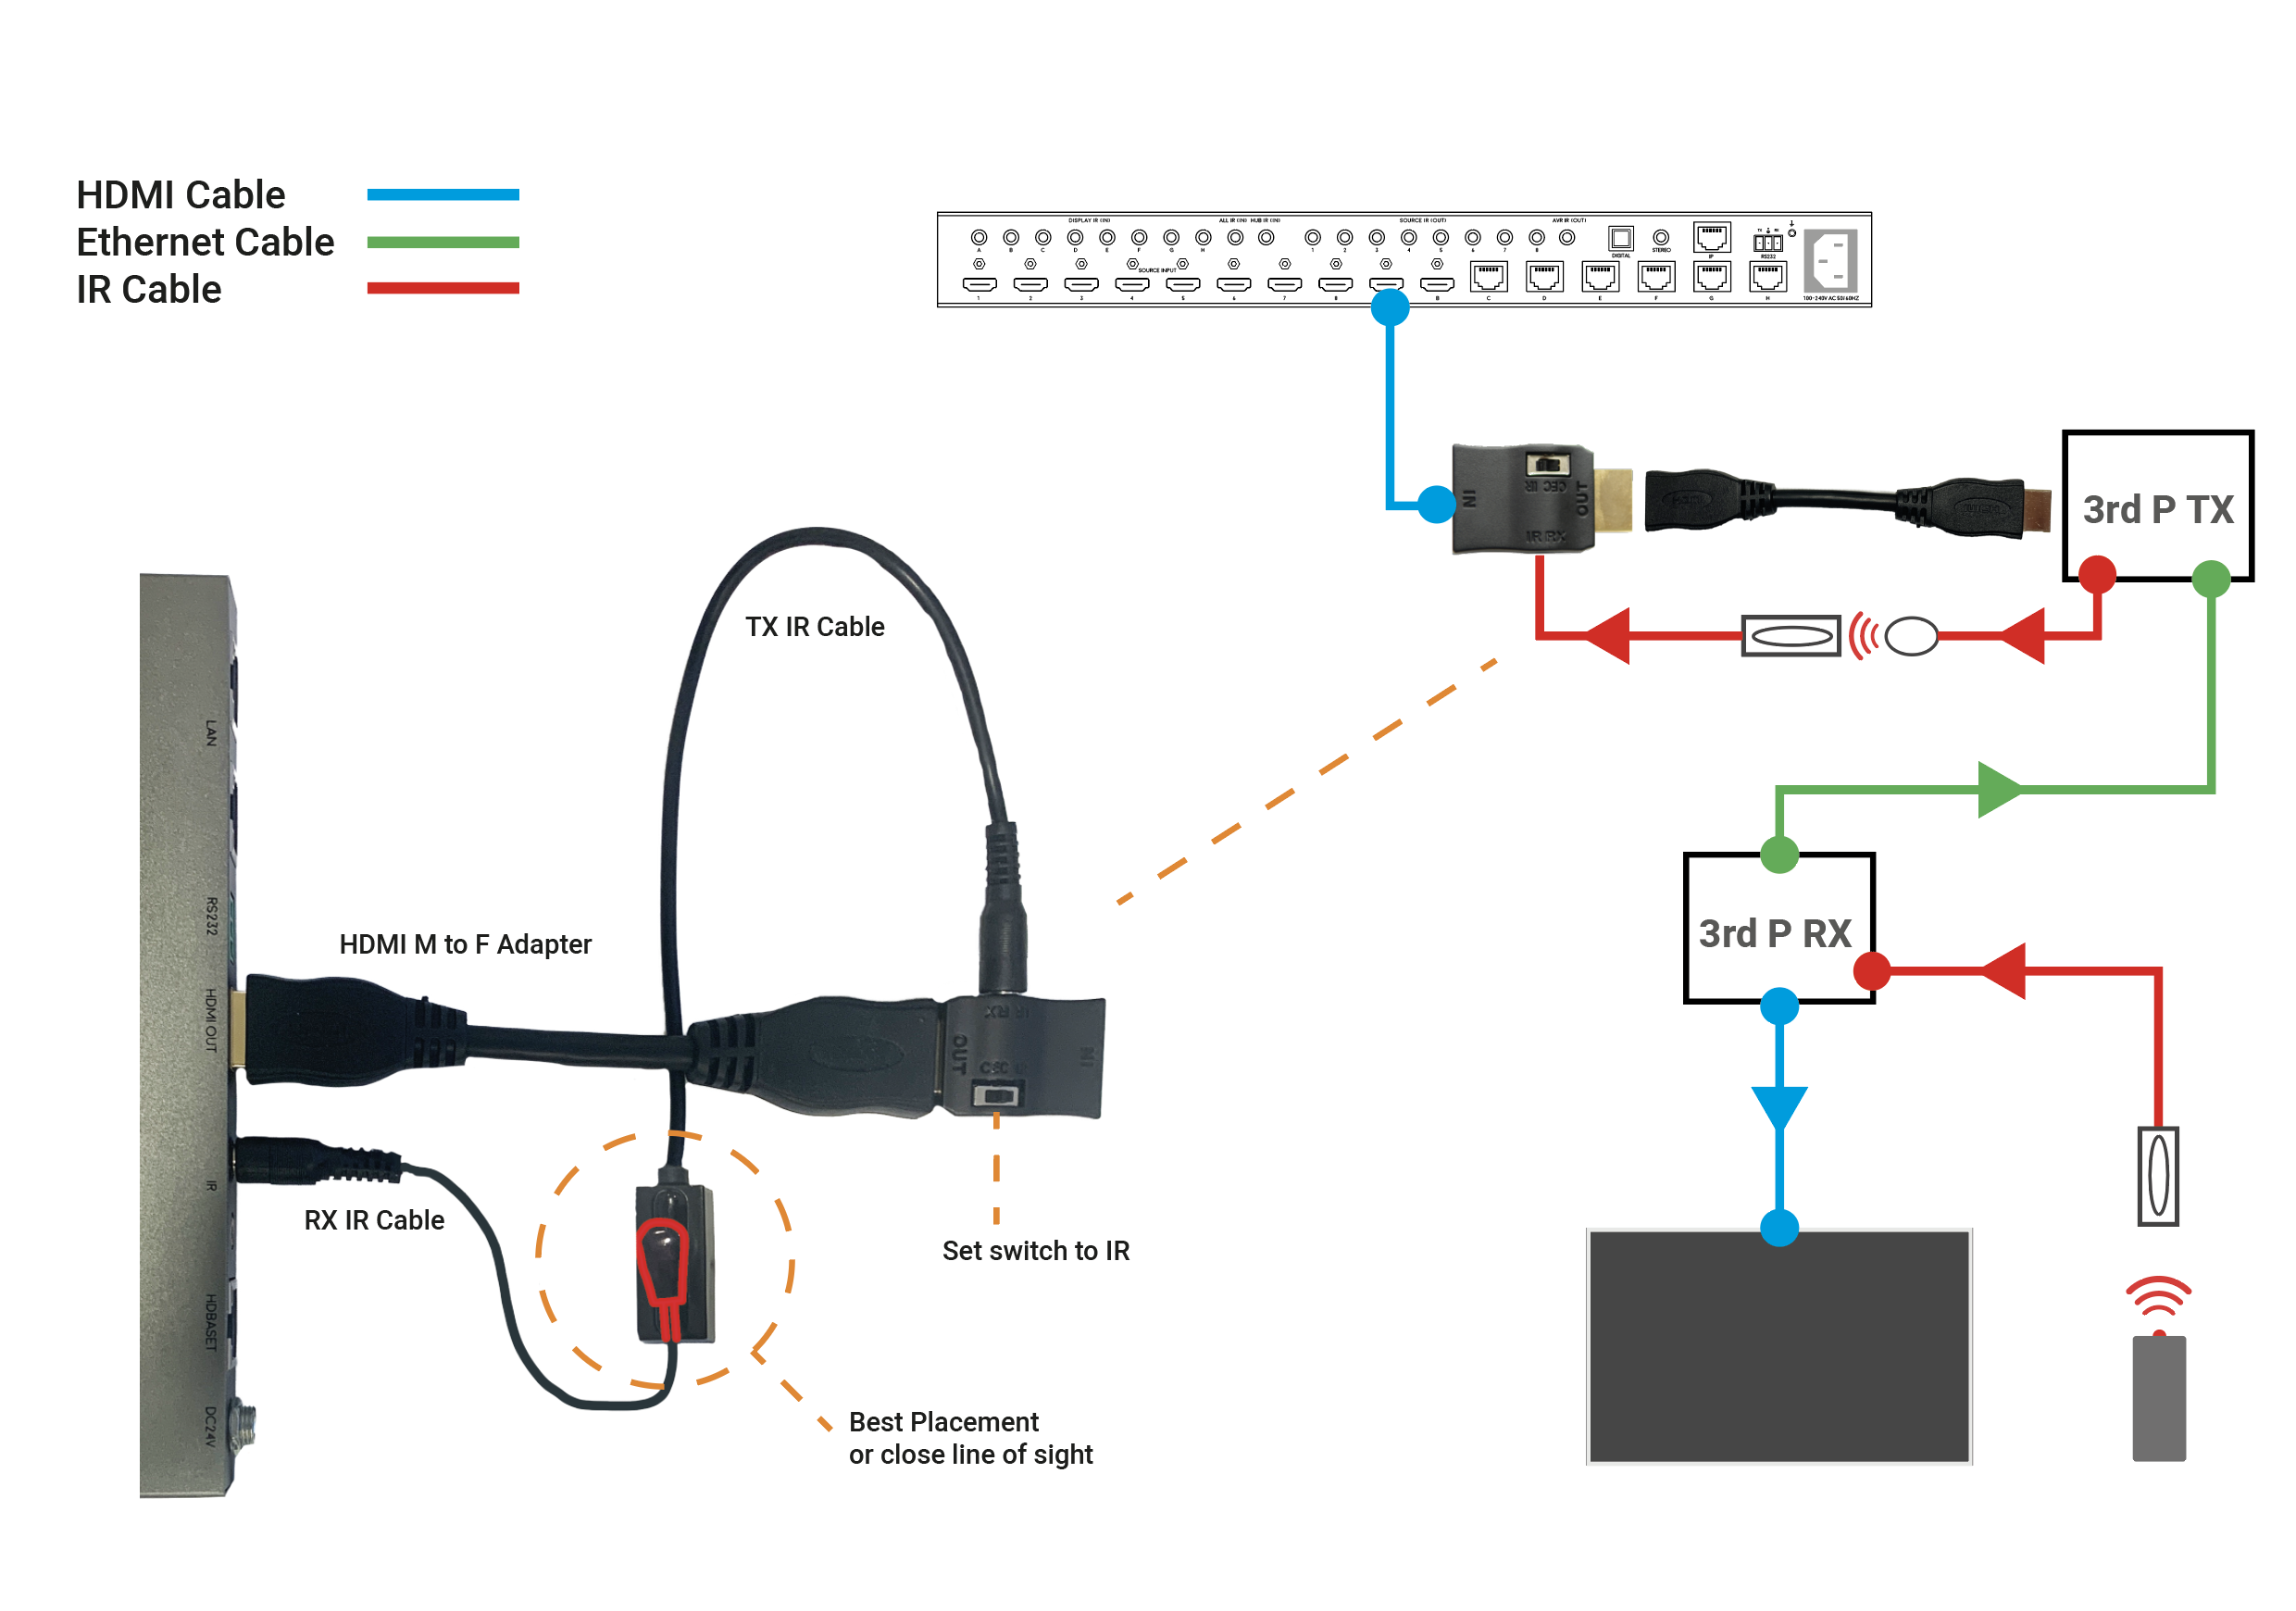
c)

Windows configuration tool for MHUB 2K and MHUB 4K systems. Search for MHUB, configure EDID and network settings.
Download the MHUB 2K and MHUB 4K configuration tool.
The software configuration tool has been written for an older version of Windows. If you run the exe file on your laptop and you receive a C++ error message then please read this support article.
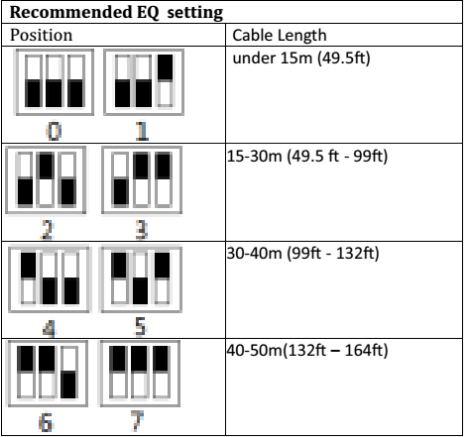
If you find that you have no picture or poor picture quality, you may need to adjust the EQ settings on your XTND 2K30 based on the approximate distance of your cable run. If you have any patch points add an additional 10% onto your effective distance. The below diagram shows the correct switch settings for various lengths of cable run. We suggest working from the maximum distance and working down if you are unsure of the length of your cable run.
Description
When I try to install the software, I receive this warning:
“The application has failed to start because its side-by-side configuration is incorrect. Please see the application event log for more detail.”
This issue is typically caused by a conflict between the program and one or more of the files in the C++ runtime libraries. These libraries are part of the Windows operating system and are used, and potentially updated, by installing or updating several Microsoft or other third party products.
If you are experiencing this error when launching or installing the program, and if the program repair option does not resolve the issue, the most effective method to correct this error is to uninstall and reinstall any Microsoft Visual C++ installations currently available on your computer before proceeding with the installation.
To uninstall all current Microsoft Visual C++ installations
Open the Control Panel and locate the list of programs.
Windows 8/10
From within the Start screen, type “Control Panel” and click on the Control Panel search result when it appears.
Select Programs and Features.
Windows 7/Vista
Click Start> Control Panel
If viewing categories, click Programs> Uninstall a Program
If viewing icons, click Programs and Features
Windows XP
Select Start> Control Panel> Add or Remove Programs
Scroll down to locate the Microsoft Visual C++ entries.
Select each one, starting from the top entry, and choose Uninstall.
Do this for each entry, until there are no more Microsoft Visual C++ entries listed.
To reinstall new Microsoft Visual C++ packages follow the instructions on this page –
Once every package has been downloaded and installed, restart Windows.
Finally, launch the program. If the error message persists after following all of these instructions, then please contact HDanywhere technical support on 01684 576348
If you find yourself encountering issues with the picture (either poor quality or no picture) then the following list of common problems and solutions will help you diagnose the problem.
Firmware – Ensure your devices are on the most up-to-date firmware. Check the manufacturer’s website and use the menu settings on any internet-connectable device, such as sources, sinks, displays, projectors, AVRS, etc etc.
Power – Check that both the MHUB and the receivers are fully powered. The front panel of the MHUB should be illuminated* and the power light on the receiver should be on. If the receiver isn’t powered try an alternate power supply from another receiver that you know works. Alternatively, if you’re using the USB power supplies double check that the USB port you are using is supplying the appropriate current.
Is your transmission distance too long? – If you have a power light but the lock light isn’t illuminated this can indicate an issue with the signal strength. The maximum transmission distance for the mHub 2K range is 50m in best-case scenarios and 100m for the MHUB 4k Range. The transmission distance can be reduced by several factors, most commonly wall plates, patch panels and stranded patch leads can significantly reduce signal strength and potentially reduce the maximum distance the matrix can transmit signal. Whenever possible you should try to use a straight point to point connection to guarantee maximum distance.
Resolution – Check that you are using compatible resolutions between your source devices and displays, in particular you should be looking for situations where a TV is perhaps older than the rest of your displays and doesn’t support the same video formats (for instance it only supports 720p) Try reducing the resolution on your source devices and see if this fixes the issue. Also, if reducing the resolution causes the picture to appear again this can point to an issue with the bandwidth which can be addressed by reducing the transmission distance.
Snow/Sparkly picture – This is most often seen when the MHUB is failing to fully establish a connection with the receiver. Your first step should be to use another working location to verify the integrity of both the receiver and output on the matrix. Once you are happy both the receiver and MHUB output are working you should take a look at all your cables. Check that your RJ45 connectors are properly terminated to 568B standards and try swapping out the HDMI cables for ones from working locations.
* – with the MHUB family of products, If the unit has been idle for 5 minutes the panel may have gone into power-saving mode
The mHub 4K range has full support for most popular control systems via serial (RS232) or IP.
All control strings and current available drivers are available in the mHub control pack, available here – Download
IP control
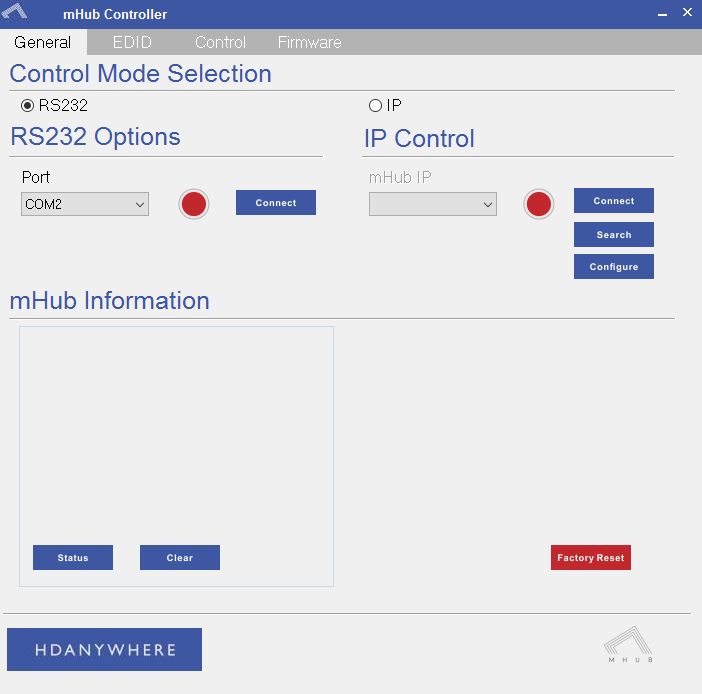
To control the mHub 4k unit via IP you will first need to discover it by using the mHub controller software available in the control pack above
The mHub 4K will acquire an IP address via DHCP the first time it is connected to your home network, use the controller software to locate it on your network.
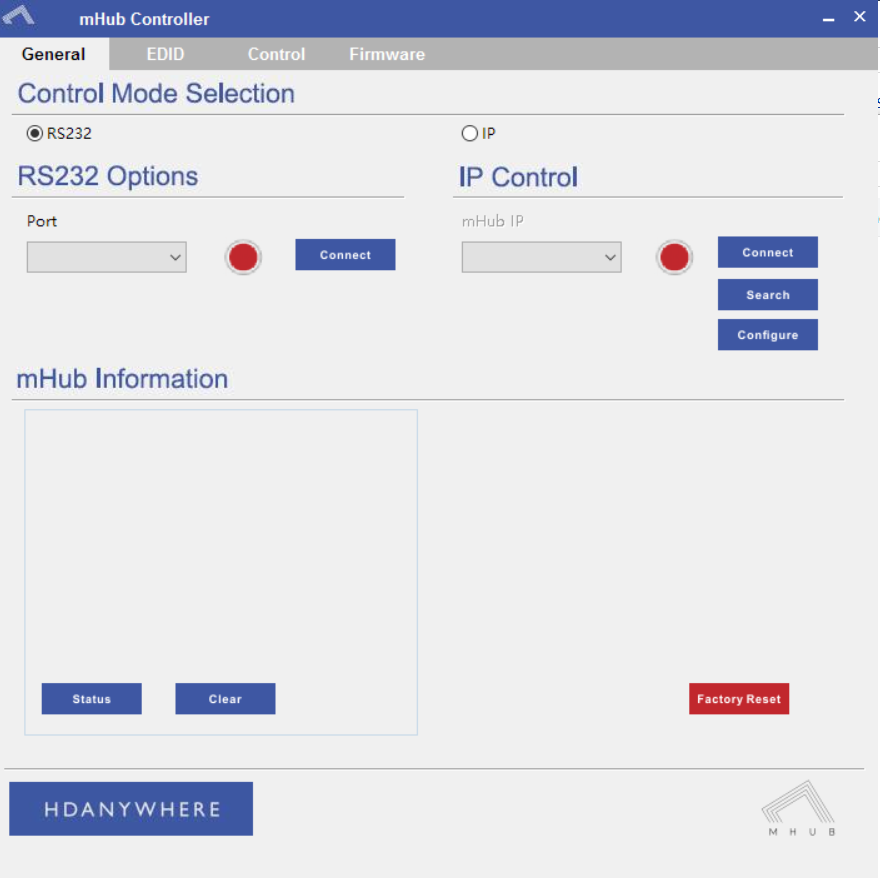
In the mHub controller software select IP and then press the ‘search’ button, this should locate your mHub matrix. Press ‘connect’ the red button should turn green.
Press the configure button
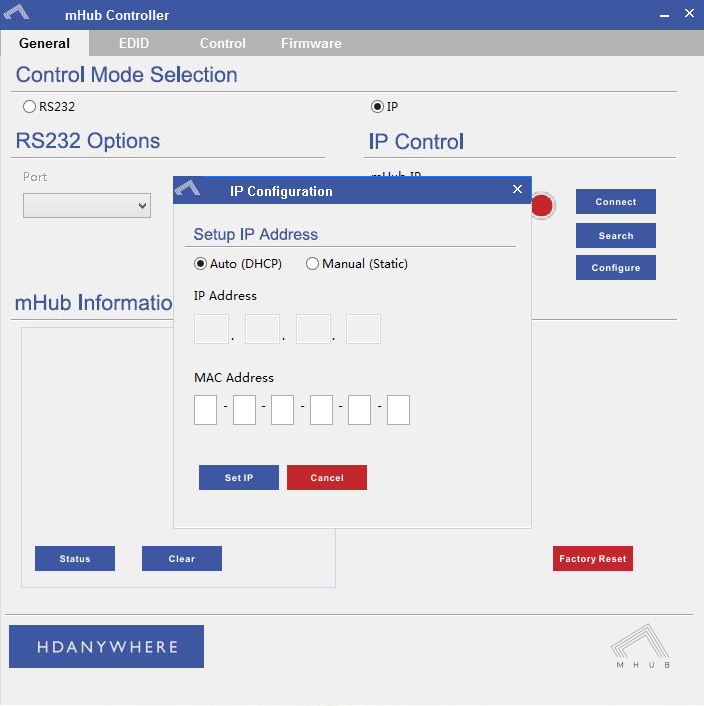
From here you can set the matrix to a static IP if you wish (this is generally good practice)
Your matrix is now on your home network and will be able to receive IP commands from whatever control system you are using.
Looking for the mHub 2K information, go here – mHub 2K
To disable the beep on the mHub 2k range of matrices please following the instructions below using either I.P or RS232 connection methods.
To adjust the settings on the mHub range of products, you will need to download the controller software Download
A) Connecting to the mHub Via I.P
The mHub 2K’s IP address is pre-configured as 192.168.0.100, your computer will need to have it’s IPV4 range configured to be within the same range initially while you setup the matrix. (You don’t need to follow this step if you have a mHub 4K system)
To configure your IPV4 settings you will need to navigate to the following menu
->Network and sharing center
—>Ethernet
—–>Properties
——->Internet Protocol Version 4 (TCP/IPv4)
———>Properties
Once you have changed the IP settings on your PC, open the Mhub controller software.
In the Control Mode Select Box choose ‘IP’, then click the ‘Search’ button. When the IP address shows in the mHub IP box, click connect.

B) Connecting to the mHub Via RS232
To connect via RS232 use the supplied serial cable can connect between the mHub and your PC, then on the Controller software select ‘RS232’, then in the RS232 Options section select the Com port being used from the drop down menu then click connect
C) Disabling the Beep
To disable the beep select the ‘Control’ tab and untick the box labeled ‘Enable Feedback Beep’.
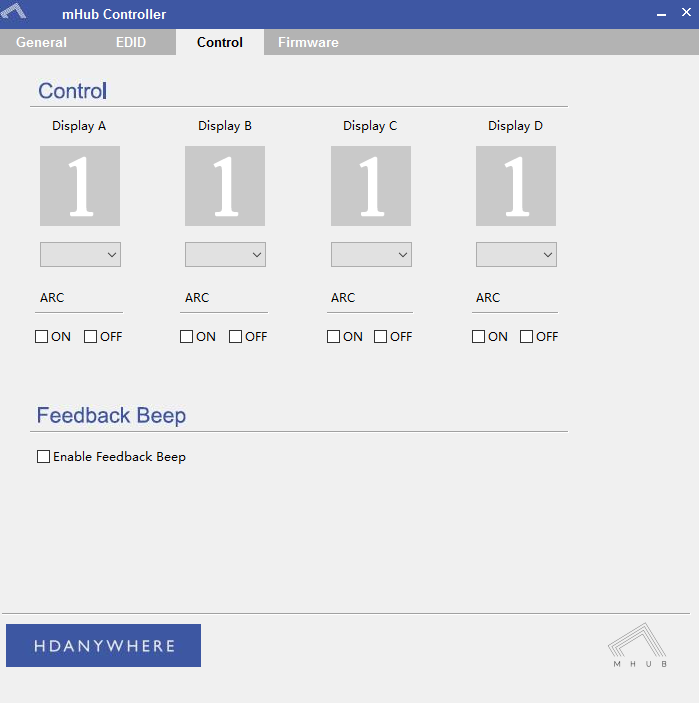
Once changed, you can verify the beep has been disabled by performing a source switch operation.
The mHub 2K range has full support for most popular control systems via serial (RS232) or IP.
All control strings and current available drivers are available in the mHub control pack, available here – mHub Control Pack
To control the mHub 2k unit via IP you will first need to discover it by using the mHub controller software available in the control pack.
The mhub 2K’s IP address is pre-configured as 192.168.0.100, your computer will need to have it’s IPV4 range configured to be within the same range initially while you setup the matrix. To configure your IPV4 settings you will need to navigate to the following menu
->Network and sharing center
—>Ethernet
—–>Properties
——->Internet Protocol Version 4 (TCP/IPv4)
———>Properties
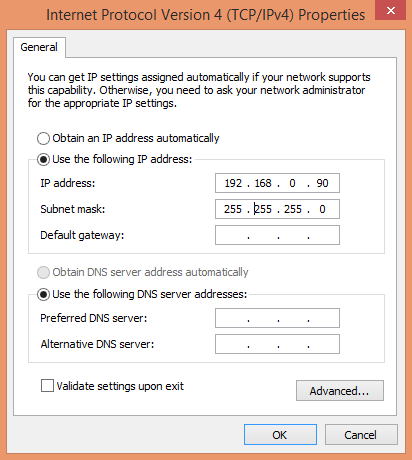
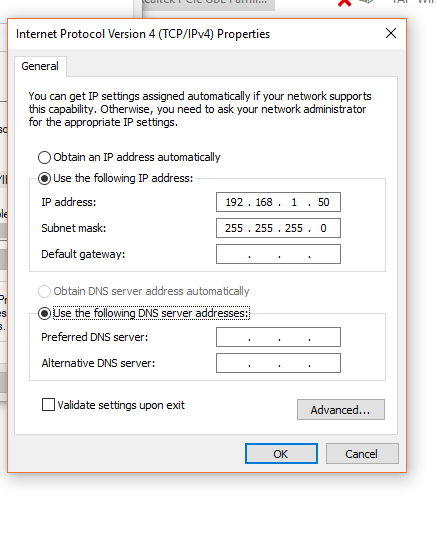
Configure your settings as shown in the image, this will change your computer IP range and you will temporarily lose internet connectivity (if your previous IP range was different from this)
Once you have changed the IP settings on your PC, open the Mhub controller software
In the mHub controller software select IP and then press the ‘search’ button, this should locate your mHub matrix. Press ‘connect’ the red button should turn green.
Press the configure button
Change the IP configuration to manual (static), and then enter an IP address within your home network range that is not currently being used and then click ‘Set IP’.
You can now go back into your IPV4 settings and set them back as they were before (obtain an IP address automatically)
Your matrix is now on your home network and will be able to receive IP commands from whatever control system you are using.
Looking for the mHub 4K information, go here – mHub 4K