Category: Miscellaneous

  • How to disable the beep on mHub 2K and 4K (4×4 and 8×8)

    To disable the beep on the mHub 2k range of matrices please following the instructions below using either I.P or RS232 connection methods.

    To adjust the settings on the mHub range of products, you will need to download the controller software Download

     A) Connecting to the mHub Via I.P

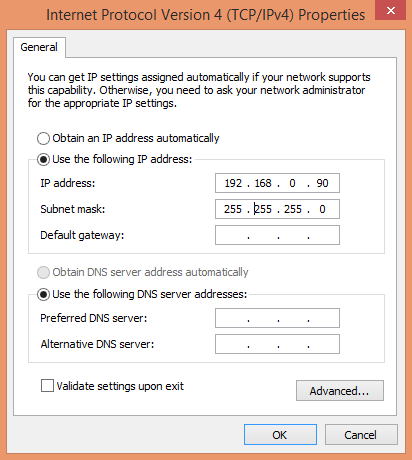
    The mHub 2K’s IP address is pre-configured as 192.168.0.100, your computer will need to have it’s IPV4 range configured to be within the same range initially while you setup the matrix. (You don’t need to follow this step if you have a mHub 4K system)

    To configure your IPV4 settings you will need to navigate to the following menu

    ->Network and sharing center

    —>Ethernet
    —–>Properties
    ——->Internet Protocol Version 4 (TCP/IPv4)
    ———>Properties

    IPV4

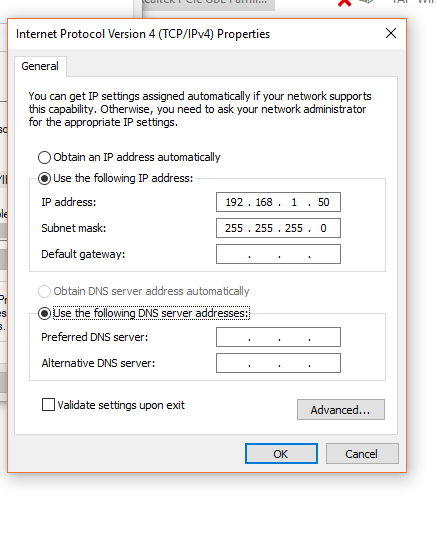
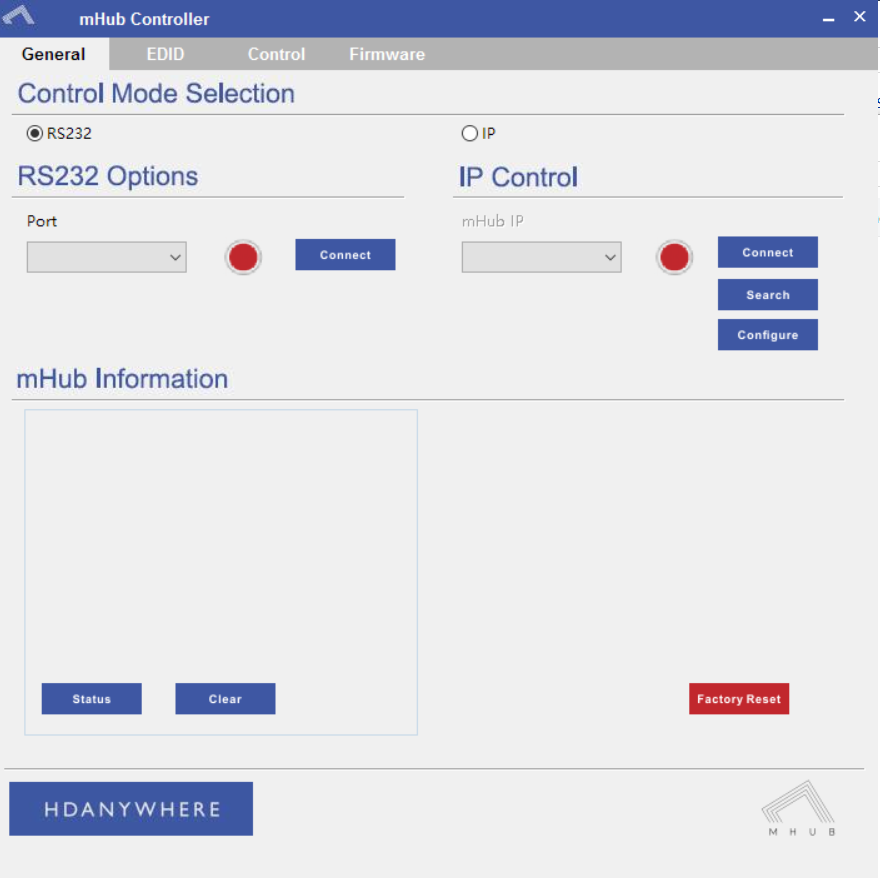
    Once you have changed the IP settings on your PC, open the Mhub controller software.

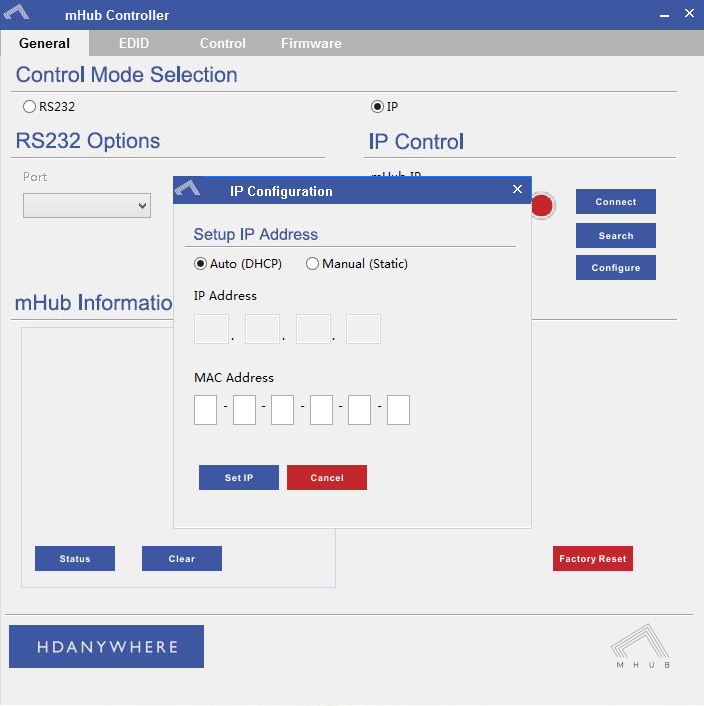
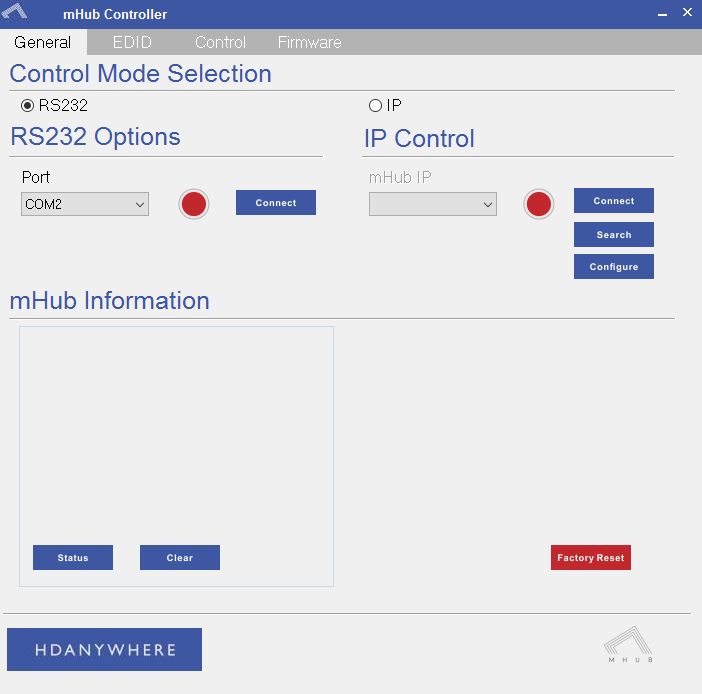
    In the Control Mode Select Box choose ‘IP’, then click the ‘Search’ button. When the IP address shows in the mHub IP box, click connect.


    B)  Connecting to the mHub Via RS232

    To connect via RS232 use the supplied serial cable can connect between the mHub and your PC, then on the Controller software select ‘RS232’, then in the RS232 Options section select the Com port being used from the drop down menu then click connect

    Capture


    C) Disabling the Beep

    To disable the beep select the ‘Control’ tab and untick the box labeled ‘Enable Feedback Beep’.

    mHubbeepimage

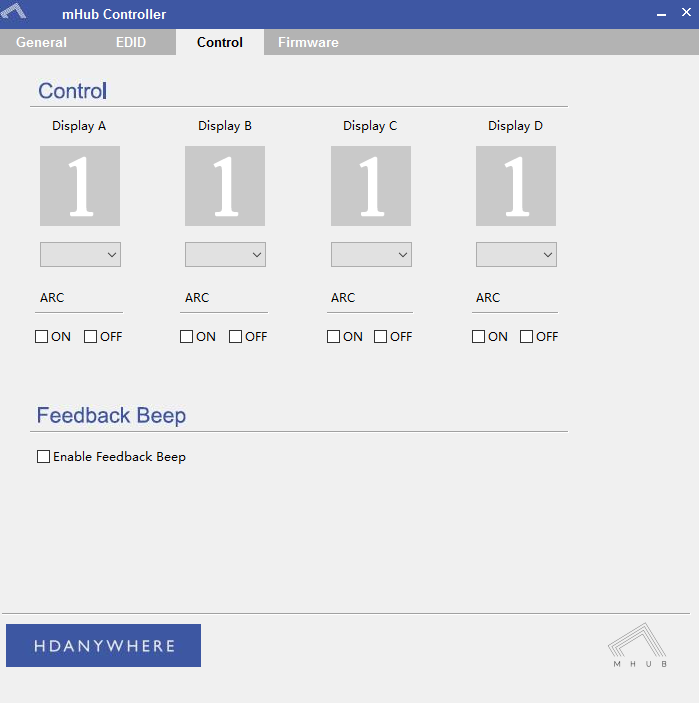
    Once changed, you can verify the beep has been disabled by performing a source switch operation.

  • mHub 2K control system integration

    The mHub 2K range has full support for most popular control systems via serial (RS232) or IP.

    All control strings and current available drivers are available in the mHub control pack, available here – mHub Control Pack

    To control the mHub 2k unit via IP you will first need to discover it by using the mHub controller software available in the control pack.

    The mhub 2K’s IP address is pre-configured as 192.168.0.100, your computer will need to have it’s IPV4 range configured to be within the same range initially while you setup the matrix. To configure your IPV4 settings you will need to navigate to the following menu

    ->Network and sharing center
    —>Ethernet
    —–>Properties
    ——->Internet Protocol Version 4 (TCP/IPv4)
    ———>Properties

    IPV4

    Configure your settings as shown in the image, this will change your computer IP range and you will temporarily lose internet connectivity (if your previous IP range was different from this)

    Once you have changed the IP settings on your PC, open the Mhub controller software

    mhub controller pic 1

    In the mHub controller software select IP and then press the ‘search’ button, this should locate your mHub matrix. Press ‘connect’ the red button should turn green.

    Press the configure button

    mHub IP

    Change the IP configuration to manual (static), and then enter an IP address within your home network range that is not currently being used and then click ‘Set IP’.

    You can now go back into your IPV4 settings and set them back as they were before (obtain an IP address automatically)

    Your matrix is now on your home network and will be able to receive IP commands from whatever control system you are using.

    Looking for the mHub 4K information, go here – mHub 4K

  • HDBaseT compatibility with Panasonic CX/CS series

    blog

    The recent release of Panasonic’s new CX/CS HDTVs feature no support for the HDBaseT transmission technology found in HDanywhere’s multiroom matrices (Modular 4×4 and 8×8 / mHub 4K / 100m Pro Extender).

    This software incompatibility caused these displays to be unable to display picture from HDanywhere products. Please note that this only affects NEW Panasonic CX/CS range displays.

    Yesterday, Panasonic released firmware updates resolving this issue. There is now full compatibility between HDanywhere products and Panasonics entire range of displays.

    A Quick tip for updating the TVs on a network: if you select update firmware in the normal way, it will probably say that it’s already up to date. You need to go to apps then select Netflix, and that will force it to check the update server.

    If your TV isn’t downloading the update automatically you can manually update it.

    For CX you need version 3.206 or higher and for CS you need 3.014 and up.

  • EX50: temporary compatibility issue

    ex50-pair


    We have recently become aware of a compatibility issue between the EX-50 extender and certain models of Panasonic televisions, which we are currently working hard to resolve.

    If you have a Panasonic TV and experience picture drop-out when using IR with the EX-50 HDMI 50m extender set, then please get in touch with us. We have replacement receivers available that don’t suffer from this issue.

    If you purchased EX50s directly from HD Connectivity or the HDanywhere website get in touch via email (support@hdanywhere.com) or phone 01684 575 324. If you purchased it through a distributor (including AWE, ACE or Unicam) then please contact them directly.

    Email: support@hdanywhere.com

  • Modular 8×8 Firmware version 1.5.100 – IMPORTANT

    On Monday 18th of May we rolled out a firmware release to all live Modular 8×8 units. Whilst the update was being delivered to the units we suffered an ISP issue causing the update file to be corrupted in some instances. Most units will repair themselves automatically. If your unit is displaying a ‘1021 cant reach gateway’ error or stuck in a boot loop please follow the instructions below

    1. Remove and re-insert the SDCard from the slot on the front by pressing it once to pop it out and press again to pop it back in. This should resolve things in most cases. (This may need to be repeated if the first attempt fails)

    2. In more rare cases, it may be that removing all of the cat5 cables from any HDBaseT outputs and then removing and replacing the SDCard is required.

    3. In extreme instances, a manual software update is required. To perform this, the SDCard needs to be fully removed from the unit and placed in a Windows based PC. Open The SD Card and remove all files except the ‘SETTINGS.INI’ File. Then file below needs to be downloaded, extracted, then the three files within need to be placed on the root of the 8×8 SDCard. Once there, the card can be inserted back into the 8×8, it should reboot and apply the correct software. Normal operation of the 8×8 will then resume.

    If none of the above works, or you require further assistance please contact the technical team via phone or email on 01684576348 & support@hdanywhere.com

    Firmware files – Download

  • HDMI 2.0- the must-know info.

    hdmi-2.0-the-must-know-info

    HDMI 2.0

    HDMI technology has different versions or specifications, the newest of which is HDMI 2.0, which has been causing a lot of confusion and questions within the AV distribution world.

    The main feature of this HDMI 2.0 specification which is relevant to custom installers, is this:

    “The HDMI 2.0 specification defines a new, more efficient signalling method, for speeds above the limits of the earlier HDMI 1.4b specification (10.2Gbps), to allow higher bandwidths (up to 18Gbps) over existing High Speed HDMI Wire Cables.” (HDMI.org) 

    What does this mean?

    This will allow transmission of higher bandwidth video formats such as 2160p @60Hz 4:4:4 UHD / 4K and 4:2:0 UHD with HDR. It’s worth pointing out that currently there is only ONE HDMI source device in existence (the Sony FMP-X10 4K) that is capable of outputting these resolutions and is HDMI 2.0 licensed. But more HDMI 2.0 licensed source devices will probably begin to appear at the end of 2015.

    Will you need new cables or specific HDMI 2.0 cables?

    HDMI 2.0 is backwards compatible, so you won’t need new cables (as long as the HDMI cables you’ve been using are high speed, passive and under 5m)

    What is HDCP 2.2? 

    HDCP 2.2 is the new encryption format for UHD content. It’s designed to create a secure connection between a source and a display. This is so you can’t take the output from a source (a Blu-ray player, say) and plug it into a recording device to make a copy of the content. HDCP doesn’t care what goes across the cable, as long as that cable is secure.

    The key point is all devices in a chain need to be HDCP 2.2 compliant or you’ll get an error message.

    What is the point of HDMI matrixes with HDCP 2.2 but NOT HDMI 2.0? Should I invest?

    The best way to answer that is with another question: ‘what HDCP 2.2 compliant devices are you planning on installing that don’t need HDMI 2.0?’

    The big push for compliance is going to come at the end of the year when new UHD Blu-Ray players are released. These will definitely require HDMI 2.0 and won’t work on the HDCP 2.2 matrices that have just hit the market.

    Another key point is that HDMI 2.0 will require HDCP 2.2, but HDCP 2.2 does NOT require HDMI 2.0. Hence new HDCP 2.2 compatible matrices hitting the market before HDMI 2.0 + HDCP 2.2 compliant matrices.

     The other big factor is what Sky will do with UHD. The current industry belief is that the new sky box won’t need HDCP 2.2. The logic is that there are not enough HDCP 2.2 compatible TV’s in the UK currently to be able to justify a new Sky box that isn’t compatible.

    What TVs are HDMI 2.0?

    The vast majority of  TV’s marketed as UHD or 4K that were bought  before 2015 don’t have HDMI 2.0 and don’t have HDCP 2.2. Some manufacturers have produced TVs with one or more HDMI 2.0 ports with HDCP 2.2, these are below:

    Samsung UE65HU8500

    Samsung UE55HU7500

    Sony KD-65X9005B

    Panasonic CX600 and CX 650 Series


  • EDID management: Modular 4×4 and 8×8

    EDID (Extended Display Identification Data) is information provided by a display to describe its capabilities to a source. It contains information including resolution, audio formats and frame rates. Modular has the ability to ‘Fix’ the EDID profile to allow a source to always pass video with a fixed resolution and/or specific audio output (i.e 1080p 60Hz, with 5.1 multi-channel audio)

    If the system is functioning as normal, then no EDID management is required, however if you have a source that will not output the correct resolution/audio type, this can be resolved by following the instructions below

    Please remove the SD card from the unit and connect it to a PC (Please do not use a MAC). On the route of the SD card is a file called ‘settings.ini’, this is the file that will be edited. Open the file in a text editor such as notepad, then scroll down to the bottom of the file

    Enter one or more the following lines where required

    edidprofile1 = x     ; sets the EDID profile for source connected to input 1
    edidprofile2 = x     ; sets the EDID profile for source connected to input 2
    edidprofile3 = x     ; sets the EDID profile for source connected to input3
    edidprofile4 = x     ; sets the EDID profile for source connected to input4
    edidprofile5 = x     ; sets the EDID profile for source connected to input 5  (8×8 only)
    edidprofile6 = x     ; sets the EDID profile for source connected to input6 (8×8 only)
    edidprofile7 = x     ; sets the EDID profile for source connected to input 7 (8×8 only)
    edidprofile8 = x     ; sets the EDID profile for source connected to input 8 (8×8 only)

    where x equals:
    0 – Presents the source with the 1080p template EDID
    1 – Fixes the EDID
    2 – presents the source with the 4K template EDID
    3 – presents the source with the 1080p template EDID with 5.1 enabled
    101  – presents source with the EDID of the Sink connected to Output 1
    ..

    108  – presents the source with the EDID of the Sink connected to Output 8


    Once all editing has been done, save the settings.ini file, and reinsert the SD card back into the Modular unit.

    Also please reboot any source where the EDID profile has been modified to allow the new EDID data to be passed.

  • mHub 4K Network Discovery Tool

    mHub 4K Network Discovery tool

    To enable access to the mHub 4K web interface, you will require the IP address of the unit.

    This is found using the Network Discovery tool. Simply download and run the software below and this will give you the current IP settings of your unit, and also the option to change the settings to suit you network infrastructure.

    Discoverytool

    To change to fixed IP settings, please click ‘Enabled’. This then allows you to manually enter network information. Finally click ‘Update Settings’ to store entered information.

    Download software – Network Discovery Tool

  • Using the HDC Trade Modular System Builder

    The Modular System Builder is an invaluable tool when you need to get a quote or setup a Modular system quickly and correctly. But before you do start configuring your system make sure that you note the following:

    1. The Modular Chassis options for the 4×4 and 8×8 have different power requirements.
      1. The 4×4 can be fitted with an optional PSU module if a redundant power supply option is needed. It’s should be set to 1 as a default.
      2. The 8×8 has its power supplies built in to the unit. There is no need to add any if you are specc’ing one of these.
    2. IEC power cables
      1. You will need x1 cable per PSU module, again the default should be set to 1
      2. 8×8’s will require x2 IEC cables are the main unit contains two power supplies
    3. Blank plates for unused ports can only be added to 8×8 systems
    4. Forwards IR is only supported by the 8×8 and needs additional configuration – please call us 01684 576 348 if you need this functionality or contact us.
    5. IR hardware is sold as an individual units, you will need to add as many transmitters and receivers as you need, HDMI Input/Output modules do not support IR Passback
    6. HDanywhere SmartControls are pre-programmed to operate with the Modular Chassis included in the builder.
  • Control Drivers for Modular Series (IP / RS232 / IR) – Modular 4×4, Modular 8×8 and mHub 4K (IP)

    Control Drivers for Modular Series (IP / RS232 / IR) – MOD44 and MOD88 & mHub 4K

    We have ready-made control system drivers available for Modular series systems for the major control systems used in the UK. These are currently IP based.

    (more…)